

本教学为翻译教学,转载请注明来自aboutcg.net,以及注明翻译者
原教学出自CGArena网站,原始链接如下:
http://www.cgarena.com/freestuff/tut…ulk/index.html
作者: Antonio Juricic, Bosnia
个人网站: www.3dhr.net/Tonco翻译: CWWS (aboutcg.net)
Making of the Incredible Hulkby
不可思议的绿巨人的制作
Making realistic character even fantasy character is not an easy task so the step by step tutorial is almost too impossible to write. But making of article can be very useful as the example of different tasks that has to be done in order to complete such project.
制作一个真实的角色甚至是一个幻想的角色不是一件容易的事情,因此要写一步一步操作的教学几乎是不可能的。但是类似制作过程这样的文章是非常有用的,它可以作为其他不同的项目的一个已经完成的参考项目。
In this making of I will show you one of common workflow used in the game and movie industry.
在这篇制作流程文章中我将会向你展示一个在游戏和电影工业中普遍使用的工作流程。
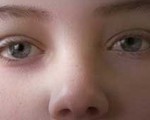
First thing to do is gathering reference images for studying the character, more you get yourself familiar with the subject, you will model more successfully the final model.
首先第一件事情是收集参考图片来研究角色,你让自己对主题越熟悉,那么你的最终模型就会建得越成功。
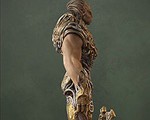
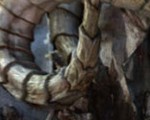
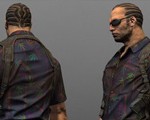
Next thing to do is building solid base mesh. There are many techniques for building the base mesh but I found that most easy and artistic way is to sculpt hi-res mesh and than retopologize it. For this task I use ZBrush and next image showing retopologised mesh that can be used later for many projects.
下一件事情就是建立实体的模型。关于基本模型的建立有许许多多的技巧,但是我发现最简单和适合艺术家的方式就是雕刻高精度模型,然后重新拓扑它。对这个项目我使用了ZBrush,下一张图片显示了重新拓扑好的模型,这个模型还可以将来被用在很多的项目里面。

I used the same technique for the rest of the body then I use 3ds max for stitching different parts together. After building base mesh it is time for hi res sculpting, that is where the real fun starts.
我使用了相同的技巧来完成剩下的身体部分,然后我使用3ds max将不同的部分缝合起来。完成了基础模型的制作之后,现在是进行高精度雕刻的时间了,这才是真正乐趣的开始
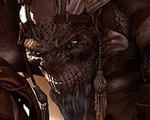
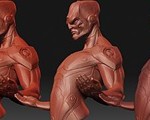
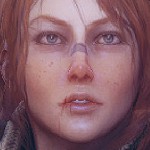
Using ZBrush standard tools, in the few hours I build hi res sculpture containing over 12 million polygons. Most important advice I can give for sculpting is to stay patient and not to rush with dividing your model too soon but focus on the overall form of sculpture, wrinkles and pores are the last thing to do.
使用ZBrush的标准工具,我在几个小时之内制作了高精度的雕刻,使用超过一千二百万的多边形,我可以给出的最最重要的关于雕刻的建议就是保持耐心,并且不要太急于把你的模型分开,关注于大整体形态塑造,皱纹和毛孔是最后要做的事情。


I used the same technique for the rest of the body then I use 3ds max for stitching different parts together. After building base mesh it is time for hi res sculpting, that is where the real fun starts.
我使用了相同的技巧来完成剩下的身体部分,然后我使用3ds max将不同的部分缝合起来。完成了基础模型的制作之后,现在是进行高精度雕刻的时间了,这才是真正乐趣的开始。
Using ZBrush standard tools, in the few hours I build hi res sculpture containing over 12 million polygons. Most important advice I can give for sculpting is to stay patient and not to rush with dividing your model too soon but focus on the overall form of sculpture, wrinkles and pores are the last thing to do.
使用ZBrush的标准工具,我在几个小时之内制作了高精度的雕刻,使用超过一千二百万的多边形,我可以给出的最最重要的关于雕刻的建议就是保持耐心,并且不要太急于把你的模型分开,关注于大整体形态塑造,皱纹和毛孔是最后要做的事情。


Texturing
材 质
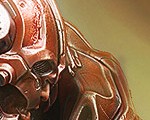
After completing hi resolution mesh I exported the model as obj file at lowest division level for generating UW maps. I often use Headus UWLayout for this job because it gives me more results in less time. After generating, UW’s model is ready for generating normal maps which is important for transferring hi res details to lo res mesh. I also use normal map as template for other maps.
在完成了高精度模型之后,我导出模型的最低细分精度版本为Obj格式的文件,用来生成UV贴图,我经常使用Headus UWLayout来做这项工作,因为它在更少的时间里面给我更多的结果。在生成好UV之后,分好UV的模型已经准备好生成法线贴图了,这对将高精度模型的细节转换到低精度模型上市至关重要的,我还使用法线贴图作为参考模板来制作其他的贴图。

ZBrush also allows you to generate cavity maps which make some kind of fake occlusion map and useful for shading some parts of the model. Details extracted from the cavity map can be used for making spectacular map.
ZBrush还允许你生成cavity maps(洞的贴图),来制作一些烘培的遮挡贴图和对某些模型有用的材质贴图。从cavity maps(洞的贴图)抽出的细节也可以被使用到高光贴图上去。
I render my maps at 4k resolution so it can hold all the details necessary for the skin pores and wrinkles. Using generated maps as template I have painted color map also.
我按照4K的分辨率来渲染我的贴图因此它可以足够包含所有的细节来展示皮肤的毛孔和皱纹,另外使用生成的贴图作为模板,我还手绘了颜色贴图。

For rendering I like to use Mental Ray because of the great sub surface scattering shader possibilities. I just load up maps to appropriate slots in fast skin shader which already comes quite tuned. Besides that I have rendered few more passes like extra spectacular/reflection and ambient occlusion so I could have more control over these things later. When it comes to lighting I like to keep it simple. In this example I use four lights setup, two back light slightly bluish and two front lights also colored but with warmish yellow.
对于渲染,我喜欢使用Mental Ray,因为它的3S效果Shader材质能实现的各种可能性,我只是在fast skin shader调用我的贴图到适当的通道,结果已经是非常真实了。除此之外我还渲染了不同的层,像是额外的 spectacular/reflection(高光/反射)和ambient occlusion(环境遮挡)因此我可以在晚些时候对事情有更好的控制。当来到灯光设置部分时,我希望保持简单,在这个例子中,我使用了4盏灯的设置,2个背光灯,有着轻微的蓝色,和两盏前方的灯光,同样有颜色,不过是暖色调的黄色。

With this kind of setup, image was rendered in 5 to 6 minutes at 3000px in height. Last step is to composite all renders using Photoshop.
经过这些设置,3000像素高的图像在5-6分钟里面被渲染出来了,最后一步是在Photoshop里面合成所有的渲染层。
I hope you will find this small making useful and feel free to contact me for any further explanation.
我希望你发现这个小小的制作流程有点用,如果你需要更进一步的解释,不要客气,来联系我吧。
作者其它作品画廊: Portfolio – anto-toni.cgsociety.org/gallery


推荐相关中文教程

3DSMAX动力学特效实战教学
本套教学将通过24章实例教学,来向你详细讲解3DSMAX的动力学特效在电视包装与广告中的应用。3DSMAX国外粒子案例效果解析
本教学通过27个实战案例,教您如何用3DSMAX结合ParticleFlow本身以及扩展的ParticleFlow Box 1、Box 2、Box 3、功能包,结合Vray渲染器,来制作流行的广告和电视包装中的粒子特效效果。无论是常见的粒子聚合,分散,动态粒子替换,粒子矩阵,粒子动力学,本套教学都有相应的案例。AboutCG Zbrush4R7高级机械建模实战教程
本套教学由我们两位强大的老师,《造型巨匠Zbrush》的作者田涛老师,和《Zbrush完全教学》的作者Purplesun老师一起打造,两位老师分别使用Zbrush4R7制作多个机械模型案例,难度由浅入深,对制作当中用到的功能命令一一讲解。并时时分享提高建模效率的宝贵经验。3DSMAX国外流体案例效果解析
本教学通过20个实战案例,教您如何用3DSMAX结合Realflow,FumeFX, ParticleFlow插件,来制作流行的广告和电视包装中的流体效果。无论是常见的液体,烟雾,流体碰撞,沙粒变化,水墨表现,本套教学都有相应的案例。Zbrush 4R7新功能中文视频教学
zbrush4 r7将会是zbrush4版本的最后一次升级,下一个版本将会是zbrush5。本次更新进一步完善了zbrush的功能,首次提供了几乎全套的多边形建模命令,大部分硬表面对象的建模将不需要借助第三方软件。ZBRUSH全案例实战中文视频教学
本套视频教学以案例为主,通过11个完整的zbrush雕刻案例,由浅入深的带领大家掌握zbrush常用的雕刻流程和雕刻技巧,全套教学在25小时以上。2.5D商业游戏场景制作教程 进阶篇
在本教程中,Freeyy老师将从零开始,向你讲解如何根据确定的主题进行前期准备,随后建模,绘制贴图,制作材质,最后再进行细节调整,完成一个商业游戏级别的2.5D场景画面。Mentalray for max实战教程
本教程共包含超过42小时以上的视频教学内容,共18章 132课,通过大量实例,详细讲解了3ds Max平台下的Mental Ray1渲染器的使用基础和实战方法。是一部非常完整详细的3dsMax版的Mental Ray渲染器的教学.


推荐课程


推荐教程

0回复如何制作不可思议的绿巨人"