本教学为翻译教学,转载请注明来自aboutcg.net,以及注明翻译者
原教学出自CGArena网站,原始链接如下:
http://en.9jcg.com/comm_pages/blog_content-art-180.htm?PHPSESSID=d2faed9e028d66533c653c82125e8ca3
作者: Mashru Mishu
个人网站: http://www.fx81.com/
翻译:KanyaYan
关于译者:

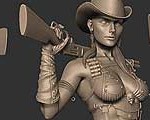
Street Cop Workflow by Mashru Mishu
街头警制作流程

Creating the base mesh.
1.创建基础模型
首先是考虑角色的外貌和怎么把概念转化到游戏的角色中去。在我进行游戏角色模型前我需要去考虑我模型预计面数、模型拓扑、装备摆放和贴图大小。
Once I have a rough idea of the technical specification and limits I start creating the main body of the character. In the case of this particular model, I created the body and head to start with. I kept the head as a separate model so that I could easily work on it separately and later export it separately for baking.
一旦我有了大概的技术框架和范围,我就开始创建角色的身体。在细致模型中,我开始创建身体和头。我把头作为单独的一个模型以便我可以在后面容易地分开导出进行烘焙。

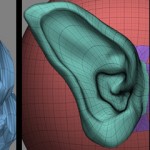
Once the base mesh is made I make sure I have enough edge loops in the face area and the model and any other places where I plan to sculpt more details. Since this is for sculpting only I try to avoid any triangles and evenly space out all the quads.
一旦我确定的基础模型,在模型的面上和每个我想雕刻细节的地方我有了足够的环边。因为这是为后续雕刻准备的,所以我尽量避免三角面,并让面分布比较均匀。

When I am fairly happy with the shape of the body I export a medium subdivision level back to Maya as a reference on top of which I create rest of the base meshes for the shirt, jeans and gun holster.
Creating these base meshes are straight forward polygon modeling so there is not much to explain how every element of the base mesh was created. For example, here you can see the two steps for creating the base mesh of the shirt.
当我很满意身体的大型后我导出一个中等细分级别再回到Maya把它作为一个我在其上面创建其余的基础模型(衬衫、牛仔裤、手枪皮套)的参考。因为创建这些基础模型很直截了当,所以没过多说明怎样去创建每个元素模型。例如:这里你可以看见2个步骤创建衬衫的基础模型。

You will notice that the collar area of the shirt has double sided faces. I did a face extrude along the collar area to create those. This gives me a nice thickness along the border of the shirt. I will do that along all of the border areas for the rest of the clothing. Here are some of the other base meshes. I tend to create all the separate elements of the character separately instead of sculpting out all the details from one base mesh. From my experience if you have separate meshes for all of the parts, your final normal map will look really clean and almost like high poly. However, if you sculpt everything from one mesh then things tend to look like plastic or clay.
你可以注意到衬衫衣领地方是2层 面的。我通过沿着单面衣领挤压创建那里的。这样给我在沿着衬衫边缘有了个不错的厚度。我同样地制作了其余衣服的边缘。这里有些其他的基础模型。我往往把角 色所有独立的元素从一个基础模型上分别去雕刻细节。由我的经验如果你用独立的模型作为所有的部件,你的最终法线贴图会看起来清楚点,几乎象高模了。然而, 如果你是从一个模型上雕刻每个地方那么东西往往看起来象塑像或者泥土。
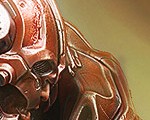
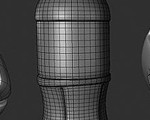
After the shirt is modeled, I create the gun holster. This way, the holster mesh conforms well to the shirt mesh. I can obviously adjust it later in Mudbox. The buckles, guns, ammos and all the hard surface parts are marked red below. These meshes are exported separately and not subdivided. They are exported only as a point of reference.
衬衫做好后,我开始创建手枪皮套。这次皮套模型的做法和衬衫一样。随后我可以在Mudbox里轻松地调节它。把扣子、手枪、子弹和其他硬表面的部分用红色底做个记号。分别导出这些模型不要细分。它们导出只是作为一个参考而已。

When creating these meshes, I usually put extra edge loops at the edge of surfaces and also around the seams. I do this mainly so that I have sufficient polygons to sculpt extra details in those areas. Otherwise I would have to do local subdivision or even divide the whole mesh just to get more detail in a small area of the mesh. This is why in my opinion, it is a smart thing to make your base mesh do most of the work for you.
当创建这些模型时候,我经常在面的边缘多加些环线并且是围绕接缝处的。我这样做主要是为 了在那里有足够多的多边形去雕刻更好的细节。不然我必须要局部细分或者甚至分开整个模型只是要在那些小地方有更多的细节。这是为什么在我看来,它是一个巧 妙的方法使你的基础模型为你完成大部分的工作。


When I am done creating all the base meshes I will check for certain errors in the mesh before exporting it to Mudbox. Things to check are un-welded vertices, overlapping vertices and whether surface normals are facing the right way. Also, I exported the shirt, jeans, shoes and most of the meshes separately so that I can work on them separately.
当我在创建所有的基础模型时,我会导出模型到Mudbox前检查确定的错误。需要检查没有焊接的点、重叠的点以及是否面法线的朝向正确。并且,我导出衬衫、牛仔裤、鞋子和大部分分离的模型以便我可以分别对它们后续工作。
2. Sculpting and detailing.
2.雕刻和细节
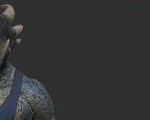
Now comes the fun part of the process. Once I’ve exported all the base meshes, I usually check them in Mudbox for any errors that might have slipped through. For example, I would subdivide all the meshes a couple of times to check for any holes, sculpt on them a little to check for proper surface normals, etc.
现在可是有趣的过程了。一旦我已经导出所有的基础模型,我经常在Mudbox里检查它们以便没有错误被遗留。例如:我细分下所有模型几次检查是否有洞;在模型上雕刻几下检查表面法线是否正确等等。
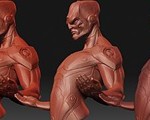
When I start sculpting something I usually don’t move up to a high level of detail too early. For an organic model the first thing I do is push out the basic forms at level 0 – 1. Things to consider at this stage are the skeletal features of the body, the level of skin fat and age of the character.
当我开始雕刻一些东西时,我经常不过早地提高较高等级细节。因为一个生物模型先要在0-1级别下推挤出基本的外形。在这个阶段要考虑身体的骨骼特征、皮肤脂肪程度和角色的年龄。
When it comes to detailing a character it is easy to get carried away, but it is important to stay on target of what you want your particular character to look like. I wanted this character to look very rugged and worn out but not look too old.
当进入到角色细节雕刻时,这样就很容易地进行下去了,但是重要的是呀基于你自己角色特有的样子为前提的。我想要这个角色看上去很粗壮憔悴但看起来不太老。

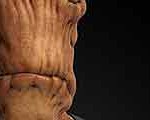
The most challenging part of creating this character was getting the cloth folds look decent. I went through several iterations for the cloth folds. There were several things I needed to consider when sculpting the cloth folds. Since this character is meant for a game I had to keep the folds fairly generic so that the folds work in most of the action poses.
这个角色创建的大多部分挑战是衣服的褶皱看起来体面点。我通过几个重复来表现衣服褶皱。这些我需要在雕刻是就考虑好。因为这个角色是一个游戏模型,我必须保持相当的通常褶皱以便褶皱是在大多数运动时的样子。

When sculpting folds, keep in mind that folds should not exist all over your fabric surface. I usually put folds where the character will be deforming such as the knees, around the shoulders. Then there are folds in places due to gravity like the area at the bottom of the jeans. There are also folds on the shirt under the holster strap which makes the integration look better. For all these folds, I will sculpt in a different level and only switch to the highest level for small, sharp folds. Since this is primarily for creating the normal map it is ok if your sculpt is slightly lumpy, it actually helps your final cloth surface look more natural. If it starts to become too lumpy, you can use the flatten brush to smooth along the folds.
当 雕刻褶皱时,记住褶皱不要在所有你的织物表面。我经常把褶皱放在角色可以弯曲的地方比如:膝盖、肩膀周围。当然褶皱的地方由于重力会下牛仔裤底部一样。还 有褶皱在手枪皮套带子下面,这样整体会更好看。所有这些褶皱,我会在不同级别下雕刻,并切换到高级别下雕刻细小的、锐利的褶皱。考虑到主要是为创建法线贴 图的,那么你的雕刻稍微有点粗糙也是可以的,它实际上有助于你最终衣服表面看起来更自然。如果它出现大的起伏,你可以用flatten笔刷沿着褶皱去光滑下。

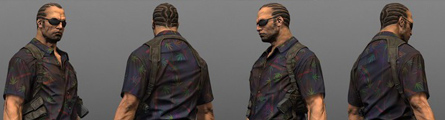
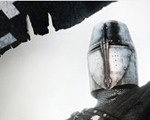
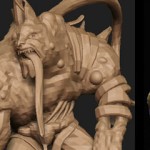
Here is a turntable of the entire high poly mesh at 7.3 million triangles.
这是730万个三角面的完整高模
3. Creating the low poly mesh.
3.创建低模
To create the low poly mesh I export a semi-high level mesh from Mudbox as a reference point for resurfacing on top of it. If there are overlapping meshes I do this separately.
为了创建低模我从Mudbox里导出一个半高级别模型作为一个参考,并在上面重建表面。如果有重叠我就如下做出分离

For this process I am using Topogun.
这个过程我使用的是Topogun。
When creating the retopo mesh I try to be a little liberal with the polycount so that the normal map baking works good. Once the normal map is baked I can optimize the mesh quite a bit to reach my actual polygon budget.
当创建重新拓扑模型时,我尽量多点的面数以便烘焙出好的法线贴图。一旦法线贴图烘焙好后我可以再优化下模型达到我的实际多边形预算。
Topogun will give me a pretty good mesh but I will eventually take this to Maya, clean it up and modify it as needed.
Topogun让我得到个很好的模型,但我最后还是会导入Maya,做些必要的清理和修改。

Once the low poly mesh is created I will go ahead and unwrap the UV. For this character I decided to keep most of the character unique. The only parts of the mesh that is mirrored in UV are the arms, eye balls, inside of the mouth and the shades.
一旦低模创建好后,我会继续分好UV。这个角色我决定保留大多的角色特点。只有部分模型是被镜像UV的(武器、眼球、口腔内和不起眼处)
Here is the UV layout:
这是UV布局:

When I unwrap a game character I usually give more pixel density to the upper part of the body. So I will give the head the maximum pixel density, then the torso and then the legs. This is done mostly because the upper part of a character will get the most screen time so that needs to look sharper than the rest of the body.
当我分好一个游戏角色,我经常会给上半身更多的象素。所有我会头最大的象素,然后是躯干再然后是腿。这样做主要是因为角色的上半部会有大部分的上镜时间以便看上去比其余身体更精致。
4. Baking map and texturing.
4.烘焙图和贴图
For baking normal maps and AO maps I am using xNormal.
为了烘焙法线贴图和AO贴图,我使用了xNormal。
I export all my high poly meshes and my low poly meshes to xNormal and bake the maps one by one.
我导出我的所有高模和低模到xNormal里,然后一个一个烘焙贴图。
Baking a good normal map depends on several factors. One of them is that your low poly model needs to conform well to your high poly mesh. Another is you baking low poly mesh needs to be a little higher poly to catch all the normals properly. When I say little higher poly, I mean you can be a little liberal around curved surfaces and add a few more edges to catch the normals properly. Just keep in mind not do any changes along the UV borders since they need to be intact.
烘焙一个好的法线贴图需要几个要求:一个是你的低模需要很好的匹配你的高模。另一个你烘焙的低模需要是一个较高的模型去适当地捕捉所有法线。我说的较高模型意思是你可以是一个有多的弯曲面和加一些更多边去适当地捕捉法线。记住不要改变UV的边缘,因为它们需要原封不动。
Here are samples of the final normal map and the ambient occlusion map:
这是最终法线贴图和AO贴图的样子:


With the normal map and the AO map created I will go ahead and start work on the color map. Both the normal map and the AO map will be used in creating the color map. First I will create the base colors to define different areas of the character.
随着法线贴图和AO贴图做好我会继续开始制作颜色贴图。法线贴图和AO贴图都是别用在颜色贴图上的。第一我会铺上基础颜色去分界不同的角色区域。
Here is a sample of the base color:
这是基础颜色的样子:

On top of this I add the AO map and on some areas I’ll also add the green channel of the normal map to add an extra layer of shading. This is because the green channel of the normal map is usually the same as a sky light bake given that all your UVs are upright.
在这上面我增加了AO贴图以及一些区域我总会加上法线贴图的绿色通道并使用阴影增加一个特殊层。这是因为法线贴图的绿色通道是通常和天光烘焙一样使你所有的UVs是垂直的。

Next I create the different surface textures, like the skin surface, the shirt surface and the jeans surface. A lot of people have already asked me how I hand painted the jeans texture. The jeans texture is a result of hand painted patterns, noises and some simple filters. So for this tutorial, I will only go through the creation on the jeans texture.
下一步我创建不同的表面贴图,象皮肤表面,衬衫表面和牛仔裤表面。一些人问我怎么样手绘牛仔裤贴图。牛仔裤贴图是手绘的图案,杂点和一些简单的滤镜。因此这个教程,我会通过对牛仔裤贴图的创建。
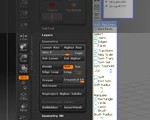
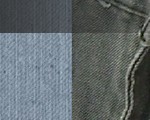
First thing I did was create two simple thread patters. I use the offset filter in Photoshop to make sure these patterns are tillable. Pattern A and B are for the threads. C is created using the noise filter and vertical motion blur. D is another layer of just noise and E is the scaled version of D. F is a layer with random black and white dots. A and B is passed through a distort-glass filter just to give it that random weaving effect. Then C, D and E is multiplied on top and F is overlaid and the base color is multiplied on top of all of that.
首先我创建2个简单图案。我用ps里的位移滤镜决定这些图案是无接缝的。图案A和B是细线。C的创建是由杂点滤镜和垂直运动滤镜模糊制作的。D是另一层就是杂点,E是对D的放大结果。F是一层随机的黑白点构成。A和B再通过扭曲里的玻璃滤镜得到一个随机编织效果。然后C、D和E用正片叠底盖在上面并把F用叠加方式,然后在最顶层创建一层正片叠底的基本色。

Once I have a base texture of the jeans fabric I use the transform-warp to conform the texture to the UV so that the fabric pattern does not look like a grid running through the whole mesh.
一旦我有了一个牛仔布料的基本贴图,我用自由变形使其符合UV以便编织图案看起来不象一个网格附在模型上。

Here is a sample of what it looks like after all the surface textures are added.
这是增加了表面纹理的样子。

On top of this I add a layer of my own shading and other details such as the hair, shirt patterns, dirt, color noise, etc. when the color map is done I will take a copy of that and use it for the base of the specular map. For the specular map the fabric areas of the texture are muted the most, the skin area usually gets a very de-saturated cyan-bluish hue and has a layer of noise over the entire specular map.
在这上面我加了一层我自己的底纹和其它细节比如:头发、衬衫图案、灰尘和颜色杂点等等。当颜色贴图做好后我做一个备份,用它去做张基础的高光贴图。在高光贴图的布料区域是被大大减弱的,皮肤区域通常用降低饱和度的青蓝色并在全部高光贴图上加一层杂点。
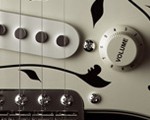
Here is a sample of the final texture:
这是最终贴图的样子:

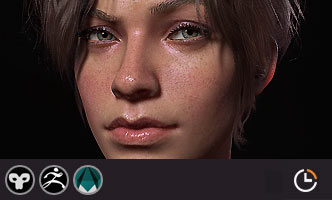
Here is the final model with AO map and color map on it.
这是AO贴图和法线贴图的最终模型:

这是最终效果图:


推荐相关中文教程

次时代角色与场景贴图渲染综合实战案例高级教程
本套教程由W.chen老师为大家带来目前最新的marmoset toolbag3实时渲染引擎的高级案例教程,本教程以超高的案例精度和完成效果,演示从模型细节,到烘焙,贴图,材质,灯光,动画等技巧,完全发挥出marmoset toolbag3在实时渲染方面的优势,以几乎达到渲染器级别的质量实时渲染角色!UNREAL ENGINE 4虚幻引擎安卓游戏开发全流程实战教学
本教程从零开始,演示如何使用Unreal Engine 4引擎完成一款安卓平台的游戏制作,包含完整的引擎制作部分和游戏打包发布部分,让您能完全掌握使用Unreal Engine 4引擎开发安卓游戏的流程。3DSMAX动力学特效实战教学
本套教学将通过24章实例教学,来向你详细讲解3DSMAX的动力学特效在电视包装与广告中的应用。手绘游戏特效制作实用案例教程 液体篇
本套教学使用典型的案例,演示了多个液体类手绘特效的绘制流程,专门针对手游,2D游戏,手绘影视动画的液体特效制作需求设计,让您能够短时间内完整的掌握这种最常见元素的动画绘制方法。手绘游戏特效制作实用案例教程 火焰篇
本套教学立足于实际工作项目的需要,演示了多个火焰类手绘特效的绘制流程,专门针对手游,2D游戏,手绘影视动画的火焰特效制作需求设计.3DSMAX国外粒子案例效果解析
本教学通过27个实战案例,教您如何用3DSMAX结合ParticleFlow本身以及扩展的ParticleFlow Box 1、Box 2、Box 3、功能包,结合Vray渲染器,来制作流行的广告和电视包装中的粒子特效效果。无论是常见的粒子聚合,分散,动态粒子替换,粒子矩阵,粒子动力学,本套教学都有相应的案例。UDK独立游戏制作教程-3D横版游戏《生机》
本套教学是案例教学,风之神韵老师主要从虚幻脚本,Kismet方面来介绍一个3D横版游戏的程序结构,关卡触发逻辑。比如推箱子,落石,限制范围的横版 视角,攀爬,转盘解密,开门把手,事件转场视角动画,可打碎的管子,收集宝石,可伤害的荆棘,可拉动的机关,飞镖,以及角色动画混合 。3DSMAX国外流体案例效果解析
本教学通过20个实战案例,教您如何用3DSMAX结合Realflow,FumeFX, ParticleFlow插件,来制作流行的广告和电视包装中的流体效果。无论是常见的液体,烟雾,流体碰撞,沙粒变化,水墨表现,本套教学都有相应的案例。


推荐课程


推荐教程

模型好帅,可以下载吗?