
本教学为翻译教学,转载请注明来自http://tut.aboutcg.com,以及注明翻译者
原始链接如下:
http://www.cgarena.com/freestuff/tutorials/maya/pacificwar/index.html
作者: Rodrigo Lloret
e-mail: rodrigo.lloret@hotmail.com
个人网站: www.rlloret.com
翻译:CWWS (Aboutcg.net)

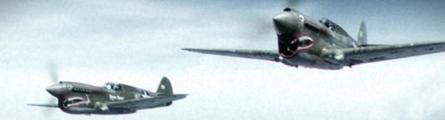
Hello, my name is Rodrigo Lloret, and here I´ll tell you about the making of my short movie “P-40 Warhawk – Pacific War” in Max and Maya. It’s a short piece base in a short plane of the “Battle of Britain” and really is a presentation of P-40. It´s a very short movie and not included any action. But my interest was centered in a integration and post production.
大家好,我的名字叫Rodrigo Lloret,,这里我将告诉你我使用Max 和 Maya制作的短片“P-40 Warhawk – Pacific War”的流程。这是“英国战役”的计划地一小部分,是关于P-40的一个介绍,这是一个非常短的片子,没有任何的动作场面,不过我的兴趣集中在流程整合 和后期制作上面。
References
参考资料
I started looking for documentation on internet and films, and I bought a Hasegawa´s P-40 E Warhawk model for the blueprints.
我开始在互联网和电影里面寻找相关的文档和资料,我还买了Hasegawa´s出品的P-40战鹰的拼装模型,这样我就可以得到三视蓝图了。


Modeling
建 模
I modeled the P-40 in 3dMax with traditional method, three perpendicular planes with blueprints. I started making the base model and them I continued refining it until the final model.
我在Max里面使用传统的方式来进行P-40的建模,三个加载了三视图的平面,我从最基本的模型开始,不断切割调整,直到完成最终的模型。

各个角度的模型线框图:


Texturing
贴 图
For the UV´s I separated the model in two UV´s map and one more to the other side of the P-40 fuselage. 1. (Fuselage and siferent parts of the aircraft) 2. (Wings and diferenst parts of the aircraft)
对于UV,我把它们展开成两张UV Map,还有另一张是关于P-40机身侧面的UV图,1是(飞行器侧面和附属部分),2是(飞行器的翅膀和其他部分)
UV 01


For the texture of the P-40 I used several images to add variety in the colors and dirt. This model has only three textures Diffuse, Reflect or Specular and Bump.
对于P-40的贴图,我使用了好几张贴图,来增加颜色和污渍的多样性,这个模型只有三个贴图,Diffuse(漫射贴图), Reflect or Specular(反射或高光贴图) 以及 Bump(凹凸贴图).


For the background texture of this movie I collect several skies photographs, 360 degree photographs, sea images and Google Earth screenshots. Then I mixed them all in Photoshop and I made a 360 degree sky. The most important is to create the depth.
对于这个短片的背景贴图,我收集了几种天空的照片,360度的照片,海洋的图片以及从Google Earth的视频截图。然后我在Photoshop把它们都混合起来,然后我还制作了一个360度的天空图片,这里最重要的是创建一种深度的感觉。

Then this moment I passed to Maya and worked on the light, shaders, particles and render.
然后我把工作转移到Maya,进行灯光,材质,粒子和渲染的设置工作。
Shaders
材 质
The principal shader was the aircraft metal. I used a Blinn shader in maya with soft reflect and specular mask. The others shaders are very simple.
这里最重要的材质是飞行器的金属,我使用了一个Maya的带有Soft Reflecti(软反射)Blinn shader,并给它赋予specular mask(高光遮罩),其他的shaders都很简单。

Lighting
灯 光
I used one direct light with raytrace shadows to the light sun and HDR image to the ambient light. In this scene I think that the light setup is very simple.
我使用了一盏带有raytrace shadows(光线追踪阴影)的direct light(直射光)作为太阳光,并使用HDR图片作为ambient light(环境灯光),我想这个场景的灯光设置是非常简单的。

Clouds
云
I need clouds in my scene and the first time I think apply texture on the planes with alpha map but finaly this was not a good idea and I made the clouds with standard particles to the main cloud and fluids layer to the background clouds.
在场景里我需要生成一些云,一开始我想给平面添加带有Alpha通道的贴图来模拟,但最终发现最终这不是一个好主意,因此我使用一个标准的particles粒子来制作主要的云朵以及背景上云的流动部分。


Rendering
渲 染
For rendering first time I used Turtle render but due to problem like HDR don’t illuminate well (I think is a bug and I hope will fixed in the future because is a good program.) Then I render through FinalRender and the HDR worked very well. I made the render with layers; Diffuse, Refelcts, GI, and Depth.
对于渲染,一开始我使用Turtle(海龟渲染期),但是发现了不少问题,类 似于HDR的照明并不是很好,(我想这是海龟渲染器的一个错误Bug,这是一个不错的渲染程序,希望将来能修正这个问题。)然后我使用 FinalRender来渲染,这一次HDR工作得非常好。我进行了分层渲染,分别是:Diffuse层, Refelcts层, GI层, 和 Depth层。
Composition
合 成
I made the composition in Combustion. I used 18 layers and many effects (Color Corrector, Color Shift, Shake, DistortRGB, Noise, Flicker Light, Film Damage…) to create the documentary look. I used the Sapphire and Cine Look plug-ins too. And the motion blur was also calculated in Combustion.
我在Combustion里面进行合成,我一共使用了18层,和许多的特效, (颜色纠正,颜色平移,抖动,扭曲RGB,噪点干扰,闪耀灯光,电影破坏等等等),来创建出一种纪录片的感觉。我还使用了Sapphire 和Cine Look插件包。另外运动模糊效果也是在Combustion里生成的。

看一下最终的动画效果。
That’s all, Thank you for your interest and if you have any question or suggestions then dont hesitae to email me on rodrigo.lloret@hotmail.com
基本就是这样了,感谢你对此有兴趣,如果你有任何问题或者建议,请给我发邮件rodrigo.lloret@hotmail.com
相关链接:Rodrigo Lloret – www.rlloret.com


推荐相关中文教程

3DSMAX动力学特效实战教学
本套教学将通过24章实例教学,来向你详细讲解3DSMAX的动力学特效在电视包装与广告中的应用。3DSMAX国外粒子案例效果解析
本教学通过27个实战案例,教您如何用3DSMAX结合ParticleFlow本身以及扩展的ParticleFlow Box 1、Box 2、Box 3、功能包,结合Vray渲染器,来制作流行的广告和电视包装中的粒子特效效果。无论是常见的粒子聚合,分散,动态粒子替换,粒子矩阵,粒子动力学,本套教学都有相应的案例。3DSMAX国外流体案例效果解析
本教学通过20个实战案例,教您如何用3DSMAX结合Realflow,FumeFX, ParticleFlow插件,来制作流行的广告和电视包装中的流体效果。无论是常见的液体,烟雾,流体碰撞,沙粒变化,水墨表现,本套教学都有相应的案例。2.5D商业游戏场景制作教程 进阶篇
在本教程中,Freeyy老师将从零开始,向你讲解如何根据确定的主题进行前期准备,随后建模,绘制贴图,制作材质,最后再进行细节调整,完成一个商业游戏级别的2.5D场景画面。Mentalray for max实战教程
本教程共包含超过42小时以上的视频教学内容,共18章 132课,通过大量实例,详细讲解了3ds Max平台下的Mental Ray1渲染器的使用基础和实战方法。是一部非常完整详细的3dsMax版的Mental Ray渲染器的教学.网游角色制作女精灵实战教学
本教学以一个AAA级网游女精灵角色为案例,向您展示如何完成她的模型,UV,和贴图绘制。教学使用的软件主要是3ds max和 bodypaint, 其中建模和UV使用3ds max完成,贴图绘制在bodypaint和 PS中完成。


推荐课程


推荐教程

0回复P-40战鹰 太平洋战争"