本教学为翻译教学,转载请注明来自aboutcg.net,以及注明翻译者
原教学出自3D Total网站,原始链接如下:
http://www.3dtotal.com//team/Tutorials_3/makingof_ethaus/ethaus_01.php
作者: Cedric Seaut
个人网站: www.khalys.net
翻译:CWWS (aboutcg.net)
‘Making of Ethaus’
Ethaus的制作流程

Introduction:
简介
Generally outside of work, I try to experiment with different styles, or to polish and furnish a personal universe. I have a lot of fun thinking up creatures belonging to this world of my creation, and the particular character I’m talking about in this ‘making of’ article belongs to the “Sang Bleu” series – a mix between “metabaron” and “moebius” (heavy references for me).
通常在日常工作之外,我尝试各种不同的风格,来搭建一个私人的世界,我有很多有趣的角色设想是属于我创造出来的这个世界,在这篇教学文章里描述的角色是属于”Sang Bleu”系列的,一个“男爵”和“莫必斯”之间的混合体,(这时我重要的参考资料)。
Step 1:
第一步:
As you can see in Fig .01, I love starting my characters from scratch, just to remove all the constraints of shape and topology. The cube is probably the simplest and best way to remove these constraints, and it gives you the opportunity to express yourself with complete freedom.
如你在第一张图看到的,我喜欢从零开始创建我的角色,只是去掉所有的形状和拓扑规定参数,而一个立方体可能是去掉这些现实最简单也是最好的方式,它会给你完全自由表达你的想法的机会。

When you’re satisfied with your concept, you will then be able, at any time, to redo the topology, re-project your quick sculpt and go in depth with the details. Keep in mind that the most important thing in a character is the concept – when you’ve got it right, the rest is all just technical.
当你对概念设计满意之后,你将可以,在任何时候,撤销拓扑,重新规划你的快速雕刻以及进一步的细节。记住对一个角色来说,最重要的事情就是概念设计,当你正确地理解它,剩下的所有都只是技术了。
So as the first step, ZBrush, which is for me the fastest way to come up with a 3D concept, I create a cube: ZBrush,
因此第一步,对我来说是创建一个3D概念设计最快的方法,我创建了一个立方体
1 – Create a ZBrush cube primitive
2 – Go to “Unified Skin”, set “Resolution” and “Smt” to the minimum values, and press “Make Unified Skin”
3 – A new tool will be created with a clean Cube mesh – select it
4 – Go down to the “Texture” tab and click on “Enable UV”
5 – Now you can go to the “Geometry” tab and reconstruct the subdivision of your cube
6 – When this is done, just delete the higher subdiv.
7 – And you’ll have a perfect cube!
8 – Now you’re free to subdivide it to get a perfect sphere
1-创建一个ZBrush立方体元素
2-到”Unified Skin”面板,设置”Resolution”(分辨率)和”Smt”为最小数值,然后点击”Make Unified Skin”
3-一个干净的立方体模型元素会被创建出来,-选择它
4-到”Texture”(贴图)面板,并点击”Enable UV”(允许UV)
5,现在你可以到”Geometry”面板并重建你的立方体的细分段数
6,做好这一步之后,删除比较高的细分
7,你会拥有一个完美的立方体了
8,现在你可以自由地细分它来得到一个完美的球形
Step 2:
第二步
All, or almost all, of the objects where done in the same way. I’ll take the chest armour now to quickly explain the work in progress (Fig.02):
所有的,或者几乎是所有的物体都是通过相同的方式来完成的,我现在选择俄胸甲部分来快速解释一下工作步骤:
1 – Cube
2 – 3D concept
3 – Redoing the topology can be hard and can quickly become a big mess. To avoid this, I usually use the Polypaint function in ZBrush to draw the topology first, thinking of keeping nice and evenly spaced quads (keeping objects clean with quads is not indispensable, but it’s still better for the entire process). I then use the Topology function in ZBrush to recreate the new wire
4 – Then I re-project the information from my old, dirty mesh to the new, clean one
Finally, I finish up the piece by polishing the main shape and volumes and add some details. Redoing the topology is quite important if you want to render the character without importing into Max a mesh that’s too heavy.
1,建立立方体
2,3维概念设计
3,重建拓扑会变得困难,并且会很快变得非常混乱。要避免这个,我通常使用Zbrush的 Polypaint(多边形绘制)功能首先来画好拓扑结构。想好保持均匀漂亮的四边形(保持物体布线干净并且以四边形构成并非必不可少的,但是这仍然对整个处理过程有利)。然后我使用ZBrush的拓扑功能来创建新的网格。
4,然后我把旧的,混乱的模型信息重新Project(投射)到新的模型上面,最终,我通过打磨主要形态和添加某些细节,完成了这个部分,如果你不想把一个超复杂的模型导入Max的话,重做拓扑这一步是非常重要的。

Step 3 – 6:
In Fig.03, I’m introducing the main brushes I use to sculpt and showing how I use them to come up with organic shapes:
1 – The Clay brush is used to define the main volumes
2 – The mask (with the Clay brush) can define some specific areas I want to pull out/in
3 – The Slash brush I usually use to smooth and also to add some depth
4 – Damien Canderle’s brush is very useful to add some depth and to define wrinkles
5 – The Inflat brush is great to bulge up volume
在下面这张图,我要介绍我在雕刻时使用的主要笔刷,并且展示我是如何使用下列的笔刷来创建有机体模型的。
1,Clay brush粘土笔刷被用来定义主要的形体。
2,遮罩(包括Clay brush粘土笔刷)可以定义某些需要拉出或者/推入的特定区域
3,Slash brush,划笔通常被我用来平滑模型,也可以增加一些深度。
4,Damien Canderle的笔刷对于增加深度和定义一些皱纹是非常有用的
5,Inflat brush扁平的笔刷对于凸起大形态非常有用。

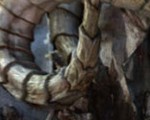
Here’s an example of how to use them (Fig.04):
1 – Quick main base with the Standard brush
2 – Clay to define the different volumes and the direction
3 – Slash to add an organic feel between and on volumes
4 – Inflat to bulge volumes and to pinch at the same time between them
5 – Alpha pass is useful for the “pore” details. I use Gnomon’s alpha in most cases – they are pretty useful!
这里是一个如何使用这些笔刷的实例:
1,使用标准笔刷快速刷出基础形态
2,使用Clay brush粘土笔刷来制作不同的形体和方向
3,用划笔来增加生物体之间和表面的有机外观
4,用扁平的笔刷来塑造整体形态的凸起和凹陷
5,Alpha通道层被用来添加“毛孔”细节,我在大多数的项目里使用Gnomon出品的alpha-它们非常非常有用!

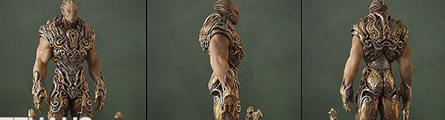
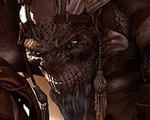
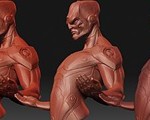
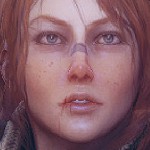
With this technique I sculpted the final version of the character (Fig.05 – 06).
使用这个技巧,我雕刻了角色的最终版本/


Step 7:
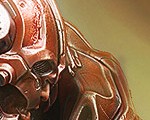
It was then time to apply some colour to the character, to inject a bit more life into him (Fig.07):
1 – For the first step, and because it’s always good to keep a global vision of the colours on the characters, I use the Polypaint function in ZBrush to define the main volumes and areas
2 – I then use XNormal which is the best tool I’ve found so far to generate an occlusion and a normal map from a high density mesh. The occlusion you can see comes purely from XNormal. The only thing you have to take care of is keeping all the extremities in order to have the best diffusion of light. The normal map will then be generated from the high-res mesh to be applied on a mid-res object, simply to avoid a memory crash in Max
3 – I usually use a couple of generic dirt maps to remove the uniformity of the colour
4 – This is the kind of final map I come up with
现在到了赋予角色颜色的时候,来为他注入生命力,
1,作为第一步,同时,知道你对于角色整体颜色感觉总是很重要的,我使用Zbrush的Polypaint功能来定义主要的形态和区域。
2,然后我使用XNormal来生成用于高精度模型的occlusion(遮挡)渲染层和Normal贴图层,这是我用过的这方面最好的工具,遮挡图层你可以看到,完全是Xnormal生成的。你唯一需要注意的事情就是保证所有的extremities(骨端)按照顺序来获得最好的漫反射灯光。Normal贴图将通过高细节模型生成,然后被赋予一个中等密度的模型,以避免在Max中因为内存不够而崩溃。
3,我经常使用一张整体的污渍贴图来去掉使得颜色不至于太过单调。
4,这是我得到的最终贴图。

Step 8 – 9:
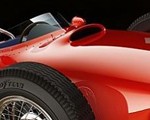
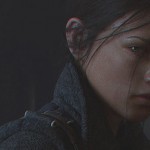
The render was done in Max with the amazing renderer, V-Ray (Fig.08 – 09):
1 – The different pieces were imported separately into Max with several XRef Objects in order to save memory during the render (when you start to render a scene including high-res meshes, it’s good to use some tricks to save memory, otherwise you’re likely to encounter multiple crashes)
2 – So for all the different pieces, I use mid-resolutions of the original ones, and on them I apply a Normal map without any displacement map (to save both time and memory)
3 – I create three different V-Ray materials: for the skin, the gold and the rock. It’s still better to use a V-Ray material when you use it as a renderer – you’ll have better results
4 – For the lighting set up, I used a basic “studio” one. First I create a “special background object” for the light bounces. I then put two big V-Ray lights on both sides and one on the top, but behind the character in order to create more bounces. I use different colours on the lights to change the ambience. It’s up to you then to play with the intensity, if you want to
5 – I turn on indirect illumination and play with the different parameters to get the result you can see in Fig.09
渲染是在Max里面使用让人吃惊的渲染器V-Ray来完成的。
1,不同的部分通过XRef场景连接功能分开被导入Max,这么做是为了在渲染得时候节省内存,(当你渲染一个包括高细节模型的场景时,最好使用一些技巧来节约内存,不然你可能会遇到好多次的崩溃。)
2,因此对于不用的部件,我使用中等密度的模型作为原始模型,然后给他们赋予Normal贴图,不包含任何displacement map置换贴图(来同时节约时间和内存)
3,我创建了3种V-Ray材质:分别针对皮肤,黄金和岩石,如果你把V-Ray作为渲染器,那么使用V-Ray材质会获得更好的渲染结果。
4,灯光设置方面,我使用了基础的”studio”(摄影工作室)的灯光布置,
首先我创建一个“专门的背景物体”用来做灯光反射,然后我在两边放置了两盏大的V-Ray灯光,并在顶部也放了一盏,但是在角色背后为了创造出更多的灯光反射,我对灯光设置不同的颜色来改变环境色,关于亮度由你自己决定。
5,我打开了非直接全局照明然后尝试不同的参数,最终得到了你在下图看到的结果。


After some quick renders, I took them into Photoshop to make some minor saturation/colour tweaks. And that’s it! You’re free to see more work by me and to contact me for requests or more via my website: http://www.khalys.net.
Many thanks! Cedric.
在一些快速渲染结束之后,我把图片导入Photoshop来调整一些饱和度和颜色。这样就做好了,你可以访问我的网站http://www.khalys.net.来看到我更多的作品或联系我委托制作或要求其它更多。
非常感谢!Cedric.
本教学完,谢谢大家


推荐相关中文教程

3DSMAX动力学特效实战教学
本套教学将通过24章实例教学,来向你详细讲解3DSMAX的动力学特效在电视包装与广告中的应用。3DSMAX国外粒子案例效果解析
本教学通过27个实战案例,教您如何用3DSMAX结合ParticleFlow本身以及扩展的ParticleFlow Box 1、Box 2、Box 3、功能包,结合Vray渲染器,来制作流行的广告和电视包装中的粒子特效效果。无论是常见的粒子聚合,分散,动态粒子替换,粒子矩阵,粒子动力学,本套教学都有相应的案例。AboutCG Zbrush4R7高级机械建模实战教程
本套教学由我们两位强大的老师,《造型巨匠Zbrush》的作者田涛老师,和《Zbrush完全教学》的作者Purplesun老师一起打造,两位老师分别使用Zbrush4R7制作多个机械模型案例,难度由浅入深,对制作当中用到的功能命令一一讲解。并时时分享提高建模效率的宝贵经验。3DSMAX国外流体案例效果解析
本教学通过20个实战案例,教您如何用3DSMAX结合Realflow,FumeFX, ParticleFlow插件,来制作流行的广告和电视包装中的流体效果。无论是常见的液体,烟雾,流体碰撞,沙粒变化,水墨表现,本套教学都有相应的案例。Zbrush 4R7新功能中文视频教学
zbrush4 r7将会是zbrush4版本的最后一次升级,下一个版本将会是zbrush5。本次更新进一步完善了zbrush的功能,首次提供了几乎全套的多边形建模命令,大部分硬表面对象的建模将不需要借助第三方软件。ZBRUSH全案例实战中文视频教学
本套视频教学以案例为主,通过11个完整的zbrush雕刻案例,由浅入深的带领大家掌握zbrush常用的雕刻流程和雕刻技巧,全套教学在25小时以上。2.5D商业游戏场景制作教程 进阶篇
在本教程中,Freeyy老师将从零开始,向你讲解如何根据确定的主题进行前期准备,随后建模,绘制贴图,制作材质,最后再进行细节调整,完成一个商业游戏级别的2.5D场景画面。Mentalray for max实战教程
本教程共包含超过42小时以上的视频教学内容,共18章 132课,通过大量实例,详细讲解了3ds Max平台下的Mental Ray1渲染器的使用基础和实战方法。是一部非常完整详细的3dsMax版的Mental Ray渲染器的教学.


推荐课程


推荐教程

0回复Ethaus的制作流程"