
请尊重互联网道德,转载请注明转载出处和翻译者,谢谢!
本教学为翻译教学,转载请注明来自aboutcg.net,以及注明翻译者
原教学出自CGArena网站,原始链接如下:
http://www.cgarena.com/freestuff/tutorials/max/ashoan/ashoan.html
作者: Alexander Tomchuk, Ukraine
网站:http://alexandert.cgsociety.org
翻译:CWWS (aboutcg.net)
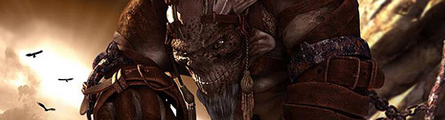
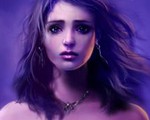
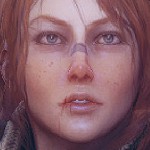
Making of Ashoan
Ashoan的制作流程

Hi, everybody who where interested in this tutorial, which is my first one and I hope you will like it. Through this tutorial I will try to explain the entire process of creating this particular image, from the first step to the final result.
Hi,所有对这个感兴趣的朋友们,大家好,这是我第一个教学,我希望你能喜欢它。通过这个教学将会解释如何制作这个详细图像的整个流程,从第一步到最后完成
About the Image
关于这幅图像
First of all, I want to say that from the very beginning I did not thought about any scene, rocks, sunset and so on. Just wanted to experiment in different direction of art, cause I usually creating human characters. So I’ve stopped on the fantasy style and asked my friend Vladimir Kiselyov to draw a very fast sketch, unfortunately drawing of the character was lost and no digital copies where created. Once very rough model been created I was forced to suspend further development. Some time later I found this model in my library and an idea of image came to me.
首先,我想要说在最初的时候,我并没有考虑任何场景,岩石,落日等等,只是想要常识一下不同方向的艺术,因为我一般创建人物角色,因此我决定制作幻想风格的作品,并请我的朋友Vladimir Kiselyov绘制了一张快速草图很不幸的是那张草图被遗失了,并没有留下数码的备份,一旦大致的模型被创建了,我就延缓了进一步的细节开发。然后晚些时候,我在我的模型库里面发现了这个模型,然后一个关于最终图像的想法在我心中产生了。
Modeling
建模
Usually I’m starting with all my models from primitives such as box, plane, spline, cylinder etc. It allows me to keep polygon count under control. This is very important, because rendering and overall development time depends on it. So my advice, keep it as low as possible, remove everything you think is unnecessary. Less polygons – more co ntrol over the volume! Every time I starting the new model, I just open the sketch and all the helpful references on the secondary monitor and starting to create.
通常,我所有的模型都会用最基本的元素比如盒子,平面,曲线,圆柱体等等开始。它让我可以控制多边形的数量,这是非常重要的,因为最终的渲染和整体的制作时间都取决于此。所以我建议,保持模型面数尽可能的低,去掉任何你认为是不必要的东西。模型多边形数越少,对于整体的控制力就越强。每一次我开始建一个新模型,我只是在第二个监视器打开所有的草图和有帮助的参考图片,然后开始创建。

Sculpting
雕刻
When the base model is done, it is time to add some more details. No need to unwrap model before exporting to ZBrush on this stage. You can do it later. What I do, is just exporting the model without Turbo Smooth modifier on it. Then, even if you finished with sculpting, you always can export first Sub divide level to 3ds max and change what ever you need. Then import it back in ZBrush over the first subdivide level. Just remember, you can not add or remove polygons. I decided to break up the character into manageable pieces (head, body, head belts, body belts). It is reasonable to do, every time you starting new character!
当基础模型完成之后,是时候添加更多的细节。在导入Zbrush之前,你不需要展开模型的UV,你可以晚些时候再做。我一般直接把没有细分过的模型导出,甚至当你完成雕刻之后,你都总是可以导出第一级细分的模型到3ds max然后按照你的想法做改变,然后再以第一级细分模式导回到Zbrush。只要记住,你不可以增加活着删减多边形。我决定把角色分成多个易于处理的部分(头,身体,头带,身体的带子),每一次你开始建立一个新模型,这么做都是非常合理的。

Skinning
绑定
After sculpting been done, I’ve exported modified first subdivide level from ZBrush and proceed to rigging. I used Biped skeleton.
当雕刻完成之后,我把模型以第一级细分导出然后进行绑定,我使用Biped skeleton骨架系统

Texturing
贴图
Once I finished with sculpting, (and surely unwrap) it is time to draw the textures and translate all the details from ZBrush to lower resolution model in 3ds max. Using displacement maps is always very expensive to process so I decide to do the work with normal maps. Firstly I generated the normal and ambient occlusion maps in ZBrush, to simulate details. All textures are hand painted with overlayed occlusion map to enhance the details. On the next you can see layering of the textures. Head and body texture resolution are 4096×4096.
一旦我完成了雕刻(同时确保展开UV),现在是时候绘制贴图并把所有的细节都从Zbrush转换到3ds max.中更低精度的模型上面。使用置换贴图处理起来永远是非常花费时间的,所以我决定还使用normal(法线)贴图。首先我在Zbrush里面生成了法线贴图和环境遮挡贴图来模拟所有的细节。所有的的贴图都是手绘的,还覆盖了遮挡贴图增强细节。接下来的图片你可以看到贴图的分层,头部和身体的贴图分辨率都是4096×4096。

Scene Modeling
场景建模
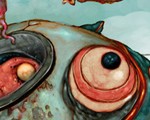
When the character was done, I have started with the scene. First of all I did very quick base model for the rock in 3ds max, then exported it into ZBrush to proceed with sculpting. Then I generated normal and ambient occlusion maps which was projected in ZBrush from the highest Subdivision level to the third one, because whole rock was very heavy to export in 3ds max, and third subdivision was like 17 000 polygons which was enough.
当角色完成之后,我开始场景的工作,首先我在3ds max里制作了基础的岩石模型,然后把它导出到Zbrush里雕刻,然后我在ZB里面把最高细分级别的模型制作出法线贴图和环境遮挡贴图,并投射到细分调到第三级的模型上面,因为整个的岩石模型对于3ds max来说面数太多了,而第三级的17 000个多边形的岩石模型就显得足够了。

Texture for the rock you can see below. And actually here is the place I did a mistake, because overall resolution of the rock texture 4096×4096 which is good, if you want to see this rock from the middle distance. But in my case I have very close look on the 30% of the rock, and in full resolution of the final image it looks not very nice. So keep this in mind!
下图你可以看到赋予岩石的贴图,实际上这里我犯了一个错误,因为整体的岩石贴图分辨率是4096×4096,如果你想要在中距离看演示的话这个很合适。但是在我的项目里,我要超近距离地看到30%的岩石表面,因此在全尺寸下,最终图像看起来不够完美,实际上贴图还应该再大一点,记住这一点。

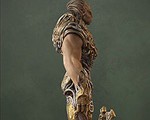
After all, I posed a character on the rock and shackled him with all those rusty chains. I understand that a lot of details and geometry is not visible on the final image and it was not necessary to model it. But it makes a lot of pleasure to create all this, and you can see it now, so it was not waste of time.
在这之后,我在岩石前面给角色摆了个姿势,并用生锈的链条把它铐了起来。我理解在最终的图像中很多的细节和多边形都不会显示,因此没有必要把它们的模型都建出来。但如果你做的话,会得到很多的乐趣,现在你可以看到,这并不是单纯的浪费时间。

Lighting and Shading
灯光和阴影
For this image I used Global Illumination. So here are Sky light, 2 spot lights and one Sun. All light sources casting “Mental ray Shadow map” shadows.
对于这张图像,我使用Global Illumination(全局照明),因此这里使用的天空光,两盏聚光灯和一个太阳照明,所有的光源都投射“Mental ray Shadow map”的阴影。

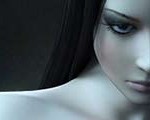
As for the character, I used mental ray skin shader. Unlike human skin which needs to prepare unique specular map, subsurface scattering map and so on, I just copied diffuse map to Specular color and specular weight channels, and it worked out just fine (actually in this shader, maps is not so important as all other values which you can see on the next image). Leather shader based on “Arch & design” Leather type with further corrections.
对于角色,我使用mental ray的皮肤材质,不像人类的皮肤需要准备特殊的高光贴图,次表面散射贴图等等,我只是把我的漫反射贴图复制到我的高光颜色和高光比重通道,然后它就工作得很好了。(实际上在这个材质类型里面,贴图并不如你在下图看到的其他参数那样重要)。皮革材质基于“Arch & design”里的Leather类型,并做了进一步的修正。

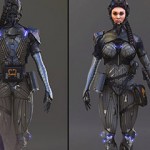
Here is the render of the character with simple lights, and on the next image you can see how shader works on the textured character.
这里是在简单灯光下的角色渲染图,下一张图你可以看到材质是如何作用于画好贴图的角色上面的。

Composition and Post Production
合成和后期处理
On the image below you can see progress of this work.
在下面的途中你可以看到工作的过程。

Lens effect was created in completely new scene. I’ve just set on the background in 3ds max image I already had, created new light and rendered lens effect which was next tuned and overlayed in Photoshop. Background where created from the photos I found (sorry cannot show it to you cause nothing where saved). And I used “Hair and Fur” to create beard. And in final touch, I rendered Z-depth to add DOF effect, and in some places I overlay the inverted ZDepth map with “Color Dodge” type, which added very nice glow effect on the bright edges. Some scratches and shadows were painted on this stage.
镜头效果是在一个全新的场景里面创建的。我只是把我已经完成的图像设置为3DS Max的背景,然后创建一盏心得灯光,并渲染成镜头耀光效果,然后把渲染结果导入Potoshop,覆盖在最顶层。背景是通过我搜集的照片创建的(对不起不能向你展示原始图片,我忘记我存在哪里了。)我使用“Hair and Fur”来创建胡须,在最后的修正中,我渲染了Z通道层并以此添加景深,我还在一些地方使用反向的Z通道图片,并应用“Color Dodge”层叠模式,这可以给画面的亮部边缘添加一种非常好的光晕效果,我还在场景里绘制了一些划痕和阴影。

Here is the wireframe of the final scene.
这里是最终场景的线框图。

And here is the final image.
然后这里是最终的完成图片

I’m glad to share this tutorial with CG community and I hope it was useful and interesting for you. I understand that some details of the process missed, sorry about this. Feel free to visit my online portfolio to see what’s new. http://alexandert.cgsociety.org Thank you for you time and interest towards my work.
我非常乐意分享这个教学作为cg 交流,并且我希望它能让你感兴趣,对你有用。我理解这个教学缺少了处理过程中的一些细节,对此我表示抱歉。希望你能浏览我的在线作品集,看看我的新作。感谢你对我的作品感兴趣。


推荐相关中文教程

电影MATTER PAINTING基础实战案例教学
马良老师将通过一个精美的实例,来教你如何使用Photoshop结合After Effects软件完成动态Matter Painting场景的制作,从而带你踏入专业MP行业的大门。3DSMAX动力学特效实战教学
本套教学将通过24章实例教学,来向你详细讲解3DSMAX的动力学特效在电视包装与广告中的应用。3DSMAX国外粒子案例效果解析
本教学通过27个实战案例,教您如何用3DSMAX结合ParticleFlow本身以及扩展的ParticleFlow Box 1、Box 2、Box 3、功能包,结合Vray渲染器,来制作流行的广告和电视包装中的粒子特效效果。无论是常见的粒子聚合,分散,动态粒子替换,粒子矩阵,粒子动力学,本套教学都有相应的案例。AboutCG Zbrush4R7高级机械建模实战教程
本套教学由我们两位强大的老师,《造型巨匠Zbrush》的作者田涛老师,和《Zbrush完全教学》的作者Purplesun老师一起打造,两位老师分别使用Zbrush4R7制作多个机械模型案例,难度由浅入深,对制作当中用到的功能命令一一讲解。并时时分享提高建模效率的宝贵经验。3DSMAX国外流体案例效果解析
本教学通过20个实战案例,教您如何用3DSMAX结合Realflow,FumeFX, ParticleFlow插件,来制作流行的广告和电视包装中的流体效果。无论是常见的液体,烟雾,流体碰撞,沙粒变化,水墨表现,本套教学都有相应的案例。Zbrush 4R7新功能中文视频教学
zbrush4 r7将会是zbrush4版本的最后一次升级,下一个版本将会是zbrush5。本次更新进一步完善了zbrush的功能,首次提供了几乎全套的多边形建模命令,大部分硬表面对象的建模将不需要借助第三方软件。ZBRUSH全案例实战中文视频教学
本套视频教学以案例为主,通过11个完整的zbrush雕刻案例,由浅入深的带领大家掌握zbrush常用的雕刻流程和雕刻技巧,全套教学在25小时以上。构图绘画完全教学
本套课程的内容重点是学习绘画艺术的构图规律和方法。在绘画学习过程中,构图是一个重要的组成部分,学习它对于提高绘画练习和创作水平有显著的促进作用。特指纯艺和插画,海报。


推荐课程


推荐教程

0回复Ashoan的制作流程"