
本教学为翻译教学,转载请注明来自aboutcg.net,以及注明翻译者
原教学出自CGArena网站,原始链接如下:
http://www.cgarena.com/freestuff/tutorials/photoshop/royalassassin/index.html
作者: Roy Stein, London (伦敦)
网站: www.roystein.com
翻译:CWWS (aboutcg.net)
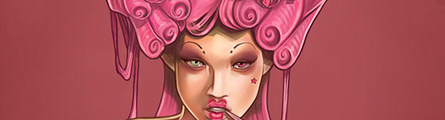
Making of The Royal Assassin
女王暗杀者的绘制流程

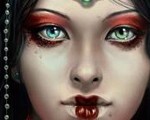
女王暗杀者
My name is Roy Stein, and I am a CG artist and Illustrator based in London. In this short tutorial I want to give you a short walkthrough of the way I build up an illustration from start to finish. This image was created over 3 sessions and took approximately 15 hours to finish.
我的名字叫Roy Stein,我是一个出生于伦敦的CG艺术家和插画师。在这个小教学里面,我想带你了解我从开始到完成一幅插画作品的整个过程。这幅画的绘制横跨了三个学期的阶段,大概花了15个小时来完成。
First stage, a subject matter – My process is to come up with an idea, then a color/mood theme, and then look for references to get my creative juices flowing… I collect images from all over, shoot stuff myself if needed, and then start sketching. Because I have a Wacom Cintiq at home, I paint on one screen, and have my references on the second, which is really nice.
第一阶段,一个主题轮廓,我的流程是首先形成一个想法,然后是找到色彩主 题,再然后寻找相应的参考图片来得到我的创意源泉……我从所有的地方搜集图片,如果需要还自己拍摄照片,然后开始画草图,因为我家里有一个Wacom Cintiq(新帝)绘图显示器,所以我直接在屏幕上绘画,然后在第二台显示器上显示我的参考图片,这种状态真是非常舒服:)
I use a hard default brush in Photoshop, and start building up the form. This stage is the most important to me because it locks the composition, movement and character. The other steps are basically refining that sketch.
我使用Photoshop默认的硬笔刷,然后开始绘制大的形态,这个阶段对我来说是最重要的,因为它将决定最终的合成,运动和角色,其他的步骤基本上就是对草稿的提炼细化。

女王暗杀者的草稿
Second stage – Color Palette and Basic Shading – Here I chose a few colors that will help me dictate the overall color mood of the character. I was going for a very simple lighting scenario, almost like a diffused light box, that is located slightly to the characters left.
第二阶段-调色板和基本的阴影处理,这里我挑了一些颜色来帮助我定义角色整体的颜色感觉,我希望达到很简单的照明效果,几乎就像是一个漫射灯箱,然后轻微地有点照射到角色的左边。
I wanted the character to have pinkish/peach overall color, which would create a very sweet feel. Created a new layer on top of the line art sketch, and with the same kind of brush went in with larger strokes and filled the main areas of light and shadow, using the color palette on the left. I kept a copy of the sketch with a 30% opacity on top of this new color layer to still give me the roadmap to where things are (you can obviously also do this with a multiply mode layer).
我希望角色的整体颜色为粉/桃色调,这可以创造出一种非常甜美的感觉。在线 稿层上面新建一个层,使用相同的笔刷,然后加大笔刷半径,填充阴影和高亮区域,使用左边的调色板,我在这个颜色层上面还保留了一层透明度为30%的线稿 层,来让我知道角色的大致结构和位置,(很明显你也可以使用一个multiply(加深)层叠模式来起到同样的效果。)

女王暗杀者的着色
Next, I tweaked the contour of her face and hips with the liquify tool, to get a better flowing shape. This step was also mainly tweaking and adding colors, more refinement to the highlights and shadow areas, and smudging it all together to get a more unified result. Slowly adding details of the hair and the face, and trying to keep the balance of dark and light. I decided to keep a very strong outline, to give a more of an old poster art feel.
接着,我使用liquify tool(液化工具)调整了她脸部和臀部的轮廓,来获得更好的流线型曲线效果,这个步骤主要就是调整和添加颜色,对于阴影和高亮区域精益求精,然后把颜色 涂抹在一起或者更加统一的结果,慢慢地给脸部和头发添加细节,并试着保持明暗的平衡,我决定保留一个非常强的外轮廓,来赋予这幅作品一种旧时海报艺术的效 果。
I then shifted the entire piece value from pinkish to more of a dark peach color because now the new saturated pink hair color was getting too rich and distracting from the rest of the image.
然后我决定将颜色从原来的粉色调偏移到一种更暗的桃色,因为现在头发的粉色饱和过于丰富,使观众的注意力从整个图像移开,只关注头发了。

女王暗杀者的头发
Next step – the hair in the previous stage was still too distracting to my taste, so I decided that the more detail I add to it will might blend all those curls back in. So I added some feather ornaments to the hair, and painted in a new set of eyebrows and a fake mole.
下一阶段,在上一步中的头发仍然让我觉得使人注意力分散,因此我决定添加更多的细节,来使得所有的卷发更加的与背景融合,因此我为头发增加一些羽毛作为装饰,并花了一对新的眉毛,和一个假的痣。

女王暗杀者的长卷发
Finally, created a simple background gradient, which complimented the color palette of the character and pushed it out a bit more. I still felt that the hair and character needed some more jewelry so I painted in some bows and bracelets, added a hint of her dress behind her because I felt it wasn’t clear she was holding a dress at all, and even a small parrot to make it a bit less serious, and that’s it… I hope you liked this short walkthrough, and hope it helped your process in some way. Happy Painting.
最终,创建一个简单的渐变背景,使用角色的调色板并且在此基础上稍微扩展一 点,使仍然觉得角色和头发需要更多的珠宝因此我在肘部和腕部画了一下手镯,并在背景上添加了她手里握着的裙子的暗示,不然完全无法清楚地表现她是握着一条 裙子,另外发簪上的一只小鹦鹉发饰来去掉一些严肃的感觉,就是这样……我希望你喜欢这个短小的流程教学,并在某些地方对你有所帮助,快乐地画吧。

女王暗杀者
原教学出自CGArena网站,原始链接如下:
http://www.cgarena.com/freestuff/tutorials/photoshop/royalassassin/index.html


推荐相关中文教程

场景美术绘画进阶教程 光影渲染篇
本教程作为场景概念设计绘画方面的进阶教程,着重讲解了如何应用自定义的Photoshop笔刷和素材,讲解照明与场景绘画的关系,光线的反射定律,场景构图的固定模式,如何使用进行概念设计的创意思路方法,以及使用案例来讲解如何按照游戏项目的需求完成一个场景的绘画过程。电影MATTER PAINTING基础实战案例教学
马良老师将通过一个精美的实例,来教你如何使用Photoshop结合After Effects软件完成动态Matter Painting场景的制作,从而带你踏入专业MP行业的大门。场景概念设计实战教学之玉门关场景绘制
本教学将通过一个从零开始的玉门关场景绘制案例,带你了解如何进行场景概念设计。手绘游戏特效制作实用案例教程 闪电篇
本套教学使用具体的案例,演示了多个闪电类手绘特效的绘制流程,专门针对手游,2D游戏,手绘影视动画的液体特效制作需求设计.场景美术绘画基础教程 中国建筑篇
场景绘画和设计是漫画绘画,游戏设计生产环节中不可或缺的一环,本教学将从最基础的原理开始,教授用户如何理解和学习场景绘画,如果把握场景绘制的设计技巧,讲解场景如何控制透视,从基础的几何体开始学习空间的管理和建筑的摆放。人物角色表情表现绘画教程
本套教程从人类基础的简单表情入手,讲解不同种类的笑容,焦虑,生气,愤怒,咀嚼,吃惊,惊恐,沮丧,哭泣等等不同的表情是如何表现的,帮助学习者能够通过夸张生动的表情变化理解人类丰富的表情绘画所能传达出来的含义。构图绘画完全教学
本套课程的内容重点是学习绘画艺术的构图规律和方法。在绘画学习过程中,构图是一个重要的组成部分,学习它对于提高绘画练习和创作水平有显著的促进作用。特指纯艺和插画,海报。艺用人体解剖实用教学 下集 四肢篇
本套“四肢篇”教学是王九斤老师的《艺用人体解剖使用教学》系列教程中的下集部分,主要讲解了四肢的结构绘画要点,以及部分人体动态的基础讲解。


推荐课程


推荐教程

0回复女王暗杀者的绘制流程"