
本教学为翻译教学,
转载请注明来自aboutcg.net,以及注明翻译者
原教学出自CGArena网站,原始链接如下:
http://www.cgarena.com/freestuff/tut…war/index.html
[B]作者: Jessada Sutthi, Thailand
个人网站: www.jessada-nuy.deviantart.com
翻译:CWWS (aboutcg.net)请尊重互联网道德,转载请注明转载出处和翻译者,谢谢!
Making of Angel of War
战争天使的绘制流程

Introduction
简介
My favorite drawing is fantasy, so this project I choose to present in my way.
我喜欢的绘画主题是幻想,因此这个项目我选择用我的方法来呈现。
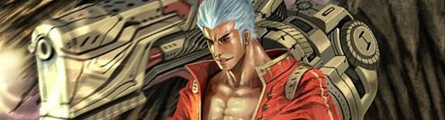
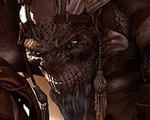
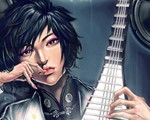
In my concept I like to combine Asian style and Mechanic. This picture is of Angel warrior. He is the solider of heaven to protect human from devil. And he obeys only GOD. For this artwork my inspiration was from game such as Final Fantasy 7.
在我的草稿里我希望将亚洲风格与机械师的感觉结合起来,这是一张关于天使战士的图片,他是天堂保护人们远离恶魔的战士,他只服从于上帝,我对这张图片的灵感来自于类似Final Fantasy 7.(最终幻想7)这样的游戏.
Sketch Idea
草稿的想法
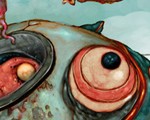
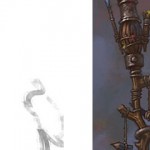
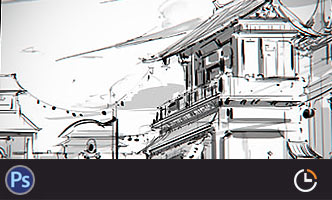
In this step when I have theme in my mind, I need to bring my imagination on canvas. So let’s do it! I start doing quick sketch for seeing the composite, direction and design. But nothing fix in description.
在这个阶段,我脑子里有一个主题,我需要把想象呈现在画布上,于是让我们开始吧,我开始快速地速写来决定构图,方向和设计,在这个阶段不需要修正什么。

orking on Coloring
使用颜色来工作
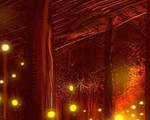
1) After doing the sketch I used Photoshop7 for painting and convert into RGB color mode, resolution 300 dpi. In this progress I quick paint to find suitable palette. Try to zoom out often. Don’t be impatient to fill detail because if the composition is not good, it must take the long time to solve this problem. Now I got my favorite color that is blue, yellow (cream), orange for main color.
1)画完草稿之后,我使用Photoshop7把图转化为RGB模式,300 dpi分辨率,并开始绘画,在这个过程着呢个,我画得很快,来尝试发现合适的调色板,经常把画面缩小,看一下整体感觉,这个阶段细节并不重要,因为如果整 体构图不好的话,你必须要花很长的时间来解决这个问题。现在我得到了我喜欢的颜色,就是蓝色,黄色(奶油色),橙色作为我的主色。

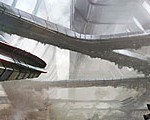
2) When I finished the quick painting. Then combine, merge the layers for preparing the real painting. After that I cleaned the entire outline by round brush. At that time I determine the direction of light and paint to make volume of object. At some parts I use flip canvas horizontal picture for checking figure. Fill the details softly. In the background I’ll run it to complete this progress because color of atmosphere has effect on the character. If I do the character before background then character will not suit for atmosphere. I use cloud photo to match paint and use Filter>Artistic>Paint Daubs to make realistic image to more painting work. Then use smudge tool paint to blend somepart. After that pen layer and adjust Blending Mode to be soft light for insert orange color.
当我完成了快速涂鸦,然后合并层,为真正的绘画作准备,在那之后,我使用圆笔刷清理了整个线稿,然后我决定光 源的方向,并画出物体的体积感,在某些时候我横向翻转画布来检查外形,轻柔地绘制细节。我会绘制背景直到完成为止,因为背景的颜色将会影响到角色本身。如 果我先画角色,后画背景,那么角色将会和背景不匹配。我使用云的照片来填充画面,并使用Filter>Artistic>Paint Daubs使得真实的照片有一点绘画的感觉,然后使用smudge tool(涂抹工具)绘画,使得某些部分混合起来,在那之后,调整一些层的叠加模式为soft light,来插入橙色。


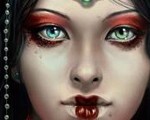
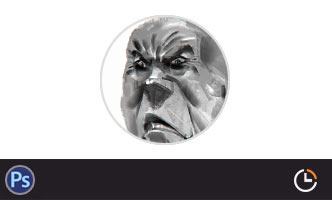
3) This progress uses a lot of time to fill the details. Zoom on the image to fill details in every part to get the clear object. And I fill the details until I am fully satisfied. In some parts of image use the reference image for help in painting. Depend on the experience and basic of art that you can practice. Now days you have many tools in programs but you should use specific tools that suits with you. When you are more skillful or experienced then try to use new method together.
这个过程使用了很多时间来加入细节,放大图片在每一个部分添加细节,获得一个清晰的物体,就这么添加细节,直 到我完全满意为止,在图片的某些地方使用参考图片帮助绘制,这取决于你的操作的艺术基础和经验,如今的程序提供很多种工具,但是你应该选取适合于你的那 些,当你更有经验和技巧之后,你就可以试着将新老方法结合起来使用。

4) At last, the final rendering progression. Adjust contrast in every color and add a few textures. Use motion blur filter in background, gun and symbol under feet. Then you have the completed artwork.
最后,最终渲染阶段,调整每一种颜色的对比度,添加一些纹理,对背景、以及脚下的符文使用motion blur filter(运动模糊滤镜),然后得到了完成的艺术作品。
Thanks and hope you enjoy the details of my project. Absolutely you can send comments on my E-mail address.
感谢并希望你喜欢我作品中的细节,绝对欢迎你给我写邮件提出宝贵意见

本教程完,谢谢大家


推荐相关中文教程

场景美术绘画进阶教程 光影渲染篇
本教程作为场景概念设计绘画方面的进阶教程,着重讲解了如何应用自定义的Photoshop笔刷和素材,讲解照明与场景绘画的关系,光线的反射定律,场景构图的固定模式,如何使用进行概念设计的创意思路方法,以及使用案例来讲解如何按照游戏项目的需求完成一个场景的绘画过程。电影MATTER PAINTING基础实战案例教学
马良老师将通过一个精美的实例,来教你如何使用Photoshop结合After Effects软件完成动态Matter Painting场景的制作,从而带你踏入专业MP行业的大门。场景概念设计实战教学之玉门关场景绘制
本教学将通过一个从零开始的玉门关场景绘制案例,带你了解如何进行场景概念设计。手绘游戏特效制作实用案例教程 闪电篇
本套教学使用具体的案例,演示了多个闪电类手绘特效的绘制流程,专门针对手游,2D游戏,手绘影视动画的液体特效制作需求设计.场景美术绘画基础教程 中国建筑篇
场景绘画和设计是漫画绘画,游戏设计生产环节中不可或缺的一环,本教学将从最基础的原理开始,教授用户如何理解和学习场景绘画,如果把握场景绘制的设计技巧,讲解场景如何控制透视,从基础的几何体开始学习空间的管理和建筑的摆放。人物角色表情表现绘画教程
本套教程从人类基础的简单表情入手,讲解不同种类的笑容,焦虑,生气,愤怒,咀嚼,吃惊,惊恐,沮丧,哭泣等等不同的表情是如何表现的,帮助学习者能够通过夸张生动的表情变化理解人类丰富的表情绘画所能传达出来的含义。构图绘画完全教学
本套课程的内容重点是学习绘画艺术的构图规律和方法。在绘画学习过程中,构图是一个重要的组成部分,学习它对于提高绘画练习和创作水平有显著的促进作用。特指纯艺和插画,海报。艺用人体解剖实用教学 下集 四肢篇
本套“四肢篇”教学是王九斤老师的《艺用人体解剖使用教学》系列教程中的下集部分,主要讲解了四肢的结构绘画要点,以及部分人体动态的基础讲解。


推荐课程


推荐教程

0回复如何使用ps绘制战争天使"