翻译 Zivix(ABOUTCG)
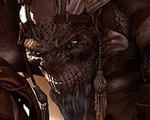
This model was inspired by the Mass Effect game universe. My first idea was to create a new character for an online challenge, so using ZBrush I tried to sketch a few ideas in 3D.
这个角色的灵感来源于游戏<质量效应> 我打算参与一个在线社区的挑战活动,所以我用ZB制作一些草图.
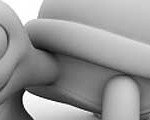
I started to sketch with a simple base mesh in ZBrush trying to find the overall idea for the design. At this stage I just used simple brushes in ZBrush such as the Move and Standard brush. I try to keep everything within one Subtool until I have found the design that I like. During this stage I usually change my mind a lot!
我开始用一个简单的基础网格在ZBrush中试图找到整体设计理念。在这个阶段我只使用简单和标准的笔刷。我尽量保持在同一个subtool上操作,直到我发现我喜欢的设计。在这个阶段我通常改变主意很多!
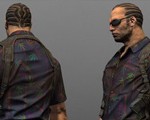
After I had found a good shape I started to refine the model by breaking it into many Subtools and adding new pieces that completed the main idea. I try not to go crazy with details at this stage, because everything will have to be redone from scratch later. As soon as I have the main idea and the overall shape of the design I stop using ZBrush (Fig.01 – 02).
当觉得找到不错的大型时,我开始吧模型细化,将模型分解成很多subtool或者增加更多细节。这时我试着不去疯狂的添加细节,因为一切都将从头开始重新设计之后。大型出来以后,我将使用别的软件细化(图01 – 02)。

Fig. 01
Fig.02
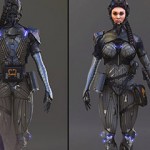
Once the sketch is ready I use the decimation master and import the model into 3ds Max to be used as a guide to create the final model. I generally use new objects to build everything but some things are faster using retopology tools in 3ds Max and ZBrush. In this instance I created some simple geometry and retopologized them to build the shoulders and legs, after which I refined and finished them in 3ds Max. At the end of this stage the entire model was done (Fig.03).
一旦草图已经准备好了我使用减面插件,并导入模型到3 ds Max作为一个基础大型来创建最终的模型。我通常使用retopology工具在3 dsmax和ZBrush中创建新的模型。在这个实例中我创建了一些简单的几何和重拓扑她的肩膀和腿,在这一阶段的最后完成整个模型(图03)。

Fig.03
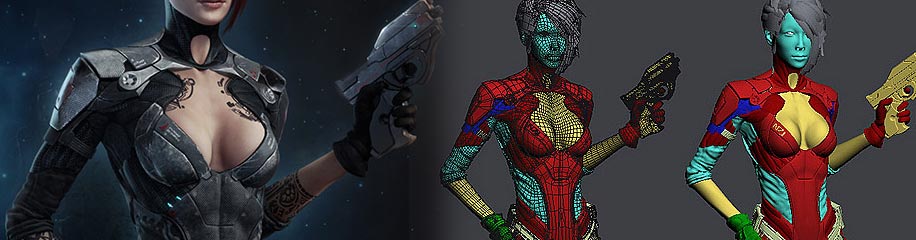
When the model was complete I opened the final model in 3ds Max along with the UVs and organized them into a basic layout, one for head and eyes, one for the torso, one for the skin and one for the legs and hair (Fig.04).
当模型是完整后,我会拆分UV将不同的部分整理到不同的UV布局中去,一个用于头部和眼睛,一个用于躯干,一个用于皮肤和一个用于腿和头发(图04)。
Fig. 04
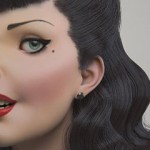
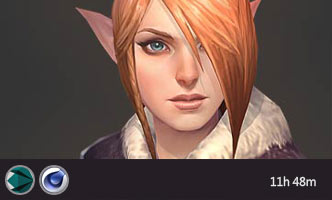
For the head I used 3ds Max to create a base mesh and ZBrush for the final sculpt. I used references from a few Asian actresses like Lucy Liu and Bai Ling. It’s really important to break the symmetry at this stage, even if it’s subtle (Fig.05).
我在max制作好的低模基础上雕刻出头部的细节来。我使用引用一些亚洲女演员刘玉玲和白凌的参考。重要的是这里我们可以做到非对称来使它的微妙的变化(图5)。

Fig.05
With the modeling and UVs finished it was time to go back into ZBrush and add detail. This time I used some specific brushes in ZBrush to create the cloth and metal scratches. This is a fast and easy stage of the project, because on this character almost everything had already been built in 3ds Max.
建模和UV完整了,是时候回到ZBrush和添加细节。这一次我使用一些特定的笔刷在ZBrush创建布和金属划痕。这是一个快速和容易的阶段,因为这个角色几乎一切都已经在3dsmax做好了.
Following on from this I added a few colors in ZBrush using Polypaint which I would use later as a guide to create the final textures in Photoshop. I re-imported the model from ZBrush into 3ds Max again and exported the Normal and Displacements maps from ZBrush. It’s important to create as much detail as you can on the topology of the model in this kind of project in order that the Displacement and Normal maps are reserved for the small details. This way the final model will be ready for production. I usually use a mix of Displacement and Normal maps. I use Displacements maps with the Displacement modifier in Max to add small changes to the topology and Normal maps for the small detail
enabling a faster render at the end.
我在ZB中为模型添加大体的颜色,这是为了帮助我指示在PS中的贴图细节位置,同时我从ZBrush中输出了相应的置换贴图和法线贴图,这能帮助我们添加细节,我通常会混合着使用置换和法线贴图,置换贴图用来体现模型的细节变化,而法线贴图用来体现模型表面的细节效果.
I used the color guides from ZBrush to create the final textures in Photoshop using a combination of hand painting and photos. A Diffuse, Specular and Bump map were created for each layout. ZBrush was used again at the end to fix seams and make a few color corrections. When not making models for games I usually don’t bake any shadow or light information onto the textures (except for an Ambient Occlusion map that I generate in 3ds Max). I create the realistic final effect using shaders, lights and render settings.
我是用ZB输出的色彩参考来在PS中完成贴图,使用到手绘和一些照片,每套UV都有一张DIffuse贴图,一张高光贴图,和凹凸贴图,使用ZB来修理接缝和色彩变化,一般来说我不会为非游戏使用的贴图添加烘焙的光影,当然AO还是要的. 灯光无需烘焙,因为可以创建真的灯光来渲染.
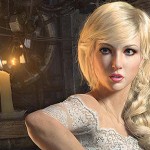
I created the hair using planes that incorporated Diffuse, Opacity, Specular and Bump maps, commonly seen in game models (Fig.06). The shader and modeling in this case helps to create a realistic look. I usually create six plane variations in one UV layout and organize the planes on the head, always using hair references as a guide.
我是用了面片贴图来制作头发,分别有Diffuse, Opacity, Specular and Bump贴图,和制作游戏角色使用方法类似,我通常制作6个不同的UV部分,用来给所有的头发贴图.

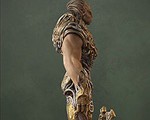
After this I add a new Edit Poly on top of all the objects and worked on her pose (Fig.07). I usually do this in ZBrush, but in this case I achieved it by way of max pivots.
之后我通过添加一个poly修改器来为角色摆姿势,通常我会用ZBrush 这么干,但这次我用的是max.

Fig. 07
The lighting in this scene involved four simple point lights, one main light, two fill lights (with cold and warm colors on each side) and one big backlight for SSS.
The model was rendered in V-ray.
在这个场景的照明涉及四个简单的点光源,一个主要的光,两个补光灯(与寒冷和温暖的颜色在每侧)和一个强的,针对对SSS背光。
最后使用vray渲染.


推荐相关中文教程

Vray for maya高级案例商业渲染流程教学
本套教程是vray的全案例流程教学,教程使用三个具有代表性的案例演示了vray的渲染参数设置经验和技巧,同时讲解了如何在实际的工作中使用这些参数来进行渲染的优化和质量的平衡。教程的内容从实际工作经验出发,详细的演示了:合理光源的布置原理,多光源合并调节,多通道渲染与合成,多象限UV的设置与渲染等高级技巧。Vray for Maya完全教学
本套教学选择最重要和最常用的核心功能作为讲解对象,所有内容占到了vray for maya全部功能的80%—90%以上。教学的目的是让学员能够加深对vray的理解,熟悉常用的vray渲染技巧,而不仅仅是记几个常用的参数。教学中很多软件原理和技巧应该是首次在vray for maya中文版教学中披露,而这些东西在帮助文档上是没有的,各位学完之后应该会打下较为扎实的软件使用基础。3DSMAX动力学特效实战教学
本套教学将通过24章实例教学,来向你详细讲解3DSMAX的动力学特效在电视包装与广告中的应用。3DSMAX国外粒子案例效果解析
本教学通过27个实战案例,教您如何用3DSMAX结合ParticleFlow本身以及扩展的ParticleFlow Box 1、Box 2、Box 3、功能包,结合Vray渲染器,来制作流行的广告和电视包装中的粒子特效效果。无论是常见的粒子聚合,分散,动态粒子替换,粒子矩阵,粒子动力学,本套教学都有相应的案例。3DSMAX国外流体案例效果解析
本教学通过20个实战案例,教您如何用3DSMAX结合Realflow,FumeFX, ParticleFlow插件,来制作流行的广告和电视包装中的流体效果。无论是常见的液体,烟雾,流体碰撞,沙粒变化,水墨表现,本套教学都有相应的案例。2.5D商业游戏场景制作教程 进阶篇
在本教程中,Freeyy老师将从零开始,向你讲解如何根据确定的主题进行前期准备,随后建模,绘制贴图,制作材质,最后再进行细节调整,完成一个商业游戏级别的2.5D场景画面。Mentalray for max实战教程
本教程共包含超过42小时以上的视频教学内容,共18章 132课,通过大量实例,详细讲解了3ds Max平台下的Mental Ray1渲染器的使用基础和实战方法。是一部非常完整详细的3dsMax版的Mental Ray渲染器的教学.网游角色制作女精灵实战教学
本教学以一个AAA级网游女精灵角色为案例,向您展示如何完成她的模型,UV,和贴图绘制。教学使用的软件主要是3ds max和 bodypaint, 其中建模和UV使用3ds max完成,贴图绘制在bodypaint和 PS中完成。


推荐课程


推荐教程

0回复质量效应风格写实CG角色制作解析"