Making Of ‘Betty’
贝蒂的制作
By Lucas Falcao
作者:卢卡斯·法尔考
原文出处:http://www.3dtotal.com/
翻译:Aniraiden(本站翻译小组成员)
Software used: 3ds Max, Photoshop
使用软件:三第艾斯马克思,否头笑胚(骗人你明明还用了blender…)

Lucas Falcao breaks down his workflow in creating this Maly Siri-inspired image of Betty Von Notty.
卢卡斯·法尔考 将他的以Maly Siri的插画产生灵感而创作的作品Betty Von Notty的制作流程分解呈现。
卢卡斯·法尔考
卢卡斯·法尔考已经制作CG模型和贴图将近4年了,参与诸如动画,广告,建筑和游戏的项目。他现在在HalStudio工作。
个人网站:http://blog.lucasfalcao.com
Introduction
介绍
In this Making Of article, I will talk a little bit about the processes I used to create the 3D adaptation of a drawing from Maly Siri. I will talk about the techniques and tools that I used in each step and share some tips and tricks that I commonly use in my workflow.
在这个制作讲解中,我将要讨论一些我创作Maly Siri的插画的3D作品的流程,我将要讲解一些我每个步骤里使用的技术和工具,也会分享一些我平时工作中使用的一些小技巧和小花招。
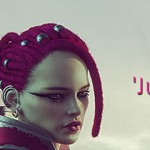
The inspiration for this work came from one of the beautiful drawings made by Maly Siri. Maly is a traditional artist that does illustration, some of which are pin-ups. The drawing in particular that caught my attention was a pin-up called Betty Von Notty, which I thought would be very interesting to put into 3D.
这件作品的灵感来源于Maly Siri的一幅插画。Maly Siri是一个传统插画家,也有一些性感女郎的作品。有一幅特别吸引我的女郎画叫做Betty Von Notty,我想,把她做成三维的一定会非常有趣。
So this is what I used as my concept art and guide to sculpting/modeling. I also did research about pin-ups just to know a little bit more about that.
所以这就是我使用的设定图和建模雕刻的参考。我也搜了下性感女郎来更多的了解了一下。
Modeling
建模
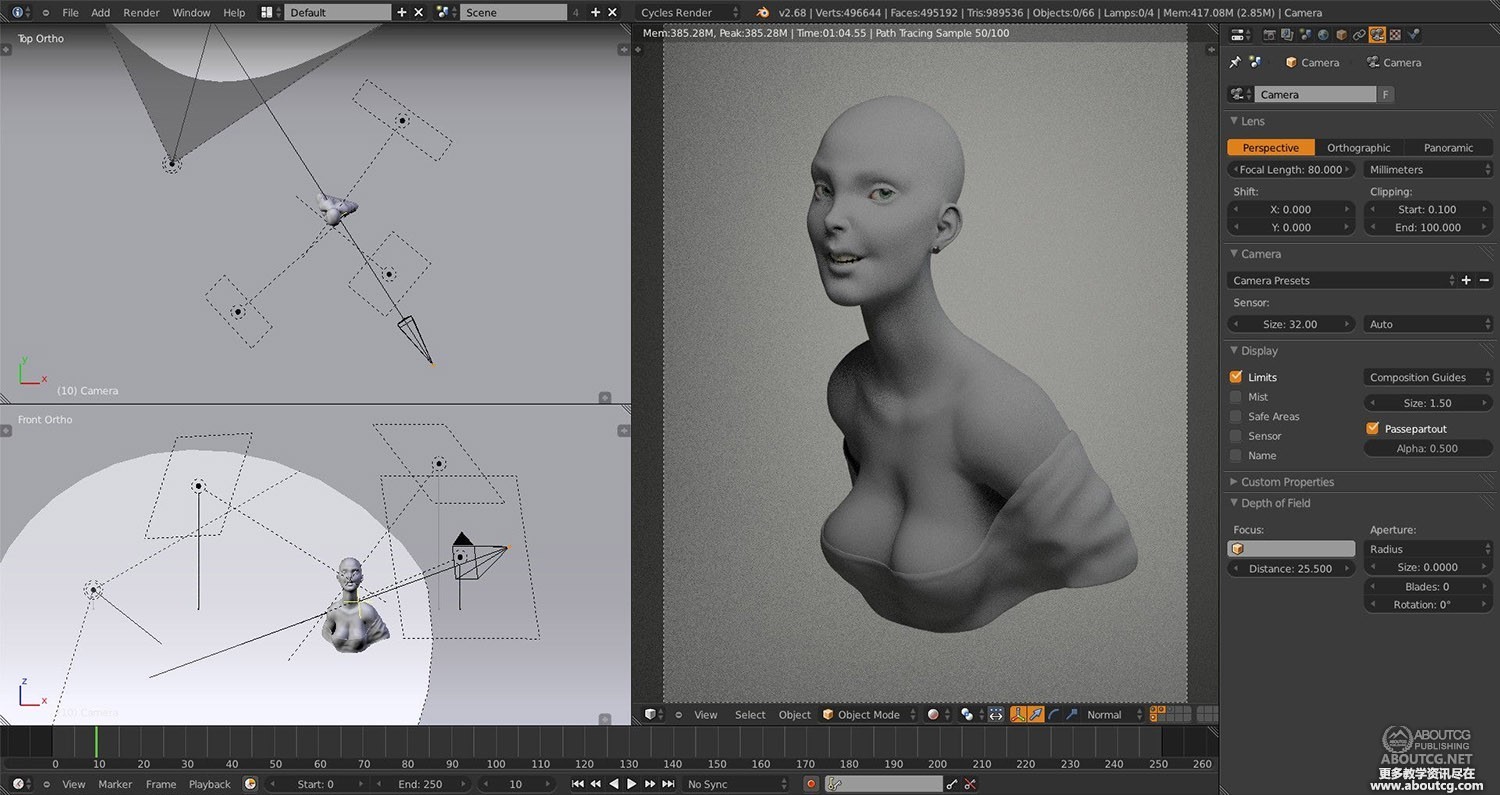
To start modeling Betty in Blender, I split the 3D view into two and in one of them I used a camera with the drawing in the background, on which I tried to match the perspective of the drawing with the base mesh I created before.
开始在blender建模之前,我将3D师徒分成了两个,其中一个我将摄像机的背景设置为了那幅画,这样我就可以依据我之前创建的基础模型来对位画的透视角度。
Then I started sculpting using the dynamic topology, which affects the subdivision as needed while you sculpt, very similar to DynaMesh in ZBrush. After sculpting the overall forms, I did the retopology and worked more on the similarity of the drawing with the sculpt tools until I was satisfied.
然后我就开始使用物理拓扑工具雕刻,这个工具可以在你雕刻的时候自动为你需要细节的地方添加细分,与zbrush的动态网格非常像。在大体雕刻完之后,我做了重拓扑然后再在与图片的相似度上继续推敲,使用雕刻工具修改直到我满意为止。
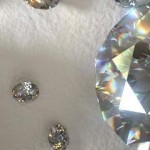
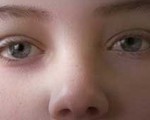
One of the crucial parts of modeling this character was the side look; from this angle the shape of the eyes change, mostly because of the volume of the cornea in the iris area.
创建这个角色的关键点之一是侧面观看的姿势,从这个角度眼睛的形状会发生透视变化,主要是因为角膜的体积和虹膜的区域。
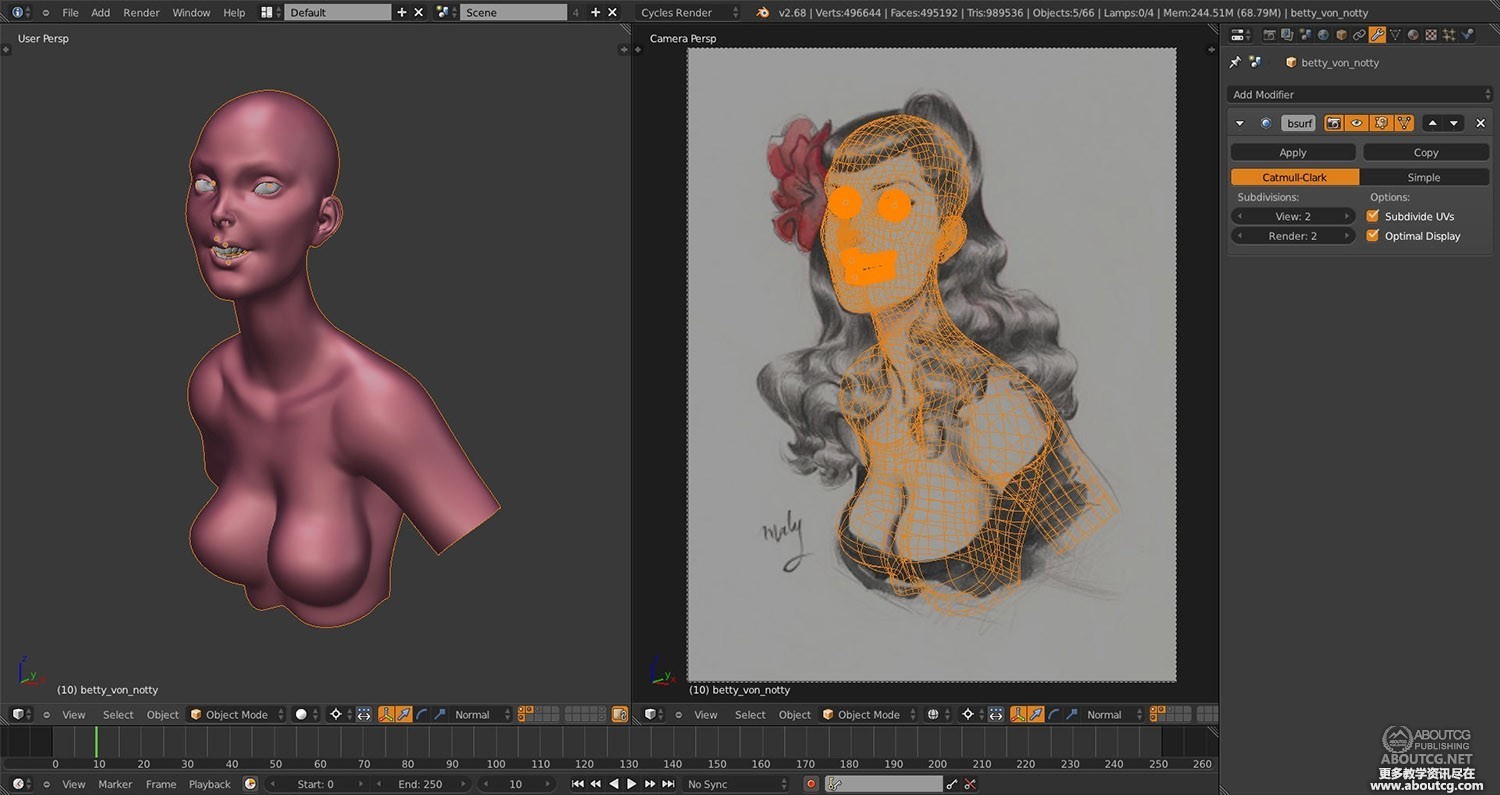
Using the camera to sculpt a likeness
使用摄像机角度雕刻相似模型
hair
头发
One of the big challenges in this work was to create the look of the hair. Maly’s drawings have a lot of subtle details, especially in the hair, which in my opinion is a very strong part of this particular character.
这个作品中最大的一个挑战就是制作头发。Maly的画中有很多的小细节,尤其是头发的部分,在我来看是这个角色非常重要的一部分。
To create the hair of Betty, I used the hair particle system. The way it works is by setting a main number of strands that will be our guide to the children particles – so the key word here is organization. The main strands need to be very well placed and distributed on the head, so this way it will be much easier to comb and stylize the hair.
创建Betty的头发,我使用了头发粒子系统。它的工作方式是设置一个主要的引导线的数量用于引导子粒子-所以这里的关键词是组织。主引导线需要非常好的放置和分布在头上,这样才能更容易梳理出风格化的头发。
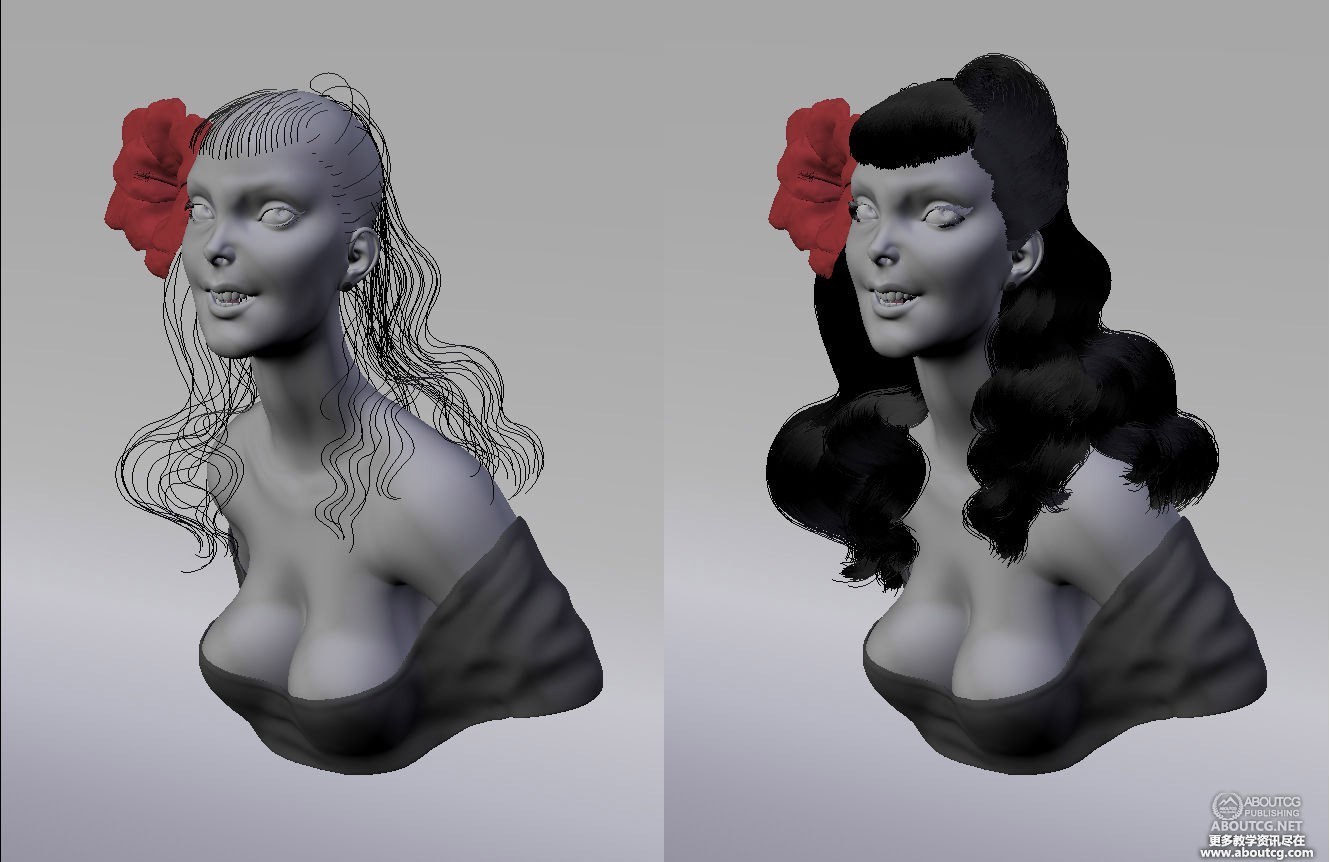
esting the hair styles to fit the concept
测试头发的风格是否符合原设
UV unwrap
拆UV
The UV step in Blender is a fairly simple and direct workflow. In organic models, usually the best way is to use Unwrap, which works based on the seams you need to create in your model, and then you can choose between two methods of unwrap: Conformal or Angle-based.
Blender里UV的流程是一个非常简单和直接的流程。在有机物模型里,通常最好用Unwrap,这是一种根据你在模型上标出的边界,然后选择两种之一的算法来展开的方式,两种算法是:保持和基于角度。
After that you can keep improving your unwrap using the stretch-draw method, which shows the distortion between the faces in the 3D view and in the UV editor. Pure red means very stretched and pure blue is without distortion.
之后你就可以继续使用stretch-draw方法提升你的UV,这种方法可以在你的3D视图和UV视图里显示贴图的失真。纯红色表示拉伸,纯蓝色表示没有拉伸。

Making the UV layouts in Blender
Blender里的UV制作界面
Texturing
贴图
In the texturing step I like to apply materials with basic colors and bake them into a texture. I did this here with the mouth, eyelids and overall color of the skin. This is fairly easy to do in Blender – you can just click one button. I also baked a Dirty Vertex Color, which is very useful to enhance your Diffuse map or to use as the start point for a Specular map.
贴图的步骤中,我喜欢将基础颜色的材质附上模型然后烘焙成贴图。这儿我就将嘴,眼睛,和整体皮肤都这么做了。在Blender里这么做非常简单–你只需按一个按钮。我也烘焙了一个脏污顶点色,作为你的漫反射和高光贴图的起点而言非常有用。
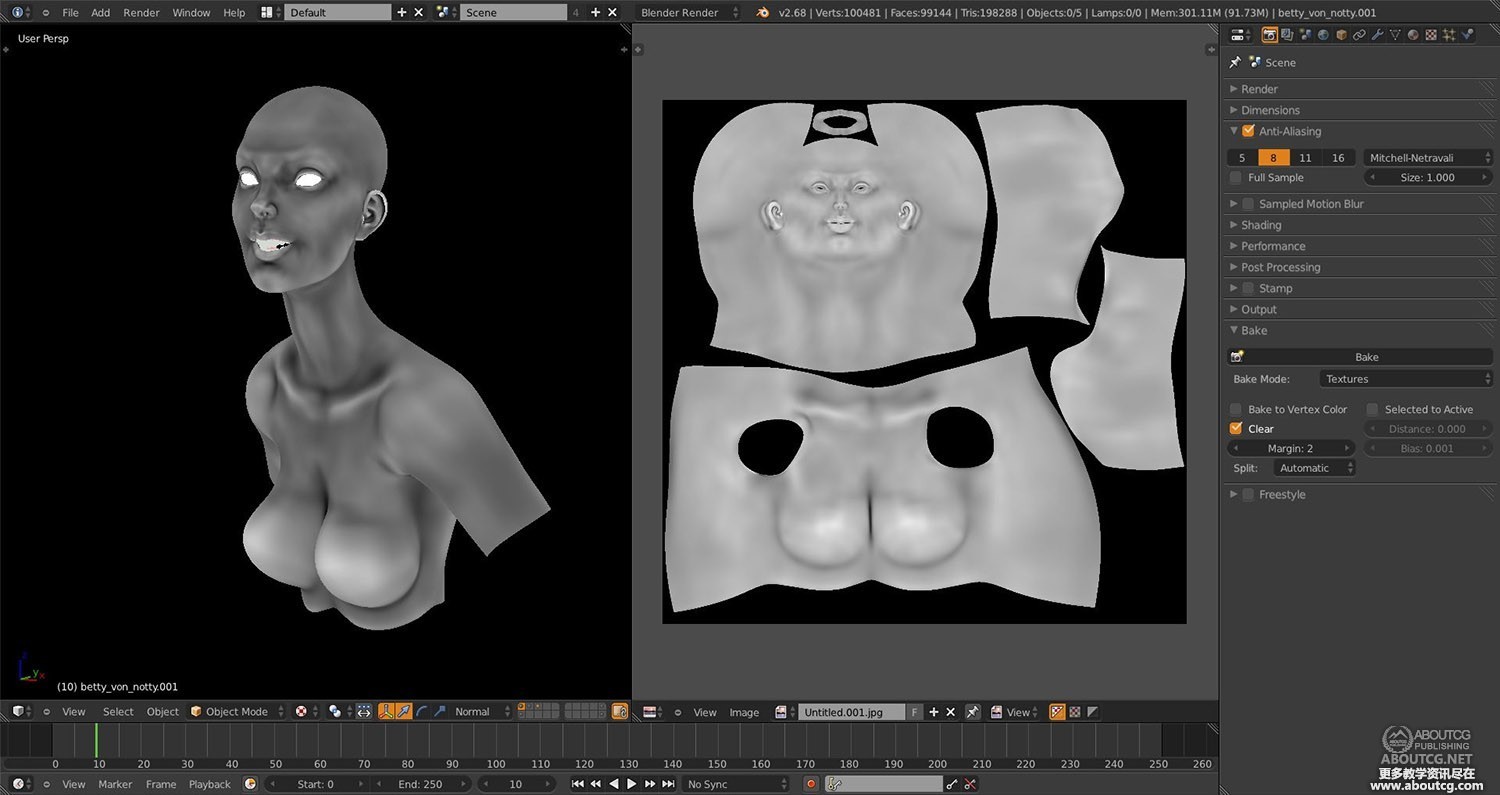
Dirty Vertex Color baked into the UV texture
将脏污顶点色烘焙至贴图
Painting in Photoshop
在否头笑胚里绘画贴图
So I have colored areas where I can make fast selections or masks to start painting in Photoshop.
所以我在photoshop将可以快速选择的地方开始涂上颜色。
Next, I start painting the color tones of the skin. I prefer to use solid color layers and paint onto the mask, so you can tweak the color later if needed. I painted the reddish tones, which are placed in the more fleshy areas like cheeks, tip of the nose and ears. Next the yellowish tones in the bony areas, like in the jaw line, arch of the eyebrow and nasal bone. I also added a little bit of purple around the eyes.
下一步,我开始涂皮肤的色调。我更喜欢用纯色图层涂到遮罩上。我在更多肉的比如脸颊,鼻子和耳朵的地方用了偏红色的色调。然后在颚线,拱形的眉毛和鼻骨出添加黄色调。我还在眼睛的周围添加了一些紫色色调。
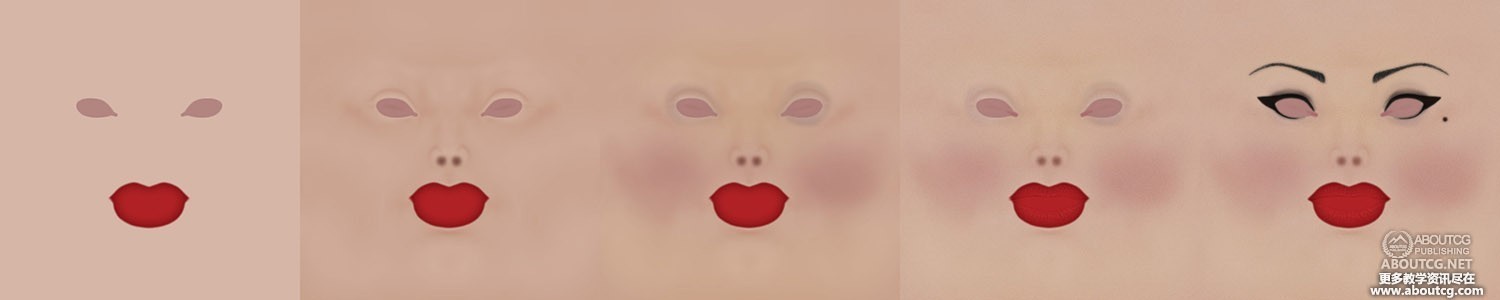
Creating the diffuse texture in Photoshop
在photoshop中创建漫反射贴图
Lighting
灯光
For lighting Betty, I used a three-point light, but with one more light turned to the background. This very common technique consists of a Key light, usually positioned about 45 degrees from your model, another Fill light on the opposite side also at 45 degrees, and a Rim light placed behind the model.
照亮贝蒂,我使用了一个三点光,但是还有一个光是对着背景的。这种非常常见的灯光包含一个主管选,通常在模型45度的地方,另一个补光在对面也是45度的位置,还有一个边缘光在模型后面。
I only used Area lights for this, except for the background – for which I used a Spot light. This last Spot light was used to create a kind of radial gradient effect that helped the model ‘pop out’. I like to set up each light separately first and then make fine adjustments with all the lights together.
我只使用了面光源,除了背景我用了聚光灯。这个聚光灯是为了创建出一个径向渐变的效果,帮助模型凸显出来。我喜欢先单独设置每一盏灯光,然后所有灯光一起调整。
The lighting layout used to enhance the model
用于增强模型效果的灯光布局
Shading
材质
I really enjoy the shading process in Cycles (a rendering engine built into Blender). The node-based system allows you to create very complex materials in a very intuitive way.
我实在是非常喜欢在Cycles(一个Blender的渲染引擎)里的材质流程。这个基于节点的材质可以用一种直观的方法创建出非常复杂的材质。
The SSS shader in this version of Blender was used in its very first development, but still works very well. The most import setting of the SSS is to adjust to the right scale, otherwise your model can look very waxy and you will lose a lot of detail. My goal here was to create a very soft skin look and yet retain translucency, so one trick I used was to preserve the volumes of her face while using SSS, mixing a falloff/colorramp above my diffuse texture with a blend mode set up to Multiply.
Blender这个版本的sss材质还处在非常初级的开发阶段,但是仍然效果很好。Sss最重要的输入设定是调节正确的大小,否则你的模型就会看起来很像腊,而且失去很多的细节。我的目的是创建一个非常柔软的皮肤表面,而且保留半透明的效果,所以我使用的一个技巧实在他的脸上使用一个sss和一个漫反射贴图混合,使用Blender的相乘模式。
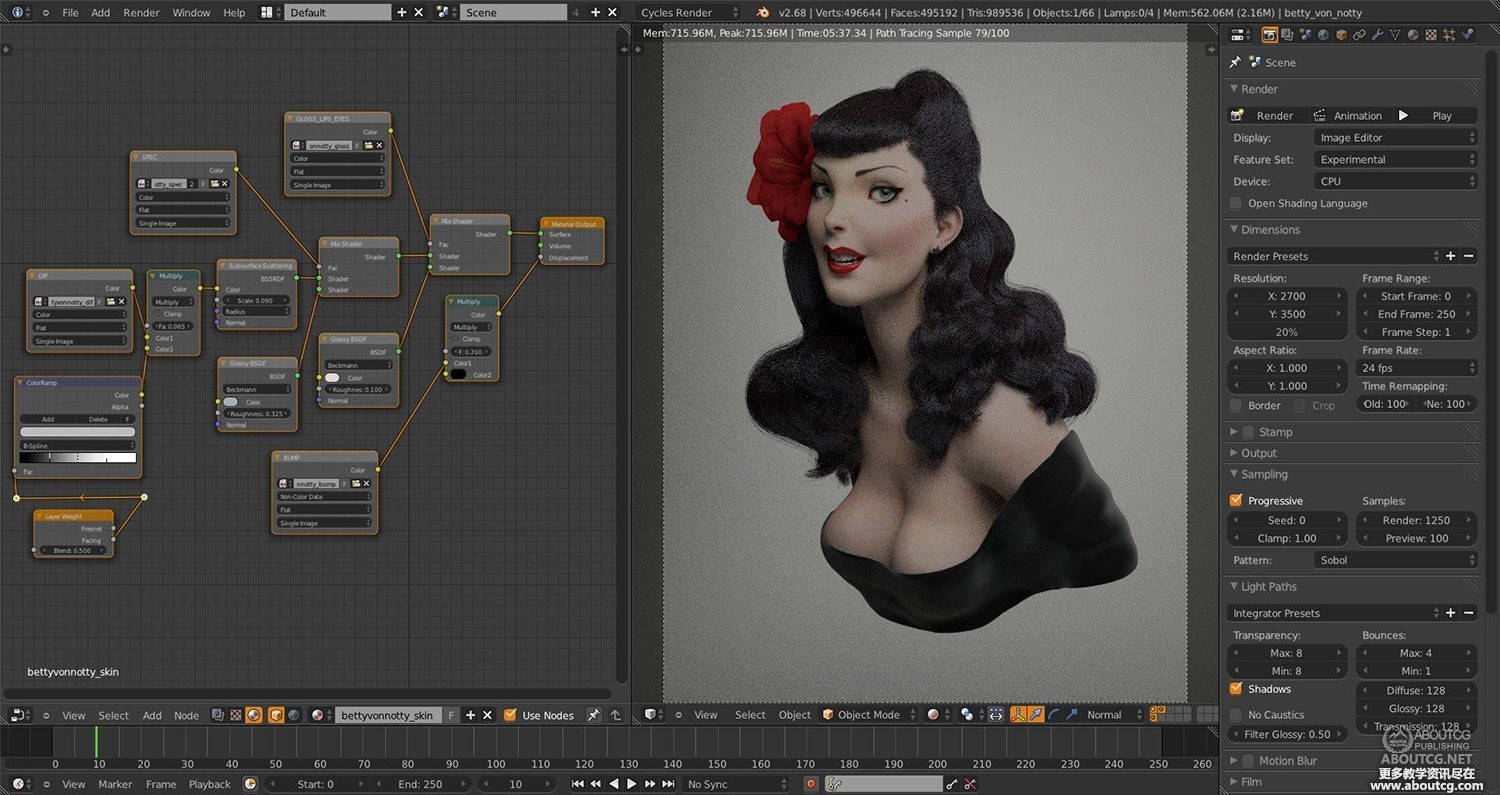
The render preview shows some of the shader settings
渲染预览和一些材质的设置
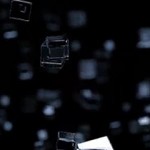
Compositing
合成
The post-production step was done inside the Blender Node editor. There, I did the compositing and put together all the render passes. My intention here was to emphasize the contrast of her hair and her clothing in relation to herself and the background, to accentuate her silhouette, and also emphasize the reddish tones, which I think is one of the charming parts in Maly’s drawing.
Blender的后期合成步骤是在节点编辑器的完成的。在那儿,我做了合成,把所有的渲染通道都组到了一块儿。我的目的是强调她的头发和衣服还有背景的对比,突出她的轮廓,并强调红色的色调,我认为这是在Maly的绘画中非常迷人的一点。
I used a Beauty pass, a ZDepth pass, an Ambient Occlusion pass and a Material Index pass.
我使用了一个Beauty通道,一个深度通道,一个AO通道和一个材质ID通道。
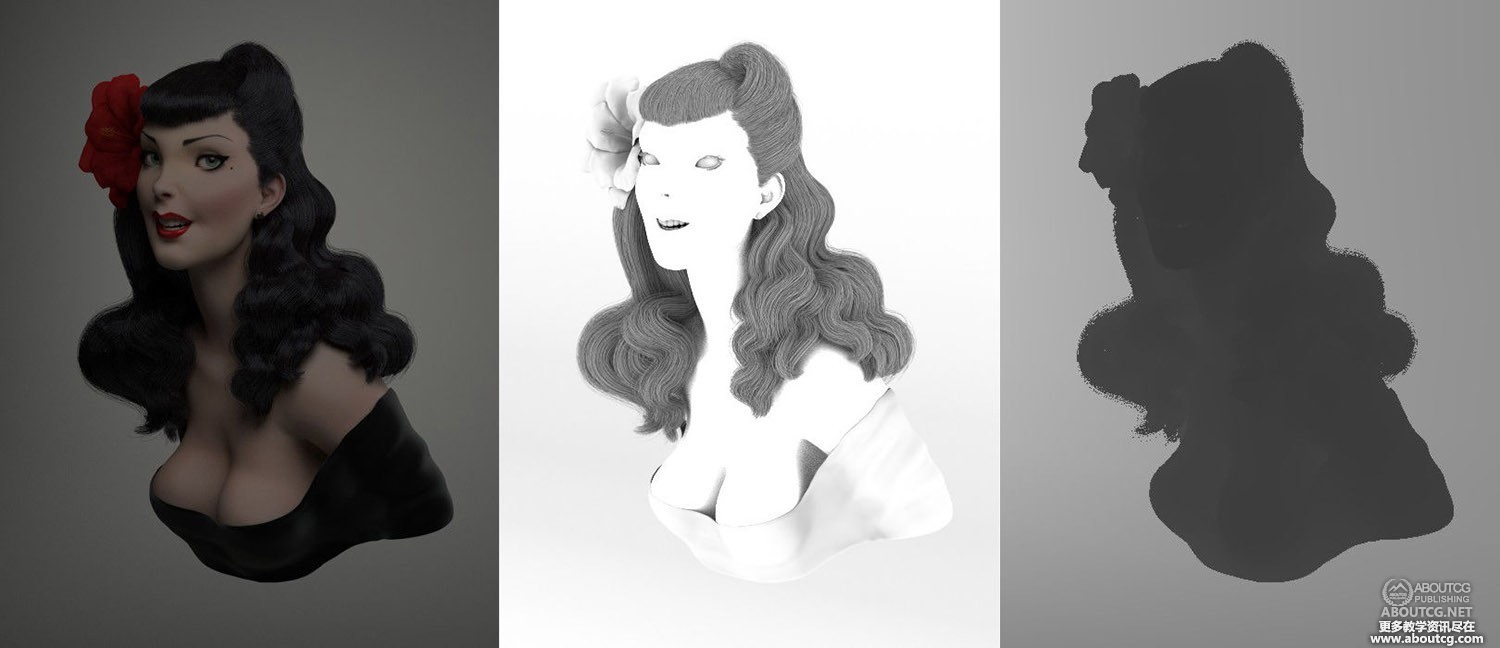
Various render passes used for compositing
各种用于合成的渲染通道
Compositing II
合成二
In the Node Editor, I mixed the Ambient Occlusion pass and also did the color grading. After that, I started creating some effects like depth of field using the Z pass, a little bit of chromatic aberration and vignette. I used the Material Index to tweak the colors of the flower.
在节点编辑器里,我将AO通道混合,而且做了颜色校正,我开始创建一些效果比如使用深度通道的景深效果,一点点镜头色散和晕影。我使用了材质ID通道来推敲花的颜色。
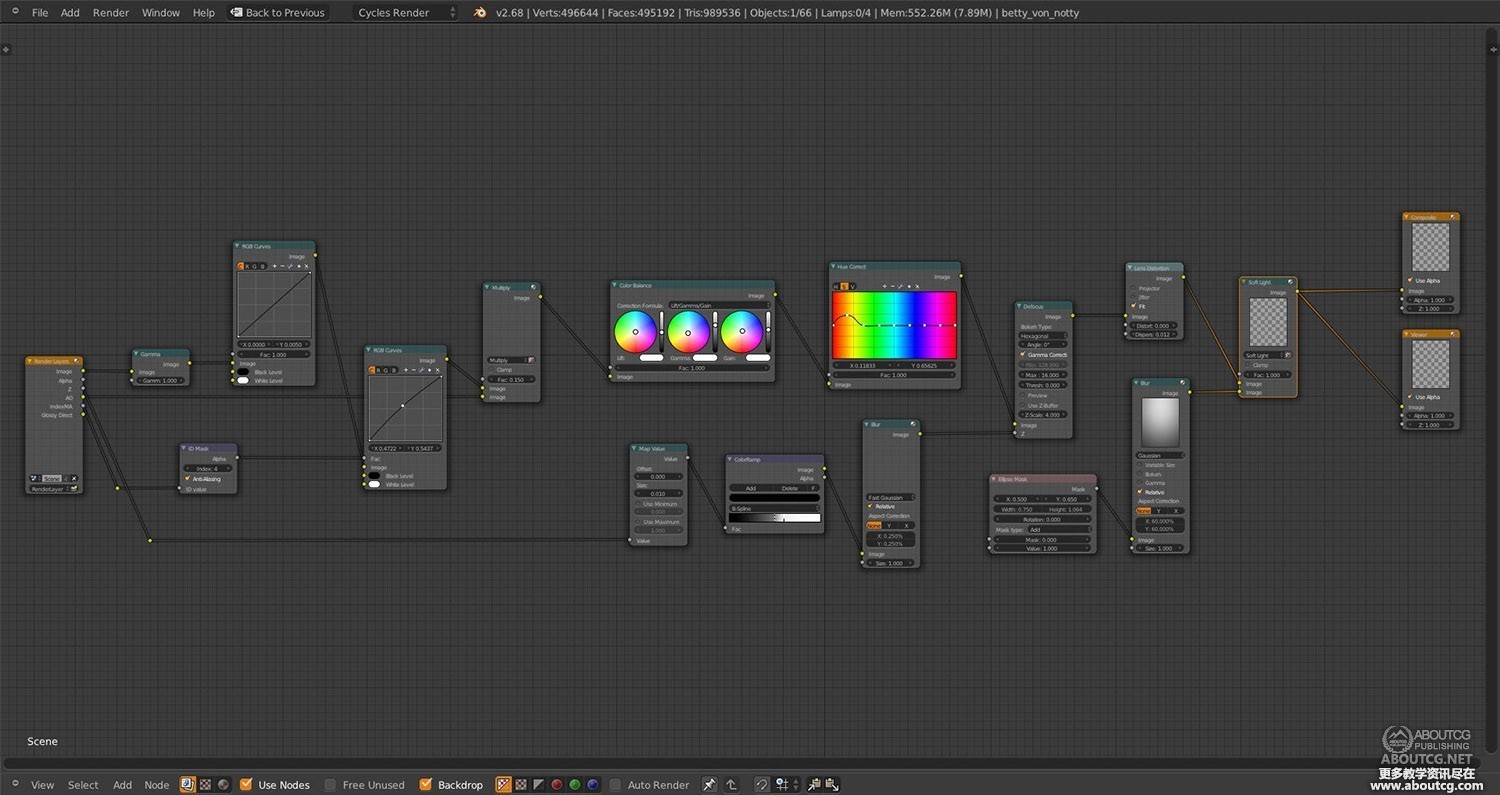
The compositing nodes setup
合成节点的设置
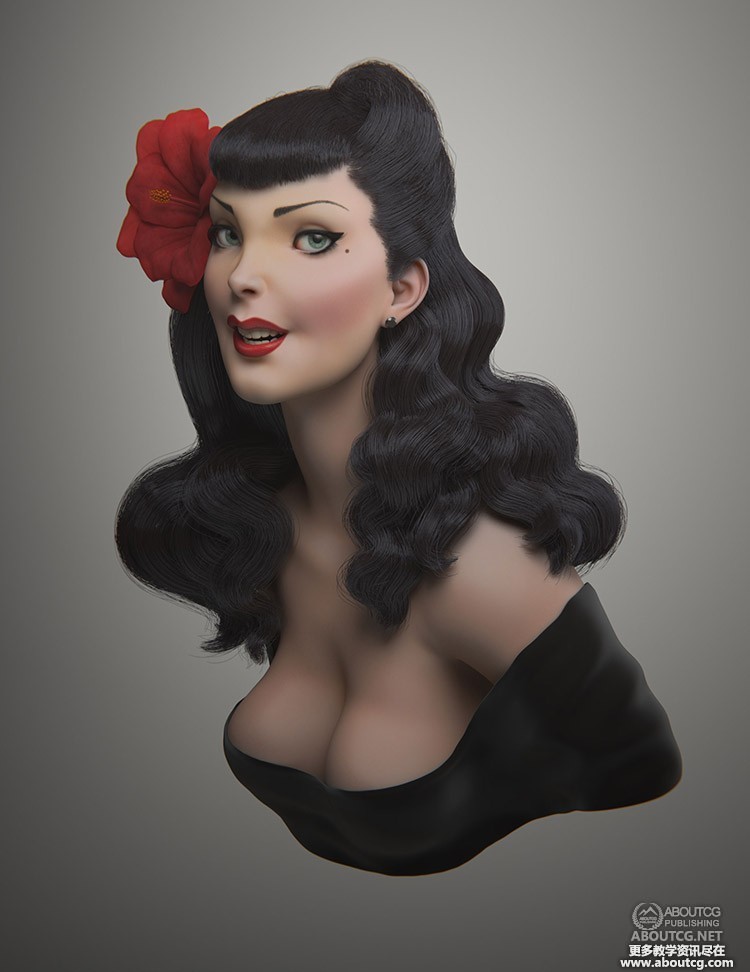
The final image
最后的图像
This is the final result!
这是最后的结果!

推荐相关中文教程

3DSMAX动力学特效实战教学
本套教学将通过24章实例教学,来向你详细讲解3DSMAX的动力学特效在电视包装与广告中的应用。VUE自然景观实战案例教程
本套教学是由MG录制。讲解分析了vue的海水材质问题,以及全中国首次以案例的形式讲解vue与maya的结合运用,如何将maya的角色动画导入到vue场景文件中做遮罩并且渲染。3DSMAX国外粒子案例效果解析
本教学通过27个实战案例,教您如何用3DSMAX结合ParticleFlow本身以及扩展的ParticleFlow Box 1、Box 2、Box 3、功能包,结合Vray渲染器,来制作流行的广告和电视包装中的粒子特效效果。无论是常见的粒子聚合,分散,动态粒子替换,粒子矩阵,粒子动力学,本套教学都有相应的案例。3DSMAX国外流体案例效果解析
本教学通过20个实战案例,教您如何用3DSMAX结合Realflow,FumeFX, ParticleFlow插件,来制作流行的广告和电视包装中的流体效果。无论是常见的液体,烟雾,流体碰撞,沙粒变化,水墨表现,本套教学都有相应的案例。2.5D商业游戏场景制作教程 进阶篇
在本教程中,Freeyy老师将从零开始,向你讲解如何根据确定的主题进行前期准备,随后建模,绘制贴图,制作材质,最后再进行细节调整,完成一个商业游戏级别的2.5D场景画面。Substance Designer贴图材质系统完全教学
本套Substance Designer教材是由AboutCG陶仁贤历经三个月的潜心研究,录制完成。从Substance Designer在游戏行业的流程入手,逐一介绍产品特点,界面,以及内置的200多个节点的原理和结构。并通过多个实例教材为您展示从零开始制作贴图,Substance Designer与Maya Anrold渲染引擎的互动,Substance Designer与Max互动、Substance Designer与Unity 3D引擎互动、Substance Designer与UnrealEngine3/UDK互动。Mentalray for max实战教程
本教程共包含超过42小时以上的视频教学内容,共18章 132课,通过大量实例,详细讲解了3ds Max平台下的Mental Ray1渲染器的使用基础和实战方法。是一部非常完整详细的3dsMax版的Mental Ray渲染器的教学.arnold for maya渲染器完全教学
Arnold渲染器是基于物理算法的电影级别渲染器,正在被越来越多的好莱坞电影公司以及工作是作为首席渲染器使用。与传统用于CG动画的Scanline(线扫描)渲染器(Renderman)不同,Aronld是照片真实,基于物理的光线追踪渲染器。


推荐课程


推荐教程

支持一下!