
本教学为翻译教学,转载请注明来自aboutcg.net,以及注明翻译者
原教学出自CGArena网站,原始链接如下:
http://www.cgarena.com/freestuff/tutorials/photoshop/firenergy/index.html
作者: Eugenio Garcia , Mexico(墨西哥)
邮件: artecnl@gmail.com
MSN:artecnl@hotmail.com
翻译:CWWS (aboutcg.net)
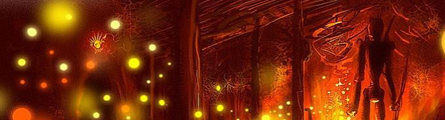
Making of Fire Energy by Eugenio Garcia, Mexico
火之能量元素的绘制

Introduction: I receive some mails to do this make up, the idea of this work is the concept of Energy, this is originally for a graphic design site, I am a designer, but I like a lot digital painting. I have this idea in my mind, to translate the fire energy to an image, and this came out, I didn’t do any sketch, for that I consider this a speed painting; (it took less than 2 hours to do).
简介:我收到一些邮件,要求我说明一下这幅画的制作流程,这个作品的主题是对 于能量的描绘,这原来是给一个图形设计网站准备的,我是一个设计师,但我非常喜欢数码绘画,我在脑子里有个想法,把火的能量用画面表现出来,因此有了这幅 作品,我没做任何的草图,因此我把它看作是一幅快速涂鸦,(这花费了2小时不到的时间)。
Tools: I used photoshop 7 and a wacom graphire 4 tablet, (the small one), my hardware specs are AMD Athlon 1800 512mb ram, and 17in. monitor
工具:我使用photoshop 7和wacom graphire 4绘图板(小的那种),我的机器配置是:AMD Athlon 1800 512mb 内存, 和 17寸显示器
Preparation: With the concept and idea in my mind I did small canvas size at 1264 x 550 pixels, since the image is for the web.
准备工作:脑子里有了想法之后,我新建了一个1264 x 550像素的画板,因为图画是为网站准备的(所以不需要太大)。
Beginning
开始
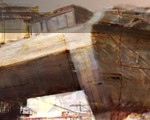
The first I do is to put a background color, the base color.
首先我放置了一个背景颜色,作为基础颜色

Then I chose my color palette and try to put only warm colors, with nice contrast.
然后我选择我的色块面板,试着只选择有着良好对比的暖色调。

I choose Dodge, sharpen and brush as my tools. I have some great brushes from Natascha Roeoesli (http://tascha.ch) and I used three of it in this image, but my base brush is the round brush, one with opacity controlled by pen and the another is 100% in opacity.
我选择加暗工具,锐化工具以及笔刷,我从Natascha Roeoesli (http://tascha.ch)那里得到了一些非常棒的比刷,并从中选择了三个来画这幅画,不过我的基础比刷还是圆形的,一个可以用过Wancom 笔来调节透明度,以及另一个是100%不透明的。

with some orange color and the dodge tool I put my light source
通过使用dodge(变暗)工具和一些橙色来定义我的光源位置

With my round brush I put the dark shapes and the main idea.
然后使用圆型笔刷来定义暗部的形状和主要的构图。

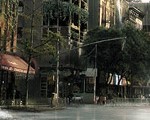
I start to put more light bounces, defining the shapes and the sketch of the
main character. I use some low opacity brush for the far trees.
我开始增加一些灯光的反射,定义形状,并绘制主要角色,对远景的树,我使用了一些低透明度的笔刷。


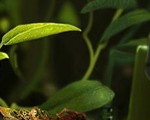
More defining and I use some tashas brushes for leaves and little trees.
然后我使用胡须状的笔刷来添加更多了树叶和小的树木。

I add some more leaves with tashas brushes and putting more detail on it.
我继续使用该笔刷添加更多的细节,并增加更多的树叶。

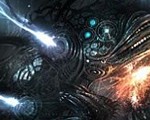
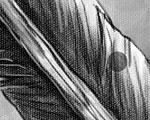
I use the smudge tool for the fire to make it more fluid.
我使用smudge(涂抹)工具来扭曲火焰,使它看起来更像流体。

Some great things happen when you use the sharpen tool, brings more details to things like logs and leaves, and some of the character details.
当你使用sharpen(锐化)工具时,能产生很奇妙的效果,给画面里的树木带来更多的细节,也能为角色添加细节。

I draw the little dots with a single touch with the round brush (thebackdrop is only for easy seeing).
我使用圆形笔刷,通过单击来画出一些小圆点,(黑色背景只是为了让你看起来清楚)。

Then I duplicate the layer and make some Gaussian blur in the down layer to add the bright effect.
然后我复制了圆点层,给它添加Gaussian blur(高斯模糊)特效,来模拟光晕的效果。

The paint is now with the dots and I put some noise (like 3 %) to make it more warm and atmospheric feeling.
现在画面里已经有了光点,我添加了一些noise(燥点)效果(数值设置为3%%左右),使它更加暖色调,并且更有环境的感觉。

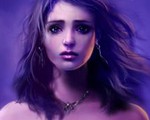
With the final image I play with the hue and saturation, bright and contrast. I used the sharpen tool to do some more final details.
对于最终的图像,我调节了色相和饱和度。亮度和对比度,使用锐化工具来添加一些最终的细节。

Hope you have enjoyed this making and if required any info then feel free to contact me in artecnl@gmail.com and in msn artecnl@hotmail.com . Thanks for seeing.
希望你喜欢这个制作流程教学,如果需要任何的帮助,请不要客气,通过邮件联系我artecnl@gmail.com,或着你也可以加我的MSN:artecnl@hotmail.com, 感谢收看。
本教程完,谢谢大家
这个教学对Speed Painting,快速涂鸦的流程是一个非常好的样本范例,你可以注意到作者是如何一步步设置他的绘画步骤地,作者的软件版本并不高,机器和绘图板也不是最好的,但是他在涂鸦时使用的方法是非常专业的,这也是我推荐这个教学的原因。
希望大家拿起笔,实际尝试一下,最好能把作品附在下面,让更多的人了解你学习后的成果,这也鼓励更多的人跟着教学练习,而不是看而不做,那样对学习提高就没作用了。
最后祝大家周末愉快。


推荐相关中文教程

电影MATTER PAINTING基础实战案例教学
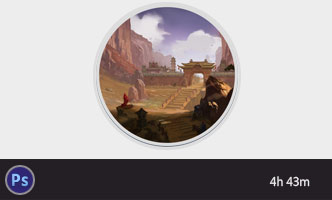
马良老师将通过一个精美的实例,来教你如何使用Photoshop结合After Effects软件完成动态Matter Painting场景的制作,从而带你踏入专业MP行业的大门。场景概念设计实战教学之玉门关场景绘制
本教学将通过一个从零开始的玉门关场景绘制案例,带你了解如何进行场景概念设计。构图绘画完全教学
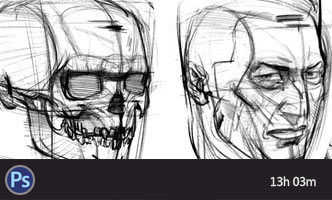
本套课程的内容重点是学习绘画艺术的构图规律和方法。在绘画学习过程中,构图是一个重要的组成部分,学习它对于提高绘画练习和创作水平有显著的促进作用。特指纯艺和插画,海报。艺用人体解剖实用教学 下集 四肢篇
本套“四肢篇”教学是王九斤老师的《艺用人体解剖使用教学》系列教程中的下集部分,主要讲解了四肢的结构绘画要点,以及部分人体动态的基础讲解。艺用人体解剖实用教学 上集 躯干篇
本套“躯干篇”教学是王九斤老师的《艺用人体解剖使用教学》系列教程中的上集部分,主要讲解了躯干的结构绘画要点,以及部分人体动态的基础讲解。


推荐课程


推荐教程

0回复火之能量元素的绘制"