
本教学为翻译教学,转载请注明来自aboutcg.net,以及注明翻译者!
原始链接:http://www.cgarena.com/freestuff/tut…me/index2.html
原作者:Florence Design Academy
翻译:Purplesun(aboutcg.net)
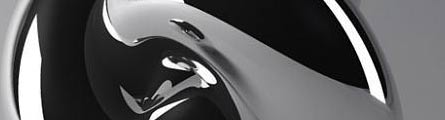
How to create Chrome Material怎样创建铬材质

Chrome is one of the most used materials in the Design field. This material needs only a few settings to be rendered in an optimal way. You can see many samples of chrome in the design gallery of the Florence Design Academy www.florencedesignacademy.com
铬在设计领域是经常被用到的材质之一,使用优化的方法你只需要做很少的设置就可以表现出这种材质质感,你可以在Florence Design Academy的设计画廊里面看到很多使用的铬材质的例子。Florence Design Academy的地址是www.florencedesignacademy.com
Let’s begin我们开始:
1.) You need a dark gray diffuse color (for a perfect mirror it should be black, but often a dark grey color has a better effect on chrome).
1.)你需要一个深灰色的漫反射颜色(如果是表现完美的镜像效果使用黑色会比较好,但在表现铬材质的时候最好还是使用深灰色)
2.) Now go to add glossiness and specular level (there are no fixed values, the correct effect is strongly depending by the light that you create. You can begin with the value 40 in both slots).
2.)现在添加光泽度和高光级别(没有固定不变的参数,正确的效果很大程度上取决于你创建的灯光,你可以把两个参数都设置为40作为初始值)
3.) Go to maps and assign to the REFLECTION map “RAYTRACE”. This will allow you to
have REAL reflections of other objects in the scene on this material. The value in the reflection slot should be between 85 and 100 (a mirror must have 100).
Very often you need to have a environment which reflects on your object to achieve a good rendering. A good reflection will give a touch of realism to your object and will describe better organic shapes. But what if we don’t have any other object in the scene that can reflect on our model?
3.)在贴图卷展览为反射贴图通道赋予一张“光线追踪”贴图。这样可以让你的材质获得真正的能够反射场景里面 其他物体的功能。反射强度设置在85到100之间(完全镜像是100)。通常为了获得较好的渲染效果,你需要为物体添加一个环境来获得较好的反射效果。好 的反射会为你的物体带来真实感并且能够较好的表现形体的轮廓。但是假如在场景里面我们没有任何可以反射到你的物体上的东西应该怎么办呢?

We will use a FAKE reflection. This kind of technique simulates to have a environment reflected on surfaces which in reality does not exist in your scene. In fact we will use a simple image to create a Fake reflection.
我们将使用模拟的反射效果,这种方法假装使用了一个在场景里面并不是真正存在的反射环境,实际上我们将使用一张简单的图片来创建这种假的反射效果。
After you have insert RAYTRACE in the reflection map you will see that the material editor is showing new settings. This are the settings of the raytrace panel (on the right side of the material editor you can see written RAYTRACE instead of standard). Like on the image below go to assign to the NONE button in BACKGROUND a BITMAP.
当你为反射贴图通道添加了光线追踪贴图后,你会发现材质编辑器显示出新的设置。这是光线追踪的设置面板(在材质编辑器的右边你会发现光线追踪的名字已经替换掉了原来的标准材质)。在背景栏的NONE按钮上添加一张位图。

After this step you will see that the material editor is showing you the settings of the Bitmap panel. Normally you must reduce the output amount of the fake reflection (this is the setting which will make more or less visible the image that you choose as fake reflection). To make the image “less visible” you must go to “Output” where in the “output amount” slot you must put a value which is a little bit smaller than 1 (for example 0,7). Normally the standard number 1 is too high as value.
经过上一步操作后,你会发现现在材质编辑已经显示为位图纹理的属性面板,通常你需要降低输出数量的值(这个设置会使你的模拟的反射效果增强或者减弱)为了让反射不那么明显,你必须在输出栏的输出数值栏输入一个小于1的数值(如0.7).通常1这个值太高了点。
 ‘
‘
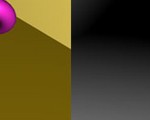
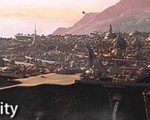
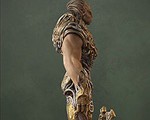
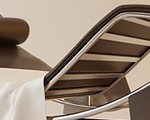
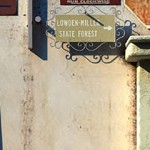
Pictures used as fake reflection for the rendering shown below
下面这两张图片就是用来作为模拟反射的。


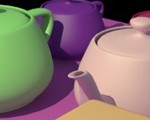
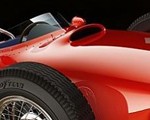
In this way you can obtain really very good reflection effects. Here below you can see a sample. On this image you can see the reflection of the gray environment + 2 white boxes + the fake reflection
使用这种方法你可以获得很好的反射效果。下面你可以看到渲染的效果。这张图片你可以看到作为反射的灰色环境和两个白色的盒子以及模拟的反射。


Tip1: Remember that with Mental Ray the fake reflection is NOT visible in the material slot as preview. You must make a test rendering to see the result.
提示1:记得如果使用Mental Ray渲染器来模拟反射的话,模拟反射在材质编辑器里面是不能被预览的,你必须测试渲染一下才能看到结果。
Tip 2: There are many ways to create Chrome. Another way to create Chrome is trough a RAYTRACE material (change standard with RAYTRACE in a new material slot). But the result is the same as in the standard material.
提示2:有很多的方法可以模拟铬材质,另外一种方法就是使用光线追踪材质(改变标准材质为光线追踪材质)单效果和使用标准材质是一样的。
Tip 3: A HDRI image can also used as a fake reflection. HDRI renderings will be explained in other Florence Design Academy tutorials or lessons.
提示3:使用HDRI图片也可以用来模拟反射环境,HDRI渲染将在另外一个Florence Design Academy得教学里面讲到。
Tip 4: If you want exclude an object from reflection: go to the chrome material, select raytrace that you have in the reflection maps slot. Click on the button LOCAL EXCLUDE. Now just select the objects that must be excluded from the reflection of the chrome material. This will make the selected object invisible in the Chrome material.
提示4:如果你想把一个物体排除在反射环境以外,在铬材质的属性面板里,选择连接到反射贴图上的光线追踪贴图,点击本地排除按钮,现在只需要选择需要排除的物体,这样选择的物体在反射的时候将不可见。
Tip 5: A mirror material is very similar to Chrome: Black diffuse color, no specular highlights and Raytrace 100% in the reflection map.
提示5:镜像材质和铬材质非常像:黑色的漫反射颜色,没有反射高光已经反射贴图里的100%强度的光线追踪。
You can find the informations for the illumination & render settings in other Florence Design Academy tutorials. I hope you have enjoyed this tutorial.
你可以在Florence Design Academy的其他教学里查到关于照明和渲染相关的信息。希望各位喜欢这个教学。


推荐相关中文教程

3DSMAX动力学特效实战教学
本套教学将通过24章实例教学,来向你详细讲解3DSMAX的动力学特效在电视包装与广告中的应用。3DSMAX国外粒子案例效果解析
本教学通过27个实战案例,教您如何用3DSMAX结合ParticleFlow本身以及扩展的ParticleFlow Box 1、Box 2、Box 3、功能包,结合Vray渲染器,来制作流行的广告和电视包装中的粒子特效效果。无论是常见的粒子聚合,分散,动态粒子替换,粒子矩阵,粒子动力学,本套教学都有相应的案例。3DSMAX国外流体案例效果解析
本教学通过20个实战案例,教您如何用3DSMAX结合Realflow,FumeFX, ParticleFlow插件,来制作流行的广告和电视包装中的流体效果。无论是常见的液体,烟雾,流体碰撞,沙粒变化,水墨表现,本套教学都有相应的案例。2.5D商业游戏场景制作教程 进阶篇
在本教程中,Freeyy老师将从零开始,向你讲解如何根据确定的主题进行前期准备,随后建模,绘制贴图,制作材质,最后再进行细节调整,完成一个商业游戏级别的2.5D场景画面。Mentalray for max实战教程
本教程共包含超过42小时以上的视频教学内容,共18章 132课,通过大量实例,详细讲解了3ds Max平台下的Mental Ray1渲染器的使用基础和实战方法。是一部非常完整详细的3dsMax版的Mental Ray渲染器的教学.网游角色制作女精灵实战教学
本教学以一个AAA级网游女精灵角色为案例,向您展示如何完成她的模型,UV,和贴图绘制。教学使用的软件主要是3ds max和 bodypaint, 其中建模和UV使用3ds max完成,贴图绘制在bodypaint和 PS中完成。


推荐课程


推荐教程

1回复怎样创建铬材质"