
这是AboutCG 成员 Zivix和Pumel的原创教学,原载于3D Total网站,咱也不能一直放老外的教学,也得自己发几个,呵呵。
英文版链接如下:
http://www.3dtotal.com/team/Tutorials_3/making_of_instanteous/making_of_instanteous01.asp
作者: 张烨(Zivix),罗子雄(PuMel)
个人网站: https://www.aboutcg.com
‘Making Of Instantaneous Eternal’
“瞬间永恒”这幅作品的制作

Reference & Concept:
参考和概念设计
We sought materials from movies, games and books in order to find out how knights looked in that period.
我们通过搜寻电影,游戏和书籍来试图发现在那个时代起事看起来是什么样子的。

We drew our concept art first, as it was then convenient for the following 3D work. We could also modify it quickly if we were unhappy with any of the original concept.
我们首先绘制了我们自己的概念设计稿,它需要便于被三维化,如果对任何原始的概念设计不喜欢的话,我们还可以快速地修改它。

Modelling:
建 模
We then created a low poly model with Silo. Silo is a very popular modelling software with good performance for the basic outward character.
然后我们使用Silo创建了一个低多边形模型,Silo是一个非常流行的建模软件,它对于基本外形的角色有着很好的执行能力。

We then took the low poly model into 3ds Max, where we set up simple bones and the controller. A complicated rig setting was unnecessary because we only wanted a fixed pose.
然后我们把地多边形模型导入3ds Max,,给它设置了简单的骨骼和控制器,我们不需要复杂的绑定系统,因为只是想为模型摆一个固定姿势而已。

We placed the character into the desired pose.
我们把模型摆成我们想要的姿势。

We created the flag using the cloth system in 3ds Max, instead of sculpting in ZBrush. As a result, the flag is more natural-looking.
我们使用3ds Max的布料系统创建旗帜,而不是通过在ZBrush里面雕刻来获得它,结果旗帜看起来非常的自然。

We then created more details for the model. We hoped for the final work to show extraordinary detail.
然后我们为模型创建了更多的细节,我们希望最终的作品能显示极致的细节。

We created an exquisite belt, buttons and armour. Carefully, we sculpted the pleats in the robe with ZBrush.
接着创建精美的皮带,按钮和盔甲,然后我们非常小心地在ZBrush里面雕刻袍子的褶皱。

We then divided the UV for the model. It was a very complicated task for such character. Fortunately, we found Unfold3d which divided the UV automatically – and fast. We classified the UVs. Each object ID was in token of a UV set, taken into Unfold separately.
然后我们开始为模型分UV,对于这样的角色来说,这是非常复杂的活,很幸运的是,我们发现Unfold3d可以自动化地展开UV,而且速度还非常快,我们调整这些UV,给每一个UV set赋予一个object ID,分别地导入Unfold展开它们的UV。

This image shows how Unfold divided the UVs automatically. After UVs were divided correctly, we baked the lightmap using Vray. We used Lightmap instead of UVTemplate because Lightmap can show a better and more old-fashioned appearance. We also created a Dirtmap with the plug-ins in Max.
这张图显示了Unfold是如何自动化地展开UV的,当UV被正确分好之后, 我们使同Vray烘培了灯光贴图,之所以使用Lightmap(灯光贴图)来代替UVTemplate(UV模板)是因为Lightmap可以更好地显示 一种老旧的外观,我们还使用Max的插件创建了一张污渍贴图。

After baking, we were then able to see the details of the model through the Self-Illumination material in Max.
烘培完之后,我们可以使用Max.的Self-Illumination自发光材质来显示模型的细节了。

Texturing:
贴 图
We used dirt maps from 3DTotal Textures: Vol.3 to finish the texturing stage. There were 72 pieced textures which had over 3000×3000 DPI, in total.
我们使用3DTotal Textures: Vol.3贴图库的素材来完成整个贴图步骤,总共有72张不同的贴图,以超过3000×3000 DPI分辨率被创建。

We then created the armour for the knight. First of all, we made a few chains. We rendered the Z channel using a camera from a vertical angle, then took a displacement map with this Z channel into Maxwell.
然后我们创建了骑士的盔甲,首先,我们只做了一些链条,使用一个垂直角度的摄像机渲染出它们的Z通道,然后把这个Z通道贴图赋予Maxwell渲染其德置换贴图。

Maxwell Rendering:
Maxwell渲染
This was our first time using the Maxwell renderer. Its powerful rendering ability impressed us profoundly. Maxwell gave us all of the things that we needed!
这是我们第一次使用Maxwell renderer.,它强大的渲染能力让我们深深折服,这个渲染器给了我们所需要的一切。
The image below shows the settings of metal armour material.
以下的图片显示了金属盔甲的材质设定。

Next, we set the physical sky and time. Then came the final rendering…
在接下来,我们设置了物理天空和实践,然后进行最终渲染......

Final Render!
最终渲染!!

Matte Painting:
背景绘制
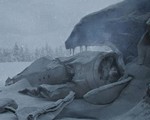
We sought for reference materials.
我们找到的参考素材

We put the images together and unified the colours, adding in the shadows and highlights.
把所有的素材图片整合在一起,同一色调,加上阴影和高光。

At last, we modified the colours and details. Then the work was finished!
最终,我们精调了色彩和细节,然后这个作品就完成了!
In Photoshop, we suggest using a 16bit/channel instead of 8 bit/channel if many adjustment layers are added, so as not to lose colour details.
在Photoshop里,如果要增加很多调整层的话,我们建议使用16bit每通道的设置来代替8 bit每通道的设置,这样不会丢失颜色细节。
This was the process that we used for this work. Thanks for reading!
这就是我们制作这个作品的整个流程,感谢你的观看!


推荐课程


推荐教程

1回复十字军制作流程"