本教学为翻译教学,转载请注明来自aboutcg.net,以及注明翻译者
原教学出自CGArena网站,原始链接如下:
http://www.cgarena.com/freestuff/tutorials/photoshop/mikewazowski/index.html
作者: Andrés Hurtado, (西班牙)
翻译:CWWS (aboutcg.net)
请尊重互联网道德,转载请注明转载出处和翻译者,谢谢!
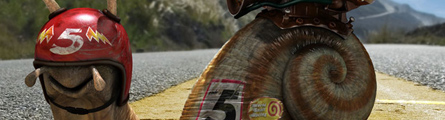
Making of Super Snail
超级蜗牛的制作流程

This work is fully modeled and rendered in Cinema 4D. I have used BodyPaint and Photoshop for the textures. I start modeling the snail shell, to do this I use a spiral spline and a circular shape inside a sweep NURBS, I activate it and adjust the spiral parameters to get both the necessary turns and the thickness at the beginning and at the end.
这个作品完全是在Cinema 4D中建模及渲染的,我使用BodyPaint 和 Photoshop来创建贴图,我从制作蜗牛壳开始建模,要完成它我使用了个螺旋线条,并增加了一个圆形的线条作为界面,通过sweep NURBS工具创建出壳,并调节螺旋参数来得到足够的圈数以及开头和结尾的不同粗细的截面。

Once the turns of the spiral are defined, I edit the model and distort the “mouth” or hollow the shell to make it bigger. Afterwards, when it is on the modeled body of the snail I will distort it quite a lot to remove stiffness and adapt it to the shapes of the snail. I also take advantage to do the first texture tests on the shell, especially to check whether the brown lines on the spiral are coming along nicely.
一旦螺旋线的圈数定义好之后,我编辑了模型,扭曲了“壳的口部”,并把壳掏空,让它显得更大。在后面当制作蜗牛身体的时候,我还要调整这个壳的很多地方来匹配身体的形状,并去掉它的硬度,特别是需要检查蜗牛壳上的棕色线条是否非常流畅。

To model the snail body I start with a cube which I subdivide several times and stretch to make it an elongated rectangle which I put into a HyperNURBS. I distort it slowly with polygons and dot tools to define the basic shapes of the body, I also reduce or extended in size some polygons according to the bigger or smaller thickness needed in the model.
为了制作蜗牛身体模型,我从一个Cube正方体开始,我把它用HyperNURBS细分若干次,然后拉伸它,然后我通过编辑点仔细地制作基本的形状,我还增减了一些多边形的大小,来配合模型或粗或细的需要。

To make the model bend I make a choice of several polygons at one end of the model which is going to be the head and I turn them and move them vertically, I keep going on distorting polygons and dots, I turn, reduce them, etc, until I got the final shape of the snail.
为了让模型弯曲,我在模型头部部位选择了一些多边形,然后纵向移动它们,我继续修改点和多边形,旋转,缩小它们,直到我得到蜗牛的外形。

The antennae and horns are created by means of extrude inner and several extrusions to provide the necessary length in each case as well as to get new polygons to modify the model in that particular side. For the mouth I have cut several polygons to which I have later applied an extrude inner.
触角是通过向内挤压以及多次基础,达到足够的长度来获得的,同时对多边形做了必要的调整,对于嘴的部分,我切开多边形,并向内挤出,来获得。

I fit the shell onto the snail body and make several distortions to be able to adjust both elements. I make the shell narrower, turn it and distort its opening to adapt it to the shape of the snail back; I retouch the back of the body to make it look as if it’s going into the shell. At this stage the basic modeling in both the body and the shell is finished.
我让壳来匹配蜗牛身体,并做了几次扭曲来调整两个物体,我把壳变得更狭窄,并打开它,调整它来适合蜗牛的背部,我也修正了蜗牛身体背面,使它看起来像是从壳里长出来的,到这个阶段,蜗牛算是建完了。

As for the helmet, at the beginning I wasn’t sure about it. I was afraid it could make the nice face of the snail less important, but once it was placed properly all doubt disappeared. Not only did it not make the face less important, but also it added a quirky touch.
对于头盔,我并不是确信是否有必要,我担心它会消弱惊心制作的蜗牛脸的重要性,不过一旦把它放在哪个正确的地方,所有的疑虑都消失了。它不仅没出问题,反而锦上添花。
The helmet is a sphere changed by means of cuts and extrusions. On the sides of the opening some polygons were triangular, which made an effect of imperfection on the model, but this was easily solved when textured, so I didn’t worry about it. Anyway the rounded side of “padding” which outlines the opening of the helmet also helps to diminish that unwanted effect. The eyes are just spheres set in the hollows of the antennae.
头盔是用一个球体通过切割与挤出修改的,在开放边的部分,一些多边形是三角形的这使得模型有一种不完美的效果,不过这可以很容易地用材质来弥补,因此我并不担心。另外围绕头盔开放边缘的填充模型也帮忙减少了不好的效果,眼睛只是球体,嵌在中空的触角里面。

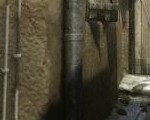
The engine is a free model downloaded from the internet to which I added many details and corrected some imperfections. Afterwards I put it into a HyperNURBS so that the edges would round and so get a wearing away effect in all the pieces of the engine.
引擎是我从网上下载的免费模型,我在其基础上添加了许多的细节,并修正了一些错误。然后我给模型加了一个HyperNURBS调整器,所有的硬边都会变圆滑,引擎的所有部件都有获得一种磨损的感觉。

The metal sheet on which the engine is lying is a choice of polygons from the shell which I separated from it and gave volume by distorting it and adding dents to it etc, to stress the wearing away effect caused by use and pass of time.Both the shime on the opening of the shell and on the body and floor are made by means of sweepa NURBS distorted with different thicknesses. The sticky stuff is EPS’s imported from Freehand.
引擎下方的金属薄片是通过分离并复制壳的一部分多边形来获得的,然后给多边形体积感,扭曲它,增加修饰物等等,为了增加磨损效果,我花了不少的时间,薄片上的零件以及身体和地板上的附件都是通过sweepa NURBS工具,旋转不同的线条组成的不同粗细的模型,粘液是由在Freehand绘制的矢量EPSon图形导入Cinema 4D来制作的。


Texturing
材质
This is the part I enjoyed the most, I really like experimenting with textures and also, as you are fitting them is when the work really comes into life. Personally I think a poor modeling can be improved a lot by means of texturing.
这是我最喜欢的部分,我真的喜欢实验不同的贴图,当你找到合适的贴图时,就能给作品带来生命。我个人觉得即使很烂的模型,额能通过材质提高一大块。
To make the texture of the snail I had to be very patient. The first step was the UV mapping in BodyPaint of the body, then using a real photograph of a snail as a starting point I cloned parts in different layers which I modified afterwards, changing size, orientation, etc.
为了制作蜗牛的贴图,我必须十分耐心,第一步是在BodyPaint里分好身体的UV,然后使用一张真实的蜗牛照片作为起点,我将需要的部分复制到各个层,然后编辑,改变它们的尺寸,方向,等等。

The specular of the snail skin is very useful to finally get the translucent skin sensation because the one from the original photo and the strong specular applied by me in the texture overlaps, together with a sub surface scattering and a low valve of reflection applied to the material help to create that effect.
蜗牛皮肤的高光对于获得那种半透明的皮肤感觉非常有用,我将一张照片上的强烈高光部分叠加到贴图上,与次表面散射效果的材质结合,再加上比较低数值的反射,就获得了这种效果。

The displacement map achieved from the texture and later applied to it highlights the specular even more and adds lots of shades to the snail skin..
置换贴图由材质贴图转化而来,使用它之后,更加突出了高光部分,并给蜗牛的皮肤增加了很多暗部。
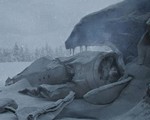
Although I wasn’t looking for a very realistic texture I did want it to be believable in the context of the illustration which still is a caricature even though it has a sense of reality (especially because of the photograph of the road).
尽管是在一种相对真实的环境中(特别是由于道路背景是张照片),但是我仍然不希望追求特别真实的贴图,我希望在这张插画中的内容有一种讽刺效果。


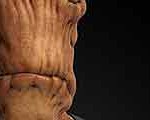
To achieve a believable effect in the texture of the shell of the snail I start with a photograph of a melon which I clone a few times in Photoshop to get a good base, then I mix it with another photograph, a piece of tree bark and finally I add vertical lines painted on another layer with an airbrush, I adjust the transparency of the layers in overlapping mode. I also make the same texture in black and white for the slight displacement I applied to the shell.
为了使蜗牛壳的贴图效果显得可信,我通过反复处理一张瓜的图片来获得一个好的基础材质贴图,然后我将其与其他照片混合,一片树皮的照片,最终我还在一个新的层上面添加了垂直的绘画线条,我在各种层叠模式下调节层的透明度,我还将同样的贴图转化为黑白效果,然后作为置换贴图获得蜗牛壳表面轻微的凹凸感觉。

I make a new black texture with “rust” shader in the material palette of Cinema 4D, I give it a high valve of specular and I mix it with the texture of the shell to create a greasy atmosphere and spots just under the engine.
我在Cinema 4D的材质面板新建一个有着黑色贴图的“rust”(生锈)材质,我给了他很高的高光值,然后将其与蜗牛壳的材质混合来创建引擎下面的铁片上那种油腻与充满污渍的感觉。

The texture of the engine is a very reflecting material with different valves of colored ambient occlusion applied in almost all the channels, bump, color, reflection, specular, etc, mixed with other black textures in a channel alpha to which I added noise and a lot of specular to get a greasy rusty and muddy effect for the lower part of the engine.
引擎的材质是一种非常高反射的材质,在几乎所有的凹凸,颜色,反射,高光等等通道上都有不同数值的环境遮挡贴图,并且在Alpha通道上与其他的增加了干扰与许多高光的黑色贴图相混合,来使引擎的下半部分获得一种生锈泥泞的效果。


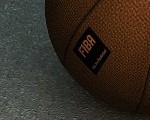
The eyes are a circular color gradient with a high specular and reflection.
眼睛是一种具有高度反射与折射材质效果的圆形色彩渐变材质。


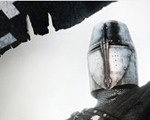
For the helmet I used a paper (film) which I torn, scratched, stamped on it, wrinkled, got it dirty and then scanned it and made it into black and white with high contrast, I inverted it and applied it to a red texture in the channel alpha, I added a little noise and a high value of ambient occlusion. The number and the lighting are another overlapped texture.
对于头盔,我在一张纸(薄膜)上反复撕裂,刮花,印刻,然后将它弄皱,把它搞脏,在扫描它,把它转化成黑白的高对比度图片,然后我在它的Alpha通道上给赋予一种红色纹理,我还添加了一些轻微的噪波,给环境遮挡贴图添加了很高的值,头盔上的数字与闪电是另一个覆盖在上面的纹理。


Lighting
灯光
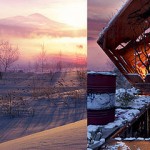
I normally use quite a lot of light sources; I place them so I can highlight details of the scene. In this image I have used 13 lights: 4 omni lights as ambient lighting, 2 to highlight the form of the engine, 3 spotlights to highlight the back of the engine, 3 highlight to stress the specular and the greasy effect on the shell, a spotlight behind the snail neck for the sub surface scattering, in addition to the sun with area shade and the sky with a HDRI with an atmosphere similar to the photograph of the road for the global lighting I have used a surface with an asphalt texture for the floor and the yellow lines only to be reflected on the engine and to add some radiosity to the snail body and shine.
通常我使用很多的光源,我到处放置它们,这样我才能照到足够多的细节,在这幅图里我使用了13盏灯,4 盏点光源作为环境光,2盏来照亮引擎的形状,三盏聚光灯用来照亮引擎的背面,三盏来强调蜗牛壳的高光及油腻的感觉,有一盏蜗牛脖子背后的灯光来表现3S半透明效果,另外还有一盏太阳光来获得各个区域的阴影,以及一个赋予了HDRI贴图的sky(天空物体),来作为全局光,我使用了一种沥青材质作为地面材质,并让引擎能反射地面上的黄色带子,并为蜗牛身体与光射线增加了一些radiosity(光照辐射效果),以取得得与背景类似的灯光环境。

Post-Production
后期合成
A very important part of this piece was the postproduction, which I carried out in Photoshop. For the background of this image, I made the final render activating the render multipass in a lot of channels so to have them separately in layers afterwards. This is useful to be able to work on each channel independently in Photoshop so that I have more control for the integration of the render on the photograph. So I had the specular, the layer for each light and another layer for the ambient occlusion. This way you get a very wide control on each channel and you are able to adjust the image as precisely as possible.
完成作品的一个很重要的步骤就是后期合成,我在Photoshop里面完成,对于这幅图像的背景,我激活了最终渲染设置里的分层渲染,将图像渲染成多个通道,并互相分离,在Photoshop里面单独处理每个通道是非常方便的,由此我对最终图像的结合与真实感有更多的控制,我现在有高光层,有每个灯光的分层以及单独的环境遮挡效果层,这使我在各种控制中得心应手,你可以如你所愿地调整图像。

最终作品:


推荐相关中文教程

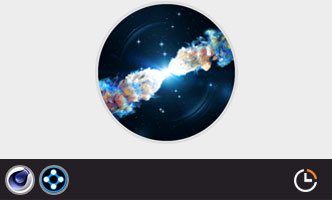
CINEMA 4D TFD和X-PARTICLE星云案例实战教程
本套教学将教您如何结合C4D和AE制作星云场景,重点学习C4D流体特效插件TFD和粒子插件X-Particle的配合使用方法(包括插件基础功能讲解),以及AE后期星云场景的合成的技法。
推荐课程


推荐教程

0回复超级蜗牛的制作流程"