
原教学出自3D Total网站,原始链接如下:
http://www.3dtotal.com/team/Tutorial…ke_wulf_01.php
作者 Tiago Medeiros
作者网站:http://tiagodmed.multiply.com/
作者邮箱:tiagodmed@yahoo.com.br
翻译:freeyy (aboutcg.net)
关于译者:

请尊重互联网道德,转载请注明转载出处和翻译者,谢谢!
‘Making of Focke-Wulf crashed in the snow’
制作福克-沃尔夫在雪地里撞毁的过程

Software Used :
使用软件:
3ds Max, mental ray, Photoshop & After Effects
Introduction :
介绍:
The idea for this project was born while watching the movie The Golden Compass, which has scenes on ice and snow that are really fantastic. I added to that the fact that I like old airplanes and then started to develop the idea.
这个项目的想法来自于观看电影《金色罗盘》期间,影片中所拥有的冰块与积雪的场景非常的令人印象深刻。我添加了我喜欢旧飞机这一细节,并且开始拓展了思路。
For a long time I’ve wanted to make a scene that involved ice and snow, but my greatest difficulty with this is the fact that I have never seen snow. After watching the movie I began to sketch a scene, and with the sketches defined, I made a simple model to use as a guide for the work (Fig.01).
很长一段时间我希望创作一个拥有复杂冰块与积雪的场景,但是对于这个想法来说我有很大的困难也是事实,我将永远看不到积雪了。在看过电影以后我绘制了一个场景的草图,并且以草图的定义,我制作了简单的模型来用于引导工作的进行。(插图1)

Following that I began to work on the creation and composition of materials to be used in the scene. Even though this is a stage that is performed further into the process, I decided to bring this to the beginning of the process, because the main focus of this work was actually the materials (Fig.02).
接下来我开始了创建过程以及材质的合成工作并用于场景之中。尽管这个任务进入了另一个阶段,但是我决定继续这件事情的最初阶段,因为这个工作的主要焦点其实集中在材质(表现)上。(插图2)

The snow material can be seen in Fig.03.
积雪的材质可以在插图3中看到。

Fig.04 shows the ice material.
插图4显示了冰块的材质。

The rock material is shown in Fig.05.
岩石的材质可以在插图5中看到。

Composing two materials:
合成2两个材质:
The composition of the base materials (we will call the materials that receive a layer of snow “base materials”) with the snow material was made using the shader Blend and to mix the two materials the Falloff map was used as a mask, using a world Z technique.
基础材质的合成(我们将称材质接收到的一个积雪图层为“基础材质”)是通过使用了 Blend (材质)着色器然后用 Falloff 贴图,利用 world Z 技术
来作为遮罩混合两个材质来完成的。
To mix the materials the shader Top/Bottom could also be used (it substitutes the world Z technique). But to have a better displacement result I used the 3D Displacement option. This cannot be used inside the shader Arch&Design (used to make the base and snow materials), so the shaders had to be placed inside mental ray, using the Material to Shader option to make the connection.
着色器 Top/Bottom(材质)也可以用来混合材质(它可以替代 world Z 技术)。不过为了更好的置换效果我使用了 3D Displacement 选项。这个(贴图)不能用在 Arch&Design(材质)着色器内(用于建立基础[形状]以及积雪材质)进行使用,因此着色需要放置到 mental ray (材质)内,利用材质到着色器的选项来制作(两者间的)连接。
As I had two different materials with two different displacement maps, which needed to have the same mix as the base and snow materials, I opted for the Falloff technique in world Z instead of the Top/Bottom option. This is because in the Falloff map itself there are two channels, one for each displacement map. This Falloff map is the same map that was used as a mask in the shader Blend.
正如我有两个不同的材质以及两张不同的置换贴图一样,这里也同样需要混合基础(材质)以及积雪材质,我选择了 Falloff(贴图)内的 world Z 技术来替代Top/Bottom (材质)选项。这是因为在 Falloff 贴图内它有两个(贴图)通道,可以对应各个置换贴图。另外在 Blend 着色器中,使用了同样的 Falloff 贴图来作为遮罩。
Let`s see how that works (Fig.06).
让我们看看它是如何工作的(插图6)。

Modeling :
建模:
The terrain modeling was made inside 3ds Max using simple resources, such as the modifiers Noise and Displace.
地形模型是在 3ds Max 利用比如 Noise 以及 Displace 修改器,这类简单的资源建立的。
After making a simple relief base, the mesh was subdivided to receive the Noise modifier.
在制作了简单的雕塑基础之后,网格被子细分(subdivide)后用来接受 Noise 修改器。
After using the Noise modifier, which pulls and stretches the mesh, I performed the mapping of the object in order to make a new subdivision and used the Displace modifier to deform the mesh according to the texture that I was going to use.
在使用了 Noise 修改器之后,拖拽并拉伸了网格,为了完成新的细分同时使用置换修改器依照纹理来变形网格,我为物体执行了贴图操作。
And finally I created a new subdivision to leave the mesh uniform.
最后我建立了新的细分来使网格脱离一致性。
With all that, the mesh became really heavy, so now that I had the shape I desired, I used the modifier Multires to optimize the mesh. This option optimizes the mesh while still maintaining the mapping (in the case of the example in Fig.07, the mesh was reduced from 53000 vertex to 5300 vertex).
有了这些,网格变得十分粗糙(也指面数多),所以现在我拥有了我想要的形状,我使用多重分辨率修改器来优化网格。当仍需要保护贴图(坐标)的时候这个选项优化了网格(用插图7的情况举例来说,网格从 53000 个顶点减少到了 5300 个顶点)。

Now I was able to convert the mesh to an Editable Poly. For those who use 3ds Max 2010, the resource Quadrify can be used to correct the mesh and remove the triangular faces. For those who use older versions, the same can be achieved by using Polyboost.
现在我可以把网格转换为 Editable Poly 了。对于使用 3ds Max 2010 的人来说,功能 Quadrify(四边化)可以用来纠正网格并且移除三角形面。对于使用旧版本的人来说,同样可以使用 Polyboost 来达到这个目的。
Now the model was ready to be used (Fig.07).
现在模型已经准备好了(插图7)
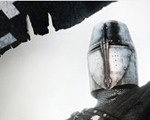
For the modeling of the airplane I utilized the Box Modeling technique, using reference images found on the internet (Fig.08).
为了飞机模型的建模,我使用了 Box 建模技术,同时利用了在因特网上找到的图片参考(插图8)。

Mapping :
贴图:
The mapping was made in 3ds Max using Unwrap, with the Pelt Map tool, to open the mesh. However, using only Pelt Map doesn’t give a very good result and so to correct the mesh I used the Relax tool, which can be found in the Tools menu. The option that presents the best result is the Relax by Face Angles.
贴图坐标是在 3ds Max 内利用 Unwrap 完成的,使用 Pelt Map 工具,打开了网格。但是,仅利用 Pelt Map 是不会获得一个非常好的结果的,所以为了正确的网格(UV坐标)我使用了 Relax 工具,它可以在 Tools 菜单中找到。通过 Relax 工具内的 Face Angles(选项),这个选项体现出了更好的结果。
With the mesh ready, all that was left to be done was to use the Pack UVV tool, also in the Tools menu. This tool correctly distributes the mesh inside the Safe Area of the Unwrap. If there is too much space left all you have to do is use the Scale tool and make the adjustments manually, but this entire process is usually pretty quick.
网格准备就绪之后,所有剩下的工作就是使用 Pack UVW 工具了,它也在 Tools 菜单内。这个工具可以在 Unwrap 的安全范围以内正确的分布(UV簇)网格。如果这里流出了太多的(UV)空间的话,那么你可以使用缩放工具来进行手动的调整,不过整个处理过程通常会非常快的。
To have textures with a good detail level, I separated the airplane elements into groups to perform the mapping (Fig.09 & Fig.10).
要让纹理具有非常好的细节等级,因此我把飞机元素分离成了组(groups)来执行贴图(插图9和10)。


Texturing :
纹理:
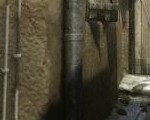
The textures were all made in Photoshop, using painting techniques and the assembling of photographic textures (Fig.11 & Fig.12).
纹理全部都是在 Photoshop 里完成的,利用了绘制技术以及图像纹理的组合(插图11以及插图12)。


The airplane material can be seen in Fig.13.
飞机的材质可以在插图13中看到。

And here’s the airplane rendering test (Fig.14).
这里是飞机的渲染测试(插图14)。

Assembly of the final scene :
最终场景的组装:
With the airplane and the scene ready, it was time to put the two together, and for that I had to wreck the airplane. I opted to do that manually, separating the elements, and mashing and tearing the bodywork.
飞机和场景准备好了,是时候把它们放在一起了,并且为了这个目的我破坏了飞机。我选择手动来处理,分离元素,然后破碎并撕开机身。
To tear the bodywork I used the Cut tool of the Editable Poly to demarcate the mesh at the position of the cut.
我使用了 Editable Poly 的 Cut(裁剪)工具在可能的地方分开网格从而撕开了机身。
The parts that were pulled out of the main body of the airplane, already demarcated, were selected through the polygon selection and separated with the Detach option.
飞机的主体零件需要被拉开,并且已经进行了区分,这是通过多边形选择然后使用 Detach 选项来完成的。
I once again used the Noise tool to make the masks. To be able to use the effect only on the selected areas, I used the Poly Select modifier, with the option Soft Selection activated.
我又一次使用了 Noise 工具来制作遮罩。我使用了打开软选择选项的 Poly Select 修改器,让它仅在被选择的区域上产生影响。
In the parts that were separated from the main body I also applied the Shell modifier to give these parts some thickness (Fig.15).
在从飞机主体上拆分的部件里,我同样应用了 Shell 修改器来给与这些部分一些厚度(插图15)。

Lighting :
灯光:
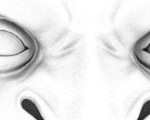
I knew that the lighting should be pale and diffuse, because the intention for the scene was to picture a blizzard during the day. To achieve this result I used a very simple alternative. A Skylight with HDRI, which was also used on the Environment as a reflection map, and a mr Area Omni with the shadows completely softened so that the scene would not be marked (Fig.16).
我认为照明应该是灰白色并且漫反射的,因为场景需要表现出白天暴风雪的景象。为了实现这个效果我使用了一种简单的选择。一盏添加了 HDRI 的 Skylight(光源),贴图也被使用在了环境中作为反射贴图,然后一盏带有完全柔化阴影的 mr Area Omni (光源),由此场景将变得不是那么显眼了(插图16)。

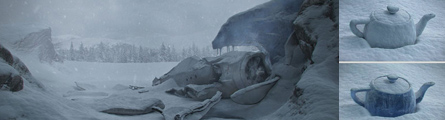
When it was all ready I just had to wait a few hours for the render to be completed, so that the post production adjustments and corrections could be performed (Fig.17).
当所有事情准备好后我仅仅是用了几个小时来等待渲染完成,然后作品的后期调整以及修改就可以进行了(插图17)。

Post Production :
后期:
The post production work was divided between After Effects and Photoshop. The first corrections were made in Photoshop and consisted of removing and fixing minor imperfections. For these corrections I used the tools Healing and Clone Stamp (Fig.18).
后期处理工作是分别在 After Effects 和 Photoshop 之间完成的。早期的修改是在 Photoshop 中由移除和修复较小的瑕疵组成的。为了这些修改我使用了修复(Healing)和图章(Clone Stamp )工具(插图18)。

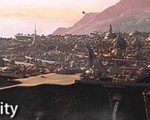
The second stage in Photoshop was to create a Matte Painting to serve as the background of the scene (Fig.19).
在 Photoshop 里的第二阶段是建立遮挡绘制(Matte Painting),使它们作为场景的背景图像来使用(插图19)。

With the corrections and the Matte Painting ready, I took the materials to the After Effects to begin the assembly of the elements. The first stage was to compose the render with the Matte Painting (Fig.20).
当修改以及遮挡绘制完成后,我把材质放置到 After Effects 内来开始元素的装配。最初的阶段是把渲染与遮挡绘制进行合成(插图20)。

To better integrate the scene, I created a fog effect using the Fractal Noise filter and a render Z-depth pass as a mask to give depth to the effect (Fig.21).
为了更好的融合场景,我利用 Fractal Noise 滤镜建立了雾效,同时渲染了 Z-depth(Z缓冲)通道来作为效果的深度(信息)的遮罩(插图21)。

After adding the fog to the scene I used three more Adjustment Layer with the following filters: Brightness & Contrast, Levels, Shadow/Highlight and Hue/Saturation to correct and adjust the scene. Only after that did I add the layer with the snow (Fig.22).
在为场景添加了雾气之后,我使用了三层以上的调整层来校正和调整场景,它们大概是:Brightness & Contrast, Levels, Shadow/Highlight 以及 Hue/Saturation。 在完成之后我添加了雪花图层(插图22)。

With that I finished the After Effects stage of the render and took the image back into Photoshop. I felt that I still needed to make further adjustments, such as the frosted metal parts of the airplane, composing an Ambient Occlusion render pass, adjusting the background to give the scene a little more contrast and turning to tone to a lighter blue (Fig.23).
我完成了 After Effects 的渲染阶段并且把图像导回到 Photoshop 之内。我觉得我仍然需要做更进一步的调整,比如飞机上被冰雪覆盖的金属部件,合成一个环境遮挡渲染结果,调整背景以便让场景获得一些对比,然后把色调调整的更加偏蓝一些(插图23)。

To continue to adjustment, the next stage was to select all the layers and convert them into Smart Objects to simulate the effect of a 35mm film. In order to do that I used the filter Lens Correction to create an effect of chromatic aberration, increased the sharpness of the image with the Sharpen filter and applied a grain with the Add Noise filter.
继续调整,下一阶段是选择所有的图层,然后把它们转换为智能物体(Smart Objects )从而模拟一种 35mm 胶片的效果。为了实现这个效果,我使用了滤镜 Lens Correction(镜头校正)来建立一种色散的效果,使用 Sharpen(锐化)滤镜增加了图像的锐化度,同时添加了 Noise 滤镜来产生一种颗粒效果。
On the top I applied three more Adjustment Layer for fine adjustments and once again I converted all the layers into Smart Objects to continue to work on the 35mm film effect (Fig.24).
在上面为了细微的调整我应用了三层以上的调整层(Adjustment Layer),并且我再一次把所有图层转换为了智能物体(Smart Objects )从而继续在 35mm 胶片效果上进行工作(插图24)。

ow came the final stage, where once again I applied a series of filters intending to soften the edges of the image but also maintaining the sharpness and the correct level of grain.
现在到了最终的阶段,我再一次应用了计划中的一系列滤镜以使图像的边界柔和,但是同样保留了锐化以及颗粒的正确强度。
A major “problem” of 3D is that it makes everything very perfect, smooth and clean. And when we work with film the scene ends up with imperfections such as softened edges, grain and some dirt due to dust and micro scratches. And as I used to say, in order to make it look good, we have to make it look “bad” (Fig.25)!
3D 的主要“问题”是它让所有的事物都显得太过完美,平滑并且干净。当我们以电影的方式来处理场景的时候它始终是有瑕疵的,比如柔和的边界、颗粒以及一些污垢灰尘和小的瑕疵都是必须的。就像我曾经说过的一样,为了使它看上去不错,我们需要让它看上去“糟糕一些”(插图25)。

And here’s the final image (Fig.26)!
这里是最终的图像(插图26)!

I would like to thank all of my friends for their help and I hope that you all have enjoyed this “Making Of”.
我要感谢那些为了场景而帮助过我的朋友,我希望大家都喜欢这个“制作项目”。


推荐相关中文教程

UNREAL ENGINE 4虚幻引擎美术设计师室内场景制作生存手册
在本教学中,黄博文老师将带你学习制作UE4虚幻引擎场景所需要的所有知识和完整流程,无论是你三维新手还是老鸟,通过学习都可以快速掌握UE4场景制作技能。3DSMAX动力学特效实战教学
本套教学将通过24章实例教学,来向你详细讲解3DSMAX的动力学特效在电视包装与广告中的应用。VUE自然景观实战案例教程
本套教学是由MG录制。讲解分析了vue的海水材质问题,以及全中国首次以案例的形式讲解vue与maya的结合运用,如何将maya的角色动画导入到vue场景文件中做遮罩并且渲染。3DSMAX国外粒子案例效果解析
本教学通过27个实战案例,教您如何用3DSMAX结合ParticleFlow本身以及扩展的ParticleFlow Box 1、Box 2、Box 3、功能包,结合Vray渲染器,来制作流行的广告和电视包装中的粒子特效效果。无论是常见的粒子聚合,分散,动态粒子替换,粒子矩阵,粒子动力学,本套教学都有相应的案例。3DSMAX国外流体案例效果解析
本教学通过20个实战案例,教您如何用3DSMAX结合Realflow,FumeFX, ParticleFlow插件,来制作流行的广告和电视包装中的流体效果。无论是常见的液体,烟雾,流体碰撞,沙粒变化,水墨表现,本套教学都有相应的案例。2.5D商业游戏场景制作教程 进阶篇
在本教程中,Freeyy老师将从零开始,向你讲解如何根据确定的主题进行前期准备,随后建模,绘制贴图,制作材质,最后再进行细节调整,完成一个商业游戏级别的2.5D场景画面。Mentalray for max实战教程
本教程共包含超过42小时以上的视频教学内容,共18章 132课,通过大量实例,详细讲解了3ds Max平台下的Mental Ray1渲染器的使用基础和实战方法。是一部非常完整详细的3dsMax版的Mental Ray渲染器的教学.网游角色制作女精灵实战教学
本教学以一个AAA级网游女精灵角色为案例,向您展示如何完成她的模型,UV,和贴图绘制。教学使用的软件主要是3ds max和 bodypaint, 其中建模和UV使用3ds max完成,贴图绘制在bodypaint和 PS中完成。


推荐课程


推荐教程

1回复福克-沃尔夫撞毁于雪地"