

本教学为翻译教学,转载请注明来自aboutcg.net,以及注明翻译者
请尊重互联网道德,转载请注明aboutcg.net完整网站链接和翻译者,谢谢!
原教学出自pixologic网站,原始链接如下:
http://www.henningludvigsen.com/inde…lumetric_light
作者: Henning Ludvigsen
网站:http://www.henningludvigsen.com/
关于译者:

翻译:KanyaYan (www.aboutcg.net)
转载请写明出处和翻译者为KanyaYan,谢谢。
Volumetric light.
体积光
Understanding light in 3 dimensions.
理解光的三个方面。
“What happens when light shines through objects in hazy air
and gets partially blocked by transparent, coloured surfaces?”
“当光线在朦胧的空气中照射物体时会发生什么,阻隔部分透明度还是影响表面颜色?”
Let’s experiment with theory of volumetric light.
What happens when the light rays become visible because of light scattering which occurs due to haze or dust?
Light turns into a visible 3-dimensional shape.
And even more interesting; what if semi transparent, coloured material occurs in some areas and partially blocks the light beam?
让我们做个体积光理论的实验。
当光因为光线的光由于烟雾或灰尘散射而放射出可见光线时会发生什么?
光变成了明显的三维形状。
而且更有趣,如果是半透明,有色物质会发生在一些区域和部分被阻隔的光束里?
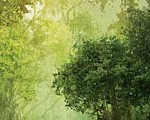
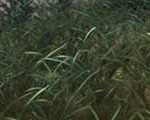
I bet most of you have painted a window with the sun shining through, or beams of light shining through the canopies in a forest.
It’s quite interesting studying to understand how this works.
我敢说你画过,一扇透过太阳光辉的窗户,或者是透过森林中的檐篷闪亮的光束。
这是很有趣的研究,以了解光是如何工作的。
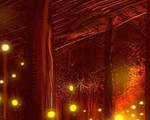
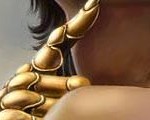
We will follow two different examples throughout this tutorial; one of them is the classic window-scene with the sun shining through the glass, and with coloured drapes to illustrate what happens when light gets influenced by this.
The other example will show a winged fantasy creature, with the silhouette of the character creating interesting shapes of light in mid air, and the thin membrane skin on the wings to work the same way as the coloured curtain in the other example.
Even if we are following two completely different scenes and settings, they are still sharing the exact same theory and basic guide lines.
我们将随着本教程中两个不同的例子,其中之一是典型的透过阳光玻璃的窗口,并且挂有彩色窗帘,来说明光在这种情况的影响下会发生些什么。
另一个例子将显示翼幻想的生物,光会对在半空中的角色轮廓创造出有趣的形状,以及翼上的薄膜皮肤会于上个有色玻璃的例子相同的方式工作。
即使我们有以下两种完全不同的场景和环境,他们还是有着完全相同的理论和基本路线指导。
You can even use the same technique to alter photographs.
你甚至可以使用相同的技术来改变照片。
What is important to keep in mind throughout the process of painting volumetric light is obviously to think in three dimensions. I will show some examples of getting aid by using simple help-lines. Make sure to keep the help-lines in separate layers, so that you can easily hide and show them. It’s also important to keep the light and shadows on separate layers.
重要的是要牢记在整个绘画体积光的过程中,显然是想在三个方面。我将展示利用简单的辅助线获得帮助的一些例子。请务必保留辅助线的这个单独的图层,这样你可以很容易隐藏和显示它们。也必须保持光线和阴影在单独的图层上。
Step 1 – Concerning 3D in 2D
第1步 – 关于三维在二维中的表现

When painting 3D in 2D you are basically trying to emulate realism, but you don’t have to go all the way and do it perfectly.
The important thing is that the end result looks good. If you go for full perfection, I suggest using 3D software.
Thinking of the mid-air beams of light and shadow as actual physical objects is a good way to start, and for a painter that is what it is; shape.
当你二维绘画三维基本上试图模仿现实的时候,你不必去最求完全真实且完美。
重要的是,最终结果看起来不错。如果你最求完美的话,我建议还是使用3D软件。
思考实际物理对象在半空中的光和阴影是一个良好的开端,并为画家提供大体样子及形状。
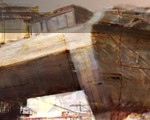
Step 2 – Starting out flat
第2步 – 平整开始

I prefer starting out with the characters and objects in the scene pretty much done with high lights and self shadowing, but I leave the surroundings quite flat and almost completely covered in shadow.
This makes is easy for me to add light, and leave the original surface as shadowed area.
我喜欢开始从在场景中的人物和物体的高光和自身阴影做起,但我把环境画的却相当平整,几乎完全覆盖在阴影下。
这使我很容易增加光线,并保留原来的阴影区域表面。
Step 3 – Setting the light sources
第3步 – 设置光源

As I have the characters already painted at this stage, I also have an idea where the main light source is coming from.
If I can see the light source, I usually make sure to leave a mark here on a separate layer as a point of reference.
If the light source is out of sight I tend to stick with a set direction, unless I’m looking for some experimental angles.
Let’s keep it simple this tutorial.
正如我已经在这个阶段画的特点,我也有一个想法,主要光源来自哪个方向。
如果我能看到光源,我通常一定要在一个单独图层上留个记号作为层参考点。
如果光源在视线之外,我会倾向于保持其既定的方向,除非我要寻找一些试验的角度。
让我们继续这个简单的教程。
To start with, I painted a circle on the ground on the fantasy themed painting, and a square on the ground on the other example in a separate layer with “soft light” as blending mode.
This makes a good base for the illuminated areas on the ground, and I use bright colours, close to white values.
This is to roughly show the area affected by the light source. As you can see, the light source is located directly above the character in the fantasy painting, and from the sky, left on the painting with the window.
首先,我在幻想主题绘画中在地面上画了一个圈,在另个例子中的地面上也单独在一个图层里画了一个矩形,使用soft light的混合模式。
这使得一个地面上的照明区域有着良好的基础,我使用得是接近白色的明亮的色彩。
这是为了大概表明下由光源影响的区域。正如你所看到的,光源位于上方的幻想画中人物,是来自天空的,画中窗口的光是向左的。
Step 4 – Help-lines for the shadows
第4步 – 阴影的辅助线

This part is important to get somewhat right, but no need to construct the perfect 3D shadow.
I suggest creating a new layer to keep some help-lines for perspective and direction of the light beams in-between the objects/characters and where the shadow will fall.
If I can’t see the main light source, I try to imagine approximately from where it origins, to extruding parts of the objects/characters, and continue this line to where it will fall on the ground and become a reference point for where the shadow will drop.
I make sure to do this a few characteristic places, and especially on each side of the silhouette.
这部分是很重要的,但没有必要最求完美的三维阴影。
我建议创建一个新图层,保留一些介于物体/人物之间为透视和光束方向的辅助线以及哪些地方会留下阴影。
如果我不能看到主要的光源,我会尝试大致想象下光的来源,以拉伸局部的物体/角色,并继续这条路线到它将落在地面上的地方,成为一个参考点的地方将留下阴影。
我要保证做到这一点一些地方的特点,特别是对每一测的轮廓。
Step 5 – Painting the normal shadows
第5步 – 绘画正常的阴影

The first rule is that the further away the shadow is from the object that creates it, the more blurry it should be, unless the source is tiny but still very sharp.
Keeping a shadow sharp at the base of an object, and blurring it out the further away it gets creates depth.
The second rule is; notice that on the fantasy painting the shadow and the dark area around the circle on the ground has got the same values.
The same goes for the shadows of the bars from the window in the traditional piece.
第一条规则是,远的影子从对象开始创建它,应该是更模糊,除非光源微不足道但仍然很锐利。
在一个对象的底部保持锐利的阴影,越远的地方就模糊掉来得到深度。
第二条规则是,注意在幻想画的阴影和周围地面上圆圈暗部取得相同的值。
从窗口投影下来的栏杆的阴影也是一样的。
Step 6 – Let there be volumetric light
第6步 – 制作体积光
Showing the layer with the help-lines from step 4, I create a new layer in which I fill the air in-between the light source and the illuminated area on the ground, using perfectly straight lines and a soft brush. If the light gets too strong, the opacity slider on the layers menu is handy for tweaking. Another easy way to do this is to make a perfectly sharp shape with 100% white, do a “Guassian Blur”, set the layer to “Soft light” and turn down the opacity of the layer.
Make sure to keep each shape of light in separate layers, or else it will all end up as one shape and you’ll loose the sense of separate layers of light.
Each of the transparent squares in the window was kept in a separate layer.
显示从第4步的辅助线图层,我创建了一个新的图层位于光源和地面上的照明领域之间,采用笔直的线条和软刷填充 空气。如果光线太强,对图层菜单透明度滑块进行调整。另一种简单的方法来做到这一点,是对100%的白色做一次Guassian Blur,设置了这层为Soft light,并降低透明度。
请务必保留每个光亮形状在单独的图层中,否则都将作为一个形状并且你会失去光的单独图层。
每块窗口都被保存在一个单独的图层中。
Step 7 – Volumetric shadows
第7步 – 体积阴影

Now we have a base with normal shadows and volumetric light, but we lack volumetric shadow.
Objects that cast shadows on the ground, or on objects, will also cast shadows on the dust/haze in mid air.
I still keep the help-lines from step 4 and use the eraser tool with low flow and a soft brush to gently remove some of the volumetric light I painted in the previous step in-between the objects and the corresponding shadows. Also, note the talons on the wings casting shadow in mid air.
If you did the process of putting the layers of light into separate layers as explained in the previous step, then most of the volumetric shadows should already be there, but adding some additional darker strokes to underline this effect doesn’t hurt.
现在我们有一个正常的阴影和体积光作为基础了,但是我们缺少体积的阴影。
对象投下阴影在地面上或者对象上,在空中的灰尘/烟雾上也将投射阴影。
我仍然保留着第4步的辅助线,并使用低流量和软刷的eraser工具轻轻删除一些对象之间我前几步画的体积光和相应阴影。此外,请注意在半空中翅膀魔爪的阴影。
如果你将光的图层放入了单独图层中,在上一步已经做了解释,那么大多数的体积阴影应该已经在那里了,但增加了一些额外的深色笔触强调了这方面是没有影响的。
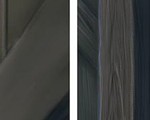
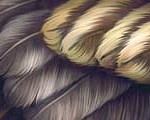
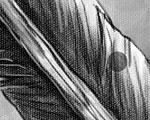
Step 8 – Skin membranes and coloured fabrics
第8步 – 皮肤膜和有色织物

Skin is transparent, and if you look at your hand in front of a strong source of light, you will see that the light will be led through the space in-between your fingers, even though you’re blocking the light completely.
皮肤是透明的,如果你在强光下看你的手,你会看到光线将穿过你的手指之间的空间,即使你完全遮挡住光线。

The colour is strong red and orange, and this is the key to make thin skin membrane look transparent when lit from behind.
The cloth works in a similar way, when lit from behind, even though it’s not an organic material, the surface will be lit on the opposite side of the light source.
As the wings of the creature have got “fingers” between the skin membranes, I make sure to keep these areas darker, but with quite a bit of red colour to give it the impression of transparent, illuminated skin. Also, showing some veins is cool.
颜色是强烈的红色和橙色,这是关键,使薄的皮肤膜从灯光后面看起来是透明的。
布也是类似的方式,当灯光从后面照过来的时候,尽管它不是一个有机材料,表面任然会在光源的对面发光。
作为生物的翅膀在“手指”和皮肤膜之间,我一定要保证这些区域是暗的,但被照亮的皮肤还是要相当多的红色给它透明的感觉。此外,显示一些暗的静脉。
Step 9 – Colour-influenced air
第9步 – 颜色影响的空气

As some of the light penetrates the coloured material, it will influence the hazy air with the same colour as the material.
I simply colour-pick the same colour of the membrane/material and do the same thing as when painting volumetric shadows, only vaguer.
Doing this adds to the final touch of realism, and its fun to play around with different coloured materials. I tend to imagine this similar the coloured spot lights at rock concerts, only toned down, leaving only a sense of the colour in the air. Experiment with the layer blending modes to see what fits.
On these examples, I used “color” mode.
The shadows from the coloured materials should also have a slight tint of red, so I added this to the ground in the fantasy piece.
由于一些光穿透有色物质,它会影响有着相同颜色物质的朦胧空气。
我只是简单地选择和膜/材料相同的颜色,绘画时,要和体积阴影有相同的模糊处理。
这样做增加了真实感,它的乐趣在于使用不同颜色的材料。我倾向于想像类似于在摇滚音乐会上的颜色射灯,只是淡化了点,只留下了空气中的色彩。尝试下改变混合模式看看什么模式适合。
在这些例子中,我用了color模式。
从有色材料投下的阴影也应该有轻微的红色,所以我增加了红色在地面上。
Step 10 – Dusty details
第10步 – 尘埃细节

To create some extra shape and perspective to the painting, I think it’s nice to add some larger floating dust particles, or flying insects to break up the light beams.
The volumetric shadows from the particles and insects should all point away from the light source, and helps creating a nice sense of space and perspective.
绘制一些额外的形状和远景,我认为补充一些较大的浮动的尘埃颗粒,或是飞虫来打破光束是很好的。
颗粒和昆虫的体积阴影都应该远离光源,并有助于建立一个很好的空间感和透视。
Adding some noise grain to the volumetric light layer makes it look more natural, so don’t be shy to experiment with this.
Personally I simply add some normal noise from the standard Photoshop filters with a normal blur at the end.
给体积光图层加入一些噪音纹理使它看起来更自然,所以不要怕去尝试这个。
我自己只需在最后用标准的Photoshop滤镜添加一些正常的杂点并模糊。
Also, if you are a really into detailing; going over the entire piece, filling in tiny beams of light penetrating through gaps in the illuminated surface is fun.
此外,如果你真正要钻入细节的话,要在整个片中,在细小的光束里填补照亮表面穿过的空隙是一种乐趣。


推荐相关中文教程

场景美术绘画进阶教程 光影渲染篇
本教程作为场景概念设计绘画方面的进阶教程,着重讲解了如何应用自定义的Photoshop笔刷和素材,讲解照明与场景绘画的关系,光线的反射定律,场景构图的固定模式,如何使用进行概念设计的创意思路方法,以及使用案例来讲解如何按照游戏项目的需求完成一个场景的绘画过程。场景概念设计实战教学之玉门关场景绘制
本教学将通过一个从零开始的玉门关场景绘制案例,带你了解如何进行场景概念设计。手绘游戏特效制作实用案例教程 闪电篇
本套教学使用具体的案例,演示了多个闪电类手绘特效的绘制流程,专门针对手游,2D游戏,手绘影视动画的液体特效制作需求设计.场景美术绘画基础教程 中国建筑篇
场景绘画和设计是漫画绘画,游戏设计生产环节中不可或缺的一环,本教学将从最基础的原理开始,教授用户如何理解和学习场景绘画,如果把握场景绘制的设计技巧,讲解场景如何控制透视,从基础的几何体开始学习空间的管理和建筑的摆放。人物角色表情表现绘画教程
本套教程从人类基础的简单表情入手,讲解不同种类的笑容,焦虑,生气,愤怒,咀嚼,吃惊,惊恐,沮丧,哭泣等等不同的表情是如何表现的,帮助学习者能够通过夸张生动的表情变化理解人类丰富的表情绘画所能传达出来的含义。构图绘画完全教学
本套课程的内容重点是学习绘画艺术的构图规律和方法。在绘画学习过程中,构图是一个重要的组成部分,学习它对于提高绘画练习和创作水平有显著的促进作用。特指纯艺和插画,海报。艺用人体解剖实用教学 下集 四肢篇
本套“四肢篇”教学是王九斤老师的《艺用人体解剖使用教学》系列教程中的下集部分,主要讲解了四肢的结构绘画要点,以及部分人体动态的基础讲解。艺用人体解剖实用教学 上集 躯干篇
本套“躯干篇”教学是王九斤老师的《艺用人体解剖使用教学》系列教程中的上集部分,主要讲解了躯干的结构绘画要点,以及部分人体动态的基础讲解。


推荐课程


推荐教程

2回复绘制体积光"