本教学为翻译教学,转载请注明来自aboutcg.net,以及注明翻译者
这个教程适合初学者
教程源地址:http://www.blog.spoongraphics.co.uk/tutorials/illustrator-tutorial-create-a-gang-of-vector-ninjas
翻译:雏田
关于译者:

请尊重互联网道德,转载请注明转载出处和翻译者,谢谢!
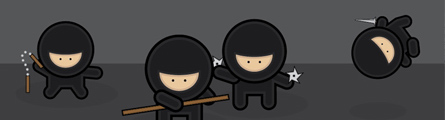
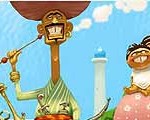
It can be quite tricky getting the hang of Adobe Illustrator, but if you take a step back and concentrate on the basics there’s a range of options for creating great looking images. In this tutorial, we’ll take a look at constructing a group of cool vector ninja characters using just the basic shapes and a variety of simple tools, making it a good start for Illustrator beginners.
熟悉AI的用法可能是复杂的,但是如果你退一步并且专心于基本原理,这些原理中为你创作好看的图形提供了一系列的可选方式,在这个教程里,我们将看到构成一群酷酷矢量小武士的恰恰是使用的了一些基础图形和多种简单的工具,这对于初学者是一个很好的开始。
After opening up Adobe Illustrator, create a new document. For a fun project the size of the document doesn’t matter, Illustrator has a vast area of artboard beyond the document edges that can be used. I personally use the CMYK color mode out of habit and the ease of managing blacks, but a wider range of colours are available with RGB. The choice should really depend on the final outcome of the project; print or web.
打开AI之后,创建一个新的文档。对于一个有趣的项目文件的大小不太重要,插画家除了你定义的文档大小之外, 周围还有很大画布面积可以利用)。我个人使用CMYK颜色模式出于习惯和易于管理黑色,但是使用RGB色彩模式是较广泛的。这个选择应该随最终输出的项目 文件来定是出版印刷或者Web。
Depending whether your Illustrator software has the default settings, you might want to check the options for the scaling of strokes and effects, this little option could save you a headache layer down the line.
根据你的Illustrator软件是不有默认设置,你应该根据scaling of strokes and effects检查一下,这个小选择,可以彻底解救你。
scaling of strokes and effects,内容:
There are a couple of options that can catch you out in Illustrator; have you ever had the problem where you scale up an object but the strokes don’t get any bigger? Or vice versa where you scale down your object but the strokes stay huge leaving your design all out of proportion and looking just plain ugly?!
If you are experiencing this, you’ll be glad to know there is a quick and simple fix right in the preferences panel…
有几个选项,可以使你在Illustrator中被难住 ;你曾经有这样的问题吗?你按比例增加物体但是轮廓没有变大反之亦然你缩小了你的对象,但是轮廓巨大使您设计不成比例并且看起来十分丑陋!如果您遇到此问 题,您会很高兴知道有一个快速简单的修正权在参数面板里。。。。

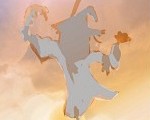
So just to reiterate, you have an object such as the smiley face above, but when you go to scale it up or down the strokes and/or effects do not, leaving it all out of proportion.
The fix to this problem is a simple four clicks:
因此,只是为了重申,你有一个对象,如上述的笑脸,但是当你安比例增加或者减小轮廓,或者效果不这样做,让所有不成比例。该修补程序对这个问题是一个简单的四个点击:

Go to Edit > Preferences > General or press CTRL / CMD + K.
、
选择Edit > Preferences > General or press或者按快捷键CTRL / CMD + K.

In the preferences window simply click the ‘Scale Strokes and Effects’ checkbox.
在预置窗口只需点击’缩放轮廓和规模效应’复选框。

lick OK, and as by magic your strokes now scale in proportion to the rest of your design! Easy.
点击OK,就像魔法一样,你的笔画缩放来匹配你其余的设计。

小教程正式开始了:

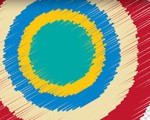
Grab the Circle Tool and draw a shape on the artboard, hold the SHIFT key to create a perfectly equal object. By default this will have a white fill and black stroke.
用圆形工在画板上具画一个图形,按住shift键得到的是一个正圆,默认情况下这将有一个白色填充黑色边缘的圆。

Select the Square Tool and draw another shape on the artboard, position this to overlap the original circle. Use the Align Palette to centre the two shapes horizontally.
选择矩形工具画另外一个图形在画板上,与原始圆重叠的位置。使用线性对齐工具使两个物体水平中心对齐。

From the same menu, use the Rounded Rectange Tool to draw a small leg. Adjust the roundness of the corners with the keyboard cursor keys until the ends are completely circular.
Zoom in and position the leg exactly in relation to the edge of the square body.
从相同的菜单里,使用圆角图形工具画一个条腿。调整圆角用键盘的光标键,直到合适为止。放大,腿的位置与方形的身体边缘有关。

Duplicate the leg and move into position for the remaining limbs, for the arms rotate the shape by 45 degrees. To position the shapes behind the other objects, press the CTRL + [ and CTRL + ] keys repeatedly to adjust the stacking order of the selected objects.
复制腿移动它们到其它肢体的位置,通过旋转图形45°来完成手臂。这些手臂跟退的位置要放在其它物体的下面,通过CTRL + [ 和CTRL + ]键重复的调整被选物的次序。

Draw another perfect circle onto the artboard, and beside it a much larger oval. Overlap the two and use the Align Palette to position exactly.
在画板上画另外一个正圆,另外还有一个较大的椭圆,重叠两个物体并且使用线性对齐工具(注:the Align Palette因为本人的AI是英文版所以不知道这个工具的中文专业术语)对齐

With the two shapes selected, click the Subtract from Shape Area option from the Pathfinder palette. Click the Expand button to refresh the bounding box of the shape.
By using temporary shapes as tools along with the Pathfinder options, a range of custom objects can be created.
同时选择两个图形,从路径查找器(Pathfinder palette)中的形状模式(Shape Area option) 工具中选择相减方式,点击展开按钮即可刷新完整的图。通过使用临时图形除了路径查找器作为工具,一系列一系列的自定义对象可以被创造。

Position this semi-circular shape within the large circle of the character to represent the facial area. Draw in a small circle as an eye, fill this with a black swatch and clear any stroke. Copy and paste in front (CTRL + F), then move horizontally to the side (hold SHIFT to constrain the axis)
Grouping any pairs of objects, such as the eyes and arms will allow them to be centralised with the other objects using the Align Palette without being moved individually.
人物大圆内的半圆位置代表正面脸的区域。画一个小圆作为眼睛,填充上黑色。复制(ctrl+c)并且重复粘贴(ctrl+f),然后水平移动到这边(按住shift去迫使沿直线移动)。群组所有的物体,如眼睛和武器让她们能集中与其他物体使用对齐面板而不被移到个别。

With the complete line-work character laid out and aligned, draw a selection around the complete object and copy and paste a duplicate. Move a copy off to the side as a backup.
随着完整的线性操作人物性质和规定的相一致,周围画一个完整的选择对象复制并粘贴重复。移动复制在一旁作为备份。

With all the objects that make up the torso and limbs selected, chose the Add to Shape Area option from the Pathfinder tool and Expand to merge the shapes into one.
所有的物体构成躯干及四肢被选择,从路径查找器中选择添加形状区域选项并扩展的形状合并成一个。

Fill the body elements with a very dark grey (95% black) and add a 4pt stroke aligned to the outside at 100% black.
填充身体部分非常深灰色( 95 %黑) ,并添加一个4像素外轮廓(注:参考图)100 %黑色。

In the Appearance Palette, click the small options arrow and select Add New Stroke.
在外观面板,单击小选项箭头,然后选择 添加的新轮廓.(注:参考图)

This time, add a 4pt stroke aligned to the inside, with a lighter, 93% black. This multiple use of strokes is a technique I’ve come to use in my character designs which really helps lift the colours by adding a little depth and variation.
这一次,加一个4像素的内轮廓,浅一点的,93% 黑色。这样多重的使用轮廓一种技术,我在我的个性设计中使用,真正帮助解除颜色,通过增加了一点深度和变化。

Select the facial area and fill with a pale skin tone, add a slightly thinner stroke at 3pt aligned to the outside using the 93% black.
选中脸部区域填充淡淡的皮肤色,加上稍薄得轮廓,3像素向外的轮廓使用93%黑。

Add a New Stroke through the Appearance Palette and give this line a slightly darker tone, aligned to the inside of the shape.
添加一个新的轮廓通过现象调色板,给此行略微暗色调,配合内部的形状。

The basic version of the character is complete, ready for some stealthy ninja action.
基本的人物形态完成了,准备一些隐身忍者行动。

Copy and paste multiple variations of the original line-work character. Adjust and rotate the limbs into a range of scary ninja combat positions, adjust the stacking order of the arms to in front or behind the body to give different effects.
复杂粘贴各种各样的初始线性小人,调整和旋转四肢纳入一系列可怕的忍者打击的立场,以便调整叠加的武器前面或后面的机构提供不同的效果。

With each individual character, repeat the process of merging shapes and colouring the objects to produce a group of cool ninjas. However, no ninja would be complete without combat accessories…
每个字符,重复进行合并的形状和颜色的物体产生的一组酷酷的忍者。然而,没有忍者将是不完整的打击accessoriesa € |(注:这里不知道是什么东东 估计就是以下所做的武器)

Create a staff using a long thin rectangle, fill the object with brown while adding a black outline.
创建一个忍者使用一个细长的矩形,用棕色填充对象与布朗同时增加了黑色的轮廓。

Create a pointed object using the Star Tool, using the Direct Selection Tool select each of the points of the path from each arm of the star.
创建一个指出物体使用星工具,使用直接选择工具从每个星星顶部选择每一个路径点。

Upon selecting the Rotate Tool, the point of origin will automatically default to the centre of the object. Click and drag to adjust the overall shape of the star.
经选择旋转工具,起点将自动默认为物体的中心。单击并拖动调整整个星星图形。

Draw a solid circle in the centre and fill the death star weapon with a metal like grey. Add a black outline and a secondary inner stroke with a slightly darker grey.
吸取了坚实圈的中心,并填写死亡恒星核武器用金属灰。添加一个黑色的边缘和一个略黑一点的灰的二级边缘。

Using the same colour scheme, draw a triangle by dragging a shape with the Star Tool and pressing the downwards cursor key to reduce the number of points. Grab the upper most point with the Direct Selection Tool and drag vertically.
使用相同的颜色,画一个三角形的形状通过拖曳的星星工具和紧迫向下的光标键,以减少点的数量。选中最上面的点用直接选择工具并垂直拖动。

Select and drag the middle two points to squash the lower half into a sword like shape. Finalise this with a small brown rectangle, remember the majority of the handle would be concealed by the hand so only a small section is required.
选择并拖动中间两点压扁下半部为一个剑形状。最后这有一个小棕色矩形,请记住,手柄的大多数会被手隐藏所以只有一小部分是必需的。

Use the Pen Tool to neatly draw in a three sided shape to represent the chamfered finish of the sword blade.
使用钢笔工具整齐地画一个三角片面的形状表示剑斜面的完成。

Create two Nunchuk handles and the beginning and end points of the adjoining chain. With both chain elements selected head to Object > Blend > Make
创建两个把手和Nunchuk的开始和结束点的毗邻链。选择两个链子Nunchuk运用对象>混合>创建混合命令。

Go back to Object > Blend > Blend Options, enter 5 under the Specified Steps option to alter the type of blend to give a line of individual items
返回对象>混合>创建混合命令,输入5根据指定步骤选择改变类型的混合,使一条线个别项目(注:参考图)

Use the Pen or Pencil tool to draw a temporary line to symbolise the desired route of the Nunchuk chain, with this and the blend selected, go to Object > Blend > Replace Spine.
使用钢笔或铅笔工具画一个临时线,象征着理想的路线Nunchuk链,这和混合选择,转到对象>混合>替换脊柱。

Group each individual weapon and move into place on the various characters, completing the group making them ready for action!
群组每个武器并移到各种人物上,完成组合使他们准备采取行动!

Using basic vector shapes, a stylish and fun image can be created using just the basic functions of Adobe Illustrator.
使用基本矢量形状,仅仅使用基本功能的AI软件,时尚和有趣的形象可以被创造。


推荐相关中文教程

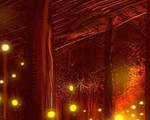
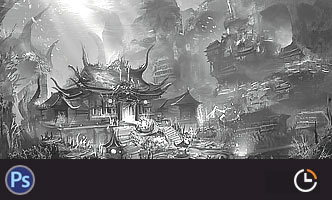
场景美术绘画进阶教程 光影渲染篇
本教程作为场景概念设计绘画方面的进阶教程,着重讲解了如何应用自定义的Photoshop笔刷和素材,讲解照明与场景绘画的关系,光线的反射定律,场景构图的固定模式,如何使用进行概念设计的创意思路方法,以及使用案例来讲解如何按照游戏项目的需求完成一个场景的绘画过程。电影MATTER PAINTING基础实战案例教学
马良老师将通过一个精美的实例,来教你如何使用Photoshop结合After Effects软件完成动态Matter Painting场景的制作,从而带你踏入专业MP行业的大门。场景概念设计实战教学之玉门关场景绘制
本教学将通过一个从零开始的玉门关场景绘制案例,带你了解如何进行场景概念设计。手绘游戏特效制作实用案例教程 闪电篇
本套教学使用具体的案例,演示了多个闪电类手绘特效的绘制流程,专门针对手游,2D游戏,手绘影视动画的液体特效制作需求设计.场景美术绘画基础教程 中国建筑篇
场景绘画和设计是漫画绘画,游戏设计生产环节中不可或缺的一环,本教学将从最基础的原理开始,教授用户如何理解和学习场景绘画,如果把握场景绘制的设计技巧,讲解场景如何控制透视,从基础的几何体开始学习空间的管理和建筑的摆放。人物角色表情表现绘画教程
本套教程从人类基础的简单表情入手,讲解不同种类的笑容,焦虑,生气,愤怒,咀嚼,吃惊,惊恐,沮丧,哭泣等等不同的表情是如何表现的,帮助学习者能够通过夸张生动的表情变化理解人类丰富的表情绘画所能传达出来的含义。构图绘画完全教学
本套课程的内容重点是学习绘画艺术的构图规律和方法。在绘画学习过程中,构图是一个重要的组成部分,学习它对于提高绘画练习和创作水平有显著的促进作用。特指纯艺和插画,海报。艺用人体解剖实用教学 下集 四肢篇
本套“四肢篇”教学是王九斤老师的《艺用人体解剖使用教学》系列教程中的下集部分,主要讲解了四肢的结构绘画要点,以及部分人体动态的基础讲解。


推荐课程


推荐教程

0回复如何使用AI 创建矢量忍者小团伙"