
本教学为翻译教学,
转载请注明来自aboutcg.net,以及注明翻译者
名称: 00.jpg 查看次数: 2 文件大小: 2.4 KB
原教学出自www.sjdigitalsculptor.com网站,原始链接如下:
http://www.sjdigitalsculptor.com/tutorials4.html
作者: Modeling : stevejubz1@hotmail.com
Texture / Lighting: yanickg@hybride.com
翻译:笨蛋!so (foxnumber)
翻译教学的书写格式及字体样式来自特种消防车教学(DiorZhang)
请尊重互联网道德,转载请注明转载出处和翻译者,谢谢!
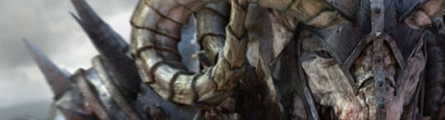
Darkness Moster: Making Of
羊头怪制作流程

Research and Concept Drawings:
The first step before starting a character is to find a subject. The look is very important but also, it is essential to consider some other aspects ; what kind of character you want, in what environment he lives, is he big or small ?
The skin texture and color will greatly depend on those previous aspects.
For this character, we wanted to play with fantasy. We researched for great references of tyrex, albinos crocodile, big bird feet and bull.
We wanted a strong character, who looks mean and crazy. Therefore, the albinos crocodile became an obvious choice as a guideline .
It was a big challenge to achieve this kind of skin look in SSS .
研究与概念设计:
在开始制作一个角色之前的第一步是找到一个主题。外观很重要,但必须同时考虑一些其他方面;诸如角色的性格,角色的生存环境,以及它到底有多大。
以上就是皮肤的纹理和色彩的主要来源。
对于这个角色,我们更倾向于奇幻风格。我们研究了大量关于白化鳄、大型鸟类的脚、牛之类的参考资料。
我们要做出一个强壮的角色,刻薄吝啬并且有些疯狂。因此,白化鳄被最终当作参考。
这类皮肤质感对我们来说是一项很大的挑战。

Darkness Monster concept drawing:
First of all, it is mandatory to put all the ideas on paper. Many sketches are nessecary to get a great design before begining modeling. For this character, we wanted to know its anatomy first. So to help us, we used many visual references from the animal research we did at the begining of the project.
羊头怪概念设计:
首先要把所有想法都画出来。在开始建模前先做大量草图,这对于得到一个非常棒的角色设计是十分必要的。对于这个角色,我们首先要构思它的解剖结构。为此我们研究了大量动物的外观。

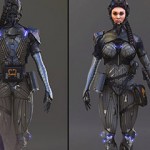
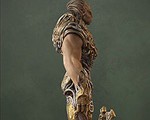
Darkness Monster Modeling:
When your concept is ready, I like to start my model with a low res mesh, this makes it easier to figure out the main features on the character. The good thing about making a low res version first, is that it is possible to send it to the rigging department early on to test the modeling deformations.
When my basic mesh is finished, I like to use Zbrush to get a better shape with the polygons.
Personally, I don’t like to start my model with a box . I prefer to start with a simple quad, duplicate the edge and then, I look for the main line. This technique is efficient to get the exact muscle shapes on your character . You could take a look at my other tutorial too see exactly what I ‘m talking about. Modeling tutorial for beginner person on Softimage XSI. ( PDF file only — 29.52 MB )
羊头怪建模:
当概念设计已经准备好,我会从低模着手,这样可以方便编辑出角色的主要特征。而低分辨率的模型的好处还有一点就是,可以早早的就发送给骨骼部门进行测试。
当我的基础模型完成,我会用zb来细化模型。
相对于box我更倾向于从片面开始一点点复制边来得到基础模型形状。这种方式可以有效并准确的找到肌肉形态。

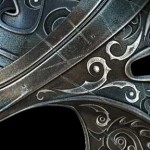
Darkness Monster Head and helmet Unwarp:
When my model is done , I like to unwrap every part of my model before starting with Zbrush. A cool trick : I like to unwrap the pieces with UvLayout and Unfold 3d.
Unfold 3d: www.polygonal-design.fr/e_unfold/index.php
羊头怪头部及盔甲拆uv:
当我的模型ok~我会在导入zb之前拆好uv(我个人喜欢用uvlayout和unfold3d)


Darkness Monster body Uv’s Unwarp:
The important thing to remember about the Uv’s , is to make sure every square on the character is equal. This step makes the texturing part easier. If you work like that, no texture scaling will be nessesary after this step.
羊头怪身体拆uv:
这里的重点是要时刻注意尽量保持每个面都被均匀展开。这步可以使得制作材质时更加轻松。

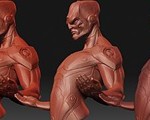
Darkness Monster Zbrush:
Every detail is made in Zbruh with different kind of alpha and brush techniques. It is also possible to extract Diplacement maps, Normal Maps and Cavity maps.
雕刻羊头怪:
我们使用zb中的alpha及笔刷来制作角色上的每一处小细节。提取出置换和法线贴图以及灰度贴图(关于灰度贴图,感谢aboutcg群中的reki提供解释,貌似是一种可以用来叠加亮暗的贴图,如有更好解释请回帖,吾会更正)

Darkness Monster Texture:
The texture choice is very important, Yannick really likes to use basic surface textures and add some paint, mix and color correct with photoshop. He never uses a texture as-is. Some 3d Total Textures are used in this process for the image’s creation. This gallery is very complete; for this reason, he used some images from 3D Total for the character.
http://3dtotal.com/ go to products –> Texture cds.
With some photoshop techniques, Yanick changed the look of the base image.
羊头怪贴图制作:
材质的选择是非常重要的,Yannick(其中一位作者)非常喜欢在ps中对基本的表面材质添加细节、颜色校正和叠加。他从来不直接使用一张未经修改的材质。在创作中,也会用到一些来自3dtotal的材质。
漫反射贴图:

置换贴图:

盔甲漫反射贴图:

盔甲凹凸贴图:

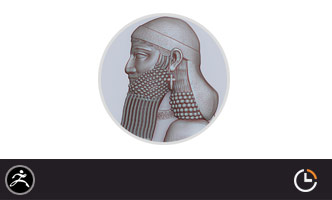
Darkness Monster Head Render Tree:
The Render Tree is really simple, a Phong for the shader and some maps. The modeling is really high detail, for this reason, Yanick use a simple Diffuse maps with a displacement maps.
No bump is nessesary for the head, maybe if you have a very big close up. At this time, the SSS shader is not connected. I want to add the SSS in pass.
http://3dtotal.com/ go to products –> Texture cds.
With some photoshop techniques, Yanick changed the look of the base image.
羊头怪头部渲染树:
渲染树的设置相当简单,一个phong材质球外加几张贴图。由于模型地细节度已经相当相当高了,yanick(其中一位作者)仅仅使用了漫反射和置换贴图。
此时,我们没有对头部使用凹凸贴图。此外,这里也没有用sss着色器,我考虑把sss放到层中去。

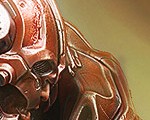
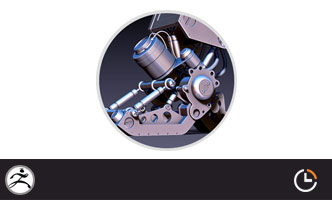
Darkness Monster Helmet Render Tree:
Same process for all objects in this image. The shader is simple, low render time!
羊头怪头盔渲染树:
相关设置如图。shader设置得很简单,渲染起来很快!

Darkness Monster Lighting:
For the lighting, it is not nessesary to create a complex rig. Just insert some light to recreate an outdoor ambiance- one sun to recreate some really nice rim light on the back border of the head or object.
In real life, the reflexion is to create, with some objects all around, an environment like, sky, ground, cars, people etc… For this reason we need to add an environment maps on a sphere in constant. The image on the sphere takes real object in an environment to simulate reality and natural outdoor details with cool variations.
With a bit of stategy and minding is possible to make the life on your creature.
羊头怪打灯:
此次打灯并没有使用一套完整的灯光。只是简单的按照户外环境放上一些灯,再用一个太阳从脑袋和物体背后做出一个漂亮的轮廓。
在现实生活中,反射是来自于周围的物体/环境/天空/地面/车辆/路人之类的东西。所以我们需要对环境球添加constant环境贴图。球上的图像不仅包含一些环境(诸如山坡上的树之类的),还可以用来呈现自然环境中颜色的冷暖变化。


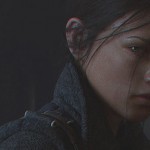
Lighting and framing test:
Yanick tried some tests to find a great and interesting framing.
灯光及取景测试:
Yanick(其中一位作者)做了些不同的尝试,从而得到了十分棒并且很有趣的角度。

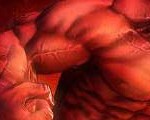
Some render passes are nessesary to obtain a great result in 3d.
The first image is a render of the key light (the sun), nice rim with Aria Light shadow.
加一些渲染层可以为最终画面得到更好视觉效果。
下面的第一张图片是对太阳光的渲染,漂亮的边缘光及区域光阴影。

Second image propose the ambien pass. (译者“笨蛋!so”在此添加“作者想说的是不是ambient pass??”)
The final gathering and the caustics propose this look, but it is very long for the render. It is possible to recreate this look with some light all around your character with little intensity and area light.
Imagine the sun in the sky, push some rays of light on an object and the rays bounce on a second object. This is the phenomen Yanick tried to apply on this character.
第二张图片来自ambient pass
这张使用了FG与caustics,但是这次的渲染相当耗时。。。然而这个pass可以为你的角色提供一些微弱的环境与区域光照。
试想一下,从太阳发射的光线从一个物体反射给另一个物体的情景。这正是yanick(其中一位作者)试图添加的效果。

Darkness Monster Precomp.
Same lighting ( Key + Ambien ) before comp. This render is from XSI. No photoshop effect in this image.
羊头怪预合成:
同样的的灯光设置下,xsi直接渲染的结果。没有ps过。

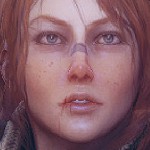
Darkness Monster Final comp.
All steps finished, Yanick comps all maps, adds blur and a little effect in Photoshop.
羊头怪最终合成:
所有步骤都结束后,Yanick(其中一位作者)把所有图片合成到一起、添加模糊及一些ps中的小效果。

Software use for this project: Softimage XSI, Zbrush and Photoshop
使用的软件为:softimage, zbrush, photoshop
呼。。。终于翻译完毕。。。
刚好十一放假在家开始尝试xsi,对于这款小日本非常喜欢的软件我还不是很熟练,我只能说这款软件真的很有趣,并且手感和maya非常相近。虽然这个教程的结果很漂亮,但不建议新人一开始就选择它去深入研究,毕竟在国内使用的极少。玩玩的话确实挺不错的。


推荐相关中文教程

AboutCG Zbrush4R7高级机械建模实战教程
本套教学由我们两位强大的老师,《造型巨匠Zbrush》的作者田涛老师,和《Zbrush完全教学》的作者Purplesun老师一起打造,两位老师分别使用Zbrush4R7制作多个机械模型案例,难度由浅入深,对制作当中用到的功能命令一一讲解。并时时分享提高建模效率的宝贵经验。Zbrush 4R7新功能中文视频教学
zbrush4 r7将会是zbrush4版本的最后一次升级,下一个版本将会是zbrush5。本次更新进一步完善了zbrush的功能,首次提供了几乎全套的多边形建模命令,大部分硬表面对象的建模将不需要借助第三方软件。ZBRUSH全案例实战中文视频教学
本套视频教学以案例为主,通过11个完整的zbrush雕刻案例,由浅入深的带领大家掌握zbrush常用的雕刻流程和雕刻技巧,全套教学在25小时以上。ZBRUSH完全中文视频教学
ABOUTCG现在荣幸的向您推荐这款Zbrush4的完全商业教学:本套教学包含150个片段,共计30小时的内容,全面细致的介绍Zbrush的所有功能,无论你是初学者,进阶者。还是行业人士,本套教学都能为您提供一个思路,一个方案和一份竞争力。
推荐课程


推荐教程

0回复如何制作羊头怪"