
本教学为翻译教学,转载请注明来自aboutcg.net,以及注明翻译者
原教学出自zbrushcentral网站,原始链接如下:
http://www.zbrushcentral.com/zbc/showthread.php?t=074301
作者: Bulgarov Vitaly
翻译:KanyaYan ( 翻译中有错误之处请谅解,并请帮忙指出!谢谢!)
关于译者:

转载请写明出处和翻译者为KanyaYan,谢谢。
Re-Angel
再生守护神制作流程
Hey guys!
I did this image for the GNOMON Gallery Show: COGNOSCO. Feel free to find out more information about the gallery here:http://www.gnomongallery.com/current_show.php
嗨伙计们!
我这张图片是为Gnomon Gallery Show(COGNOSCO)做的。想要免费得到更多信息可以去这里:http://www.gnomongallery.com/current_show.php
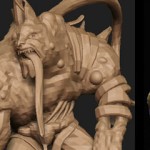
So I used my old “Angel” model and just re-rendered it. Here is the final image:
我用了我之前的“守护神”模型并重新修改了下。这里是最终图片:
点击放大:

I’ve also created a showcase tutorial article about how to create cool renders using ZBrush and Photoshop.
Let’s get started.
我已经写了一个展示如何使用ZBrush和Photoshop创建很酷的效果教程的文章。
现在就让我们开始吧。
Preparing model and document.
Create new document with size twice as bigger as image you want in result. I do that every time I render any model in ZBrush because in the end I shrink the image at half size to get rid of “jagged” lines. I also press AAHalf button to see a preview for smooth-rendered antialiased image.
准备模型和文件
创建新的文件,文件要是你的最终效果图的2倍大。我每次这样做是因为我在ZBrush里渲染任何模型最后都会把图缩小一半来消除锯齿。我总是使用AAHalf按钮(快捷键Ctrl+0)来查看。


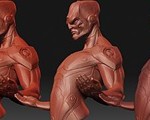
Set up your model on the canvas as you want to see it rendered. You will need masks for easier selections at further comp stage. So just go through all subtools one by one and export image with Flat render turned on.
在画布上设置好你想要渲染到的模型。你需要用遮罩在后面的合成阶段很容易地选择模型。这样把所有subtools里的模型一个一个用Flat render输出。

As result you get bunch of images with masking for each separate subtools.
这样你就得到一大堆每个分开的subtools带遮罩的图片。

There is also an alternative way to do that: Select each one of your subtools and fill it with a certain color from the ZBrush color palette. As result you get just one image with separated colors for different subtools. So you can group your mask colors depending on what kind of material you have. Here is how it works:
还有另一种办法就是:选择每一个你的subtools并使用Color>FillObject填充一个颜色。这样你就得到一张不同subtools被颜色区分开来的图。你的不同遮罩颜色取决于模型是什么样的材质。这里是制作演示:

After that you may no longer worry about the model itself and just concentrate on rendering. Save document as *.zbr file. It will convert everything you have on canvas to pixols. You can use that as advantage and add more small details to the surface.
Use Directional Brush with Stroke set to DragRect and Texture turned off. Also make sure you apply it at Zadd or Zsub mode. I used alphas of damaged metal, bullet holes, some logos, etc. You can also add some dirt using Simple Brush with Spray stroke and mode set to RGB. Here is an example how it works
在你确定模型没问题后就可以集中渲染了。保存文件为*.zbr格式。你可以利用这个优势在表面添加更多的小细节。
使用Stroke的DirectionalBrush设置为DragRect并把Texture关闭。还要确保你使用的是Zadd或Zsub模式。我用alphas制作受损的金属、弹孔和一些标志等,你还可以使用Spray stroke的Simple Brush添加一些污垢并设置为RGB模式。这里有一个例子如何制作:

Light.
One thing you have to keep in mind is that the light in ZBrush doesn’t affect the same way to MatCap as it does to standard materials. For example: If you change the position of light and use Best render with Shadows turned on for Standard materials you get the full response of your settings including color of the light, highlight and shadow orientation. Dealing with MatCap you get only shadow orientation because MatCap material already keeps information about color of the light. So I usually render bunch of images with different materials and light setup and just combine them together.
Here is my light settings I used for rendering this model.
灯光
有一件事你必须记住的是,ZBrush里的灯光对MatCap和对标准材料影响不同。比如:如果你在标准材料下改变光的位置并使用带Shadows的Best render将得到及时反应你的设置,包括光线、高光、阴影方向。处理MatCap你只是阴影方向,因为MatCap 材料已使有关的光的颜色信息。所以我通常把不同的材料和光的设置来把一大堆图像结合在一起。
这是我本人对这个模型渲染的简单设置。

You can play with Shadow Curve and Shadow Length setting. Depending on what kind of lighting you want to get you may want to adjust these values. Also if you have too noisy shadows you can increase rays amount to get smoother GI effect
你可以调节Shadow Curve和Shadow Length设置。根据你的灯光类型你可以按需调整这些值。此外,如果有太嘈杂阴影你可以增加rays数值来获取更柔和的GI效果。
Materials.
I’ve found at ZBC tons of super-cool materials and I take my opportunity here to thank those people who do such great stuff and share that to ZBC community. To render this image I apply many different materials to the model and then combined the renders in Photoshop using blending modes of layers. Cool thing about MatCap I’d like to mention is that it’s easy to refine it if you’re looking for something more specific.
材质
我在ZBC发现了超酷的材料,我趁此次机会在这里感谢那些共享自己制作的出色材料在ZBC里的人。为了做这个图片我应用了许多不同的材质到模型上,然后在Photoshop中使用混合模式层来合并起来。我想提的是很酷的MatCap,如果你正在寻找更特殊的效果,它很容易做到。
Here is a trick:
1.Create a square size document, 1024×1024 is fine.
2.Press “AAHalf” button to get Antialiased half sized image.
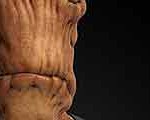
3.Create a sphere, subdivide it a couple times until you get it smooth, apply a MatCap you want to refine and export image. Make sure your preview shadows are turned OFF in render menu.
4. Exported image you can edit in Photoshop and do whatever you want from changing color to adding more highlights. If you want to stay in ZBrush just convert sphere to pixols and use ZBrush 2D brushes. To do that just turn off Edit Objet mode (“T” hotkey) and pick a brush you need.
5. Import your edited image of rendered sphere back in ZBrush. I just added more highlights and edited color a bit.
6. Go to Materials/Modifiers/Material Texture and replace old sphere image with a new one.
这里是一个技巧:
1.创建一个1024×1024大小的文件。
2.按“AAHalf”按钮把图像缩小一半大小来添加抗锯齿。
3.创建一个球体,把它细分几次使它光滑起来,按你要求应用MatCap来改进并输出图片。确保render>preview shadows是关闭的。
4.你可以在Photoshop里编辑你输出的图像并按你想要的改变颜色以便增加更多的高光。如果你想在ZBrush编辑只要转换成球体去pixols再使用ZBrush 2D brushes。要做到这一点需要关闭编辑展模式(快捷键“T”),并选择一个你的需要的刷子。
5.导入你在ZBrush里编辑好的渲染图像。我只是增加了更多高光和一点颜色。
6.转到Materials/Modifiers/Material Texture并用新的图替换掉以前的。

You can go further. Combine this MatCap with ReflectedMap Material which is standard in ZBrush:
你可以进一步编辑。将这个MatCap的材质加上ReflectedMap Material:

Rendering and Comp.
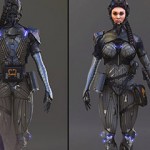
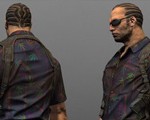
I rendered the whole model with applied materials of different metals, some materials for the suit and skin. To reapply a material to your *.zbr document use Simple brush with “M” mode turned on. Select a material you want to apply. Set the stroke to DragRect and fill the model with the new material. Render image with shadows turned On and save it. As result you get bunch of images with different materials applied to it.
This is what I got:
渲染和合成
我使用了不同金属材质、一些军事机甲和壳的材质符于整个模型,并渲染它。使用Simple brush(打开“M”模型)重新用一个材质给你的*. zbr文件。选择一个你想应用的材质想。将stroke设置为DragRect,填充一个新的材质给模型。打开render>shadows并将其保存。这样你就可以得到一大堆应用不同材质的图像。
这是我得到的:

I combined these renders in Photoshop using masks I exported from ZBrush earlier. It helped to quickly apply a material to proper parts of the model. During gathering all passes together I keep the image values pretty soft for easier control. I also try to avoid overdone shadows or highlights. You can always enhance shading/lighting/contrast after.
Here is an approach I use to organize materials using masks I rendered before:
我在Photoshop里把之前从ZBrush里导出的图用遮罩来合并起来。它有助于快速给模型适当部分应用相应的材质。在把所有的层合起来的时候为了便于控制我保持了图的柔和度。我尽量避免过度阴影和高光现象。你总是可以提在之后进行调整着色/照明/对比度。
下面是我渲染前使用遮罩创建材质的方法:

To add or enhance reflections at metal surface I put rendered reflection pass on top of rendered metal pass and used mostly “Color Dodge” mode. You can also use Soft Light or Overlay mode depending on what kind of metal or light type you want to achieve, just don’t over-burn the image with too many Overlay passes ? You can also duplicate the layer and keep at the same comp Color Dodge and Overlay for better control.
Here is an example:
添加或加强在金属表面的反光,我把反光层设置为颜色减淡方式放在金属层的上。您也可以使用柔光或覆盖方式,这取决于你想实现何种金属或光的种类,只是不要使用太多覆盖层,这样会使得图过于黑。您也可以复制层保持用同样的颜色减淡和覆盖合成以便更好的控制。
下面是一个例子:

Regarding to different metal renders I mix the layers at Normal mode and just tweaking opacity of layer. When I’m pretty much done with general material look I move to scratches. Here is the trick:
As you can see from previous image I have a Base metal layer below Red metal. I did on purpose: if I use eraser on Red metal, the Base metal material will pop up. That is logically the same what happens in real world when a painted metal gets scratched. But there is a more flexible way to add scratches – it’s creating a mask. The advantage of that is that you can go back/forward in adding/removing scratches by switching color between black and white. This method is good for production texturing as well.
对于不同的金属表现我只是调整正常模型下的层透明度。我在在基本完成一般材质的时候就开始制作划痕了。这里有个技巧:
正如你在前面的图里看到的,我有一层基本金属层在红色金属下面。我的目的是:如果我在红色金属层上用橡皮擦就可以露出下面的基本金属材质。这在逻辑上是相同的,现实中当涂漆的金属被刮伤后的效果。但有一个更灵活方法添加划痕——就是创建遮罩。该好处是,你可以很轻松地切换黑色和白色来返回/前进或添加/删除来制作。这是一个制作纹理很好的方法。

Here is a work-in-progress what I got using this approach.
这个是我这样制作得到的效果。

As you can see it’s still pretty flat and boring in terms of color/tone and texture details. So after this I will add dirt, do a quick over-paint. You can play also with fog pass rendered in ZBrush and apply it as Multiple or Overlay pass to enhance feel of depth.
Here is a trick you can use when refining an image: duplicate flattened layer and set to Overlay Mode. Then use Blur filter, play with the radius and pick one what works better. After you’ll probably want to adjust levels and reduce pure black. The image below shows the effect. As you can see the image after applying blur at Overlay mode layer has nicer mood because of contrast and filtered color flow.
你可以看到它仍然相当平,调整颜色、色调和纹理细节。之后我再添加污垢,做一个快速的覆盖。你可以在ZBrush里渲染fog并应用它通过正片叠底或覆盖来加强深度效果。
这里是一个方法你可以优化图象:重复看上去很平的层,设置为覆盖模式。然后进行半径模糊处理,调节半径并挑选一个较好的效果。之后,您可能要调整色阶,降低纯黑色。下面的图片可以看出效果。你可以看到在应用模糊后覆盖层的效果更好,这是因为对比度和色彩过滤流量的关系。

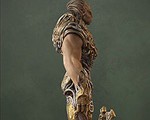
I did that overlay pass to all painted metal parts. After this I moved to other metal stuff and suit parts, refined the color here and there, painted a background, accentuated some highlights, added more dirt.
Here is work-in-progress image.
我覆盖到所有涂漆的金属部分。之后,我移到其它金属材料和适合的部分,优化色彩,画了一个背景,突出一些高光,增加了更多的污垢。
以下是工作过程中的效果。
点击放大:

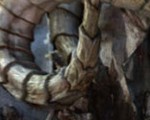
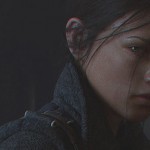
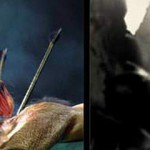
At this point I thought it would be cool to change the light and background to more warm tone. So I duplicated the layer (flattened image), applied blur to it. Went to HUE/Saturation, shifted the color to yellow. Then I refined background a bit. I used a smoke photo and distorted/twisted the image to create the effects.
Here is screenshot:
我认为它应该更冷,现在太亮了,而背景要更温暖的色调。因此,我复制图较平的图层,再模糊它。用色相/饱和度,让颜色偏向黄色。然后我优化一下背景。我用smoke photo和distorted/twisted来调整图创造效果。
下面是截图:

I also wanted to desaturate a little some of the parts of armor, so I created HUE/Saturation layer control with mask.
Here where you go to do that:
我还要把装甲某些部分去色一点点,所以我创建色相/饱和度和遮罩层的控制。
这里你可以看到:

And then click here to create mask:
然后点击这里创建遮罩:

Conclusion
This is pretty much all my tips & tricks for the process of rendering models using ZBrush and Photoshop. At the end I shrinked the image, adjusted a bit HUE/Saturation and added sharpness.
That’s it. Hope you liked that and hopefully you grabbed some useful tricks from this article.
结论
这是我在渲染模型制作中使用ZBrush和Photoshop所有的方法和技巧。在最后我缩小图象,调整一下色相/饱和度和增加点锐化。
就是这样。希望你喜欢的,希望你在本文里获得一些有益的技巧。


推荐相关中文教程

AboutCG Zbrush4R7高级机械建模实战教程
本套教学由我们两位强大的老师,《造型巨匠Zbrush》的作者田涛老师,和《Zbrush完全教学》的作者Purplesun老师一起打造,两位老师分别使用Zbrush4R7制作多个机械模型案例,难度由浅入深,对制作当中用到的功能命令一一讲解。并时时分享提高建模效率的宝贵经验。Zbrush 4R7新功能中文视频教学
zbrush4 r7将会是zbrush4版本的最后一次升级,下一个版本将会是zbrush5。本次更新进一步完善了zbrush的功能,首次提供了几乎全套的多边形建模命令,大部分硬表面对象的建模将不需要借助第三方软件。ZBRUSH全案例实战中文视频教学
本套视频教学以案例为主,通过11个完整的zbrush雕刻案例,由浅入深的带领大家掌握zbrush常用的雕刻流程和雕刻技巧,全套教学在25小时以上。ZBRUSH完全中文视频教学
ABOUTCG现在荣幸的向您推荐这款Zbrush4的完全商业教学:本套教学包含150个片段,共计30小时的内容,全面细致的介绍Zbrush的所有功能,无论你是初学者,进阶者。还是行业人士,本套教学都能为您提供一个思路,一个方案和一份竞争力。
推荐课程


推荐教程

0回复Re-Angel 再生守护神制作"