本教学为翻译教学,转载请注明来自aboutcg.net,以及注明翻译者
原教学出自EVERFLOW STUDIOS网站,原始链接如下:
http://www.everflow.com/support/tutorials/AO/Everflow_AmbientOcclusion3.html
http://www.everflow.com/support/tutorials/AO/Everflow_AmbientOcclusion4.html
作者:Bruce
Email:webmeister@everflow.com
翻译:freeyy
关于译者:

请尊重互联网道德,转载请注明转载出处和翻译者,谢谢!
这是个系列教程,这是后面的两个部分。
3.Creating custom occlusion maps
3.创建自定义遮挡贴图
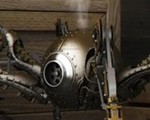
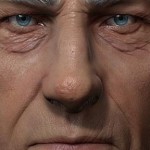
The skin shader for this model includes Sub Surface Scattering (SSS). This effect is mostly noticeable at the edges of the model as well as the ears. The AO Shader does a great job of accentuating details, but in this instance the Occlusion in the ears hides most of the SSS effect.
这个模型的皮肤着色器包含的次表面散射(SSS)。这个效果在模型的边缘以及耳朵的地方大部分区域显而易见。AO 着色器在一些突出的细节起到了很好的作用,不过在这个实例中耳朵内的遮挡因为 SSS 效果而大部分隐藏了。
What we will do is create a map for the AO shader that will control the strength of the effect, making it weaker at the ears so we keep more of our hard earned SSS.
那么我们这么做才能为 AO 着色器创建一个贴图从而控制这个效果的强度,使它在耳朵区域减弱,同时更多的保持我们努力得到的 SSS。

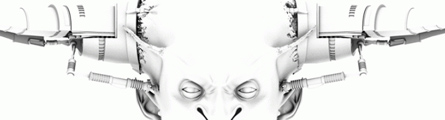
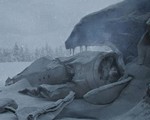
Above: an example of the Ambient Occlusion/Displacement with and without the ‘weight’ map. I didn’t want the Occlusion to obscure the detailing of the horn nub displacement as well as the ears.
上面:环境遮挡/置换以及没有“权重”贴图(译者:指黑白的置换贴图)的一个例子。我并不希望遮挡模糊掉角状物的置换以及耳朵上的细节。

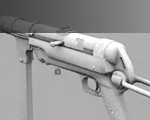
Left: The resulting composite render. The Sub Surface Scattering is still very visible on the left ear.
左边:合成后的渲染结果。次表面散射仍然在左耳上清晰可见。

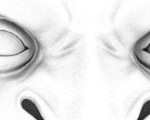
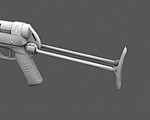
Below: The weight map for the Occlusion. (Wireframe included for your reference)
下面:遮挡使用的权重贴图。(包含线框供你参考)
The application of this technique is quite simple. Using the existing mapping coordinates we paint a simple grayscale image indicating where we want less of the Ambient Occlusion effect. The darker the area, the less Occlusion will be rendered. Absolute black results in no Occlusion rendered on those polygons.
这个技术的应用是非常简单的。利用额外的贴图坐标我们绘制一幅简单的灰度比例图像来标注我们希望那里的环境遮挡效果较少。暗色的区域,将渲染较少的遮挡。在那些多边形上绝对的黑色将导致没有遮挡会被渲染。
Once we have our map painted, we apply it to our custom Occlusion Material. Click On the Surface Slot in which we have our Ambient Occlusion Base Material. Next click the map box next to the Dark Parameter. Select Bitmap.
一旦我们有了我们绘制好的贴图后,我们将把它应用到我们的自定义遮挡材质上。在我们已有的环境遮挡基础材质上点击 Surface 贴图通道。然后点击 Dark 参数傍边的贴图按钮。选择 Bitmap。


Next scroll down to the Output options on our Weight map. Click Invert. This will invert our image. We could have drawn the map initially this way, white on black, but I find it easier to paint black on white over the wireframe and simply invert it in max as opposed to painting it White on Black.
下一步卷动到我们权重贴图的 Output 操作部分。点击 Invert(相反)。这将会反转我们的图像。我们可以在开始的阶段把这个贴图绘制成,也就是在黑色上的白色,不过我找到了更容易些的方法,把黑色绘制在白色覆盖的线框图上然后简单的在 max 翻转它,就好像他是在黑色上绘制的白色一样。


Apply our material to the object in question. Press render. Shake it like a polaroid picture.
应用我们的材质到先前谈到的物体上。点击渲染。 然后….(不翻译这个,这老外有毛病~~)
4 Alternative applications for the shader
4.着色器可选择的应用程序
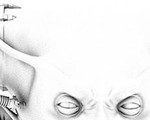
I will briefly touch upon another possible use for this shader. I sometimes use it to help define mass when using Toon Shaders. This by no means is the only alternative use for this, just one of many. Please experiment and enjoy. Below is a simple comparison with the raw Toon render and the composited Toon render with Ambient Occlusion. Note the accentuation of detail of the eye sockets as well as the side of the head. These details don’t detract from the Toonlike feel, but add important surface information to the viewer.
我将简短的涉及到这个着色器其它可能的用途。我有时候在利用卡通着色器的时候利用它来帮助定 义体积。这里并不意味着这是它唯一可以利用的地方,而是许多方 面的其中之一。请尽量实验和享受吧。下面是原始卡通渲染与用环境遮挡合成的卡通渲染的一个简单比较。注意眼窝以及头部的侧面被强调出细节。这里的细节并没 有因为卡通样式的感觉而减少,而相反的为观察者添加了重要的表面信息。


hat’s it for now. I hoped this has helped and as usual; feel free to contact me with any questions, comments and suggestions.
-Bruce Updated 5.13.05
暂时就这样吧。我希望这篇文章就像往常一样能有帮助;若干有问题、意见和建议的话可以随意联系我。
-Bruce 于 5.13.05

推荐相关中文教程

3DSMAX动力学特效实战教学
本套教学将通过24章实例教学,来向你详细讲解3DSMAX的动力学特效在电视包装与广告中的应用。VUE自然景观实战案例教程
本套教学是由MG录制。讲解分析了vue的海水材质问题,以及全中国首次以案例的形式讲解vue与maya的结合运用,如何将maya的角色动画导入到vue场景文件中做遮罩并且渲染。3DSMAX国外粒子案例效果解析
本教学通过27个实战案例,教您如何用3DSMAX结合ParticleFlow本身以及扩展的ParticleFlow Box 1、Box 2、Box 3、功能包,结合Vray渲染器,来制作流行的广告和电视包装中的粒子特效效果。无论是常见的粒子聚合,分散,动态粒子替换,粒子矩阵,粒子动力学,本套教学都有相应的案例。3DSMAX国外流体案例效果解析
本教学通过20个实战案例,教您如何用3DSMAX结合Realflow,FumeFX, ParticleFlow插件,来制作流行的广告和电视包装中的流体效果。无论是常见的液体,烟雾,流体碰撞,沙粒变化,水墨表现,本套教学都有相应的案例。2.5D商业游戏场景制作教程 进阶篇
在本教程中,Freeyy老师将从零开始,向你讲解如何根据确定的主题进行前期准备,随后建模,绘制贴图,制作材质,最后再进行细节调整,完成一个商业游戏级别的2.5D场景画面。Substance Designer贴图材质系统完全教学
本套Substance Designer教材是由AboutCG陶仁贤历经三个月的潜心研究,录制完成。从Substance Designer在游戏行业的流程入手,逐一介绍产品特点,界面,以及内置的200多个节点的原理和结构。并通过多个实例教材为您展示从零开始制作贴图,Substance Designer与Maya Anrold渲染引擎的互动,Substance Designer与Max互动、Substance Designer与Unity 3D引擎互动、Substance Designer与UnrealEngine3/UDK互动。Mentalray for max实战教程
本教程共包含超过42小时以上的视频教学内容,共18章 132课,通过大量实例,详细讲解了3ds Max平台下的Mental Ray1渲染器的使用基础和实战方法。是一部非常完整详细的3dsMax版的Mental Ray渲染器的教学.arnold for maya渲染器完全教学
Arnold渲染器是基于物理算法的电影级别渲染器,正在被越来越多的好莱坞电影公司以及工作是作为首席渲染器使用。与传统用于CG动画的Scanline(线扫描)渲染器(Renderman)不同,Aronld是照片真实,基于物理的光线追踪渲染器。


推荐课程


推荐教程

0回复如何使用AO贴图来增强细节3、4"