
本教学为翻译教学,转载请注明来自aboutcg.net,以及注明翻译者
原教学出自Sketchy Pictures网站,原始链接如下:
http://sketchypictures.com/tutorials/cinema_4d_tutorials/planet_tutorial/planet_tutorial_pt1.html
作者: Sketchy Pictures
网站:http://sketchypictures.com
翻译:SO
Planet
小小大星球

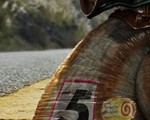
For this tutorial you’ll need to start out with a panoramic image. They’re not hard to create, you can get professional lenses and tripods to make some killer panoramics. I created this image using a digital camera on a tripod, taking a picture each time I rotate the camera a few degrees. I then used Photoshop’s Photomerge feature to create the image below out of 25 individual pictures. I’ve included the image above in the “tutorial assets” section so that you can follow along from here.
在本教程中,首先需要一个全景图。全景图并不难制作,你只需要找个专业的镜头再配上个三脚架,就能得到一张相当相当棒的全景图。我使用数码相机配合三脚架,每照一张图片旋转一些角度的拍摄方式来得到一圈各个角度的照片,然后把这些图片放到ps中合出如下一张全景图。

Step 1:
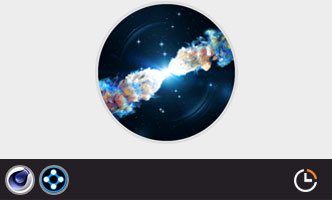
Rotate the image 180 degrees, then go to Filters -> Distort -> Polar Coordinates and choose Rectangular to Polar. This will take the panoramic image and turn it into a ball.
将图像旋转180度,然后使用filters>distort>polar coordinates工具将图像转变成一个球型

Step 2:
Ok now we need to correct the distortion caused by the Polar Coordinate Filter. So go ahead and select Edit -> Free Transform (or Command + T) and drag the image to the right till the globe looks like the correct shape.
使用edit>free transform命令将图像拉伸成正常比例的球体。

Step 3:
Now use the Clone Tool to fix the “pinching” in the center of the globe. Also feel free to adjust some of the colors in the image to make it stand out more. I created a levels and vibrant adjustment layer to increase the contrast and saturation of the image
现在使用克隆工具修补球形中心点附近的图像拉伸。与此同时,使用调节层增加图像的对比度和饱和度。

Ok now on to the second part of this tutorial, creating the 3D text.
下面我们开始制作三维字体。
Ok so here’s part 2 of the Planet Tutorial, we’re going to use Cinema 4d to create the 3d text like in the image above. Feel free to use the software of your choice, this is a technique that can be easily duplicated in other 3D apps.
好了~在这第二部分当中我们来用c4d制作球体上的三维文字。
Step 1:
Create a new background by going to Objects –> Scene –> Background.
创建一个新的背景。

Step 2:
Then create a new material and import the image you create in the first part of the tutorial into the color.
Now drag and drop this material on the background object your created. You’ll notice that the picture is a little stretched. No problem, just go to the render settings and change the width and height to fit the actual image size of the image.
将第一部分做好的图片导入到新材质球的颜色中。并添加新材质到背景。你会发觉图片有些拉伸,去渲染设置中将宽高比设置成图片的数值就可以解决这个问题。

Step 3:
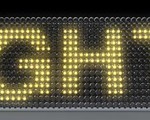
Now select the Text tool and create the words to go across the globe.
When you’re done create an “Extrude NURBS” object and drag the text into the Extrude NURBS to create the 3D text. Adjust the extrude distance to 100m or more.
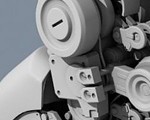
Also make sure to position your camera directly in front of you object. You can see in the image below that plane is lined up with the center of the globe.
现在创建一个字体。
新建一个”Extrude NURBS”并将你创建好的物体添加进去,从而得到一个三维文字。将挤压距离设定成100m或者更大的数值。
同时要确定的是,将你的摄像机摆到物体的正前方去。摆出如下图的效果。

Step 4:
This is an optional step, it depends on how you want your text to look. For this step we want a two color font on the globe.
So duplicate the Extrude NURBS object, name one “text caps” and the other “text fillet.”
这步可做可不做,做不做取决于你想让你的字体看上去是什么样子的。在这步中我们把extrude nurbs物体复制一次,一个用来显示边缘颜色一个用来显示正面颜色。


Step 5:
So now in the “text caps” object make sure under the Caps tab that it’s set to only caps.
For the “text fillet” object make sure it’s set to “Fillet” and use the settings to the right to create an interesting look to your font.
现在将上一步复制出来的其中一个extrude nurbs物体改成只显示”caps”,将另一个extrude nurbs物体改成只显示”fillet”,如图所示。

Now create two different colored materials and apply one to the “text caps” object and the other to the “text fillet” object. You should get an image like one below.
现在为两部分物体分别指定不同颜色的材质,结果如图。

Step 6:
Group the two text objects together in a group and call the group “text group.”
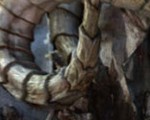
Now create a “Wrap” effector and drag it into the text group. You’ll see it will start to warp the text into a sphere shape.
将两部分物体打组,并将组改名叫作“text group”。
为text group组添加”wrap”效果器。你将会看到你的文字变成如图所示的球面效果。

Step 7:
Now adjust the settings of the Wrap to fit the globe, you can use the settings I used to help you out.
现在调节一下wrap的参数,以达到理想效果。

Step 8:
Now create a sphere object and move it behind the text. Scale it up to fit perfectly with the planet in the background.
We’re going to use this to capture the shadows from the text, making it look like the text is actually part of the planet and not just floating in the air.
创建一个球体,并将球体移动到文字的后面去,缩放大小使它正好和背景中的球体一致。
我们将利用这个球体模拟出文字在星球上的影子。

Step 9:
Now drag and drop the same texture you created for the background onto the sphere object. Now click on the texture icon to load the texture settings and change the Projection to Frontal.
Now are texture is perfectly projected on the sphere, when you render this there shouldn’t be a noticeable difference in the image.
将背景的材质球拖拽给球体。然后到材质标签中将映射方式改为”Frontal”。
现在球体的纹理和背景一致了。

Step 10:
Create a light and change the Type to Area and turn on Soft Shadow Maps. Position it off to the upper left side of the globe.
Create a second light and position it to the lower right of the globe, this will be our fill light. Turn the intensity down to 90% and change the color to a light blue. Also turn off the shadows.
创建一个Area Light,并打开Soft Shadow Maps。将灯放到场景的左上方去。
创建另一个灯光,并放到右下,这盏灯是我们的辅助光,将它的强度调整到百分之九十,并改为亮蓝色。关闭它的阴影。


Step 11:
Ok now to add a little more realism to the scene… Go to Objects -> Scene -> and add a Sky object.
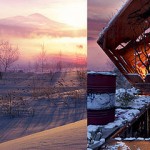
Drag the same globe texture for the background and sphere onto the sky object. Now turn on the Ambient Occlusion and Global Illumination options in your render settings. Hit render and you’ll see a noticeable difference with these two features turned on.
最后我们要为图象增加一点点的真实感。在场景中添加一个天空物体,将背景材质拖拽给天空物体。

并打开Ambient Occlusion 与 Global Illumination的渲染方式。下面两张图中,左边是上一步的渲染结果,右边是明显感觉不同的修改后的渲染结果。


译者注:这教学通看一遍才发现有很多需要改进的地方,比如可以给球体放个合成标签上去,只用球体显示阴影,对应球体的光照分层出来叠加上去。这样做的话球体边缘不会显得那么平- -
有问题可以参与答疑


推荐相关中文教程

CINEMA 4D TFD和X-PARTICLE星云案例实战教程
本套教学将教您如何结合C4D和AE制作星云场景,重点学习C4D流体特效插件TFD和粒子插件X-Particle的配合使用方法(包括插件基础功能讲解),以及AE后期星云场景的合成的技法。
推荐课程


推荐教程

3回复小小大星球制作流程"