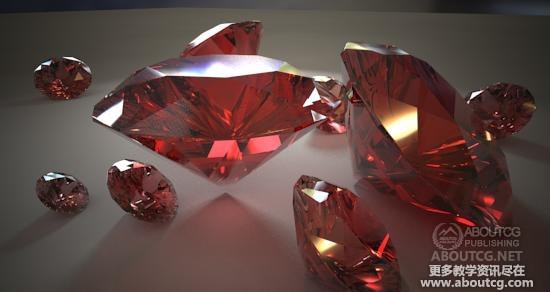
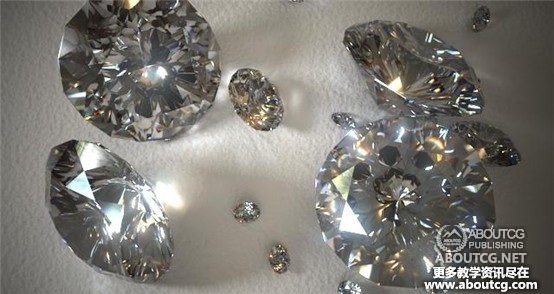
Looking at the gems above (rubies, perhaps?), the small ones are just as deeply red as the big one, and the tip of the big
one is just as deeply red as the thickest part of it. That doesn’t look… correct.
看上面的宝石(或者是红宝石?),小的和大的同样深的红色,大的钻石尖端和它最厚的地方颜色一样深。这看起来并不…正确。
What we need to do is to enable attenuation through the medium instead. To do this we need to set our transparency
color back to white (basically, treat the surface itself as completely transparent), and move to the falloff settings within the material:
我们需要做的是开启通过介质的衰减来代替。为了做到这一点,我们需要把我们的透明色设置回白色(基本上,把表面本身看成是完全透明的),
并且移动到材质的衰减设置里:

We can use the same color as before, but we just have to set up a distance; at how thick a piece of material would you expect to see that color?
Thinner than this will be less colored, thicker will be more deeply colored.
我们可以和之前一样使用相同的颜色,但我们只需要设置一个距离;你希望在多厚的材料看到颜色?薄于这个厚度会变浅,厚了会加深。
NOTE: It is important that this color has no component of 100%, and no component of 0%. If you were to set it to 1,0,0 red,
it would be just as bad as the nonphysical setting. A better “red” would be something like 0.9,0.1,0.1, meaning,
it lets through a lot (but not all) red, and very little (but not zero) of the other colors.
注意:重要的是,这个颜色成分没有100%,也没有0%。如果你将它设置为1,0,0红色,它将和非物理的设置一样差。一个更好的
“红色”会像0.9,0.1,0.1,这意味着它允许通过大多数(但不是全部)红色,和非常少(但不是零)的其他颜色。
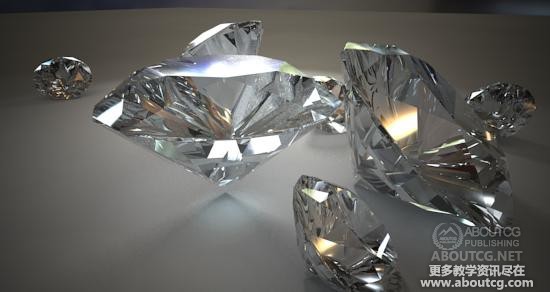
Here is our result:
这是我们的结果:
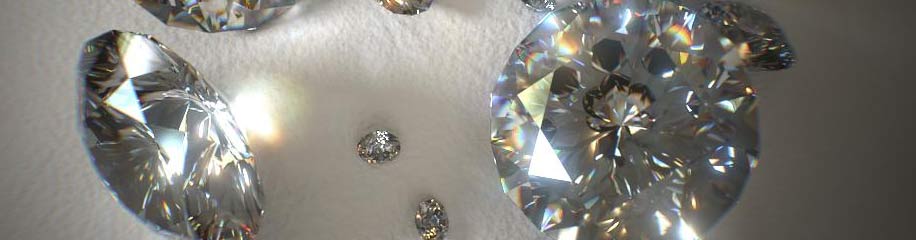
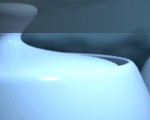
But ideal diamonds are pretty much completely transparent, so for our excercise we will turn this
falloff inside the mateial off completely! Uncheck the “Max Distance” and get:
但理想的钻石是非常透明的,所以对于我们的练习,我们将完全关闭材质里面的衰减!取消选中“Max Distance”,得到:

Caustics
焦散
Finally, it is time for those elusive Caustic effects. First we must make sure the material is set up to actually do caustics,
since Arch&Design (mia_material) has an explicit option to NOT do that. If we used the “Physical Glass” preset, this will already be set up for us, but lets make sure
最后,是时候处理那些难以捉摸的焦散效果了。首先我们必须确保材质实际产生焦散,因为Arch&Design有一个明确的选项不要这样做。
如果我们使用了“Physical Glass”预设,这将为我们设置好,但还是让我们确认一下
Also we must make sure that caustics are turned on in the render itself. To get nicer “sharp” caustics,
I tend to lower the number of photons per sample, and set the filter to “cone”.
我们也必须确保在渲染中打开焦散。为了得到更好的“锐利”焦散,我倾向于降低the number of photons per sample,并设置filter为“cone”:
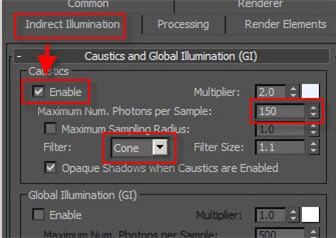
Generally, the Multiplier should always be 1.0, but we can allow ourselves some artistic licence here and
turn it up a tad. But in general, since we are using the photometric lights, we should be getting the physically
correct caustic brightness out-of-the-box. If they seem to weak, its probably beacuse people intuition of how
bright they “should” be tend to be very overestimated.
通常,倍增器应该永远是1.0,但是我们可以艺术性调高一点。但是一般来说,由于我们使用的是photometric lights,
我们应该得到正确物理学正确的焦散亮度。如果他们减弱了,那可能因为人们的直觉高估了。
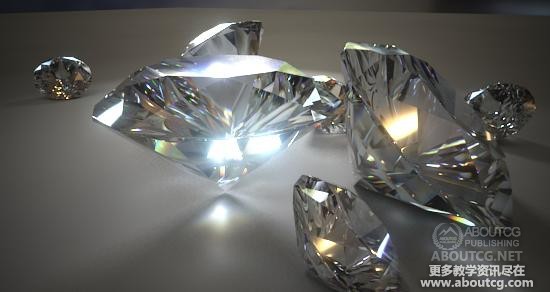
We get this image:
我们得到这张图:

Notice how the shadows actually became darker? This is because they were previously faked by simply
attenuating the light a little bit, bit now the light is properly concentrated in the caustic effect instead. So this is correct.
注意阴影实际上是如何变黑的呢?这是因为它们是在之前通过简单衰减灯光伪造的,现在灯光在焦散效果中适当集中。所以这是正确的。
A final touch on this image is to apply some glare.
最后一步是添加一些眩光。
Both real world cameras and human eyes perceive a “glow” around superbright objects, partially due
to scattering in the atmostphere, but actually much more due to scattering in the light path (lenses) and
the imaging surface itself (the film, the CCD, or our retina).
真实世界相机和人眼都会感知到超亮物体的“光晕”,部分由于散射在空气中,但实际上更多由于散射在光路(镜头)和成像表面本身(胶片,CCD或我们的视网膜)。
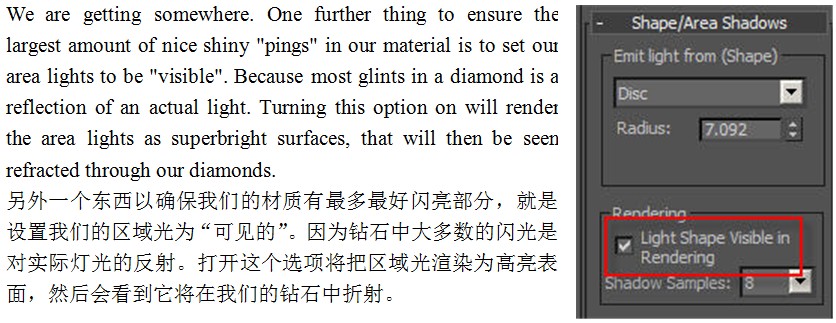
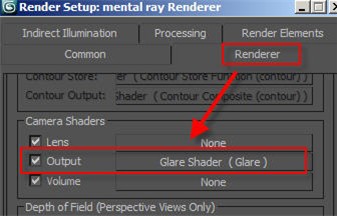
When adding the “Glare” output shader, we get the following image:
当添加“Glare”着色器输出的时候,我们得到以下图片:

Notice how it looks much brighter without actually being any brighter at all. That’s psycho-optics at work.
A white pixel just looks white. A white pixel with a glow around it, and you’ll be reaching for your sunglasses…. ![]()
注意为什么它看起来更明亮但是并没有真正变亮。那是心理学光在起作用。一个单独的白色像素只是看起来是白色的;一个白色的像素周围发光,你会想找你的太阳镜….☺
And now – finally – time for Dispersion
现在终于有时间处理色散
Dispersion is when different wavelengths refract differently. I guess the most obvious case of this is a rainbow.
色散(http://en.wikipedia.org/wiki/Dispersion_%28optics%29)是当不同波长折射不同产生的。我想最明显的例子就是彩虹。
Real sunlight is a spectra containing basically an infinite number of wavelengths at once,
and each of the different wavelengths will refract slightly differently… i.e. when a sunray hits a surface,
one would (in principle) need to trace an infinite amount of rays around the scene to get the “real” effect.
真实的阳光是一个包含基本上无数不同波长光的光谱,并且每一个不同的波长折射将略有不同…即当太阳光直射一个表面,
我们(原则上)需要跟踪无数的射线在场景周围来获得“真实的”效果。
Computers aren’t very fond of doing an infinite number of things – at least not if you want them to ever finish.
So there are several ways to simulate this w. various techniques.
电脑不喜欢做无限的事情——至少除非你希望他们能够完成。所以有几种方法来模拟这个w. various技术。
The technique we will be using here is a very low-tech one – we simply render the scene multiple times with slightly
different IOR’s, colorize each of the renderings based roughly on the “color” of that wavelength, and combine the result.
Et voila, we have a dispersive render.
我们在这里使用的这项技术将是一个非常简单的——我们只是多次渲染不同IOR的场景,依据波长“颜色”粗略的给每一个渲染着色,
并且将结果合成在一起。就这样,我们有了一个色散渲染。
To aid in this I slapped together a little piece of maxscript. Go to your Maxscript menu and choose “Run Script”.
A small dialog will pop up with some options.
为了帮助实现这个,我制作了一个小maxscript(我会上传到论坛上)。在你的maxscript菜单,选择“Run Script”。将会弹出一个小的对话框和一些选项。
Simply put, the script will render your image multiple times, while modifying the IOR of your material. But to do this,
it needs to know what “your material” is.
简单地说,脚本将在你改变材质IOR的时候多次渲染你的图像。但要做到这一点,它需要知道“你的材质”是什么。
It tries to be clever and find any material named “Diamond”, but if it doesn’t find it, you will have to click the “pick material” button,
and choose the material from the scene that you are using (in Instance mode).
它会聪明的试图寻找任何名为“Diamond”的材质,但如果没有找到它,你需要点击“pick material”按钮,并选择从你的场景中选取材质(在实例模式)。

hen you need to set the IOR you want it to use, and how the amount of “dispersion”. In gemology “dispersion”
is pretty much defined as the change in IOR across the visible spectrum, so I tried to mimic this in the script,
but it’s a bit hacky and probably not accurate at all, so take it for what it is.
然后你需要设置你想要的IOR,以及多少量的“dispersion”。在宝石学“dispersion”定义为IOR横跨整个可见光谱的改变,
所以我在这个脚本中试图模仿,但是它可能根本不正确,所以将就用吧。
When you are done setting up, you can hit the “Do Dispersion Render” button.
(Note: The script does not save the image, you will need to do that yourself from the image window)
当你完成设置,点击“Do Dispersion Render”按钮。(注意:脚本不保存图像,你需要自己从图像窗口保存)
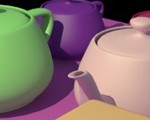
The “3 bands” mode does three renders, one each for red, green and blue, and looks like this:
“3 bands”模式做三次渲染,分别为红色、绿色和蓝色,看起来像这样:

The “6 bands” mode does six renders, for red, yellow, green, cyan, blue and magenta,
and is a more subtle effect, but more likely to yeild a “nicer” looking rainbow effect:
“6 bands”模式做六次渲染,分别为红色、黄色、绿色、青色、蓝色和品红色,
并且是一个更细致的效果,但很可能呈现出一个“更好的”彩虹效果:
And as a final pièce de résistance, we can enabled depth of field on the camera.
作为最后的主菜,我们可以开启相机的景深。
In 3ds Max, this is done by using a ‘multi pass render effect’ on the camera.
This is a bit of a misnomer because it isn’t really a “multi pass” effect at all,
but it re-uses the UI concept of other 3ds Max “multi pass” effects, so that’s where you’ll find it. Sorry,
it wasn’t me who put it there ![]()
在3ds Max,这是通过使用“multi pass render effect”在相机上。这有点用词不当,因为它并不是一个真正的“
多通道”效果,但它使用了3ds Max其他“多通道”效果的UI,所以,你会在那找到它。对不起,不是我把它放在那里的:)
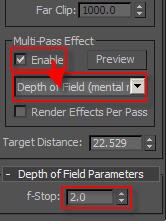
You simply set the f-stop of the camera, and you will get the physically correct depth of field assuming that
你只需设置镜头的f-stop(光圈),并且假设如下两条,你会得到正确物理学的景深
• your scene units are properly set up, AND
• your Aperture Width (in the render dialog) makes sense.
• 你的场景单位设置适当
• 你的Aperture Width(在渲染窗口)是合理的
That will give you this “ultimate” render – and we are pretty much done:
这将给你这个“终极”渲染,我们已经差不多完成了:

Of course, we can exaggerate the dispersion effect for arts sake (simply turn up “Dispersion” a bit):
当然,我们可以为了追求艺术性而夸大色散效果(只需要调高“Dispersion”一些):

Finally, the script also supports a somewhat hacky “chromatic abberation” mode, where it introduces the Lume
“Distortion” lens shader, and modifies the pincushion/barrel distortion slightly for each of the colored renders,
if you want to go really Crazee. This is one result of that:
最后,脚本还支持一个“chromatic abberation”(色彩像差)模式,采用了Lume “Distortion” lens着色器,
并略微改变每个颜色渲染的pincushion/barrel distortion(枕形/桶形畸变)。这是其中的一个结果:

Hope this was helpful.
希望这会有帮助。
Unfortunately, you can’t cash these diamonds in a bank, nor sell them on eBay…
不幸的是,你不能在银行用这些钻石兑现,也不能在淘宝上卖它们……

您可以能还会喜欢这些内容:
 mentalray 使用环境闭塞 (AO) 作为一个独立的通道
- 三维现实主义渲染:实用简单的工作流程
- 通过V-Ray或mental ray创建 天鹅绒/绒面革 材质
- mental ray sample – MR 采样详解
- Mentalray in 2011
- MentalRay 一点点“环境”的乐趣
- Mental Ray毛发渲染
- 3dsMax2011的MentalRay基础 1/2
- 3dsMax2011的MentalRay基础 2/2
- 3dsmax与Marmoset toolbag面部皮肤实时渲染教程一枚
- Making Of ‘Betty’ 制作贝蒂小姐
- 3d技术基础知识:教你认识反射和折射
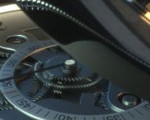
- 如何制作精美挂表
- 如何使用AO贴图来增强细节2

推荐相关中文教程
3DSMAX动力学特效实战教学
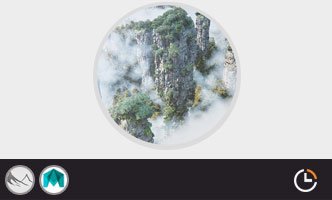
本套教学将通过24章实例教学,来向你详细讲解3DSMAX的动力学特效在电视包装与广告中的应用。VUE自然景观实战案例教程
本套教学是由MG录制。讲解分析了vue的海水材质问题,以及全中国首次以案例的形式讲解vue与maya的结合运用,如何将maya的角色动画导入到vue场景文件中做遮罩并且渲染。3DSMAX国外粒子案例效果解析
本教学通过27个实战案例,教您如何用3DSMAX结合ParticleFlow本身以及扩展的ParticleFlow Box 1、Box 2、Box 3、功能包,结合Vray渲染器,来制作流行的广告和电视包装中的粒子特效效果。无论是常见的粒子聚合,分散,动态粒子替换,粒子矩阵,粒子动力学,本套教学都有相应的案例。3DSMAX国外流体案例效果解析
本教学通过20个实战案例,教您如何用3DSMAX结合Realflow,FumeFX, ParticleFlow插件,来制作流行的广告和电视包装中的流体效果。无论是常见的液体,烟雾,流体碰撞,沙粒变化,水墨表现,本套教学都有相应的案例。2.5D商业游戏场景制作教程 进阶篇
在本教程中,Freeyy老师将从零开始,向你讲解如何根据确定的主题进行前期准备,随后建模,绘制贴图,制作材质,最后再进行细节调整,完成一个商业游戏级别的2.5D场景画面。Substance Designer贴图材质系统完全教学
本套Substance Designer教材是由AboutCG陶仁贤历经三个月的潜心研究,录制完成。从Substance Designer在游戏行业的流程入手,逐一介绍产品特点,界面,以及内置的200多个节点的原理和结构。并通过多个实例教材为您展示从零开始制作贴图,Substance Designer与Maya Anrold渲染引擎的互动,Substance Designer与Max互动、Substance Designer与Unity 3D引擎互动、Substance Designer与UnrealEngine3/UDK互动。Mentalray for max实战教程
本教程共包含超过42小时以上的视频教学内容,共18章 132课,通过大量实例,详细讲解了3ds Max平台下的Mental Ray1渲染器的使用基础和实战方法。是一部非常完整详细的3dsMax版的Mental Ray渲染器的教学.arnold for maya渲染器完全教学
Arnold渲染器是基于物理算法的电影级别渲染器,正在被越来越多的好莱坞电影公司以及工作是作为首席渲染器使用。与传统用于CG动画的Scanline(线扫描)渲染器(Renderman)不同,Aronld是照片真实,基于物理的光线追踪渲染器。


推荐课程


推荐教程

好 好
好
我记得张晗老师的BLOG上也有一篇关于钻石渲染的文章
ding