
本教学为翻译教学,转载请注明来自aboutcg.net,以及注明翻译者
原始链接:http://www.cgarena.com/freestuff/tut…/anemone3.html
作者:Luca Broglio, Italy
翻译:Qi
关于译者:

很久没用max了,而且以前用的是中文版的。有翻译不到位的地方,请大家多包涵。

This tutorial is dedicated to the use of hair & fur in 3ds max, a modifier that grows hair and fur over any object. Usually hair & fur is used to generate hair: in tufts, sparse, curly, long, short, braids, etc. … but rarely used for other purposes. This short tutorial will show you how to create and animate sea anemones in a few clicks.
这个教程主要是介绍3ds max中毛发系统的使用,使得可以在任何物体上生长毛发。毛发系统经常被用来产生头发:一束头发,稀疏的头发,卷发,长发,短发,发辫……但是很少用于其它目的的应用。这个简短的教程将向你展示怎样简单的制作海葵,并使之运动起来。
Sea anemones are a group of water dwelling, predatory animals of the order Actiniaria; they are named after the anemone, a terrestrial flower.
海葵是一些海生的掠夺性动物的住所,这些动物属于海葵目。因此它们被用海葵的名字命名。

Create a seabed modifying a plane as you like. This will be the distribution object.
把一个面片修改成你喜欢的样子用做海床,之后就会在这个上面产生海葵。

The second step is to create an anemone strand. To do so you can add a lathe modifier to a spline. Be sure to add enough subdivision to the mesh as you will have to bend it.
第二步是建立一股海葵。你可以用一条样条线进行车削(lathe modifier)来得到它。确保你对它进行了足够的细分,从而在后面的步骤中可以弯曲它。

Apply the hair & fur modifier to the plane. If needed it’s possible to select single face for the distribution. Initially hairs are oriented by the face’s normals in an uniform way.
对这个平面增加毛发修改器(hair & fur modifier)如果需要,你可以选中个别面进行特别的分布。起初毛发都是朝向面的法线方向的。

At this point open the panel “tools” of hair & fur, then click in the empty box “Instance node” and pick the anemone object. Instance node allows you to use any mesh instead the default hair object. Settings like hair segments, passes, etc will be ignored. Certain qualities belong to the mesh used as instance, so if you want more subdivisions you have to edit the original mesh.
然后打开毛发的工具栏,点”Instance node” 后选择海葵。”Instance node”可以使用任何网格,而不是默认的头发对象。一些像发段和枯萎的头发的设置,就不考虑了。它的质量主要取决于你之前建立的那一股海葵,所以你想要 更细的效果就要修改之前的那股海葵。

Now you will see the distribution of anemones on the floor, the scene is beginning to resemble a seascape. Now you need to refine some settings. While certain settings are ignored others are not. Density, scale, thickness are still influencing the anemones shape. Increase the size of the hairs.
现在你可以看到一些海葵分布在面上,就像最原始的一处海景。现在你需要修改一些设置。但是某些设置将被忽略有些不是。密度、大小、厚度是受最原始的那股海葵的影响。然后增加毛发的大小。

Try to use frizz and kizz parameters, watch how they influence the anemones. If the base mesh isn’t subdivided enough you’ll see sharp and unrealistic corners.
使用弯曲等参数,看会产生怎样的效果。如果基础海葵细分不够,你会看到一些尖锐的角。


Now are you confident with most parameters, try to set them properly. Then if you go in the rollout dynamics you can add a simulation to the anemone that will behave like hair, falling and folding. If you click on “live” button you’ll see the mesh gradually deforming.
你现在已经对这些参数做到了心中有数,把它们调到适当的样子。你可以增加一个模拟力场来得到像头发一样陷落和折叠的动态效果。你按了“Live”按钮后,你会看到物体在逐渐的变形。

Do not forget they will always remain “hair”, so why not comb it? The toolset for hairstyling will work, so you can use it to achieve an interesting look.
不要忘了它们现在看起来还是有点像头发,为什么不梳理一下呢?你可以使用发型工具来得到一个好看的效果。

Once you are satisfied with styling you can assign a material and proceed to render, and your anemones will finally be alive!
当你满意现在的“发型”后,赋予一个材质然后渲染,海葵就活生生的出现在你的面前了。

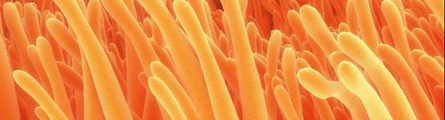
You can change the density or even assign a map to it. Here are some examples of what can be done.
你可以改变密度或者分配一张贴图给它。下面有一些例子供参考。


Now, if you really want to add life to anemones, the steps to do this are very simple. Turning on the “Live” bends down every strand. To make strands float you can raise the parameter “root hold”, for high hold value the mesh becomes totally rigid. To avoid rigidity keep root hold value low, and set the gravity to negative (type -2.33) so that it will be “attracted” to the top. Now create a space warps-> forces-> Wind and put it on a side of the scene. In the panel of hair & fur -> add it to the dynamics rollout “external forces”.
如果你想让海葵有生命,实现它的步骤也是很简单的。打开“Live”使每一股海葵都进行弯曲。为了产生漂浮感你可 以提高参数“root hold”,高数值会使物体变成完全僵化。为了避免这种情况就要降低“root hold”的数值,把引力变成负的(type -2.33)来得到海葵“吸引”到顶部的效果。建立一个风(space warps-> forces-> Wind ),把它放在场景的一边。在毛发的属性中,把风场加到动力场”external forces”中。


推荐相关中文教程

3DSMAX动力学特效实战教学
本套教学将通过24章实例教学,来向你详细讲解3DSMAX的动力学特效在电视包装与广告中的应用。3DSMAX国外粒子案例效果解析
本教学通过27个实战案例,教您如何用3DSMAX结合ParticleFlow本身以及扩展的ParticleFlow Box 1、Box 2、Box 3、功能包,结合Vray渲染器,来制作流行的广告和电视包装中的粒子特效效果。无论是常见的粒子聚合,分散,动态粒子替换,粒子矩阵,粒子动力学,本套教学都有相应的案例。3DSMAX国外流体案例效果解析
本教学通过20个实战案例,教您如何用3DSMAX结合Realflow,FumeFX, ParticleFlow插件,来制作流行的广告和电视包装中的流体效果。无论是常见的液体,烟雾,流体碰撞,沙粒变化,水墨表现,本套教学都有相应的案例。2.5D商业游戏场景制作教程 进阶篇
在本教程中,Freeyy老师将从零开始,向你讲解如何根据确定的主题进行前期准备,随后建模,绘制贴图,制作材质,最后再进行细节调整,完成一个商业游戏级别的2.5D场景画面。Mentalray for max实战教程
本教程共包含超过42小时以上的视频教学内容,共18章 132课,通过大量实例,详细讲解了3ds Max平台下的Mental Ray1渲染器的使用基础和实战方法。是一部非常完整详细的3dsMax版的Mental Ray渲染器的教学.网游角色制作女精灵实战教学
本教学以一个AAA级网游女精灵角色为案例,向您展示如何完成她的模型,UV,和贴图绘制。教学使用的软件主要是3ds max和 bodypaint, 其中建模和UV使用3ds max完成,贴图绘制在bodypaint和 PS中完成。


推荐课程


推荐教程

0回复3D MAX毛发系统制作海葵流程"