
本教学为翻译教学,转载请注明来自aboutcg.net,以及注明翻译者
原教学出自CGArena网站,原始链接如下:
http://www.cgarena.com/freestuff/tut…ing/index.html
作者: Géza Kádas, Budapest
网站:www.techtron.extra.hu
翻译:purplesun (aboutcg.net)
请尊重互联网道德,转载请注明转载出处和翻译者,谢谢!
Studio Lighting in Vray
如何使用Vray渲染静帧
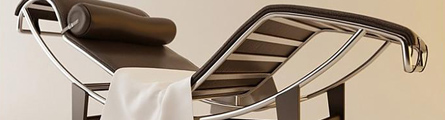
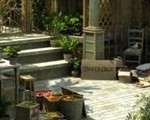
In this tutorial i will tell you the method of studio lighting. For the rendering i used Vray 1.5rc3, the latest version of the program. This famous chair called “Corbusier” was modeled in 3ds max 9. With the knowledge of this tutorial you will be able to present your models in a more ambitious way than before…
在这个教学里面我将告诉你影楼灯光的制作方法。使用的是Vray 1.5rc3进行渲染。这把著名的椅子叫做”Corbusier”,是在3ds max 9中创建的。使用本教学所讲的方法将会使你更能出色的展示你的模型。

The main parts of the tutorial are :
本教学主要包括以下内容:
* Making the environment
* 环境的创建
* Placing the lights
* 灯光的布置
* Setting up Vray for tests
* Vray的测试设置
* Shaders
* 材质制作
* Setting up Vray for final rendering
* Vray的最终渲染设置
* Postwork in Photoshop
* Photoshop的后处理
Making The Environment
环境的创建
The environment is pretty much simple. Place a plane under the model and set 3 for the Length segments and set 2 for the Width segments.Convert it to editable poly with right click on the plane and choosing “convert to:”. The next step is selecting the two edges behind the chair and pull them up while pressing the shift button… With this way create a shape around the model like in the third picture.
环境的创建非常简单。在模型下面放置一个平面,设置长度的分段数为3,宽度的分段数为2,.然后转换为可编辑多边形。接下来的步骤是选择椅子背后的两条边,按住shift键向上挤出新的面,使用这种方法创建出如第三张图所示的环绕模型的

We will use a Turbosmooth modofier on the plane, but to controll the way of smoothing we have to chamfer a few edges before.
对刚创建的平面使用Turbosmooth修改器,但在光滑前我们必须对几条边进行chamfer处理。

Now we are able to use the turbosmooth with 2 Iterations.
现在我们可以使用Turbosmooth修改器了,迭代次数设置为2.
Placing the Lights 灯光的布置
This topic is the heart of the studio lighting. We will use 3 vray lights with different strength,postion and color. This three attribute will determine the mood and the individuality of youre render. So place a vray light from left view, with the given settings.
这部分内容是studio lighting的核心部分,我们将使用三盏不同强度、不同位置和不同颜色的vray灯光。这三个属性将决定你的渲染结果的整体基调和特性。所以首先在左边放置一盏vray灯光,设置如下。

Now change to top view ,copy the light and mirror it to the X axle. Place it to the right side of the plane and use the given settings. The third light will be placed later, after the test renderings.
现在切换到顶视图,复制刚才的灯光然后在X方向上镜像。然后把这盏复制出来的灯光放置左面,设置如下所示。第三盏灯光将在后面创建,在测试完成以后。


Create a Target Camera from top view with 35mm lens, and set it up as you see.
在顶视图创建一个35mm lens得目标摄像机,位置如下所示。

All right, choose vray as youre primary renderer. Make a vray material with a light grey diffuse color, R:170/G:170/B:170. Put this material to the “override mtl” slot in the Global Switches tab.
好了,现在更改渲染器为vray渲染器,创建一个vray材质,diffuse color为亮灰色R:170/G:170/B:170.然后在全局开关卷展栏中把该材质链接到”override mtl”后面的按钮上。

Now all the objects in the scene will have this material, so this function is great to test lighting with a clay render. Later we will turn this function off. Hit F9 and lets see what we got here.
现在,场景里面所有的物体都会使用这个材质,这个功能对于灯光测试是非常好用。后面我们会把这个功能关掉,执行F9看看渲染结果。

* So this is what we have without any settings. No illumination,or any kind of sampling except the standard one. Now we need to set up vray for test renderings. It is time to move to the next topic.
*以上就是所得的结果,没有其他的设置,只使用灯光的照明没有使用间接照明,现在我们需要去设置vray进行测试渲染。
*Setting up Vray for Tests Vray的测试设置
To test the illumination in the scene we need to set up vray with low values. These are only tests ,so we only want a quick feedback from the lighting. First of all change the image aspect ratio to 1.8 in the Common tab. Go to camera view and turn on the “Safe Frame” option. Safe Frame will help you to place your camera to the right position and it is also helps to notice unwanted parts in the view.
为了测试场景的照明我们需要把Vray得参数设置的较低。因为这仅仅是测试,所以我们只需要快速的得到照明的反馈即可。首先在公用标签下改变image aspect ratio为1.8. 到摄像机视图中打开安全框,安全框可以帮助你把摄像机的位置放好同时也可以帮助你发现视图中不需要的部分。

Now here comes the capital part of the Renderer tab settings.
接下来是渲染设置面板的主要参数设置。

这是是对测试设置的简单介绍:
* Default lights: turn it off ,we do not want any light, except the vray ones.
* 默认灯光:关掉。我们只想使用vray的灯光而不像使用其他的。
* Adaptive QMC: A faster image sampling method than Adaptive subdivision.
* 自适应准蒙特卡洛:比自适应细分更快的图像采样方法。
* Mitchell-Netravali: With this antialiasing filter edges will be sharp but not crisp.
* Mitchell-Netravali::使用这种抗锯齿过滤在边缘的地方会更加的清晰并且锯齿较少。
* Irradiance map + Light cache: the mostly used GI combination.
* 发光贴图+灯光缓存:GI的最常见的组合。
* HSph subdiv: (GI samples) lower it to speed up the rendering process.
* 半球细分:(GI采样)较少的值会使速度加快。
* Show calc phase: The rendering process will be visualized, so if are not happy with the effect you don’t have to wait until the effective rendering.
* 显示计算过程:想染过程将会可见,所以如果你不满意结果可以马上停止而不用等到渲染结束。
* Subdivision: The subdiv. of lightcache controls the number of traced paths… The actual number of the traced paths is the square of the adjusted number.So with 500subdiv. 250.000 paths will be traced.
* 细分:灯光缓存的细分控制光线的数量,实际的光想追踪路径会是参数的一半,所以细分值为500,就是说有250条路径会被追踪。
* Exponential: With this type of colormapping ,colors will be saturated so you can avoid burnouts on the surfaces.
* 指数曝光:使用这个类型可以避免曝光过度。
* Dark multiplier: This controls the “Sternth” or the multiplier of dark colors.
* 黑色倍增:这个参数控制暗色的倍增。
* Render region division: set it to 32×32 ,smaller bucket size less ram will needed with smaller bucket size a faster feedback can be achieved. All right, lets see the render with the mentioned settings.
* 渲染范围划分:设置为32 x32,较小的设置会降低内存的使用,并且加快渲染设置。好了,让我们来看看这些设置的渲染结果。

It is much better than the first one. The scene is much more brighter, light is smoother and there are no burnouts. Because of the low quality settings there are GI artifacts ,noise and blurry lines. However ,these settings provide us a very efficent way of testing. Lets play with the colors to break the dull feeling of the render. Change the color of the vray light on the right to R:255/G:180/B:80. This warm orange color will take care of the monotonic lighting.
现在比第一张好多了,场景变得更亮了,灯光更加柔和并且没有曝光过度。由于渲染参数设置的比较低,所以GI的杂点比较多,线条也显得比较脏。不过这个设置提供了快速的测试反馈,让我们添加点颜色让场景更加生动,改变右边灯光的颜色为R:255/G:180/B:80.这个暖调的橙色会去掉单调的色彩。

At this point if you are satisfied with the result you can go to the next step. Creating and understanding shaders is the following topic.
如果此时你对结果满意就可以进入下一步了,创建和理解材质是接下来的工作。
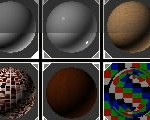
Shaders材质
In this scene i used four or five shaders. Plasctic,Chrome,Leather,White fabric, and the white background of course. Turn off the “override mtl” function in the Global Switches tab. Lets take a quick look at the settings.
在这个场景里面我使用了五个材质:塑料、铬、皮革、白色的布料,当然还有白色的背景,在全局开关卷展栏中关掉”override mtl”。让我们来看看这些材质的设置。


Diffuse: This controls the color of the material.
漫反射:控制材质的颜色。
Reflect: Pure white means 100%reflections ,black means 0% reflections.
反射:纯白表示100%的反射,黑色表示完全没有反射。
Refl. Glossiness: Controls the blurryness of reflection 1 means perfect mirror-like reflections, lower values produce blurry reflections.
反射模糊:控制反射的模糊程度,1意味着镜面反射,较低的值产生较模糊的反射。
Subdivision: This controls the quality of glossy reflections, higher values increase rendertime lower values produce noisy effect. For testing /5-8/ final rendering /15-35 or higher if necesarry/.
细分:控制反射模糊质量,较高的值会增加渲染时间,较低的值会产生噪点,测试设置为/5-8/最终渲染设置为/15-35/
Freshnel reflections: If you check it that means the strength of the reflection will depend on the viewing angle of the surface. In nature water and glass is reflecting in this manner. The strength of the reflection depends on the Freshnel IOR too. All right lets see the shaders in action…
菲涅尔反射:如果开启这个选项就表示反射的强度将取决于相对于物体表面的视角,在自然界中水和玻璃都有这样的特性,反射的强度也同时取决于Freshnel IOR的参数,好了,让我们来看看这些材质的效果。

I am pretty happy with the reflections on the leather material. I only need a little more light from above the chair, so lets put that third vraylight to its place.
我对皮革材质的反射效果比较满意,我只需要在椅子的上面再增加些亮度,所以我们将添加第三盏vray灯光。


It is important to uncheck the “Affect Specular” slot, we don’t want any specular reflection from that light ,only diffuse light.
有一点很重要就是要取消掉“影响高光”的参数。我们不想这盏灯光产生高光,只影响漫反射即可。

As we can see the bounced light reaches to the bottom of the chair too. Now the lighting and the shaders are finished so lets move on to the next topic. I will discuss the settings of the final rendering.
我们可以看到反弹的灯光也照亮了椅子的底部,现在灯光和材质都已经设置好了,让我们进入下一步,最终渲染设置。
Setting up Vray for Final Rendering Vray的最终渲染设置
At this point of the workflow it is very important to find the balance between speed an quality. I will talk about the settings globaly, because some problems can’t be solved with only changing the value of an option. So lets see the Renderer tab in this light
在该流程的这个步骤上对于找到速度和质量的平衡点是非常重要的,我将谈到全局设置,因为有些问题不能被解决除非设置正确,让我们来看看这些设置吧。

-Change the resoultion to 900×500 -Set the Adaptive rQMC image samplers min dubdiv to 2.Now thinner lines can be rendered correctly.
改变渲染尺寸为900×500-设置自适应准蒙特卡洛的最小采样细分为2.现在细小的线条将会被渲染正确了。
-Change the preset of the Irradiance map to Medium from Low.Set 50 to the HSph subdiv to achive higher quality GI.
改变发光贴图的预设值为中等。设置半球细分值为50,这样可以得到高质量的GI效果。
-Use value 1200 for the Light cache subdiv.Change the Sample size to 0,006 ,now small details will be more visible. Use value 1000 to the Pre-filter option to reduce noise.We have a lot of glossi rays so check the “Use light cache for glossi rays” option./it will speed up rendering/ For the Filter use the “None” possibility.
设置灯光缓存的细分值为1200,改变采样大小为0. 006,现在较小的细节将会被渲染出来。Pre-filter的值为1000,这样可以减少噪点的产生,我们有很多的glossy rays,所以勾选”Use light cache for glossi rays”,过滤设置为”None”会加速渲染过程。
-At the rQMC sampler use value 0,005 for noise treshold. Set the Global subdivs multiplier to 4 ,it will increase samling quality everywhere in the scene.
在准蒙特卡洛采样里设置噪点阈值为0.005,设置全局细分倍增为4,这样将会增加场景里面每一个地方的采样质量。
-You can find the Light properties in System>Lights settings. Changing the diffuse subdivision of the lights wil effect the number of the traced photons.
你可以再System>Lights settings找到灯光属性面板,改变灯光的漫反射细分将会影响到光子产生的数量。
-Change all the vraylights subdivison to 15 or 20 to avoid noisy parts.
改变所有灯光的细分值为15或者20以避免噪点的产生。
-Change all the materials subdivs to 20 in the Reflection section. With these settings the rendertime will increase a lot according to test render settings. Now hit F9 and wait until the calculation finishes.
改变所有材质的反射细分值为20,以上的设置将会相对测试渲染增加不少时间,执行F9来看看渲染结果。

This is the final rendering, no noise ,artifacts or any nerve-racking rendering trouble. A picture would not be complete without the postwork so lets move on.
这就是最终渲染结果,没有噪点或者乱七八糟的渲染问题,渲染的图片必须经过后处理,所以我们继续吧。
Postwork后处理
Launch photoshop, and load in the image. Because of the saturated colors of the exponential colormapping type. We need to add more character to the colors and play with the levels to achieve better contrast. Go to Image>Adjustments>Color balance.
启动photoshop,导入渲染的图片,由于使用了指数曝光方式,所以我们需要为颜色添加更多的个性,使用色阶编辑器增加画面的对比度,执行图像-调整-色彩平衡

Than Image>Adjustments>Levels
接着图像-调整-色阶

And here comes the finished picture…
这就是最终结果。
Congratulations ! you finished the tutorial… I hope you liked it


推荐相关中文教程

Vray for maya高级案例商业渲染流程教学
本套教程是vray的全案例流程教学,教程使用三个具有代表性的案例演示了vray的渲染参数设置经验和技巧,同时讲解了如何在实际的工作中使用这些参数来进行渲染的优化和质量的平衡。教程的内容从实际工作经验出发,详细的演示了:合理光源的布置原理,多光源合并调节,多通道渲染与合成,多象限UV的设置与渲染等高级技巧。Vray for Maya完全教学
本套教学选择最重要和最常用的核心功能作为讲解对象,所有内容占到了vray for maya全部功能的80%—90%以上。教学的目的是让学员能够加深对vray的理解,熟悉常用的vray渲染技巧,而不仅仅是记几个常用的参数。教学中很多软件原理和技巧应该是首次在vray for maya中文版教学中披露,而这些东西在帮助文档上是没有的,各位学完之后应该会打下较为扎实的软件使用基础。3DSMAX动力学特效实战教学
本套教学将通过24章实例教学,来向你详细讲解3DSMAX的动力学特效在电视包装与广告中的应用。3DSMAX国外粒子案例效果解析
本教学通过27个实战案例,教您如何用3DSMAX结合ParticleFlow本身以及扩展的ParticleFlow Box 1、Box 2、Box 3、功能包,结合Vray渲染器,来制作流行的广告和电视包装中的粒子特效效果。无论是常见的粒子聚合,分散,动态粒子替换,粒子矩阵,粒子动力学,本套教学都有相应的案例。3DSMAX国外流体案例效果解析
本教学通过20个实战案例,教您如何用3DSMAX结合Realflow,FumeFX, ParticleFlow插件,来制作流行的广告和电视包装中的流体效果。无论是常见的液体,烟雾,流体碰撞,沙粒变化,水墨表现,本套教学都有相应的案例。2.5D商业游戏场景制作教程 进阶篇
在本教程中,Freeyy老师将从零开始,向你讲解如何根据确定的主题进行前期准备,随后建模,绘制贴图,制作材质,最后再进行细节调整,完成一个商业游戏级别的2.5D场景画面。Mentalray for max实战教程
本教程共包含超过42小时以上的视频教学内容,共18章 132课,通过大量实例,详细讲解了3ds Max平台下的Mental Ray1渲染器的使用基础和实战方法。是一部非常完整详细的3dsMax版的Mental Ray渲染器的教学.网游角色制作女精灵实战教学
本教学以一个AAA级网游女精灵角色为案例,向您展示如何完成她的模型,UV,和贴图绘制。教学使用的软件主要是3ds max和 bodypaint, 其中建模和UV使用3ds max完成,贴图绘制在bodypaint和 PS中完成。


推荐课程


推荐教程

谢谢分享