Copyright © be_fast
Edit by Stryker
Source: http://www.3dm3.com/tutorials/vray_render_studio/index.php
翻译:Zivix
Setup car rendering studio with V-ray
使用Vray设置渲染布景。

1. Open 3DS Max . Press F10 to show rendering settings dialog or the button with the tea-pot icon on the main panel
as shown on the picture 1. At the Common tab expand Assign Render rollout and show the dialog to select V-ray reder
by pressing the button with the triple-dot.
1.打开max,按下F10或者按照图1的指示点击茶壶按钮打开渲染控制面板,然后按下切换渲染器按钮指定Vray为渲染器。

2. Set parameters of V-ray and Indirect Illumination rollouts as shown on the following pictures:
然后按照图片所示,设置好Vray的渲染规则

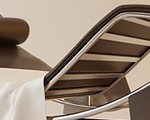
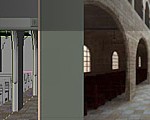
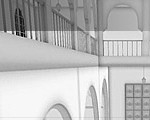
3. Then create a line (not necessarily NURBS, but my opinion is that nurbs is the quickest and high-quality mean to create beautiful bends what is actually needed to form the wall of the studio)
然后创建一个曲线(不一定非要是NURBS,但是我在这儿使用的是NURBS,因为可方便的创建漂亮的曲度来表现这个渲染布景的墙面

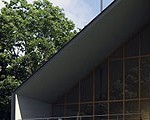
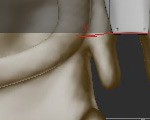
4. Apply Extrude modifier to the newly created spline to model the wall. After extruding convert the object to
Editable Poly or apply Edit Poly modifier to make bottom of the wall fluently become a floor. For this purpose
select the lower edges of the wall, hold Shift and move a lower verge forward, and after Scale Down you will get
new edges. After that operation you will have the floor with a direct corner in relation to walls. To create a
smooth transition select edges along connection of the wall and the floor and apply Chamfer. To create the same forceiling apply Symmetry simply. And also use Mesh Smooth for smoothing the surfaces.
使用挤压工具配合曲线来创建墙体,然后可以塌陷物体到编辑多边形物体,并且创建出底部的地板,要得到地板的效果,可以渲染底部的边,然后按住Shfit键,然后拖拉,缩放完毕以后就可得到新的边界,创建出地板,这样可以得到一个拐角是垂直的地面和墙体,如果要得到光滑的过度,可以给交界的边做倒角,如法炮制天花板,然后给他细分光滑。

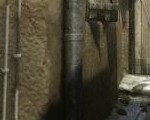
5. We will create illumination with V-ray lights. You can see how to locate them correctly on the picture 5. All ofthe light sources are directed on walls. And exactly this will give the effect of the dissipated light as in the
real studio. Intensity (Multiplier of every source is to be picked up by the means of several experimental
attempts)
我们将要创建Vray的全局照明,你可以在下图看到如何布光,所有的光线都指向墙壁,这样可以得到类似真实的布景散射照明,(实践出真理)

6. We do not have the last wall. Just make it as an ordinary plane. Well and for the tests of the auto paint create
a sphere in the middle of the studio.
我们还没有最后的墙面,直接建立一个平面,测试墙面的东西就用球球吧

7. After the required foreshortening of the Perspective View is selected (along the diagonal through the studio
having the sphere in the center of the view) press Ctrl+C to create a Camera and fix the chosen foreshortening. Infuture pressing P will allow you to switch to the Perspective View mode fast twisting the view and turning it andthen going back to the fixed one simply pressing C. This will help you designing your environments really fasthaving the final shot controlled as well as the overall scene structure.
调整透视,(将所要表现的物体放置在画面的中间)然后按下Ctrl C来创建出摄像机,然后修正透视,之后按P键切换的透视图都会继承这写透视设置,然后做些小的调整以后,可以在此按下C,这可以让你快速的调整所需要的视图结构。
The most important effect of a studio is the illumination that goes beneath the background. I achieved the best
results with Target Spot. Target it from a sphere on a wall as shown on the picture 7. To make the background
illuminated softly from beneath you would have to decrease Hotspot/Beam and increase Falloff/Field in Spotlight
Parameters
对于这个布景最重要的事情就是背光,我认为最好用聚光灯来表现,图7显示背光灯的布置,为了得到柔和的效果,你可以减少Hotspot/Beam以及增大Falloff/Field等参数
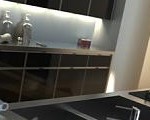
8. Create material of the studio – ordinary grey V-ray material (picture 8) and material of the auto paint (picture 9)
创建布景的材质,只需要一个简单的灰色Vray材质。

9. Making a render test by F9 at the active type of camera/perspective or pressing the Render button as shown on the picture 10
按下F9键来渲染测试。

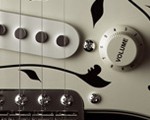
10 Add another thin Vray Light as on the picture 11 for more contrast thin reflections.
增加其他的Vray材质来增加反射的效果

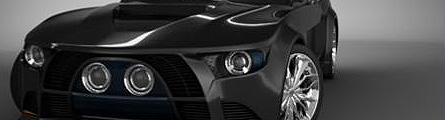
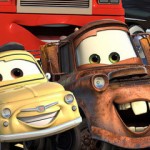
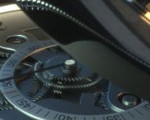
12 The same scene and material of paint on the car model.
同样的场景和材质渲染汽车模型的效果。
Good luck! Don’t forget that surpassing my result is very simple – just experiment more.
祝好运,别忘记超过这个简单的教学设置很简单,只要多实验就可以了。


推荐相关中文教程

Vray for maya高级案例商业渲染流程教学
本套教程是vray的全案例流程教学,教程使用三个具有代表性的案例演示了vray的渲染参数设置经验和技巧,同时讲解了如何在实际的工作中使用这些参数来进行渲染的优化和质量的平衡。教程的内容从实际工作经验出发,详细的演示了:合理光源的布置原理,多光源合并调节,多通道渲染与合成,多象限UV的设置与渲染等高级技巧。Vray for Maya完全教学
本套教学选择最重要和最常用的核心功能作为讲解对象,所有内容占到了vray for maya全部功能的80%—90%以上。教学的目的是让学员能够加深对vray的理解,熟悉常用的vray渲染技巧,而不仅仅是记几个常用的参数。教学中很多软件原理和技巧应该是首次在vray for maya中文版教学中披露,而这些东西在帮助文档上是没有的,各位学完之后应该会打下较为扎实的软件使用基础。


推荐课程


推荐教程

0回复Vray的渲染环境设置"