
本教学为翻译教学,转载请注明来自aboutcg.net,以及注明翻译者
原始链接:http://www.cgarena.com/freestuff/tutorials/ae/oldfilmlook/index.html
作者:Andy Halls
翻译:鬼谷子(aboutcg.net)
关于译者:


Old Film Look
老电影效果
Step 1: Create a New Composition and Import your video clip. Place the clip in your Timeline. Create a New Solid (Control+Y). Make the solid the same size as the composition. Name the layer scratches.
第一步:新建一个合成导入你的视频素材。把视频拖到时间线上。新建一个和合成同大小的固态层(快捷键Ctrl+Y)。命名为scratches.
Step 2: To the Scratches layer, apply the Fractal Noise effect and choose the following settings.
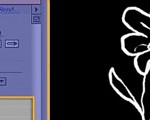
第二步:选中Scratches层,添加Fractal Noise效果按照下图设置参数。

Note: Decreasing the amount of noise is done by changing the Contrast and Brightness settings. Increasing the Contrast value to 250 and lowering the Brightness value to -100 is a great place to start. If you want to increase the number of scratches, begin by increasing the Brightness value. To make some scratches more pronounced than others, increase the Contrast value.
注意:降低噪声数量是通过改变对比度和明度实现的。把Contrast的之增加到250,降低Brightness的值为 -100。如果你想增加划痕的数量,可以增加Brightness和 Contrast的值让它变得更加明显。

Step 3: For moving the scratches, Create an initial keyframe for Offset Turbulence by clicking on the Stopwatch icon. Move to the end of the Timeline by pressing the End key on your keyboard. Change the Offset Turbulence Y-axis value to a really large negative number (like -10000). The reason we are using a negative number is so the scratches move from the bottom of the screen to the top。
第三步:为了使划痕移动起来,可以给它的Offset Turbulence属性打关键帧通过激活它的关键帧开关就好了。按键盘上的END键到时间线的最尾出把Offset Turbulence Y-axis 改成一个很大的负值(比如-10000)。我们使用负值的目的就是为了为了让这些划痕线从屏幕的底部移动到顶部。
Step 4: When you are satisfied with your scratches, change the Transfer Mode of the Scratches layer to Add. Now that we have completed the scratches for our old film, let’s create some crud. The crud build up I am talking about usually comes from improper storage of the film. This can lead to stains, mildew, mold and the like to damage the film.
第四步:当你对这些划痕线比较满意的时,把它的Mode 改成Add。现在就有那么点老电影效果的意味了,再给它添加一些污垢,这些污垢大多是由于影片贮存不当造成的。这就会产生污点,霉点还有一些对电影有害的东西。

Step 5: Create a New Layer. Make this layer the same size as your composition, change the color to black. Apply the Fractal Noise effect to this layer. Change the Contrast value to 350 and lower the Brightness value to -100. Reduce the opacity to 50% (according to footage).
第五步:新建一个和合成大小一样的 Layer,将其颜色变为黑色。给它添加Fractal Noise效果,把Contrast的值增加为350,降低Brightness 的值为-100.降低opacity到50%。

Step 6: With the Timeline Indicator at the beginning of the Timeline, create an initial keyframe for the Evolution control in the Effect Controls Panel. Move the Timeline Indicator to the end of the Timeline and crank the Evolution amount to a high number. In this example I used a value of 2000 rotations and change the Transfer Mode to Silhouette Luma.
第六步:在时间线开始出,给Evolution属性打一个关键帧。然后到时间线末尾处在K帧把它的数值提升到一个较高的数值。在这个教程里我个人使用Evolution值为2000,把Mode改为Silhouette Luma.

Step 7: To create a Sepia look for your movie, create an Adjustment layer, and place it just above your video layer in the Timeline. To the Adjustment layer, apply the Tint effect. Change the Map White To color to the Sepia tone of your choice.
第七步:为了给电影增点乌黑色,新建一个Adjustment layer,把它放到你视频素材的上面。给Adjustment layer添加Tint效果,按你个人喜好把Map White To的颜色改为乌黑色。

Step 8: Make the solid the same size as the composition, change the color to black. You will need to apply a round mask to the layer. An easy way to do this is to change the Mask Tool to an Oval and then double click on the tool icon. This will create an oval mask the size of the layer. Invert the mask and change the Feather Amount to 200. If you want to go for even greater realism, create another Adjustment layer in your Timeline and adjust the Brightness/Contrast of the video layer over time.
第八步:把solid 的大小调整到于合成大小一致,颜色改为黑色。个他添加一个圆形的Mask。简单的方法就是把Mask Tool 的模式切换到 Oval 然后双击工具图标。这会创建和Layer一致的椭圆Mask。反转在调节其羽化值为200.如果你还想更真实一点,在新建一个 Adjustment layer然后在调节它的Brightness和Contrast参数到你满意为止。


That’s it. Hope you enjoy this small after effects tutorial.
就是这样,希望你喜欢这个简单的AE教程。
本教学翻译完毕!
其实Old Film效果可以有很多方法来制作。
Vegas里有内置的效果就可以完成。
这是我在Vegas里的截图,希望对大家有帮助!

作者用了过多的文字说明,我把他的第2,3步属性值的改变和第五步的参数设置重新截图,把其属性改变的地方都用红色标记了出来,便于大家观看。
第2,3步的参数见下图

第5步的参数设置见下图


推荐课程


推荐教程

0回复如何使用AE制作老电影效果"