
本教学为翻译教学,转载请注明来自aboutcg.net,以及注明翻译者!
关于译者:

原始链接:http://www.cgarena.com/freestuff/tut…aks/index.html
原作者:Andy Halls (USA)
andyhalls123@yahoo.com
翻译:鬼谷子(aboutcg.net)
Ipod Commercial Lighting Streaks
Ipod广告发光条纹

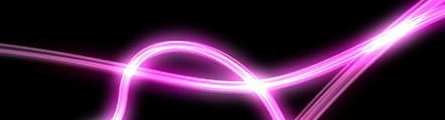
In this tutorial we will create lighting streaks like you have seen in the latest commercial of Apple Ipod Nano. To accomplish the project we will you a third party plug-in called Trapcode Particular. This is a wonderful plug-in for After Effects which generates particles and help in creating various effects.
在这个教学中我们将模仿制作最近流行的Apple Ipod Nano的广告发光条纹。完成这个项目我们需要第三方插件Trapcode Particular的支持。Trapcode Particular是一款很酷的AE插件它可以帮你生成粒子可以做出丰富的效果。
Step 1: Create a new 640 x 480 size composition for 10 seconds or more as per your requirement. Also create two new layers named Background and Particles respectively.
第一步:创建一个640 x 480大小的合成,10秒钟或者按照你个人的需求设置。在新建两个层分别命名为Background 和 Particles 。
![]()
Step 2: Create Layer > New > Light (Ctrl + Alt + Shift + L). We used this light as an emitter for generating the particles. Also change the name of the light to “Emitter” because Trapcode particular emits particle from only those lights which named Emitter.
第二步:新建一个灯光Layer > New > Light 或者快捷键Ctrl + Alt + Shift + L。我们使用这盏灯光作为生成粒子的发射器。再将它的名字改为”Emitter”这是因为Trapcode particular只能从哪些叫做Emitter的灯光中发射粒子。
Step 3: Select an Emitter layer and Press P to bring the position settings of the light. Now press Alt and click on the position stopwatch so we can write an expression to move a light. Because moving a light manually is a cumbersome process. So we will apply a wiggle expression on the emitter. Please write “wiggle(.5,300)” (without quotes).
第三步:选中Emitter层按P键打开他的位移属性设置,接下来按住ALT键单击码表图标输入表达式来移动灯光。因为手动移动灯光是一个繁琐的过程。所以我们使用了表达式来达到想要的效果。在表达式输入行中键入wiggle(.5,300)

Step 4: Now your light is moving all over the composition. You can change the values in the expression as per your requirement. Select a layer named Particles and apply a trapcode particular plugin. Select the following settings as shown in the image.
第四步:现在合成中的灯光可以移动了,你可以按照你的需求改变表达式中的数值。给Particles层添加trapcode particular效果。按照下图的数值设置!

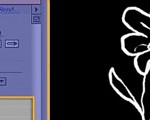
Step 5: If you play the timeline then particles are not emitting as you are looking for. So we have to create a design and need to give a custom design to the particle. So select New > Composition of size 50×50 and create a design as below through masking the solid layers. I know working on such a small comp is very difficult so increase the magnification to 400%. Also reduce the opacities of these solid layers to 10-15%.
第五步:如果你在时间线上预览动画例子并没有按照你期待的那样发射出来。所以,我们要做一个设计,需要给粒子 一个自定义的设计。现在新建一个50×50得合成,通过对固态层的遮罩来达到我们需要的效果。我知道在这样小的合成中工作是很困难的,所以我把大小提高到 400%.把不透明度降到10-15%.


Step 6: Drag this composition in the original composition at the bottom and hide the layer by clicking the eye button because we don’t need to show in the scene.
第六步:把这个合成拖到原始合成的最底部,单击眼睛图标隐藏它因为我们不需要在场景中看见它。

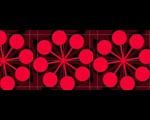
Step 7: Go into the Particular settings again and change the following settings. Now you achieved the effect on which you are working.
第七步:按照下图的参数再次设置Particular的参数。现在你就实现了你想要的效果。

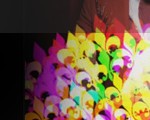
Step 8: Create an adjustment layer and apply a hue and saturation effect to change the color of the effect. Apply a glow effect on this adjustment layer and increase the radius and intensity.
第八步:新建个调整层添加hue and saturation效果改变颜色。给调整层添加glow效果增加radius和intensity的数值。


推荐课程


推荐教程

4回复AE仿Ipod广告发光条纹得制作"