

关于译者:

本教学为翻译教学,转载请注明来自aboutcg.net,以及注明翻译者
原始链接如下:
http://ae.tutsplus.com/tutorials/vfx/create-fairly-realistic-fire-using-cc-particle-world/
作者:Eddie Bogdanov
I’m an aspiring digital artist from Latvia mainly concentrated on motion graphics.
我是一个来自拉脱维亚的胸怀大志的数码艺术家,主要专注于运动图像设计领域。
翻译:鬼谷子 (www.aboutcg.net)
请尊重互联网道德,转载请注明转载出处和翻译者,谢谢!
Create Fairly Realistic Fire using CC Particle World
使用CC Particle World创建逼真的火焰
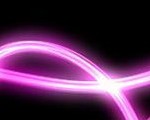
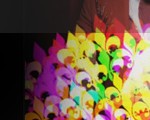
最终效果预览:
Create Fairly Realistic Fire using CC Particle World
使用CC Particle World创建逼真的火焰
Step 1
Make a new composition. Use whatever settings you like to have. Call it “Main”.
第一步
新建一个合成。按照自己的喜好去设置它。命名为”Main”。

Step 2
Now, create a new solid which will be the main fire element. Call it “Particles” and apply CC Particle World to it.
第二步
创建一个新的固态层,这是火焰的主要元素载体。命名为”Particles”,添加CC Particle World 效果。

Step 3
Start by changing Longevity to 2.3, later you can change it as needed for height of your fire.
Open Physics menu and lower Velocity down to 0 because we want fire to move according only to gravity.
Change Gravity to -0.02.
Next, open Particle menu and change Particle type to Tetrahedron. You can try other types but this one looked good for me.
第三步
开始处把Longevity的值改为2.3,后头设置可以按照所需火焰的高度来设置。
打开Physics选项,把Velocity的值降到0为的是让火焰只仅仅按照garvity来移动。
将Gravity的值改为-0.32.
接下来打开Particle选项将他的Type改为Tetrahedron。你可以试试其他类型,我个人比较喜欢这个类型。

Step 4
To change a shape of animation a bit closer to look of fire, change Death Size to 0.110, Size Variation to 100% and Max Opacity to 20%
Now the colors, I went with #FFBF74 and #FF6C00, it’s better to use dull colors because then it’s easier with color correction later as you’ll see.
Open the Producer menu and change Position values to move emitter closer to bottom of the view. Change Position Y to 0.13 and Position Z to -0.52.
Also you need bigger emitter so change Radius X to 0.10.
Turn off the Grid and save.
第四步
为了得到更加逼真的效果,将Death Size的值改为0.110,Size Variation的值改为100%,Max Opacity改为20%
再来看颜色,我是用的#FFBF74 和 #FF6C00,你可以使用不清楚的颜色,因为使用color correction可以很容易的将它调整过来。
打开Producer选项,把发射器的位置移到试图的底部。把 Position Y 的值改为 0.13,Position Z 改为 -0.52。
你还需要更大的发射器,把Radius X改为0.18
关闭Gird,保存下。

Step 5
Precompose “Particles” layer and call it “Particles_percomp”. Don’t forget to check Move all attributes into the new composition. Open “Particles_precomp”. Highlight “Particles” layer and apply CC Vector Blur. This will give us some of that fire texture.
Change Amount to 45.
Save.
第五步
将 “Particles” 层打包为”Particles_percomp”。不要忘记将所有的属性移到新合成里。打开”Particles_precomp”,高亮”Particles”层,添加CC Vector Blur。这就提供给我们火的材质。
把Amount的值改为45
保存

Step 6
Apply Turbulent Displace to the same layer which will give us some irregularity. For this one you don’t have to change anything unless you want to.
Next, go back to “Main” composition and duplicate “Particle_precomp” layer three times.
Save.
第六步
添加Turbulent Displace效果这会给我们带来一些不规则,也就是更加真实。你没必要去改变任何参数在这一步里除非你想去改变它。
接下来,回到”Main”合成将”Particle_precomp”连续复制三次。
保存下。

Step 7
Now, we’re going to polish and color correct to get a nice looking flame.
First set the upper layer’s Blending Mode to Add.
Then select the lowest one, apply Fast Blur to it and set Blurriness to 200. Tick Repeat Edge Pixels.
Still it doesn’t look quite right. Create a new Adjustment Layer above all three fire layers.
Save.
第七步
现在,我们要做的就是矫正颜色让它更像真实的火焰。
先将顶上的层的Blending Mode改为Add
然后选择最底下的一层,给它添加效果Fast Blur并且把Blurriness 值改为200.标记边上重复的像素。
看起来还是有点问题。新建一个Adjustment Layer把它放在三个火焰层之上。
保存下。

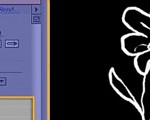
Step 8
Apply Bezier Warp (Distort>Bezier War) to the adjustment layer. Set its parameters to something similar as seen in screenshot. Save.
第八步
给调节层添加Bezier Warp。按照下图设置它的参数。保存。

Step 9
Next, highlight all the layers and precompose them into “Fire_element” composition. Stay inside “Fire_Precomp”.
Now you’ll do some compositing – you have to arrange a composition of those “Fire_element” layers. Now it’s all about you creativity as you can do that on your own. Use scale for variation and don’t forget to offset everything so there would be no identical animation.
Also, set the blending mode for every layer to Add.
Save.
第九步
接下来,高亮所有层把他们打包到”Fire_element”合成。选中”Fire_Precomp”
现在就要做合成工作了,你得将”Fire_element” 层合理的安排到你的合成里去。这就是考验你创造力的的时候了,尽情发挥吧。改变大小,不要忘记做一些位移的改变,别让他们看起来都一样。
保存。

Step 10
Next, I created a new Adjustment Layer and applied Bezier Warp to it and animated it so everything looks a bit better. You can do that too if you want. This again, depends on your desires.
第十步
接下里,我新建了一个Adjustment layer,给它添加Bezier Warp效果,给它做动画让他看起来很真实点。你可以多做几次,这完全取决于你个人喜好。

Step 11
Now you can color correct the fire. Create a new Adjustment layer and apply Fill effect to it. Set its color to red and change layers Blending mode to Add. Save.
第十一步
现在就要调整颜色了。创建一个新的Adjustment layer 添加Fill 效果。把颜色改为红色,把Blending mode改为add。保存。

Step 12
Precompose everything to “Fire_Composite”. Now, you should find a texture for glass and import it. Place it inside “Main” composition and correct its size if needed so it would fill the screen.
第十二步
将所有层都打包到”Fire_Composite”。现在找一个玻璃材质导入它。把它放在”Main”合成里再调整它的大小让他充满整个屏幕。

Step 13
Turn off its visibility as it’ll serve only as a layer map now.
Highlight “Fire_Composite” and apply both CC Vector Blur and CC Glass to it.
Change Vector Blur Amount to 40, Angle Offset to 22 degrees and set Vector map to your glass texture layer (Glass_texture.jpg). This will give some additional distortion.
Set Type to Constant Length. Save.
第十三步
先把它隐藏掉,让它只作为layer map
高亮”Fire_Composite”添加 CC Vector Blur和CC Glass效果。
把Vector Blur Amount的值改为40,Angle Offset的值改为22度,再把Vector map 设为你的glass texture层。这会添加一些额外的扭曲。
把Type改为Constant Length。保存下。

Step 14
Select CC Glass and change Bump Map to your glass texture layer.
Change Softness to 1, it’ll give bunch of detail.
Then change Height to 20 to bring down sharpness.
Set Displacement to 200.
As you can see, there’re black stuff going on around borders. Scale up “Fire_Composite” layer until you can’t see them anymore. Save.
第十四步
选择CC Glass效果,把Bump Map一项选择为glass texture 层。
把Softness值改为1,这会添加更多的细节。
然后改变Height值为20是为了让他不那么尖锐。
你可以看到,在边界上有一些碎片。放大”Fire_Composite”知道看不见它们为止。保存。

Step 15
Again, precompose everything to “Fire_Precomp”. Bring in your glass texture and scale it so it would fit the screen. Change its Blending mode to Screen.
第十五步
再一次将所有东西打包到”Fire_Precomp”。把glass texture放进来调整大小让它适合屏幕。把它的 Blending mode 改为Screen.

Step 16
Create a new Adjustment Layer and apply Curves and Levels to it.
Draw a curve so it would give some contrast.
第十六步
新建一个Adjustment Layer添加Curves 和 Levels。
调整curve 增加对比度

Step 17
Now, change the Gamma for Levels so it would give a satisfactory outcome.
第十七步
现在,调整 Levels的Gamma从而得到你满意的结果。

Step 18
The fire looks a bit dull, so go to “Fire_Composite” composition and apply Glow to the upper, already created, Adjustment Layer. No further changes are necessary unless you want a different look.
Save.
You’re done!
第十八步
火焰看起来有些暗,所以给”Fire_Composite”添加Glow 增加它的亮度。不要增加的过多,除非你想得到不同的效果。
保存。
本教程完。


推荐课程


推荐教程

3回复AE和CC插件创建逼真的火焰"