
本教学为翻译教学,转载请注明来自aboutcg.net,以及注明翻译者
请尊重互联网道德,转载请注明aboutcg.net完整网站链接和翻译者,谢谢!
原始链接:http://www.cgarena.com/freestuff/tut…saycheese.html
作者:Vaibhav Shah, India
翻译:Qi
关于译者:

Introduction – Hello, my name is Vaibhav shah from India. I was so inspired with water tanks in childhood. Whenever I’ve visit fisheries and aquariums, I always found some attraction towards one tank which was dirtier and poor fish try to accommodate in that. I’ve always spend time to observe water movement and its whirl effects. So I approached to make cool dirty flooded water bathroom, and fish tries to survive there in between of leaked water pipes. Even leaked pipe blows air into water which makes sweetie bubbles. I had used Maya, ZBrush, mental ray, photoshop and headus uv-layout.
介绍——大家好,我是来自印度的Vaibhav shah。童年时的水箱给了我很大的灵感。每当我参观了渔业和水族馆,我总是被肮脏的水箱所吸引,而鱼就是在这里面生活着。 我总是花时间去观察水的运动和旋转的影响。因此,我试着去制作肮脏的,又被冰冷的水淹没的浴室,而鱼就生存在漏水的水管之间。还有水管向水中吹入空气产生 了漂亮的水泡。我使用到的软件有Maya,Zbrush,Mental Ray PS和UV-Layout。

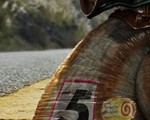
Before any further move, I always prefer to make little production scratch chart for my guideline, which can help me to focus in between my personal work and office work’s deadly deadline as shown in.
任何进一步的行动之前,我总是喜欢先做一些小测试来为后面的步骤做参考,这可以帮助我在个人工作和公司工作之间集中更多的精力在这个上面。

Usually I’m spending 2-3 hrs for my personal work. That’s why I assumed to spend almost 2 weeks for ‘Say cheese!!’ artwork, then I started to make rough list of production stages which I’ve thought to make out fish in estimated time and with most perfection.
通常我花2-3个小时在个人工作上。这就是为什么我以为要花近2个星期的时间在这个工作上,然后我开始列出生产阶段的清单,我试着在规定的时间内作出尽可能完美的鱼。
After rough calculation, I’d started to make concept drawings and thought to add lots of stuffs into it. I was about to add more than two fishes at a time but, it was giving scene much complexity and unbalance. I wanted to spend little more time for concept design to make it clean clear idea. Concept gives me very bright appealing for composition and POV.
粗略计算后,我开始画概念图,认为要添加更多的元素在里面。我刚开始想着在同一时间增加两条以上的鱼,但它让场景变的复杂和不平衡。我想花多一点的时间在概念设定上,使它尽可能的清晰明了。概念图使我对构图和POV有一个直观的了解。

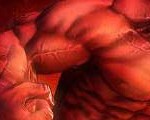
References – After conceptualization, I really needed real references for water effects, bubbles, gravels, dirt tiles and especially for fish. I gathered all possible references from net and even reused from my references library. I founded very good references for fish eyes, and it attracted me lot to experiment onto. Well most key role for any character artwork is to learn its whole anatomy first. I checked out fish anatomy for better to make modeling and texturing.
参考——概念化之后,我真的需要很多有关水,气泡,砾石,泥土砖的参考,尤其是鱼的参考。我从网络和自己的参考图书馆里收集所有可能有用的参考。要在一幅艺术作品中创造一个重要的角色,首先要了解它的解剖结构。为了更好的建模和制作纹理,我研究了鱼的解剖结构。


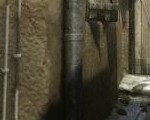
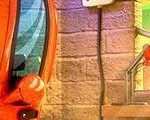
Modeling incorporated with dynamics – All models were done in Maya and minor tweaks done in Z-Brush. I took props first where BG setup needs priority. I made very simple and low poly tiles and floor in short time. Then As per reference I made pipes absolutely like that but, kept it limited according to Logical and Composition sense. After completion of whole basic setup; I’d decided to make gravels.
模型与动力学——所有的模型是在maya中完成,然后在ZB中做小改动。我首先制作了一些小道具。我在很短的时间内制作了地板的低模。然后照着参考,我制作了像这样的水管,但使它符合逻辑和构图。经过整个基础设置完成后,我决定开始制作砾石


Gravels were little tricky one! So, I thought to spread it through dynamics. I made little emitter “particle setup” for such things which can help me in further. With collision of each object (pipes, floor and tiles); gravels placed perfect on floor and some on pipes even. To give little natural effect I have used Random Transformation (rotate, scale) script for gravels.
砂砾是比较棘手的模型中的一个!所以,我想用动力学来分布它。我创建了一个发射器“particle setup”,这在后面会帮到我。随着每个对象的碰撞(管道,地板和瓷砖),砾石非常完美的分布在地面和管道中。为了产生一些随机的效果,我用旋转和缩放 对砾石编辑了一下。
Amazing water level needed right attention. So, I made pond fluid and wake emitter for waves. Once I satisfied with shape of water level I’d converted fluid into polygon for MR shading purpose.
惊人的水位需要正确的注意。所以,我创建了“Pond Fluid”流体和“Wake Emitter”产生波纹。当我对形状和水位感到满意后,我把流体转变为多边形。
Bubbles were made same with dynamics process, I’d put emitter into leaked pipe connection. With help of mathematical expressions into instancer properties, bubbles were little screwed, pressed, randomly rotate and scaled properly. Dynamics helps most with such situation.
气泡也是用相同的方法制作的,我把发射器放在水管结合处。借助instancer属性中的数学表达式,气泡被适当的旋转和缩放。在这种情况中,动力学是最有用的。
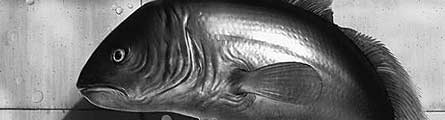
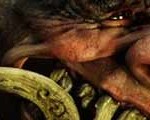
Then it was a time to make Lead star of the scene a common “Tropical Fish”. I had used few references to understand its anatomy and skin structure as I mentioned. I’d also loaded reference image into front camera for better proportion guideline. First Made very basic block out stage of Fish model first, then I took blocked model into ZBrush for minor tweaking and proportion check up.
现在在场景的中心制作一条很普通的热带鱼。正如我所说,我用了很少的参考去了解它的结构和皮肤纹理。我还在相机的正视图中导入了参考图片来更好的掌握大形。首先做出一个鱼的大形,然后再在ZB中添加细节。


For better result in ZBrush; I had attention on topology according to area where actual details needed. Topology and flow is really matters when character is going to animate with support of all type of maps like displacement, normal, bump, cavity etc. Before starting sculpting I took UVs of exported ZBrush fish object in stand alone uv-layout application.
为了在ZB中得到更好的结果,我按照实际中需要的对鱼进行了重新拓扑。当一个带有凹凸,法线,置换贴图的角色要进行动画时,布线结构是非常重要的。在开始雕刻之前,我用UV-layout把鱼的UV分了一下。

For upper, lower and tail fins; I used hair system with the help of nurbs shape. The process was little manual but, it gave me right soft rays or dorsal spines on perfect place and clump. I had hold shift and make numerous isoparms according to taste, then I’d duplicate curves and converted it to hair and follicles with “convert curves into hair-system” function. Again I had converted hair into polygon geometry for better optimization, Sent fish model for more detail sculpting in very cool software called ‘ZBrush’.
对于上鳍,下鳍和尾鳍,我用NURBS和毛发系统。这个过程很简单,但它让我在正确的位置生成了正确的 鳍。我按住shift键并选择全部的Isoparms,然后我复制曲线用“convert curves into hair-system”功能转变为头发。为了更优化我再次把头发转变为多边形,然后再ZB中把鱼雕刻出更多cool的造型。

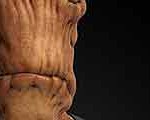
Sculpting – Well, that’s really ‘full of fun’ stage; just we need to be aware of some pre-requites steps before get into ZBrush package. Such as clean topology, clean UVs (if you want to use any map), equal space of quads, lesser tries.
雕刻——好,这真是’充满了乐趣’的阶段; 我们在导入ZB之前需要注意一些细节。比如干净的拓扑结构,干净的UV(如果你想使用任何贴图的画),相同大小的四边形。
I’d decided to put full details as much as possible on Fish in Maya only. I’d started sculpting with ‘Standard brush’ and ‘Inflate brush’ to catch up basic details on 1st level of subdivision. I was keep going towards more details, particularly on fins, gill cover, anal fin, soft dorsal fin and caudal fin area within 2nd and 3rd level of subdivision.
我决定在maya中把鱼做的尽可能的详尽。在一级细分的模式下,我开始用“Standard brush”和“Inflate brush”来雕刻出最基本的结构。我继续深入下去,尤其是在二级和三级细分下对鳍,鳃盖,臀鳍,背鳍软和尾鳍。

I’d used layers option for more details like skin pattern with help of alpha brush. I’d decided to use masking with cavity and enhanced details. Now time was for posing, so I took it to lowest level and exported to Maya and rigged (Last level, rigged one) then again imported back to ZBrush. I’d decided camera angle so, I didn’t need to concentrate on asymmetrical shape.
我使用Alpha笔刷来使皮肤达到更多细节层次。我决定使用腔和洞的mask遮罩。现在要摆Pose,所以我导出一个低模,在maya中进行绑定(最后一个级别,绑定一个)然后再把它导入Zb中。我要决定摄像机的角度,不需要把精力集中在非对称外形上。


Texturing and Shading – Texturing and shading is one of the important stages through out whole artwork look and feel depended. I assumed major objects would be shaded with procedural shaders. So, I used very basic single switch node for gravels and I’d used 3 little scripts for randomization.
纹理——在整个制作流程中纹理是非常重要的一个环节。我设想着主用物体的纹理用程序贴图。
所以我给了砾石基本的“single switch”节点,还使用了3个小的脚本。• Assigned user defined attribute “vcoord” to n selected objects using script.
• Connected geometries with selected single switch node in hypershade using script.
• Randomized all selected geometries attribute “vcoord” using script.
• 用脚本指定用户定义的属性“vcoord”给选择的对象。
• 用脚本来连接几何与选定在Hypershade中单个开关节点。
• 用脚本随机所有选取的几何属性为“vcoord”。

For pipes, I was so inspired from old copper and mossy effect. I made two different shaders for surface bubbles and water bubbles. So, I used different MR dielectric and DGS materials for bubbles. I found problem at water droplets on tiles were highly intensive glow because of key photonic light was linked to it.
对于水管,我的灵感来自旧铜和苔藓的效果。我对表面气泡和水中的水泡使用了两个不同的着色器。所以我对水泡使用了MR的“dielectric”和“DGS materials”。我发现因为大量的光子对水泡有影响所以在瓷砖表面的水泡就有曝光的现象。

I used ZBrush for fish and tiles texturing, especially I’d used ZApp-link plug-in for easy texturing, which can be interlinked with Photoshop and ZBrush visa versa. Great package from ZBrush!!
我用ZB来制作鱼和瓷砖纹理,尤其是用“ZApp-link plug-in”来制作简单的纹理,他们可以在Photoshop和Zbrush中互联反之亦然。
I made specular, reflection, all three skin layer maps from ZBrush for MR SSS shader in Maya. I’d noticed shiny glossiness in fish skin, so I need to make glossy map which was really effective enough. Even SSS shader’s specular attribute has quite detailed options to generate nearly real skin.
我从ZB中得到高光,反射,所有的三种皮肤贴图,然后放入Maya的MR SSS材质中。我注意到在鱼皮肤上有光泽度,所以我需要制作足够有用的光泽贴图。SSS材质的高光属性有详细的参数来达到真实皮肤的效果


Lighting and Rendering – I’d used basic 3 lights setup (photonic key, fill and rim light). I’d used key photonic light for whole Layout and other 2 lights were linked just for fish individually.
灯光和渲染——我使用3点布光(主光,辅光和轮廓光)。我用主光作用于整体环境,其他的两盏光只对鱼起作用。
I’d used GI photons for better result to the scene. Because of mental ray’s dielectric shader and DGS refracted and reflection values, I had used caustics photons also. I was exited with double bounced shadow layer when light reflected through main photonic Light. It gave me real water shadow effect.
我用GI灯光来得到更好的画面效果。由于MR的“dedlectric shader”、“DGS refracted”和反射值,我使用了“caustics photons”。我设置反射的次数为双倍。这样给了我真实水面的效果。

I made proxy/dummy box under water level till floor with refracted glass, transparent shader assigned on it. It was just for refracted effect to water from straight front.
我在水面和地板之间制作了水箱,并把透明的材质指派给它。在正面角度,它对水的折射产生了影响。
I was facing challenge at rendering occlusion pass, where refraction appears at under water portion specially. But, simple solution was to assign manually overrides at each property of light and shaders. i.e., in occlusion pass; I made AO shader, proxy box has same refracted shader but, I’d assigned AO shader to all other objects apart from ‘proxy box’.
我在渲染OCC的时候遇到了挑战,其中折射出现在水下部分的特殊处理。但是,简单的解决办法是手工分配每个光线和阴影属性。在OCC部分,我制作了AO阴影,水箱有相同的折射阴影。但是我分配AO的时候把水箱和其他物体分开。

I always prefer self review first! After almost final rendered image, I did self correction and review of an image. According to self review, I found some minor creative corrections and changes. So, I rather preferred to be back on texturing and layout stage. Production can be suffered if you found some problems, which can be technical or creative after rendering passes. So, reviews + correction stages are most reliable and accurate for any production. ![]()
我总是喜欢自我检查!经过最终渲染,我进行了自校正和画面的审查。通过检查,我发现一些小的创意更正和 更改。所以,我比较喜欢重新回到纹理和布局的时候。作品可能被修改,在渲染之后你发现了一些可以通过技术和创意来解决的问题。因此,对任何作品来说审查+ 校正阶段是最可靠和准确的。 ![]()


如果你对此文章感兴趣欢迎来到社区讨论:http://www.aboutcg.net/showthread.php?p=9253#post9253


推荐相关中文教程

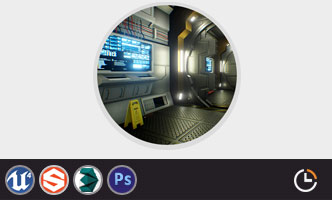
UNREAL ENGINE 4虚幻引擎美术设计师室内场景制作生存手册
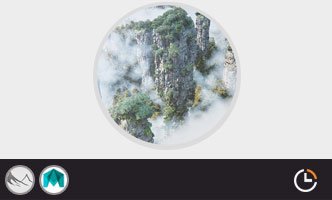
在本教学中,黄博文老师将带你学习制作UE4虚幻引擎场景所需要的所有知识和完整流程,无论是你三维新手还是老鸟,通过学习都可以快速掌握UE4场景制作技能。VUE自然景观实战案例教程
本套教学是由MG录制。讲解分析了vue的海水材质问题,以及全中国首次以案例的形式讲解vue与maya的结合运用,如何将maya的角色动画导入到vue场景文件中做遮罩并且渲染。
推荐课程


推荐教程

1回复制作小鱼"