
本教学为翻译教学,转载请注明来自aboutcg.net,以
及注明翻译者
请尊重互联网道德,转载请注明aboutcg.net完整网站链接和翻译者,谢谢!
原教学出自pixologic网站,原始链接如下:
http://www.evermotion.org/tutorials/…of-mexico-city
作者: Olivier Cernay-Kim(bakho)
网站:http://oli.vernay.free.fr/
翻译:KanyaYan (www.aboutcg.net)
转载请写明出处和翻译者为KanyaYan,谢谢。


INTRO
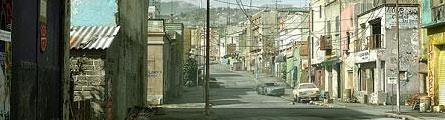
I originally made this environment for a Ghost Recon 3 (Advanced Warfighter) trailer in 2005. It’s an imaginary street supposed to be in a poor suburban area of a Mexico City ravaged by war. I was so excited about the project that I continued it at home, adding more details and atmosphere. So it’s quite an old project, and some techniques and software used here are a bit outdated, but as you know, it’s artistic feeling and inspiration that matters the most
我本来在2005年为一个幽灵行动3(先进战士)的房屋制作这个场景的。这是一个虚构的假想的一个在战乱中贫穷的墨西哥城市的郊区街道。我对这个项目十分兴奋,我在家里继续增加了更多的细节和氛围。所以这是相当一个旧的项目,其中的一些技术和软件用在这里是有点过时,但你也知道,它的艺术感觉和灵感,才是最重要的。
Software used :
• Max 7
• Scanline (with “light tracer”)
• Dreamscape (sky)
• Photoshop
• After Effects
REFERENCE
I spent a long time looking for reference, as I always do, but in this particular case, while analysing the specific Mexico architecture, it was very interesting to “discover” a country I know almost nothing about.
我花了很长的时间寻找参考,因为我总是这样,但在这种特殊情况下,在分析具体的墨西哥建筑,这是非常有趣的去“发现”一个我几乎一无所知的国家。

MODELING
The buildings were very simple to model, they are basically boxes with holes for windows, and little or no ornaments.
房子是很简单的模型,它们基本上就是为窗户开个洞的盒子,几乎没有什么装饰。
I made some buildings from the reference pictures I had, also from the many derelict old shops of my neighborhood.
我按照我的参考照片以及我家附近的许多废弃的老店铺制作了一些建筑物。

Then I added details like cracks, damaged walls, for which I used mostly standard booleans (“subtraction” mode). It can be painful since Max’s booleans are very unstable (at least it was when I did the project, it’s getting better), but it’s worth the effort because it takes little memory and is very fast to do despite being buggy.
然后,我增加细节比如裂缝,损坏的墙壁,这些我主要都是用标准的布尔运算(“减法“模式)制作的。这一步是相当痛苦的,因为Max的布尔运算是非常不稳定的(至少这是在我制作项目那时,它应该变得更好写),但是这是值得的,因为它需要很少的内存,并且相当快捷。
Then I made lots of set dressing objects (mostly secondary, background ones) like lamp posts, fences, planks, posters… I was helped in that task by fellow 3D artist Olivier Fleurette while working on the trailer at MAgiclab. I also reused a couple of objects from older projects and some free meshes too.
然后我制作很多像灯柱,栅栏,木板,海报布景模型(主要是写次要的背景模型)… 当我在MAgiclab工作的时候,一个3D艺术家同行Olivier Fleurette帮助了我。我还从旧的项目中重新用了一些模型和一些免费模型。

TEXTURING
The longest part of the process. For the main buildings I made customized maps in Photoshop (one unique map per building), then some more generic ones for the background buildings, with some black and white masks and a bit of vertex color for dirt (used as a mask in the materials)
这是个耗时最长的部分了。主要建筑我是用Photoshop制作贴图的(每个建筑独特一张贴图),然后为背景制作了一些通用的建筑物,用了黑白遮罩和一些顶点色制作污垢作(在材质里使用了遮罩)。
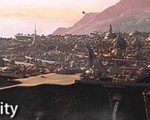
LIGHTING/RENDERING/COMPOSITING
The scene is lit only by sunlight, which is a standard directional light with area shadows, and a Skylight. It was rendrered in Scanline using Light Tracer. It’s not a physically correct radiosity engine so the results are not very accurate. It’s quite fast when using only Skylight, but if you want light bounces, anything takes forever to render (That’s when “light bleed” becomes useful). That was the last time I used it, and I’ll never come back ! But anyway, it was a practical choice in a time when default Scanline was already outdated, Mental Ray was crappy (compatibility issues with lots of plugins) and new renderers like Vray were not very wide-spread in studios. After rendering a good near-final version of the whole scene in 4k (including the sky and fog rendered with Dreamscape), I kept adding details by merging small region renders into the main image in Photoshop, while I started to do some paint-overs to correct a couple things I didn’t like but were too long to do in 3D. Then I contrasted, color corrected and added a slight glow in After Effects. That’s it, because fx-wise I’m an activist of the “less is more” movement
场景只是通过sunlight照亮,并且通过area shadows和一个Skylight作为一个标准的方向光。使用Scanline里的Light Tracer渲染。这不是一个正确的辐射物理引擎所以结果并不十分准确。当只使用Skylight时速度相当快,但如果你要让光线反弹,任何东西都需要长久渲染(这时 “light bleed“很有用)。这是我最后一次使用它,我再也不会用它了!但无论如何,在默认Scanline已经过时的时候它是一个很实用的选择,Mental Ray很蹩脚(有大量的插件的兼容性问题),Vray在工作室实用还不是很广泛。渲染后一个近乎成品的版本的整个场景有4K(包括梦境般天空和雾气的渲染),我一直通过Photoshop把小区域细节合并到主要图像中,然后我开始做一些后期工作纠正一些我不喜欢的地方,但这在制作3D中需要相当长的时间。然后我在After Effects中使用对比,色彩校正,并添加了轻微的辉光。
Thanks for having read this little making-of, and thanks to Evermotion for publishing it !
Olivier Vernay-Kim (bakho)
http://oli.vernay.free.fr/


推荐课程


推荐教程

0回复MAKING OF MEXICO CITY"