本教学为翻译教学,转载请注明来自aboutcg.net,以及注明翻译者
Rendering in Layers in Maya
Application Used: Autodesk Maya
Author: Bogdan Amidzic
Contact:the@cavz.com
Author Website:http://www.cavz.com/
翻译:单骑扫千军
关于译者:

Rendering in Layers in Maya
Render layers is one very powerful feature of Maya. You might ask why?
分层渲染时Maya一项很有用的功能,也许你会问这是为什么?
Here we show you how to use it properly.
接下来我将给你介绍怎么有效的使用它。
In this tutorial we will be using a finished model. You can download it here.
简单的场景文件请点击下载
Imagine this — you are doing a shot for a film, for example, a cyber cityscape. And you use many lights, glows, fog, crafts … and of course, you turn on some form of GI or ambient occlusion. And when you press render it takes hours to render, but it looks really great. And then your director comes, looks at the render and says, “Wow that is really great!”. You’re happy cause you haven’t slept for three days in order to finish it. But then he says “… but I don’t like the color of that fog, make it a little brighter!” So you go and change it, but thing is that he has to wait hours for that new render. And you are very lucky if you have to change only that one thing. But in most cases he will ask you to change a million things. He doesn’t have time for you to render frame again and again. So after some time, you will be fired!
想像一下,假如你为电影做一个镜头,一个城市街景,你使用了许多的灯光,辉光,雾,和设施,打开了全局光照和环境光阻塞,渲染成品耗费了大量的时间但是看起来效果很好,当那个你的导演看到时,会惊呼:“WOW,这真棒!”虽然因为这个作品你好多天没有睡觉,但是听到导演的话你会非常的高兴,但是导演说:“…但是我不喜欢雾气的颜色,把它调亮一点”你去调整它,导演又要花上一点时间等渲染结果出来,这次幸运的是他只要求你更改一个东西,但是在大多数情况下,导演会有无数个需要你去更改的地方,你不得不一次次的更改,重新渲染….这样一来,你会疲于奔命。
But — if you are smart, you will separate your scene in many layers so that when he comes and asks, “change the color of that craft there, change the color of the sky…”, you will just change one slider in the compositing program, and the result will come almost instantly. Your director will love you, and you will get few hours to sleep.
但是,如果你很聪明的话,你会将场景分别放到不同的渲染层里面(也就是分层渲染,详情请观看共和国的教程)这样导演来了之后说,“改一下那个东西的颜色,改一下天空的颜色….”你之需要在后期合成软件里滑动一个滑块,结果就立竿见影的显示出来了,这样你的导演将会爱死你,你也可以有不少睡觉的时间了。
So I used Maya and Shake to build this cityscape scene. It’s very simple, I didn’t have time to create a complex model.
这样我使用Maya以及Shake来演示这个过程,场景文件较简单,我没有多少时间来创建一个复杂的模型。

As a starting point I used this.
教程开始了
Created one directional light (sun), that casts depth map shadows with 2k resolution.
创建一盏平行光,用来模拟太阳,使用分辨率为2048的深度贴图阴影。
Also I created four directional lights from different sides to create blue illusion of sky illumination.
我还创建了四盏不同方向的平行光来模拟天光的蓝色效果。

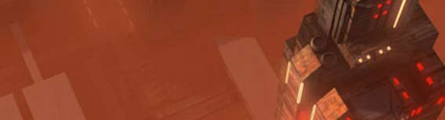
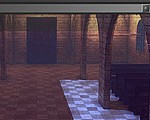
When rendered, the image looks like this. You can notice that those four lights make the scene look flat. Later I’ll use an ambient occlusion pass to make small details more visible.
当渲染后,你发现四盏平行光使场景看上去很平,等一会我使用一个环境光阻塞效果来加一点细节。

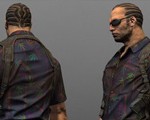
I used blinn materials for some buildings.
有些建筑物我使用了Blinn材质。

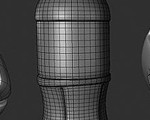
I assigned a texture to it. You can notice how odd it looks. We need to fix the UVs.
我给建筑物贴了图,你能注意到贴图的效果,我们需要调整匹配一下UV。

Select all faces.
选择所有的面。

Use cylindrical projection to project texture from cylinder around the object. Use manipulators to fit the cylinder to your object.
使用一个圆柱体投射,使用操纵器来编辑匹配效果。

I also added bump using the same texture, and used that same texture for specular color.
我使用了Bump贴图,平且使用同一张贴图作为高光贴图,只不过加了一个色彩数学运算节点。

Select all faces that look to the sky. Use planar projection to project texture to them.
从天空的角度选择所有的面,使用一个平面投射贴图。


I also created few more materials.
创建一点更多的材质

For some parts I used automatic mapping. This will try to project the texture from different angles.
许多地方我为了偷懒使用了自动投射,从不同的角度投射贴图。

You might notice that the texture looks very big. In the UV texture editor, you can select all UVs and scale them. This will repeat the texture.
可能注意到这些贴图看起来很大,到UV texture editor中,选择所有的UV,缩放它们,这样能重复使用贴图。

Now the cityscape is starting to take shape.
现在城市街景有效果了

For small lights, I created very simple geometry and assigned surface shaders to them. I added a bit of glow to them. You can add glow also in compositing passes.
对于这些小的灯光设施,我使用很见到的集合体来创建,并且赋予了surface shaders。我创建了一点辉光给他们,你也可以到后期软件里合成的时候再创建辉光。


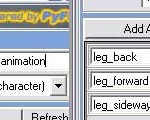
Now Rendering Layers. Select all objects except those tiny glowing objects (grouping and selection sets will be your great ally in this step), and in thechannel box check render. This will display your render layers. By default, all objects are assigned to masterLayer. Click that second button (one with tiny blue ball), this will assign objects to the new layer you created. Double click to layer and change its name to Color. All new layers will be named layer1 by default. Check ‘R’ in the box to the left. That means that layer is rendered.The masterLayer shouldn’t have this ‘R’.
现在进行渲染的分层,选择所有的物体除了那些小的辉光物体(给他们打组,这样可以很轻松的选择他们)到通道栏的渲染层面板,这里是现实渲染层的。默认的所有物体将添加到MasterLayer中,保持你的选择物体被选择的状态下,点击第二个按钮(就是新建渲染层并添加所选物体)创建一个新的渲染层,双击修改该层的名字为Color,所有的渲染层默认名字是layer1,点击层左边的“R”使这个层可以被渲染。

With same selection (all except the tiny glows), create new layer. Hold right mouse button onlayer1 (that new layer) and you will see presets submenu. Choose Ambient occlusion. This will create a shader override for all objects in that layer. Name the layer occlusion.
同样的选择(所有物体除去辉光)创建新的渲染层。右击这个新层,你将看到一个
“Presets”,选择Ambient occlusion。将创建一个shader给这个层中的物体,将这个层命名为occlusion。

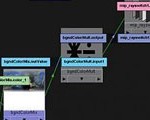
In hypershade, you can see that new surface shader was created. In color input it hasmlb_amb_occlusion1. That is the mental ray occlusion sampler. Set samples to 32.The more samples you set, the less noise it will have and the longer time it will take to render.
在hypershade中,看到一个新的surface shader被创建了,在Color选项输入了一个mlb_amb_occlusion。这是一个MR的occlusion sampler。将采样值设为32.更高的采样值将获得噪点较少的效果但是渲染时间也会增减。

If you render that layer, you can see the result. In compositing, I will multiply this layer withcolor to make details more visible.
如果你渲染这个层,你会得到如下的效果,在合成中我将这个AO层“正片叠底”到颜色层上面,这样会获得较多的视觉细节。

Our scene still looks normal.
我们的场景依旧看上去很普通。

Select all objects in the scene, except lights and create new layer. Select all objects except the tiny glows and assign one surface shader to it. That material will be assigned to those objects only in that layer.
选择场景中的所有物体,除了灯光创建一个新的层,在这个层里面,选择除去辉光物体之外的所有物体,赋予一个surface shader,这个材质将只被赋予到这个层中的物体。

Set all attributes to black. When matte opacity is black (0) it will not create alpha and it’ll block out all other objects and have no color.
设置surface shader所有的属性为黑色。当matte opacity是黑色时,将不会创建Alpha通道,其他的物体将被排除在外,也没有颜色。

If you render that glow layer, the colors shall be blocked in all other objects and only those tiny lights will have alpha, so it could be put over all other layers in compositing.
如果你渲染辉光层,除了辉光的物体其他物体被阻塞,没有Alpha,这样可以在合成中被其他层所覆盖。


In options, check Render All Layers if you want to render all layers together. You can also set blending modes for each layer to get preview
在“options”选项,选择“Render All Layers”如果你希望一次渲染全部的层。还可以选择渲染层的混合模式来预览结果。

Create another layer, and assign all objects to it. Assign a surface shader to all objects.
选择所有的物体,创建一个新的层,给所有物体赋予一个surface shader 。

In Out Color for surface shader, create a Ramp texture, as projection. This will create a placement node for texture.
在surface shader 的Out Color,以projection的方式创建一个Ramp texture,这样为贴图创建一个坐标节点。

Scale the placement node to fit all geometry in the scene.
缩放场景中的这个2D坐标,以使他适应场景中的所有几何体。

Change colors in ramp from white to black.
将Ramp颜色改为从白到黑。

When rendered, that layer looks like this. We will use it for the fog (Y depth).
渲染将得到如下图的结果,我们用来做雾的效果(Y深度)。(NB的老外,没有做不到,只有想不到)

The last thing you need to do is to render all layers or do a batch render of the sequence if you have it.For compositing I will use Shake. In Shake, I created four fileIn nodes with render layers.
最后你只需要渲染所有的渲染层或者进行批量渲染序列帧出来如果你制作了动画的话。
我使用Shake来进行后期合成,在Shake中,我创建了四个fileIn 节点。

If you like hypershade, you will love Shake. So use Imult node to multiply color with the ambient occlusion layer. This will darken the holes and details.
如果你喜欢hypershade。你将一样喜欢Shake。我首先将AO层“正片叠底”到颜色层上,这样我们就获得了一个有细小黑点和细节的效果。

Then with over node put glows on top of IMult layer.
再使用一个“IMult”将辉光层“叠加”上去(“Over”是不是翻译为“叠加”,“IMult”怎么翻译?我不会用Shake,见谅)

This is a little more complicated, I used IMult to change the density of fog, with Reorder, I copied the R channel of image to Alpha channel, since Color node (plain color) is using it for a mask.
这里稍微有点难懂,我使用IMult层来改变雾的密度,使用“Reorder”节点,我复制图像的R通道到Alpha通道,“Color”节点作为一个蒙版来使用。(没用过Shake,囧了!)
The Color node is orange, but here the thumbnail is black. Then that orange goes on top of over1 node.
“Color”节点是橘黄色的,但是这个的缩略图是黑的,橘黄色到了“over”节点的上面。

Here I added blurred glows as the height drops. Those glows on the streets are blurred.
这里我使用了模糊的辉光作为高光点,这样街道的辉光就模糊一些了。

Now if you want to change the color of the fog, just change the color of color1 node. You can tweak everything instantly.You can do all that in Photoshop, but you can do that only on single images. Shake is much better for these kinds of jobs, and for a Maya user, it takes only a few hours to get into Shake.
现在如果你想改变雾的颜色,之需要去调节相应的节点,你可以很直观的去调节一切。
如果是一张单帧的图片,也可以在photoshop中调节这些。Shake做这些是比较容易和简便的,而且作为Maya用户,之需要几个小时就能简单的使用Shake。
That will be all for now.
现在一切都做好了。
场景OBJ文件在此下载


推荐相关中文教程

arnold for maya渲染器完全教学
Arnold渲染器是基于物理算法的电影级别渲染器,正在被越来越多的好莱坞电影公司以及工作是作为首席渲染器使用。与传统用于CG动画的Scanline(线扫描)渲染器(Renderman)不同,Aronld是照片真实,基于物理的光线追踪渲染器。

推荐课程


推荐教程

你好,文件下载地址丢失- -~~~