

本教学为翻译教学,转载请注明来自aboutcg.net,以及注明翻译者
原始链接:http://features.cgsociety.org/story_…?story_id=4275
原作者:Jonas Persson
网站 :http://jfvalentin.cgsociety.org/gallery/
翻译:Qi
关于译者:

请尊重互联网道德,转载请注明转载出处网站链接和翻译者,谢谢!
以上声明,链接,地址,作者译者信息请勿在转载时删除或做任何编辑,否则,请勿转载。

About the Artist 作者简介
查看作者所有的教学
My name is Jonas Persson. I’m currently studying my second and last year at “Nackademin digital graphics” in Stockholm, Sweden. Before I started here, I had never really thought about working with 3D, my main interest was in classic art and illustration which I had studied before. I have always loved creating things, especially things that can trigger my imagination and hopefully other people’s as well. I figured game and visual effects jobs must offer a lot of this.
我的名字是Jonas Persson。我目前正开始我的第二学习,去年在瑞典斯德哥尔摩举行的“Nackademin数字图形”会议。在开始之前,我从来没有真正有在3D这个行业工作的想法,我的主要兴趣是在古典艺术和我以前研究过的插画。我总是喜欢创造,特别是那些可以触发我的想象也能让其他人有这种想法的东西。我所从事的游戏和视觉效果的工作使我必须要有这种想法。
I still haven’t done anything professional in 3D, and only three months of 2D work for a small game company here in Sweden this summer. By far the most creative holiday job I have ever had.
我还没有做过任何专业的3D行业的工作,只有这个夏天在瑞典的一个小游戏公司做2D工作的三个月经历。在迄今为止我所做过的大部分都是需要创造力的假期工作。
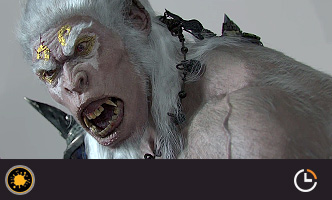
CGChoice winner Jonas Persson tackles a troll as part of his introduction to 3D character modeling.The picture was made as a school project this spring at “Nackademin Digital Graphics” in Stockholm. It was not only our first individual project but also the first where we could choose subject ourselves. So I decided to do something fun, a troll. At this time I had only studied 3D for about ten months so there was heaps of stuff I didn’t know. I think more than half of the time spent on the project was research, and of course a lot of trial and error.
CGChoice获胜者Jonas Persson制作了一个他所介绍的3D人物模型中的一个部分——巨魔。该图片已在今年春天在斯德哥尔摩举行的“Nackademin数码图像”上作为一个学校的项目。这不仅是我们的第一个个人项目,也是我们能自由选择主题的一个。所以我决定制作一些有趣的东西,比如一个巨魔。在这个时候,我学习3D才只有大约10个月,所以有很多东西是我不知道的。我认为,要把该项目的一半时间用于研究,当然了要反复的试验。
The concept 概念设定
For a while now I have been doing illustrations for a sort of Swedish version of dungeons and dragons, called “Drakar och Demoner Trudvang”. A game much more influenced by Nordic folklore and fairy tales. One of the big differences from other fantasy worlds is that this one doesn’t have the classic orc, instead there are numbers of strange and fun troll species. When I did this sketch I got inspiration from other illustrations made for this game, especially some from the artist Alvaro Tapia, a true master of drawing trolls. And of course from the old paintings made by the great Swedish fairy tale illustrator John Bauer.
有一段时间我一直在为一个有关龙与地下城题材的叫做”Drakar och Demoner Trudvang”的瑞典语译本制作插画。这个游戏更受北欧民间传说和童话的影响。与其他幻想世界中最大的不同是,它里面没有传统模式的兽人,取代它的是有更多谜题和乐趣的巨魔种族。当我在画草图的时候,是从这个游戏的一些插画中汲取灵感,尤其是艺术家Alvaro Tapia,一个真正的绘画巨魔的人。当然,也有参考一些由伟大的瑞典童话插图家约翰鲍威尔所画的古画。
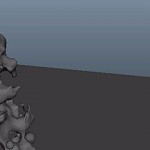
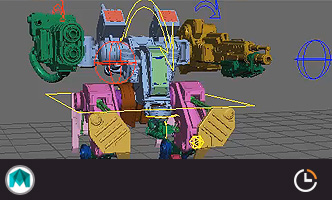
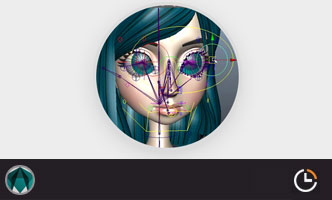
Unsmoothed mesh built in Maya./在maya中没有光滑的样子
Low Poly mesh 低面模型
Even though I wanted to have nice topology, I knew I didn’t have to make the edge loops perfect since the final product would be an image without any need of blend shapes or other deformation. There are no big secrets in this part. I just tried to get loops that didn’t go too much on the diagonal and that concentrated the geometry to where it was needed. I was not trying too hard to create the perfect mesh from the beginning. It usually works out when you start to sculpt the shapes and see what kind of loop you need. After that, I began solving all the problems that I had created, adding and shifting loops to make the mesh as clean as necessary.
尽管我希望有很好的拓扑结构,但是我知道我不需要让布线太完美,因为最后的成品是一张图片并不需要进行Blend Shapes以及变形。在这个步骤没有太多要说的东西。我只是试图在对角线的地方让循环不要太多和把布线布在真正需要的地方。我并不想一开始为了完美的布 线而太辛苦。它通常当您开始形状造型的时候被考虑到,看看什么样的循环是需要的。之后,我开始解决所有的,我已造成的问题,为了使布线简洁来增加和不断变 化线的循环。
I finally ended up with something that was good enough for the next step, the fine sculpting.
当模型已经达到下一步雕刻要求的时候,我结束了这一步骤。
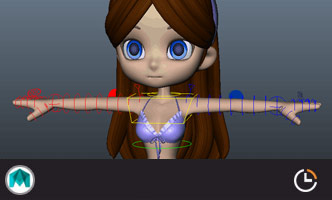
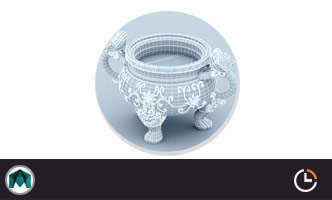
 The later rendered mesh. Mudbox Level 1 exported back into Maya.
最后渲染的网格。Mudbox细分一级后导回如Maya中。
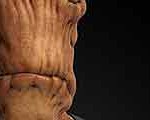
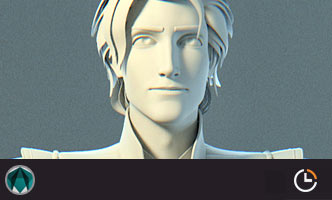
Mudbox sculpting Mudbox雕刻
I had quite a strong vision of how I wanted it to look and that always makes the work a lot easier. I just tried to create a fairly realistic looking creature, where you can sense the thick skin and the skull underneath.
我已经对最后的效果有了一个很好的想法,这总是使工作变得更轻松。我只是试图建立一个相当逼真的生物,让你可以感受到粗糙的皮肤和下面的头骨。
Like always I finished the big shapes in the first levels before even starting to look at details. Something that can be applied to almost every creative work. And though I tried to achieve some level of anatomical realism I knew some things were not 100% correct, like the corner of his mouth sticking out and that he has a fat lower lip even though he is smiling widely.
在开始看参考图之前,我都是先在一级细分下完成一个大型。这些可以应用到每一次的创作中。虽然我试图达成像现实中解剖的一样,但是我知道有些东西不是100%的正确,就像他的嘴里伸出来的角,而且他有一个厚厚的下唇,尽管他很灿烂的微笑着。
Our teacher often tells us “you are never better than your reference material.” So true. I used some reference material for the wrinkles and other details, pictures of older, smiling people with thick leather-like skin. Two tools that really help you give the wrinkles the correct feel is the pinch and bulge tool.
我们的老师经常告诉我们,“你永远不会比你参考材料更好。”它是对的。我参考了一些皱纹和其他细节,还有一些老年人的图片,及有厚厚的皮肤的人的微笑。Pinch和Bulge笔刷可以帮助您让皱纹产生正确的感觉。
When I considered finishing the sculpting, I extracted a 32-bit map for the displacement. I also generated an 8-bit bump map from the last level to help me create the fine details without having to tessellate the mesh as much in Mental Ray. Although the bump map was 8-bit I figured out that I got more control if I baked it as a 32-bit to later turn it into an 8-bit in Photoshop.
当我考虑已经完成雕刻时,输出一张32位的图片用于置换。我在最后又输出了一张8位的凹凸贴图,帮助我在Mental Ray中不用tessellate来达到最后的效果。虽然凹凸贴图是8位的,但是我先烘焙出32位然后在Ps中转成8位,这样可以让我有更好的控制。

Texturing 纹理
I started off painting a simple base color. When I finished, I started adding texture. The ones I used were two different rock textures that I liked, and an adjusted version of my displacement map. This was one of the steps that took the most time, trying different methods in Photoshop and doing lots of test renders, before I found what I wanted.
我开始画一个简单的基色。当我完成后,我开始添加纹理。我使用喜欢的两种不同的岩石纹理,然后和置换贴图进行匹配。这一步花费了大量的时间,在Photoshop中尝试不同的方法,,在我发现我要的效果前做大量的测试。


Displacement map test in Maya \ Base color and shader test
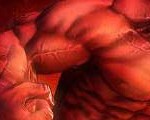
Shading 底纹
For the shading, I used the Mental Ray’s SSS shader, ‘Fast-Simple’ for the teeth and gum, and Fast-Skin for the head. I think I could have managed with only the Fast-Simple one though. A lot of tutorials have already been made in this subject so I wont go into details.
对于底纹,我使用了MR的SSS材质,’牙齿和牙龈’用“Fast-Simple”,脑袋用“Fast-Skin”。我想我能控制好“Fast-Simple”这一个材质。很多的教程已经涉及在这个例子中涉及到了,所以我再详细的说明一下。
One thing worth saying is, before you start to tweak the other parameters make sure you get the shader as good as possible by only adjusting the scale. I have seen many different ways of using the Fast-Skin shader, some where you use different textures for the different layers of the skin. What I ended up doing was just having one texture plugged into the overall color, only using colors in the underlying layers. I think it worked out nice, no need to make it more complicated than necessary.
值得一说的是,在你开始调整其他参数之前,一定要通过只调整规模得到尽可能好的画面。我已经用“Fast- Skin”试了很多种不同的方法,在一些地方不同的层中对皮肤使用不同的纹理。最后我用一种纹理来填充整体的颜色,在基本层上只用一种颜色。我认为效果很 好,没有必要再做复杂的调整了。


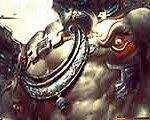
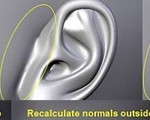
Additional details 其他详细信息
Even though I didn’t have the time to do the hair, hat and other props, I still wanted something that turned the troll into a fairy tale character instead of just an ordinary beast. I figured the earring would do the job and still not be too complicated. After some studying some old Viking and Celtic jewelry, I designed it in Maya and Mudbox. I am quite happy how it turned out after adding a Photoshop generated bump map and a simple color and specular texturing. This test render is done with a point light in Maya software.
虽然我没有时间做头发,帽子等道具,但我仍希望使巨魔变成一只带有神话色彩的生物而不是一只普通的野兽。耳环就照 一般的方法来做就好像一种工作,并没有太复杂。研究过一些旧Viking和凯尔特珠宝后,我在Maya和Mudbox中设计了它。当添加了经过PS处理后 的凹凸贴图和简单的色彩和高光材质后,我对最后呈现的效果很满意。此测试渲染,是在Maya中用了一盏点光源。

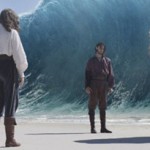
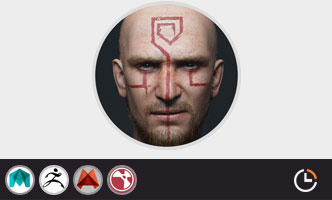
Final rendering 最后渲染
I tried with some more advanced lighting. I finally used a more simple lighting, similar to what I used in the test renders. I simulated a simple diffuse light from above with three slightly bluish directional lights for a night sky and one slightly from underneath with more yellow tones, to look as it came from a fireplace or a flashlight.
我尝试一些更高级的灯光照明。我终于用了一个更简单的照明,跟我在测试中所使用的是一样的。我模拟从三个方向略有蓝灯的简单的漫射光的夜空下有一个以更多黄色为主的色调,看上去就好像是从一个壁炉或者一个手电筒照出来的一样。’

Photoshop post 最后的PS
The background was done really fast the night before deadline. I used pieces of photos and paintings, corrected the colors and painted away the seams just enough so it wouldn’t be noticeable when I blurred it. And after some fake depth of field with the blur tool it was pretty much done. After deadline I still had some thoughts about creating hair, and I did try, but to get it the way I wanted, demanded too much work. I was already involved in too many other projects.
背景是在截止时间的前一个晚上很快就做好的。我用照片和绘画作品,纠正了色彩和增加了接缝的距离,使我在模糊它的 时候不至于太明显。用模糊工具制作了一些景深后,它已经很完美了。经过最后限期,我仍对头发的生成有一些想法,我曾尝试,但得到我想要的效果,要求的工作 太多了。我已经参与了太多的其他项目。


推荐相关中文教程

《大猿王传》电影级别动画短片系列教学第二部:大猿王贴图篇
学完本套教学以后将能够理解自然界物体贴图的规律,不再局限于照片贴图的投射方式画贴图,能够高效率的完成大分辨率超多UV象限的UDIM模式贴图的绘制,制作出真正电影级别的贴图并且够理解Liner线性工作流程的原理,在工作流程灵活高效的完成贴图以及渲染工作。Maya绑定技术精解教程机器人绑定完全教学
本套教学还会讲解在绑定中如何结合python,大大提高绑定效率,与人物不同,机械类的绑定往往需要联动的效果,并且四足的设置也与人物不同,需要结合多套IK的特性和设置达到最终效果Maya绑定技术精解教程进阶篇角色身体绑定
本套教学基于初级人物绑定基础上增加了IKFK拉伸,肘部锁定,IKFK共存,无缝切换等大家迫切想要了解的知识,并结合作者经验,让大家快速掌握这些非常有用的技能。Maya高精度建模全案例实战教程进阶篇
本教程是maya影视建模的实战教程,作者教授了多年的影视模型制作工作经验。使用maya的建模工具完成武器,场景,道具,角色等高精度的多边形模型的建模。这类模型的制作能力在影视制作,游戏制作中,都是必备的。也是所有CG从业者的必须技能。写实女性角色制作全流程高级案例教程
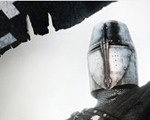
本教程是超高质量的写实角色肖像制作完全流程,教程从基础模型搭建开始,演示了一个写实欧美女性的制作全流程,教程保留了所有技巧的关键节点,全面呈现制作这种写实类型角色的技巧和流程。希望制作写实角色肖像的用户将从中学习到大量的高级技巧。超写实角色《剑圣》全流程实战教学
本教学将带你进入超写实CG角色的世界,石磊老师通过一个剑圣的角色头部制作,教你完成照片级别角色的完整流程,从此,超写实CG角色不再高不可攀,你也可以做到!Maya绑定技术精解教程 中级篇 角色表情绑定
本套教学将带进入绑定的进阶领域,通过实例从零开始,使你掌握表情绑定的全套技术,如果你想在绑定领域成为专业工作者,那本教学绝对不容错过。Maya零基础入门及建模实战中文教学
本套教学通过软件讲解和实际案例相结合,带领大家快速学习和掌握maya的基础操作,多边形建模和uv编辑,为后续的学习打下较好的基础。

推荐课程


推荐教程

0回复巨魔的制作"