
本教学为翻译教学,转载请注明来自aboutcg.net,以及注明翻译者

原始链接:http://www.cgarena.com/freestuff/tut…ge/garage.html
原作者:Luca Fiorentini, Giovanni Lo Re
作者信息:
Luca Fiorentini
Blog: lucafiorentini.wordpress.com
Giovanni Lo Re
Portfolio: www.pixila.com/portfolios/portfolio/?artist=1424
翻译:Qi

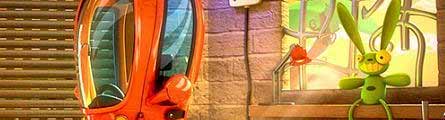
Introduction – Hi all! It’s a pleasure for me to give you an overall view of this project! This image started last summer… Due to vacation I decided to take a model from our short in development and use it to study lighting and shading with a cartoony look.
简介 —— 大家好!我很高兴给大家做一个大体的介绍。这张图是从去年夏天开始…由于休假,我决定用有限的时间给自己做一个提升,并用它来研究灯光和卡通材质。
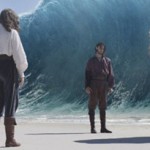
I wanted to create an ambient with an alien look… The principal character is from another world (the one with the big foot outdoor) and I wanted to communicate that with little details here and there. As usual I asked Giovanni Lo Re (a really good friend I used to work within Italy) to make a little sketch of the scene and to design the objects.
我想用局外人的眼光来创建一个场景…主要特点是从另一个世界(就是在门外的一双大脚),我想在这里于一些细节进行沟通。像往常一样,我请Giovanni Lo Re(一个很好的朋友,我曾经工作在意大利),对场景做一个速写和设计物体。

After collecting some reference images (especially from other 3d artists) and after some emails he ended up with this drawing and was a really good starting point! Then he sent me some detailed drawings of the tools and the car.
通过收集一些参考资料(尤其是来自其他的三位艺术家)和一些电子邮件后,他结束了草图的绘画,这是一个非常好的开端!然后他把有关工具和车的详细草图发了给我。


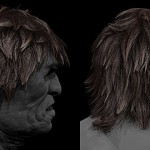
Modeling – Modeling was pretty straightforward… All poly modeling and a lot of little pieces! For the car, after the body was finished, I started modeling the interior and the details.
建模 ——建模是相当简单的…全部是POLY模型和一些细小的零件!对于汽车,在完成车身后,我开始做模特的内部和细节。
As to the environment, I modeled every object separately and then imported them as references. I wanted to find a good camera angle, similar to the one of the drawing. At the end I decided to turn wall on the right side about 45 degrees to have more space and get a nicer shot.
至于环境,我把每个模型单独的摆在那里,然后把它们输入做为参考。我想找到一个好的角度,就好像设定中一样。最后我决定把墙壁放在45°位置来获得更多的空间和更好的拍摄。


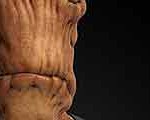
Texturing and Shading – For texturing I’ve been using the Total Texture collection. For the wall I took the base layer from the Total Texture 1, some dirt from Total Texture 5 and 2 and mixed them in Photoshop following the UV layout… same for the tires.
纹理和贴图 —— 对于材质我一直在使用3D Total的素材库。对于墙我从素材库1中得到底色,从5和2素材库中找到一些污迹。然后在UV输出后在PS中把它们进行混合..对轮胎进行一样的操作。
For the sky Giovanni started from a base from the Total Texture 15 and continued adding details, painting clouds and little planets.
对于天空,Giovanni是从15号素材库中找到基础图,然后再在上面增加细节,绘画云和小的行星。
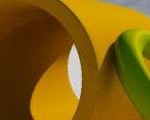
For the carPaint and tires material I decided to go with layered materials… this gave me the ability to add dirt, scratch and all the little details I wanted with the minimum effort. The texturing is based mostly with Total Texture 5 & 8 because they’re full of dirt masks… after importing them in Photoshop I reduced the details to make them cartoonier.
对于carPaint和轮胎的材质,我决定使用多层材质…它可以让我用最少的力气来增加污垢,划伤,以及所有的小细节。该纹理主要是从素材库的5&8中提取的,因为他们布满了污迹…把它们导入PS后我减少他们的细节,使他们变得卡通些。

and I make a lot of masks to control the layering. The shaders are quite simple, lots of fresnel effect for glass and metal and then simple shader trees layered with a mib_color_mix node.
我做了很多的遮罩来控制层材质。很简单的着色器,对玻璃和金属做了很多的菲涅尔效果,然后用一个简单的着色器mib_color_mix节点。


Lighting and Rendering – At the beginning I wanted to try the new Mental Ray pass system, but after a while I liked the raw render from Maya so I decided just to use beauty pass, occlusion pass, one pass for light fog and some masks. I ended with 16 passes, mostly masks because I wanted to do separate color correction while still doing an image ready for animation without hand drawn masks or retouching in Photoshop.
灯光和渲染 —— 在开始的时候我想尝试Mental Ray新的渲染系统,但经过一段时间,我还是喜欢从玛雅渲染出原始的图。所以我决定只用beauty层,OCC层,一些灯光雾和一些遮罩。我总共分了16 层,大部分都是遮罩层。因为我想要做独立色彩校正,同时在出图的时候不用手画遮罩或者在PS里润色。

Lighting was real fun and also time consuming… I think I’ve spent most of the time on this and on compositing. I rendered a lot of different versions with different colors and light rigs going back and forth between versions until we found a good combination of mood and details.
打灯光是真正的乐趣,同时也耗费时间…我想我已经花了大部分时间在灯光和合成上面。我渲染了很多由不同的颜色和灯光组成的不同的版本,直到我们找到了一个良好的气氛和细节的结合。
I used a technique I saw in a DVD from Jeremy Vickery (www.jermilex.com) on the use of Ambient Occlusion to simulate bounce/fill lighting: all you have to do is to connect the output of the AO to the ambient color of ALL the shaders in the scene. You have to think about it like this: the light color is going to light the non occluded parts, while the dark one is going to light the occluded ones… so, avoid pure black and pure white!!! I put some orangish tones to warming the image up.
我使用了在Jeremy Vickery(www.jermilex.com)的DVD中看到的技术,就是使用AO来模拟灯光的反弹:所有你必须做的是正确的把AO输出到场景中物体的环境颜色上。你必须想想这样的:光的颜色会照亮没有被遮住的部分,而黑暗是是遮住的部分变暗…因此,避免纯黑色和纯白色!我提了一些淡橘色色调使画面变暖。
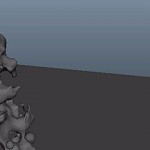
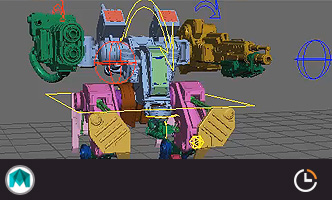
After establishing the key + fill I started adding bounce lights for the sunLight and a lot of rim light to separate the objects from the background. This is a screenshot of the scene and a list of all the lights in the scene. I also added some reflectors with a white surface shader to give that cartoony look to the reflections on the glasses.
在建立了关键灯和环境灯之后,我开始增加阳光的反射灯和大量的边缘光来使物体从背景中分离出来。这是一个屏幕截图和一个场景中的所有灯光名单。我还添加了一些白色的表面反射,使卡通看起来有镜片上的反光效果。


Compositing – This was the first time I tried to use Nuke and I really learnt a lot!
合成——这是我第一次使用NUKE,我真正学到了很多东西。
I rendered some passes as 32bit floating point openEXR (beauty, zDepth) to have more freedom and the rest as 8bit iff.
我把一些图输出为32位(颜色层,景深层)来更自由的调节,剩下的都是8位的IFF。
Nuke gives you the possibility to create new channels from images, so I used the colorID passes to put new channels into the pipe in order to select the various objects with just one click through the whole script. This was especially useful while doing color correction. Height passes and the light fog helped me to improve the atmosphere while the vignetting allowed me to concentrate the attention on the car, which was supposed to be the most important spot of the image. Here you can see a screenshot of the whole script with some explanations!
Nuke可以让你从图片中创建新的通道,所以我用了colorID层来把主要的物体出场景中勾勒出来。 当在色彩校正的时候是非常有用的。高光层和灯光雾让场景变的更有气氛,而光晕让我把注意力集中在汽车,这应该是图像中最重要的关注点。在这里你可以看到一 个带解释的全景的屏幕截图!

Conclusion – I’m really happy about writing this tutorial and sharing what I’ve learnt with you! I think that this has been a little like a production workflow because we had to get feedback from each other by mail… sending progresses and trying to understand each other just by reading. Maybe if we had been able to work side by side we wouldn’t have done all those tests, but I think that this has been a nice research and I’m just looking forward to start a new project  If you have any questions feel free to write me! Thank you to everyone!
结尾 —— 我真的很高兴能写这篇教程,并与大家分享我所学到的东西!我觉得这已经像一个小的生产流程,因为我们不得不通过邮件来反馈信息…并试图通过阅读来理解 对方的意图。也许如果我们能够并肩努力,我们就不用做这些测试了,但我认为这是一个很好的研究和我只是期待着开始一个新项目:)如果您有任何问题随意写信 给我!谢谢大家!


推荐相关中文教程

《大猿王传》电影级别动画短片系列教学第二部:大猿王贴图篇
学完本套教学以后将能够理解自然界物体贴图的规律,不再局限于照片贴图的投射方式画贴图,能够高效率的完成大分辨率超多UV象限的UDIM模式贴图的绘制,制作出真正电影级别的贴图并且够理解Liner线性工作流程的原理,在工作流程灵活高效的完成贴图以及渲染工作。Maya绑定技术精解教程机器人绑定完全教学
本套教学还会讲解在绑定中如何结合python,大大提高绑定效率,与人物不同,机械类的绑定往往需要联动的效果,并且四足的设置也与人物不同,需要结合多套IK的特性和设置达到最终效果Maya绑定技术精解教程进阶篇角色身体绑定
本套教学基于初级人物绑定基础上增加了IKFK拉伸,肘部锁定,IKFK共存,无缝切换等大家迫切想要了解的知识,并结合作者经验,让大家快速掌握这些非常有用的技能。Maya高精度建模全案例实战教程进阶篇
本教程是maya影视建模的实战教程,作者教授了多年的影视模型制作工作经验。使用maya的建模工具完成武器,场景,道具,角色等高精度的多边形模型的建模。这类模型的制作能力在影视制作,游戏制作中,都是必备的。也是所有CG从业者的必须技能。写实女性角色制作全流程高级案例教程
本教程是超高质量的写实角色肖像制作完全流程,教程从基础模型搭建开始,演示了一个写实欧美女性的制作全流程,教程保留了所有技巧的关键节点,全面呈现制作这种写实类型角色的技巧和流程。希望制作写实角色肖像的用户将从中学习到大量的高级技巧。超写实角色《剑圣》全流程实战教学
本教学将带你进入超写实CG角色的世界,石磊老师通过一个剑圣的角色头部制作,教你完成照片级别角色的完整流程,从此,超写实CG角色不再高不可攀,你也可以做到!Maya绑定技术精解教程 中级篇 角色表情绑定
本套教学将带进入绑定的进阶领域,通过实例从零开始,使你掌握表情绑定的全套技术,如果你想在绑定领域成为专业工作者,那本教学绝对不容错过。Maya零基础入门及建模实战中文教学
本套教学通过软件讲解和实际案例相结合,带领大家快速学习和掌握maya的基础操作,多边形建模和uv编辑,为后续的学习打下较好的基础。

推荐课程


推荐教程

1回复车库的制作"