本教学为翻译教学,
转载请注明来自aboutcg.net,以及注明翻译者
原教学出自EVERFLOW STUDIOS网站,原始链接如下:
http://www.everflow.com/support/tutorials/AO/Everflow_AmbientOcclusion2.html
作者:Bruce
Email:webmeister@everflow.com
翻译:freeyy
关于译者:

请尊重互联网道德,转载请注明转载出处和翻译者,谢谢!
这是个系列教程,我今天翻译了第二部分,后续的我会尽快翻译出来。后天就去像素软件面试了~~~
2.Using displacement with the shader
2.利用环境遮挡来进行置换
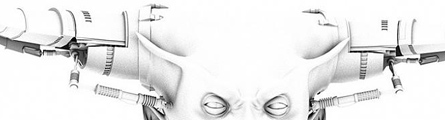
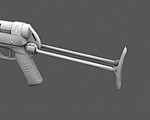
This model has a displacement map on the horn ‘nubs’. This map shows the wear and tear that the friction of the metallic horns have wreaked. The diffuse map contains red coloring in this area as well to enhance the effect. MentalRay displaces the geometry, changing it, as opposed to a bump map. The problem occurs when you place the standard Ambient Occlusion effect over the render. In order for the Occlusion to ‘fit’ the renders, is to add the displacement to the Ambient Occlusion passes as well.
这个模型在长角的“残缺”部分有一张置换贴图。这个贴图展示了金属角状物在发怒以后所造成的磨损。漫反射贴图在这个区域所包含的红色也增强了效果。MentalRay 置换几何体,改变它,这与凹凸贴图正好相反。当你把标准的环境遮挡覆盖到渲染上的时候就会发生问题。因此让遮挡“匹配”渲染,需要为环境遮挡添加置换来使它也能得到处理。

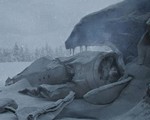
标准遮挡渲染

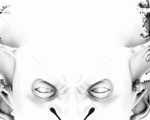
遮挡加入了置换

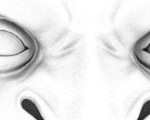
漫反射/置换以及环境遮挡
The first step is to make sure you do not have material override on. We will be using a custom Ambient Occlusion Material for the head with the added displacement. The rest of the objects in the scene will contain a standard Ambient Occlusion Material. Since the material override applies one material to the entire scene, we must disable it.
第一个步骤是确保你没有打开材质覆盖。我们将为添加了置换之后的头部使用一个自定义的环境遮挡材质。在场景中剩余的物体将包含一个标准的环境遮挡材质。因为材质覆盖把一个材质应用到了整个场景中,所以我们必须关闭它。

Next we will make a copy of our original Ambient Occlusion Material. In this instance I renamed this new material AO Displacement.
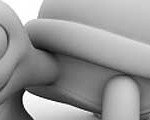
I will not go into the details concerning Mental Rays Displacement, it is simply a grayscale image denoting the areas/amount of displacement. The wireframe is illustrated here for your reference.
下一步我们将制作一份我们原始环境遮挡材质的副本。在这个情况下我重命名了新的材质叫 AO Displacement。
我将不会讨论关于 Mental Ray 置换的细节,它只是一副简单的灰度比例图像同时标注出了置换的区域/数量。线框图作为插图放在那里供你参考。

We will drag and drop the map from the Displacement in the Extended Shader slot from my skin shader into an empty slot. Select Instance when prompted.
从我的皮肤着色器中(译者:这里的着色器指材质)我们将在扩展着色器内的置换通道上拖拽贴图到一个空的材质样本槽上。当程序询问的时候选择Instance(实例)。


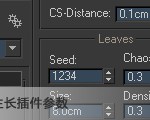
Select your AO Displacement Material. Drag the Displacement Map into the Displacement Slot under the Extended Shader’s of the AO Displacement Material.
选择你名为 AO Displacement 的材质。拖拽{刚才的}置换贴图到 Extended Shader 下面的置换贴图通道上。

Apply the AO Displacement Material to the Object that has the Displacement. Next Invert the selection, choosing every other object in the scene.
应用 AO Displacement 材质道需要置换的物体上。然后翻转选择,选择在场景中其它所有的物体。


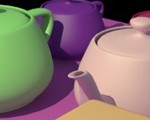
Apply the standard AO Material to the rest of the objects to the scene. Remember the background should be white without any Environment map. Press render. Jump for joy. Or in this case, run in fear.
应用标准的环境遮挡材质(译者:指第一部分内讲的标准AO材质)到场景中其它的物体上。注意背景必须是白色的,而且没有任何的环境贴图。点击渲染。然后起来跳个舞轻松一下…..


推荐相关中文教程

3DSMAX动力学特效实战教学
本套教学将通过24章实例教学,来向你详细讲解3DSMAX的动力学特效在电视包装与广告中的应用。3DSMAX国外粒子案例效果解析
本教学通过27个实战案例,教您如何用3DSMAX结合ParticleFlow本身以及扩展的ParticleFlow Box 1、Box 2、Box 3、功能包,结合Vray渲染器,来制作流行的广告和电视包装中的粒子特效效果。无论是常见的粒子聚合,分散,动态粒子替换,粒子矩阵,粒子动力学,本套教学都有相应的案例。3DSMAX国外流体案例效果解析
本教学通过20个实战案例,教您如何用3DSMAX结合Realflow,FumeFX, ParticleFlow插件,来制作流行的广告和电视包装中的流体效果。无论是常见的液体,烟雾,流体碰撞,沙粒变化,水墨表现,本套教学都有相应的案例。2.5D商业游戏场景制作教程 进阶篇
在本教程中,Freeyy老师将从零开始,向你讲解如何根据确定的主题进行前期准备,随后建模,绘制贴图,制作材质,最后再进行细节调整,完成一个商业游戏级别的2.5D场景画面。Mentalray for max实战教程
本教程共包含超过42小时以上的视频教学内容,共18章 132课,通过大量实例,详细讲解了3ds Max平台下的Mental Ray1渲染器的使用基础和实战方法。是一部非常完整详细的3dsMax版的Mental Ray渲染器的教学.网游角色制作女精灵实战教学
本教学以一个AAA级网游女精灵角色为案例,向您展示如何完成她的模型,UV,和贴图绘制。教学使用的软件主要是3ds max和 bodypaint, 其中建模和UV使用3ds max完成,贴图绘制在bodypaint和 PS中完成。Mentalray for maya实战教程
本教程共包含超过32小时的视频教学内容,共20章 128课,通过大量实例,详细讲解了Maya平台下的Mental Ray1渲染器的使用基础和方法。


推荐课程


推荐教程

0回复如何使用AO贴图来增强细节2"