
本教学为翻译教学,转载请注明来自aboutcg.net,以及注明翻译者
原教学出自CGArena网站,原始链接如下:
http://www.cgarena.com/freestuff/tutorials/max/ironman_helmet/helmet.html
作者: Bracer Jack, Singapore
个人网站: www.bracercom.com
翻译:CWWS(anoutcg.net)
Model the Ironman Helmetby
制作钢铁侠的头盔模型

When I first saw Adi Granov’s Ironman Helmet design in the movie, I was overwhelmed by how he had designed something that looked so geometrically simple yet harbors such a high-tech sophisticated look.
当我第一次在电影里看到Adi Granov的钢铁侠头盔设计,我完全被震撼了,他究竟是如何做到让设计在几何形状上看起来如此简洁,然后又充满了精密的高科技感觉。
Very naturally I seek to replicate that design for the sake of my own satisfaction.
非常自然地,我希望通过重新制作这个设计来满足我自己对它的喜爱。
I will also be taking this opportunity to share some of the key points I engage in when modeling hard surfaces as I had received a number of emails regarding how I go about modeling the Evangelion Eva heads which you can see here.
另外我也希望通过这个机会分享我在从事制作高硬度表面模型时的一些关键技巧,因为我收到好些的Email来问我之前的一个作品,新世纪福音战士里面的机器人是如何制作的,关于那个作品,你可以点击这里观看
The principle is the same, the key is to “Tighten the Edges” to create that fantastic highlight catching edge fillet effect when the 3D model is subdivided. In an ideal world, the perfect 3D model is one which edges are all sharp fillets thereby allowing it to catch perfect highlights everyway it turns.
原理是相同的,关键就是“把边收紧”来创建那种当三维模型细分之后呈现的引入注目的奇妙导角效果,在理想世界里,完美的三维模型就是当所有的锐边无论如何转动,它的导角都可以反射出完美的高光。
Please note that this principle should not apply when modeling LARGE scale buildings or anything huge as the fillet effect would end up giving your large scale buildings that vacuum form plastic toy model look.
需要注意的是,当你在制作巨大体积的建筑模型或者其它任何巨型物体时,这个原理不适用,它会最终让你的模型看起来像是不真实的塑料玩具模型。
The first thing one must do before any modeling begins is to obtain a decent schematic view of whatever you modeling.
无论你想要做什么模型,第一件事总是得到你要建的东西的正确的三视图。
However if you are as obsess with the movie version of the helmet design as me, you would have notice some small differences which I will not bother explaining, for what it’s worth if you can’t tell the different, you might as well use this image as this drawing originated from the designers themselves.
无论如何假使你和我一样对电影版本的头盔设计着迷,你会注意到我会不厌其烦地解释我用的这张图和电影版本的一些小区别,如果你不能分辨出特殊的不同,那么你使用这张图来替代原始设计稿也是有价值的。
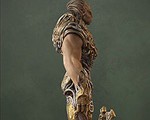
ironman helmet concept
钢铁侠头盔的概念设计

In my case, I prefer the way the cheek bone “structure” was designed in the final movie version.
在我的项目里,我更倾向于最终电影版本的脸颊骨构造。
I also would like to improve on the design consistency on the back of the helmet and to adjust the ratio of the helmet’s frontal nose area curvature and a couple of other nick-knacks to fit the human facial proportion that I personally like, all in all very small changes but are things that matters to me.
我同样想要改进头盔后部设计的一致感,以及调节头盔前部鼻子区域的曲度,和一些其他的凹槽来匹配我个人喜欢的人类脸部的比例,所有这些都是非常小的改变,不过这些对我来说都很重要。
P:S: Just in case you are curious, I have a short nose and I tend to draw my characters as such, in this case I had also altered the ratio of the helmet to reflect this. SORRY !
顺便一提:只是考虑到万一你会好奇,我有一个短鼻子,因此我希望把我的角色也画成这样,在这个项目里我还更改了头盔比例来反映这一点,对不起啦!
There’s a lot of redrawings, refinements, blab bla bla but when all is said and done, these are the final line placements. Don’t move on until your schematic is dead solid, this is very important for technical modeling, you can have more leeway for organic modeling when it comes to schematic accuracy.
这包括很多的草图,细微的改良,等等等,不过所有提到的这些都已经完成了,这是最终的线稿,除非你的概念大纲绝对靠谱,不然不要急着做下一步,对于技术类物体的建模,这非常的重要,如果概念设计精确,你在原始模型制作的时候就会有更大的余地。
helmet sketch
头盔草图

Bring the schematic into your 3D modeling application; I will be using very basic tools so you can pretty much follow the workflow regardless of your application of choice.
把三视图防到你的三维建模软件中,我将会使用非常基本的建模工具,无论你选什么软件,你都应该完全可以跟上我的流程步骤。
You can download this file containing my schematic drawing and the 3DS Max Schematic planes placement here.
你可以点击这里来下载包含我的三视图和3DS Max三视图放置面板的文件。

The first thing I did was to create a place holder for the ear “tube”, I did that because it was the only shape I am the most sure of, it’s just a simple cylinder.
我做的第一件事情是创建一个耳朵部分“柱状体”的暂时代替物体,我这么做是因为这是唯一我非常确定的形状,它只是一个简单的圆柱体。

The next thing to tackle is the cheek plate.
下一个要解决的是脸颊部分。
Edge Extrusion procedure for the Ironman Cheek Plate
这是针对脸颊面板的边挤出建模的步骤。
This will be the first and last image to demonstrate what I am basically doing throughout the initial modeling process; I started out with a simple rectangular plane with symmetry mode on and I keep on extruding its edges and placing them in their rightful coordinates repeatedly until the entire structure is complete.
这会是第一张,也是最后一张图说明我在整个的建模过程中使用的基本技巧。我从一个开启了对称模式的简单四边形开始制作,不断地将边挤出,然后把它们放置到合适的位置,直到完成整个结构。

The basic frontal portions of the helmet completed using the method illustrated on the previous step along with some simple extrusions, nothing complicated, the only thing it takes is time.
头盔的前面基础部分就是使用我上一步描述过的方法,一些简单的挤出操作来完成了,没有复杂的技巧,唯一需要的就是时间。

Same goes for the basic back portion of the helmet.
这同样也适合于对头盔的后面基础部分的建模。
In retrospect I guess I could have started out the back with a sphere but in this case it started life from a single rectangular plane like the rest of the helmet…oh my god the time I must have wasted tweaking those vertices to look like this when I could have just use a sphere and refine from there instead…
现在回想起来,我猜我实际上可以从一个基本的球元素开始制作头盔的后部,但在这个项目里我仍然从简单的四边形面开始制作的,就像头盔的其他部分一样……哦我的天哪,我绝对浪费了不少的时间,当我可以仅仅通过雕刻一个球元素来作为代替的时候……

With the basic layout of the helmet complete, it is best to layout its UVs at this point, however I will not dwell into texturing as that is another topic unto itself.
当头盔的大致形状完成之后,在这个阶段,是展开UV的最好时机,但我不会深入到材质部分,那本身又是另外一篇文章了。
Implement thickness to the back of the Helmet along with one extrusion.
使用一个挤出来创建头盔后部的厚度。
The original Ironman Helmet concept was for this to be a two piece plate so that one can slide up inside another; I am not going to implement this as I do not see how the geometry can actually do that.
对于这一部分,原始的头盔概念设计把它们分为两片,这样一个就可以滑到另外一个里面去,我不准备这么做,因为我看不到多边形如何来实现这一点。

Added one more line to enhance the jaw area.
多增加一条线,来强调下巴区域

Added one more line alongside the already existing line pattern, implements overall thickness and extrude that thin area in. Cut a smaller square pattern at the corner using “insert” and then intrude and extrude the smaller polygon to create the bolt.
沿着已经存在的线条图案再增加一条线,增加整体的厚度并把那个微小的区域挤入,使用”insert”工具在角落切出一个微小的四边形,然后挤出更小的多边形来创建螺栓。


Implement thickness, tighten the edges, extrude the bolts completes the forehead of the helmet.
添加厚度,把边收紧,挤出边缘来完成头盔的整个的前部。

Same goes for the jaw; thickness and edge tightening.
对下巴部分采取同样的操作,厚度和边缘的收紧

The cheek plate before and after edge tightening in subdivision mode. This is what I mean by Edge Tightening, simply adding one more edge alongside the existing edge.
脸颊部分在细分模式下收紧之前和之后的状态,这就是我所谓的边缘收紧,只需要沿着已有的边的外缘再增加一圈边。
Most often than not, the subdivision algorithm will not give you what you want, you may have to adjust the surrounding vertices a little to “appease” the algorithm.
很多情况下,细分运算法则并不会给你期望的结果,你必须自己稍微调节一下周围的点来“适应”细分运算法则。

Recreate the Ear geometry, start from a 16 section cylinder, chamfer the edge, then merge the points like so. Extrude and tighten the edges like so.
重新创建耳朵的多边形,从一个16段的圆柱体开始,对边进行导角操作,然后像这样合并点,再像这样挤出并收紧边。

The eye is just a warped box that had its edge tighten for the edge fillet effect. [To be more exact, it’s a hollow box with thickness so that when I implement the light material, it will diffuse the light correctly like a real physical lens.]
眼睛只是一个变形的方块,并对它的边做收紧处理来达到导角的效果,[更加确切地说,这是一个中空的有厚度的方块,因此当我给它赋予灯光材质的时候,它会显示出正确的物理镜头光效]


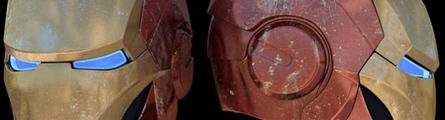
Normally, I like to keep my models perfect and clean, but for the sake of this tutorial, I shall match the dirty, battled look of the helmet as seen in the movie.
一般我喜欢让我的模型保持简洁和完美,不过为了这个教学,我不介意模型脏一点,和电影里看到的比拼一下。

It shouldn’t take you long into the tutorial to realize I’ve given an almost “holy grail” status to the Edge Fillet effect.
你不用花太长的时间就会在这个教学里发现,我给了边导角功能几乎“圣杯”一样重要的地位。
The matter of the fact is, to me, a 3D model with all its edges and intersections filleted is the pinnacle of 3D modeling perfection. This myth, however, had long been debunked by my very own observation. The truth is, by the time you add in all your dirt/rust map to your model, the fillet effect will cease to impress; their sole purpose, catching highlight, isn’t really useful for dirt/rust 3D models anyway.
实际上对我来说,不管怎样,一个三维模型在所有的边缘和交叉处都有导角是三维 建模操作的极点,这个迷信,就我个人观点来说,早就被揭穿了。实际情况是,当你把你所有的污渍/锈渍贴图都加入到你的模型上之后,导角效果会引起不必要的 注意,它们的自身特性,反射灯光,对于比较脏的模型来说,它真的是不那么有用。
I have come to realize it is an obsession to me that I model like this, it puts a strain on my modeling time and can sometimes make the whole UV mapping process so much more complicated than it needs to be.
但我意识到一个困扰我的地方就是,我还就是喜欢这么建模,(指三维模型在所有的边缘和交叉处都有导角),这个习惯让我的建模时间总是不够用,同时也把UV贴图变得和一般情况相比过于复杂了。
I strongly advise that you do NOT behave like me when it comes to implementing Fillet Edges; if it looks right to you then it’s alright. I am just mental.
我强烈建议你不要和我一样,对边缘导角有执念,你看起来不错就是不错,我只是有点神经质强迫症,非要都加上导角。
Feel free to email me Bracer Jack at bracercom@hotmail.com regarding any enquires on this tutorial.
关于这个教学的任何技巧,你都可以给我写邮件到Bracer Jack at bracercom@hotmail.com
Iron Man is a trademark and copyright of the Marvel Enterprise.
钢铁侠是的版权和注册商标属于Marvel Enterprise
本教程完,谢谢大家
教学发完了,强烈建议大家看看作者的网站,非常年轻的一个小伙子,来自新加坡。对机械建模很有心得,有意思的是,网站上还有他的减肥记录,不同时间的体型照片,呵呵。
感谢 Bracer Jack的教学,希望大家多给他支持。


推荐课程


推荐教程

1回复制作钢铁侠的头盔模型"