

使用软件:modo
作者信息:
Domenico Selvarolo
mailto:macironelix@gmail.com
原文:http://www.cgarena.com/freestuff/tut…arl/pearl.html
翻译:StoneBird(aboutcg.net)转载注明译者和详细出处。
关于译者 :


In this tutorial I will show you how I created this Black Pearl Treasure in Modo. Hope you will enjoy this journey…
我将在这篇教程里向大家展示如何在Modo里制作这个黑珍珠宝藏。希望大家喜欢~
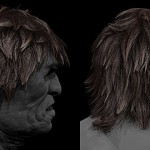
Step 1 – In top view create a backdrop item – set “Top” in projection type and choose reference image in “image”…. The image I find out from google.
切换到顶视图,设置好背景参考图。图是我从google弄来的。

Step 2 – Start modeling with pen tool… Check the “Make Quads” option
用 Pen 工具开始建模,选中“Make Quads”这个选项。

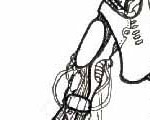
Step 3 – Follow the reference image lines.
– Adjust the shape by the vertices.
– Assign a topology to the skull.
根据参考图调整顶点的位置,用拓扑的方法描出头骨。


Step 4 – Use the thicken tool to thickness the shape and loop slice to define the edges
用 Thicken 工具给做好的形状增加厚度。用 Loop Slice 定义圆角边缘。


Step 5 – Add a circle and use thicken tool and loop slice. Now we have the base of the medallion.
制作一个圆,加厚,Loop Slice。这样就有勋章的基座了。


Step 6 – Now with solid sketch and pen tool add the interior details.
用 Solid Sketch 和 Pen 制作细节装饰。


Step 7 – Then start adding the spheres and toroids for the finishing touches. For the hook I used the pen tool.
之后制作小球和环装饰物。我用的是 Pen 工具。


Step 8 – I used modo UV tool (great tool) for all pieces – Here’s an example with atlas projection.
所有贴图我都是用Modo内置的 UV 工具完成的,这工具超强。下面是一张以 atlas 方式展开的 UV。

Step 9 – I used only one hdr image for some tests with basic materials.
我只用了一张hdr图和一些基本的材质做测试。

Step 10 – I used these maps and these setting to define the medallion materials. Bump map was used in the diffuse amount channel
之后我用以下贴图和设置来定义勋章的材质。凹凸图用在了色散量通道上。


Step 11 – For the plan I used this picture taken from google and then hand colored.
我在google上找了一张图作为藏宝图,并对之人肉上色。

Step 12 – I used a hdr image with 2 luminous panel (red on the right and blue on the left). Luminous intensity set 5.0w/srm2 for the blue and 6.0w/srm2 for the red.
我用一张hdr图外加两个发光板(左蓝右红)做照明。发光强度,蓝色为5.0,红色为6.0


In luminous panel material I added a shader with the following settings.
发光板材质上我加了一个着色器,设置如下。

These are the settings for the render and the final output color. Gamma set at 1.2 for a dark scene. I have activated the bloom.
下面是渲染和最终输出色的设置。Gamma值设置成1.2是为了得到较暗的场景。我开启了 bloom 效果。


Step 13 – For the final image I modeled with the technique of box modelling and using pen tool other items to be included in the final scene.
最后我又用立方体建模和 Pen 工具制作了一些附属的小玩意儿给最终场景进行点缀。

Step 14 – I exported the final color and ambient occlusion output and imported into photoshop. After I superimposed the channel occlusion on final color in this way. In the occlusion level I was led into channels and I have selected all (cmd+click on mac) …the dark parts of the image are selected.
我将最终渲染的颜色和AO导入到PS里面。在通道里选择所有通道,AO的暗部就被选中了。


Step 15 – Invert selection. With the active selection create a new layer.
反向选择,创建新图层。


Final image with slight color correction
最终效果。


推荐课程


推荐教程

1回复黑珍秘宝"