
本教学为翻译教学,转载请注明来自aboutcg.net,以及注明翻译者
请尊重互联网道德,转载请注明aboutcg.net完整网站链接和翻译
原文链接:
http://www.blog.spoongraphics.co.uk/…-skull-pattern
作者信息:
Chris Spooner
http://www.blog.spoongraphics.co.uk/about
mailto:info@buildmultimedia.com.ar
翻译:CWWS(aboutcg.net)转载请注明出处。
请尊重互联网道德,转载请注明转载出处网站链接和翻译者,谢谢!
How to Design a Skate Deck with a Cool Skull Pattern
如何使用很酷的骷髅图案设计滑板
Illustrator’s built in Symbol Sprayer can be a highly useful tool for quickly creating awesome pattern graphics. Let’s look at creating a few vector skull graphics, then combine them into an intricate pattern design to customise a skateboard deck.
Illustrator内置的Symbol Sprayer(图标喷射器)对于快速创建漂亮的图案来说是非常有用的工具。让我们看看如何创建一些矢量骷髅图形,然后然后将它们结合成一幅复杂的设计图形并作为一个滑板车身的设计。
We’ll be using our design to create a custom skate deck graphic, but it doesn’t have to stop there. This technique can come in handy for any design project.
我们将要使用我们的设计作为滑板图案,但这不意味着只能这么做,你可以将这个技术应用到任何的设计项目中。

Open up Adobe Illustrator and draw a circle onto the artboard. Hold Shift to constrain the proportions.
打开Adobe Illustrator在画板上画一个圆,按住Shift键,保持正圆比例。

Draw a Rounded Rectangle onto the artboard, alter the radius of the corners by pressing the cursor keys. Overlap the rectangle with the circle and Align along the vertical axis using the Align Palette.
然后在画板上画一个圆角矩形,通过按住向上向下箭头键来改变圆角的弧度,将圆角矩形放在圆上面,使用对齐面板的纵向对齐功能,让它们纵向剧中对齐。
Combine the two shapes using the Add to Shape Area option from the Pathfinder palette.
使用Pathfinder palette面板,应用Add to Shape Area(形状相加功能)将两个形状结合起来。

Adjust the stroke of the new shape to add a thick black outline.
调节新形状的描边宽度,给它添加一个黑色的外轮廓。
Draw a circle filled with black, then duplicate it to the side. Group the two circles then align them centrally with the overall skull outline.
画一个黑色填充的圆圈,然后复制一个放到旁边,将两个圆成组然后放到骷髅外轮廓中,纵向居中对齐。
Grab the Star tool and click and drag a shape onto the artboard. Before releasing the mouse, press the downward cursor key to limit the points to three, creating a triangle.
Go to Effect > Stylize > Round Corners, enter a figure of around 10mm to round off the pointed edges.
选择星型工具,然后在画板上绘制一个形状在松开鼠标之前,按向下箭头键来讲星型的点改成3个,这样我们可以创建一个三角形。
然后选择Effect > Stylize > Round Corners(圆角功能),输入一个大约10mm的数值,来将三角形圆角化。

Scale and position the triangle as a nose on the skull.
缩小三角形,将它作为骷髅的鼻子。

Use the Rounded Rectangle to create a long thin shape. Copy (CMD+C) and paste in place (CMD+F), then move to one side while holding Shift.
使用圆角矩形创建一个长瘦的形状,按(CMD/ctrl+C)复制,再按(CMD/ctrl+F)原地黏贴,然后按住shift 键用鼠标将它移动到骷髅嘴的另一边。

With the two shapes selected, go to Object > Blend > Make. Go back and adjust the Blend Options under the Object menu to give three specified steps. Go to Object > Expand and select just the Object checkbox.
选择这两个形状,点击Object > Blend > Make(创建过渡效果),在specified steps(过渡步数选项)上输入3,按确定。然后再点击Object > Expand(展开),在弹出选项窗口点击Object (物体本身)勾选框,将过渡效果转换为实际形状。

Duplicate the skull outline and send it to the top of the stack (CMD+Shift+]). Temporarily fill it with a random colour. Ungroup the collection of rectangles, then go to Object > Compound Path > Make. Select both the new skull outline and set of rectangles and use the third option from the Pathfinder palette to trim out the excess.
Duplicate(复制)骷髅外轮廓形状,并将它放到所有物体顶部,使用任何一种颜色填充它,取消之前的5个细长矩形的成组状态,然后选择Object > Compound Path > Make(制作复合路径),然后同时选择顶部骷髅形状和所有矩形,使用Pathfinder 面板的第三个选项按钮,这样只保留骷髅和矩形重叠的部分。
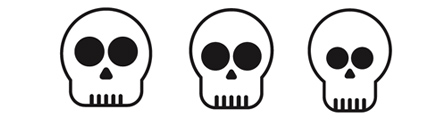
Repeat the last few stages to create a set of three skull graphics, each with slightly different proportions to add a little variety to the pattern.
重复之前的各个步骤,创建出3个不同的骷髅图案,每一个在比例上稍有不同,这样我们可以在最终图形上增加一点变化。

Select each graphic individually and click the New Symbol icon from the Symbols palette.
单独选择每一个骷髅图形,然后在Symbols palette(图标面板)点击新建图标按钮。

Grab the Symbol Sprayer tool and select the first skull graphic from the Symbols palette. Click and drag across the artboard to place the first few instances of the graphic.
选择图标喷射器工具,从图标面板选择第一个骷髅图案,按住鼠标在画板上拖动,来放置一些骷髅图标的复制品。

Click and hold the Symbol Sprayer icon to reveal the secondary tools. Double click the Symbol Rotator to adjust the settings. Change the Method to Random.
一直按住Symbol Sprayer(图标喷射器)图标,在弹出的一系列图标上选择第二个工具,双击Symbol Rotator(图标旋转器)来调整设置,将旋转方式设置为Random(随机)。
Use the Symbol Sprayer Rotator to spin the skulls in various directions, creating a purely random layout.
使用Symbol Sprayer Rotator (图标旋转器)在画布上将每个骷髅旋转到不同朝向,创建一种真正随机的分部状态。
Select the Symbol Sizer tool and change the Method to Random. Then use the tool to add a variety of sizes to the symbols.
选择Symbol Sizer(图标尺寸工具),双击,也将模式改变为Random(随机),然后用这个工具将图标的尺寸随机缩放。

Select the next skull symbol in the palette and go back to the basic sprayer to add more graphics to the design.
选择下一个骷髅图标,然后再回到基础的Symbol Sprayer(图标喷射器)工具,在画布上喷出更多骷髅。
Repeat the process of rotating and scaling each set of symbols, then move onto the next skull.
重复之前的旋转和缩放工作,然后再使用第三个骷髅做同样的事情。

In no time the artboard will be packed full of random skulls. Keep alternating between the symbols until all gaps are filled.
用不了多久,画布上就会充满随机的骷髅,不停替换骷髅图标,重复喷射,旋转,缩放,直到画面被骷髅填满。
Manually drag a symbol onto the design to fill specific areas.
手工地将一些骷髅单个拖到画面中,填满某些空隙。
Zoom out and check over the design for balance, ensuring no areas have a bunch of larger skulls or a collection of graphics facing the same direction.
缩小视图,检查整个设计的平衡性,确保没有地方是有一堆很大的骷髅或者某组骷髅朝着同一个方向。

Position individual skulls onto the design to balance out the pattern with large graphics evenly spaced.
将单独的骷髅放在画面上,使得画面空间比较平均。
Select all and group the skull symbols. Use the Rounded Rectangle tool to draw a shape simulating a skate deck to ensure a large enough area is covered.
选择所有的图标,将它们成组,使用圆角矩形工具画一个模拟滑板面得形状,它要有足够大的尺寸,可以包括这些骷髅图标。

Download this handy skateboard deck template from Deviant Art [Nunosk8], and open it up in Photoshop.
你可以从Deviant Art 网站的[Nunosk8]这里下载这个有用的滑板面模版,然后在Photoshop中打开它。
Paste in your design to create a realistic mockup of your skate deck graphic.
将你的设计粘贴进来,创建一个逼真的模拟画板面图案。
The final design uses just the three skull illustrations, but thanks to the Symbol Sprayer, a cool pattern can be quickly created. The result is an awesome deck design!
最终的设计只用到了3个骷髅插画,但感谢图标喷射器,可以通过使用它创建一个很酷的图案设计,结果就是一个漂亮的滑板设计!
Written by Chris Spooner
Chris Spooner is a designer who has a love for creativity and enjoys experimenting with various techniques in both print and web. Follow Chris’ daily design links on Twitter, and be sure to check out his second blog over at Line25.com.
本教学由Chris Spooner撰写
Chris Spooner是一位热爱创意并乐于在印刷和网络设计中实验广泛技巧的设计师,你可以在Twitter观看它的日常设计,另外也请一定检查他在Line25.com的第二个博客
如果你对此文章感兴趣欢迎来到社区讨论:http://aboutcg.net/showthread.php?t=1388


推荐相关中文教程

构图绘画完全教学
本套课程的内容重点是学习绘画艺术的构图规律和方法。在绘画学习过程中,构图是一个重要的组成部分,学习它对于提高绘画练习和创作水平有显著的促进作用。特指纯艺和插画,海报。

推荐课程


推荐教程

0回复如何使用很酷的骷髅图案设计滑板"