
本教学为翻译教学,转载请注明来自aboutcg.net,以及注明翻译者
原始链接:http://www.cgarena.com/freestuff/tut…/red_hulk.html
原作者:Fabio Bautista, Columbia
翻译:Qi
关于译者:

制作红色版Hulk

Since childhood, I’ve been a big fan of the comic books and have always tried to include some of this style in my work. I recently had the opportunity to participate in the Comicon Challenge 2009. The challenge consisted of creating a representation of one favorite action character of comic books, no matter if it was hero, heroine or villain. As this is a competition specifically related to character creation for games, had some restrictions like not being able to use more than 10k triangles in the final model and to create 2048 x 2048 texture maps.
在童年,我是一个漫画迷,现在也经常试着把这种爱好融入到我的工作中。最近,我有机会去参加2009年的漫画挑战赛。这个比赛是让你制作一副你喜欢的漫画人物的作品,不管他是英雄,女英雄还是反面角色。因为这个比赛跟游戏的人物角色有关,它就有一些限制,比如最后的模型不能多于1万个三角面还有贴图的尺寸是2048×2048.
Idea 想法
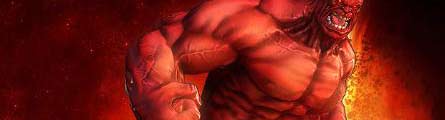
One of the comic book and movie characters and that I have consistently followed is the Incredible Hulk. I always wanted to make one that looks as real as the movies, but comic’s likeness. But there are so many versions created by different artists and an equal number of representations in 3D, I thought about doing an unusual one.
我一直喜欢一部漫画和电影中的角色,他就是Hulk。我一直想制作一个看上去很接近电影,但是偏漫画风格的Hulk。但是不同的艺术家已经创造了很多不同的版本,在3D中又有很多类似的作品,我想制作一个不一样的Hulk。
Thus was the idea of making Red Hulk, a character not well known in movies or games, but even so in comic books? This character is an evil version of Hulk, created by Jeph Loeb and Ed McGuiness (one of my favorite comic artists) and according to them, he is more aggressive and intelligent, besides having all the abilities of Hulk. The main difference with the original Hulk is that it does not become stronger with anger, but rather radiates increasing levels of gamma radiation. In some editions also called Rulk to distinguish him from the original Hulk character, but personally I prefer the original name.
因此有了制作一个红色Hulk的想法,它没有出现在电影或者游戏中,但是漫画中确实有。它是恶魔化的Hulk,由Jeph Loeb 和 Ed McGuiness (一个我非常喜欢的漫画艺术家) 创造。根据他们的设定,它好斗、聪明,还有Hulk的所有能力。跟原版的Hulk最大的不同,它并不是因为愤怒而强大,而是受到了太多伽马射线的辐射。在一些版本中它也被称为Rulk,从而区别于原版的Hulk,但是就个人而言我更喜欢原来的名字。
Keeping all this in mind, I began searching and collecting images that I could use as a reference for creating my own version of this strong character.
当在脑中想好这些后,我开始收集图片来作为参考。
High – Poly Modeling 高模
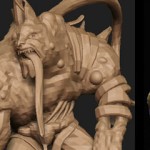
The first thing I do with this kind of characters for games, is to create a high-poly model, which later on I can use to transfer all the geometry detail to the texture maps. Starting from a box and by using the polygon editing tools, I began creating a base mesh in Max and exported it to an .obj file. Once inside ZBrush, I imported this basic form and began to move vertices with the Move brush, looking for a more defined shape.
在开始之前,我做的第一件事是做一个高精度模型,在之后我将会把全部的信息都保存入贴图中。由一个立方体开始,我使用多边形编辑工具在max中制作一个基础模型,然后导出OBJ文件。在Zbrush中,我导入这个模型,然后使用移动笔刷来移动点来使模型看起来更精确。

When I am satisfied with the overall proportions, I retopologized it, always trying to keep a balanced number of quad polygons in the entire model’s surface. From this model I created other parts such as the pants and hair, making a selection by using the <CTRL> key and drawing a mask selection with the Standard brush.
当我满意整体结构后,进行重新拓扑,使四边面均匀的分布在模型的表面。在这个模型上,我制作了一些其他的部分比如裤子和头发,是按住<CTRL>选择然后用基础笔刷来画一个mask遮罩。

Once I made the selection (shaded in the model) I used the Extract function to create the new object, which is added automatically to the SubTools panel.
然后我选择一些面用提取功能来制作一个新的物体,然后把它添加到子工具面板。

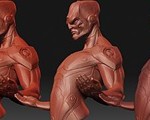
When I had all the elements organized, I started working on the overall anatomy. First I enabled the symmetry button in X axis, began to move vertices and looking for a good balance in the proportions. Then I added a new subdivision level to the model and began to shape muscles by using the Standard brush.
当我把所有的内容组织,我开始对整体进行雕刻。首先我对X轴打开对称功能,开始移动一些点来使模型看起来更协调。然后把细分增加一级,用标准笔刷来刷肌肉。

To achieve a better definition, I again subdivided the mesh and kept using the Standard brush in conjunction with the alpha 39 to accentuate the separations.
为了得到更好的轮廓,我继续细分模型。用标准笔刷和39号Alpha贴图来加强凸起的部分。

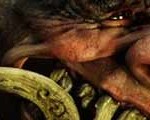
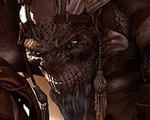
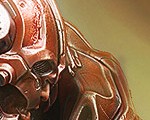
Once the overall anatomy was defined, I started working on each specific body part, starting with the head. From the beginning I was looking for an extreme anger expression and to get this I had to work hard on his face. By using brushes as Standard and Inflate, I started to give volume to the eyebrows area, eyelids and cheeks and by using the Slash1 brush I added and defined the expression lines of the forehead, nose and mouth contour. To define the lips I used the Pinch brush.
现在大体的人体结构已经确定好了,我开始对一些具体的身体进行更细致的制作,从头部开始。首先我要找一个更好的角度来表现,从面部着手。使用标准和膨胀笔刷,我在眉毛、眼皮和脸颊部位增加了一些体积感。通过使用Slash1笔刷,我添加并确定了在前额,鼻子和嘴的轮廓线的表达。我用Pinch笔刷来定义嘴唇。


To sculpt the the hair, I added 3 subdivision levels and used the SnakeHook brush to pull softly the vertices from the surface. Then a further subdivision was necessary to define the hair style.
为了雕刻头发,我细分了3级然后用SnakeHook笔刷轻轻的从表面的顶点拉。然后,为了定义发型进一步细分是必要的。

With the pants I made a similar process, first I used the Move brush to give shape to the rips, then added a new subdivision and used again the SnakeHook brush to pull the mesh and finally added some folds making use of the Standard brush with the alpha 39.
我用一样的步骤来刻画裤子,首先,用Move笔刷来定义撕裂部分的形状,然后再次细分,并再次使用SnakeHook笔刷来拉出形状,最后用Standard笔刷和Alpha39来加上一些褶皱效果。

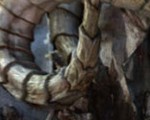
There is still to work on final details of the body, I subdivided once again and made use of the LazyMouse mode to create veins, arteries and to define more the anatomy. Finalizing this session, I added some details such as blemishes and wrinkles on the skin, by using different alphas, some of these custom alphas.
还要来刻画身体的最后细节,我再次细分,并用LazyMouse模式来创建静脉,动脉和确定更多的结构。完成这个过程后,我在皮肤上增加污点和皱纹等细节,使用不同的Alpha贴图和一些自定义透明度。


To create the pedestal, which was a section of damaged road, I used a similar procedure, I began creating a basic form in Max, then exported it to ZBrush to sculpt and add final details through alphas.
要创建的基座,是一个损坏的公路。我用同样的方法,先在max中建立一个基础的模型,然后导入到ZBrush中,用不同的Alpha来添加最后的细节。

Low Poly Modeling and Normal Mapping 低模和法线贴图
After, it was the turn of the low poly model. First, I placed the high poly model and went down to a medium subdivision level trying to keep the overall detail.
之后,就是低模的转化过程。首先,我把高模降低细分到中等来保持住大体的结构和细节。
Then it was exported to an .obj file to open it in Max and once there overlapped it to the initial base model. From this model I made a mesh with a new topology by using Polyboost and Max’s polygon editing tools.
然后导出OBJ文件并在max中打开,把它跟最初的基础模型进行重叠。我用Polyboost和Max的多边形编辑工具对这个模型进行了重新的拓扑。

Once this model was ready, I started the UV mapping. Although usually I use the unwrapping tools of Max, especially the pelt tool, I also sometimes use Unfold3D, a quick and effective tool when performing these tasks. What I did was mark cut lines on key places such as the neck, trunk, back and on the inside of the limbs, trying to make the fewest number of divisions, to keep recognizable these areas when painting and creating the textures.
一旦这个模型准备好,我开始UV贴图。虽然通常我使用最多的是max的unwrapping工具,尤其是pelt工具,我有时也使用Unfold3D,一个快速和有效的工具。我所做的就是在诸如颈部,躯干,背部和四肢的关键位置标记内切线,要使分割线最少,以致在画贴图时能进行识别。

I finished this task, the model was exported back to open it in ZBrush and create the normal maps. The importance of these maps is that they transfer all the detail created in the high poly modeling stage to the low poly model, making it appear to have more detail in geometry than it really have. It’s just a visual effect, which is effective from any point of view. This allows adding high detail to low poly models, and that’s the reason for its continuous use in games industry today. To start, I placed the high poly model without mapping and went down to the first subdivision level.
当我完成这个任务,把模型导回到Zbrush中,并建立法线贴图。这些贴图的重要性在于,它们把所有的高模信息转化到低模上,使低模呈现出比自身多的多的细节。这只是一个视觉效果,并从任何角度来看都有效。这就允许在低模上呈现跟高模一样的细节,这就是它在游戏中现在还在被使用的原因。首先,我把不带贴图的高模降低到一级细分。

I used the ZMapper plugin included with ZBrush. There, I used the Mesh Current Capture function that is under the Projection tab. Normally, this is done in order to capture all the high poly detail information through the polygon normal directions. Then I imported the low poly unwrapped model and turned on the ZMapper again to project the normal map on this mesh. To do this, first I check the Tangent Space map type and used the Create Projected NormalMap function. This procedure was repeated with each one of the model parts to get the final normal map. As you can see this map show all the detail of the high poly model.
然后我用Zbrush自带的ZMapper插件。在这里,我用在Projection tab中的Capture Current Mesh功能。通常情况下,它是用多边形的法线方向来获取高模的全部细节信息。然后,我导入未展开的低模,再次打开Zmapper去烘焙它的法线贴图。要做到这一点,首先我检查已经切到Tangent Space Map 模式,然后使用Create Projected NormalMap功能。为了得到最终的法线贴图,对每一个模型来说这一步骤被重复多次。正如你所看到,这张贴图显示所有的高模的细节。


With the pedestal I did a similar process, however in this case I used the same model to create the normal map. After creating this normal map, I exported the low resolution mesh again in Max and then it was divided into pieces by using the ProCutter tool included in the Max2009. This tool helps us to create several sections of an object from cutting lines by drawing Splines over the model. Finally, I moved the pieces and added the tubes I created in a previous process.
对基座我做了相同的步骤,但是在这里我用同一个模型区生成法线贴图。在这之后,我把低模从Zbrush中导出并导入到max中,然后用max2009自带d的ProCutter工具把它分成几块。此工具可以帮助我们创建一个物体的零件,通过在物体表面画分割线。最后,我把它们分开,并且加入了之前所做的软管。


Next, I went back to ZBrush and started to work on the pose of the model. I used the useful Transpose tool which allows us to move, rotate and scale parts of the model only by making a selection through masks. Although there is a more advanced technique to create skeletons and rigs using ZSpheres, this is a quick way to try different positions and in this case was appropriate to pose the Red Hulk model.
然后,我回到Zbrush中开始给模型摆Pose。我用Transpose工具对所选中的mask遮罩部分进行移动、旋转和缩放操作。虽然有更高级的技术比如用Z球建立骨骼,但是用它来摆pose是最快的方法。在这里我就是用这种方法来给Hulk摆Pose的。

Texturing 贴图
The texturing process was straightforward, I just opened the model in Max and assigned a Multi/SubObject material . Then I assigned colors according to each part to differentiate them on the map. Next, I used the Render To Texture feature to create the base diffuse map.
制作贴图的流程是简单的,我在max中打开模型然后给它一个Multi/SubObject材质。然后我分配不同的颜色来区分它们。用RenderTo Texture功能来生成一个基础的diffuse贴图。

The map generated was opened in Photoshop to paint the details and to mix with other textures. Initially, I opened the normal map and modified the levels, curves and saturation and then it was blended in Soft Light mode.
把生成的贴图在PS中打开来添加更多的细节,并且跟其他贴图叠加。打开法线贴图,增强它的色阶、曲线和饱和度,然后用柔光模式叠加。

Taking a copy of this map and then tweaking it again, helped me to apply details, highlights and shadows to the texture, then I touched up by using the Photoshop paint tools.
把贴图复制一层再次进行绘画,画上细节、高光和阴影,然后我用PS的涂抹工具进行润色。

I added more detail to the map making use of some brushes and mixing it with some other textures. I also worked with a color palette with similar tones to the initial colors to create a uniform graduation, especially for the skin tones.
我使用不同的笔刷和叠加一些其他的素材来得到更多的细节。我还用调色板对最初的颜色进行调整来长生相同的色调,尤其是皮肤的风格。

To complete this process, I added some details of stains and imperfections on the skin and finished working with the AO (Ambient Occlusion) map. To get this map, I went to Max and used the Render to Texture dialog again, but this time I used the high-poly model for the projection. Finally it was applied as a layer in Photoshop in Multiply mode.
当这个过程完成后,我在皮肤上再加上一些污迹和皱纹,然后再叠加上AO贴图。为了得到这张贴图,在max中再次使用Render to Texture ,但是这次我用高模来投射。最后,在PS中,用叠加模式加到原来的贴图上。

Time Rendering and Compositing 渲染和合成
New toys always make me happy, and one of the things I enjoy a lot about this project was the fact to try something new. For first time, Toolbag a simple tool that uses the Marmoset game engine and include a real time model viewer. In my professional experience had the opportunity to work with some advanced game engines such as Unreal and Unity, and although these are very powerful tools for game development, are not so intuitive and easy to use. With Toolbag I was able to quickly test different camera angles of the model so that I could decide which was more suited for the final presentation.
新事物总是让我快乐,而我喜欢这个项目是因为可以尝试新的东西。我是第一次使用猴子游戏引擎,包括实时模型的预览。在我的职业经验中,有机会使用一些高级的游戏引擎如虚幻(Unreal)和统一(Unity),虽然它们对游戏的发展是非常强大的工具,但没有那么直观,易于使用。用Toolbag我能快速测试模型的不同角度,这样我可以决定哪个角度是最适合的。
I started placing the model on the pedestal in Max and making small adjustments such as the position of the feet and the location of the pieces of the road. Then these were exported to an .obj file so later that it can open in Toolbag.
我开始在max中把模型放置在底座上,做一些小的调整,如脚的位置和道路的块的位置。然后,输出为obj文件,以便在Toolbag打开。

Once inside of Toolbag I went to the Material Editor and imported the model, then I applied a Phong material and added the textures created in the previous stage. With the shader set up and render options by default, all I did was taking some screen shots.
进入Toolbag我打开材质编辑器,导入模型,然后我采用了Phong材质,并在前一阶段加入了贴图。阴影和渲染都是默认选项,所有我所做的就是截图。

From there, everything was very easy and quick, I just changed some things like the viewpoint of the model and direction of light and instantly, I got the real time render. That was how I could get the final images after adding some post effects and adjustments included in the application.
因为这些,一切都非常方便、迅速,我只是改变了一些东西,比如模型的角度和灯光方向。马上,我就得到了实时渲染结果。


The final post work was done with Photoshop. In this image I wanted to capture a moment of the rage of Red Hulk but with the look of comic books. To get this, first I created and touched up a bit the background. Then I placed the rendered image on top and tweaked a bit levels, saturation and color balance. At the end, I added some shadows and glowing effects.
最后的工作就是用Photoshop来润色。在这张图片中,我想捕获红Hulk愤怒的时刻,但又有漫画的风格。为了这一点,首先我创建了一个背景。然后,我把渲染图放在首层,然后改变了一点色阶,饱和度和色彩平衡。最后,我加了一些阴影和发光效果。

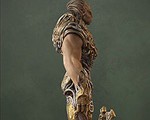
Well ,this was whole process I done to meet the challenge to create the Red Hulk. This involved approximately 70 hours of hard work, which eventually were well rewarded with the great reception it got. Thanks and I hope you have enjoyed this making of.
那么,这就是整个过程。在制作中,我努力去解决遇到的挑战。这大约需要70个小时的艰苦努力,但最终也得到了巨大的回报。谢谢,我希望你喜欢这个教程。


推荐相关中文教程

AboutCG Zbrush4R7高级机械建模实战教程
本套教学由我们两位强大的老师,《造型巨匠Zbrush》的作者田涛老师,和《Zbrush完全教学》的作者Purplesun老师一起打造,两位老师分别使用Zbrush4R7制作多个机械模型案例,难度由浅入深,对制作当中用到的功能命令一一讲解。并时时分享提高建模效率的宝贵经验。Zbrush 4R7新功能中文视频教学
zbrush4 r7将会是zbrush4版本的最后一次升级,下一个版本将会是zbrush5。本次更新进一步完善了zbrush的功能,首次提供了几乎全套的多边形建模命令,大部分硬表面对象的建模将不需要借助第三方软件。ZBRUSH全案例实战中文视频教学
本套视频教学以案例为主,通过11个完整的zbrush雕刻案例,由浅入深的带领大家掌握zbrush常用的雕刻流程和雕刻技巧,全套教学在25小时以上。ZBRUSH完全中文视频教学
ABOUTCG现在荣幸的向您推荐这款Zbrush4的完全商业教学:本套教学包含150个片段,共计30小时的内容,全面细致的介绍Zbrush的所有功能,无论你是初学者,进阶者。还是行业人士,本套教学都能为您提供一个思路,一个方案和一份竞争力。
推荐课程


推荐教程

0回复制作红色版Hulk"