翻译:新几何影视文化 | freeyy
教程作者:NHAN LE(越南)
作者博客:https://www.behance.net/leanhnhan
原文地址:http://www.ronenbekerman.com/making-go-home-late-tokyo-2007/
原文版权归属作者所有,本人仅做学习目的进行翻译,翻译转载请注明出处及作者!
Lê Anh Nhân is a 3d Artist from Vietnam. He studied 5 years in the university of architectural design, and got interested and use 3dsmax & V-Ray during his 4th year there. His passion for CGI got him to follow ArchVIZ after the university. Today I’m very happy to share with you all the process behind his AMAZING work – Tokyo 2007, done as a tribute for his wife. Enjoy!
NHAN LE 是来自越南的3D艺术家。他在大学学习了五年的建筑设计,在第四年的时候他对使用3dsmax和V-ray产生了兴趣。对CGI的热爱使他在大学之后追随了ArchVIZ。今天我非常开心的为你分享,在他的惊人作品——东京2007后面的所有过程,作为向他妻子的致敬。祝愉快!
Introduction
介绍
Hi, everybody!
嗨,大家好!
I’ll start with thanking Ronen for giving me this opportunity to share with you the method used for “Go Home Late (Tokyo 2007)”. It is a great honor for me.
我首先要感谢Ronen给我这个机会,与大家分享用于“晚回家(东京2007)”的方法。这是我的荣幸。
I only have 2 years experience in the profession. All the things I am sharing with you here I have learned by myself, without training courses, just study on the internet. It may contain flaws, so pat attention to this fact. I hope everyone can sympathize with me.
我仅有2年的专业经验,所有在这里分享给你的东西,都是我自学得来的,我并没有参加过培训班,仅通过Internet来进行学习。文字会有许多缺陷,所以请注意到这个情况。所以希望大家能够包容我。
Let’s start with the inspiration behind the project.
让我们从这个项目背后的灵感开始吧。
Inspiration
灵感
Why did I create this image?
我为什么创作这幅图片?
I just got married and each evening I waited for my wife coming back home late after work. Since I love her very much, I wanted to do something for her. I look for inspiration in the works of others artists which, thankfully, there are many of around us to learn from.
我刚结婚然后我每个晚上等待上班回家的妻子。由于我非常爱她,所以我想为她做些事。我在其他艺术家的作品中寻找灵感,欣喜的是,我们周围有很多这样的人可以学习。
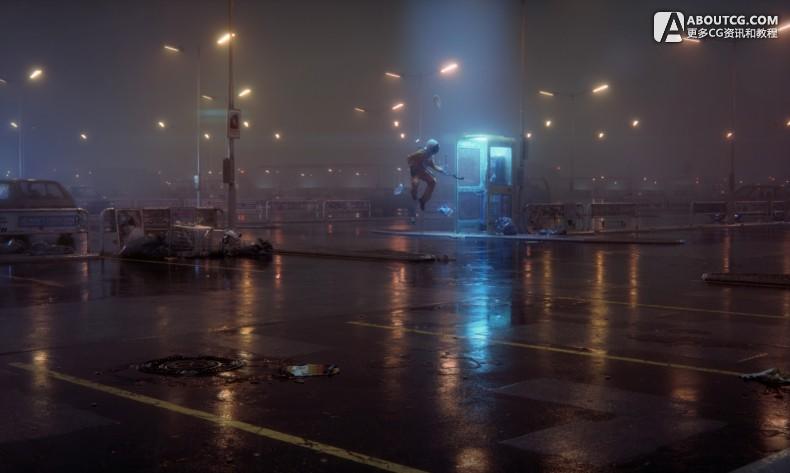
It was a coincidence when I saw the work “Big City Sensory Overstimulation” which was performed by Gleb Alexandrov, a very talented artist.
碰巧我看到了由一个非常有才的艺术家,Gleb Alexandrov完成的作品“大城市感官过度刺激”。
And I was even more inspired when Cornelius Dammrich published the work “52HZ“.
并且当我看到Cornelius Dammrich发布的作品“52HZ”时得到了更多的灵感。
I confess, I was addicted to these two images.
我承认,我对这两幅作品上了瘾。
I’ve decided to do something similar, also “crazy” like them but in my way. Due to commercial work deadlines, I had very little time to do it. I had only 8 hours a week to do it, and modeling and texturing are not my strengths. I am the best at observing everything around us. So let’s start with my references in this project.
我决定某些类似的事情,用于向他们一样“疯狂”但是用我的方式。由于商业工作的时限,我很少有时间这么做。我仅能用每周8小时来制作它,并且建模和纹理不是我的强项。我很擅长观察我们周围的一切。那么从我在这个项目中的参考来开始吧。
References
参考
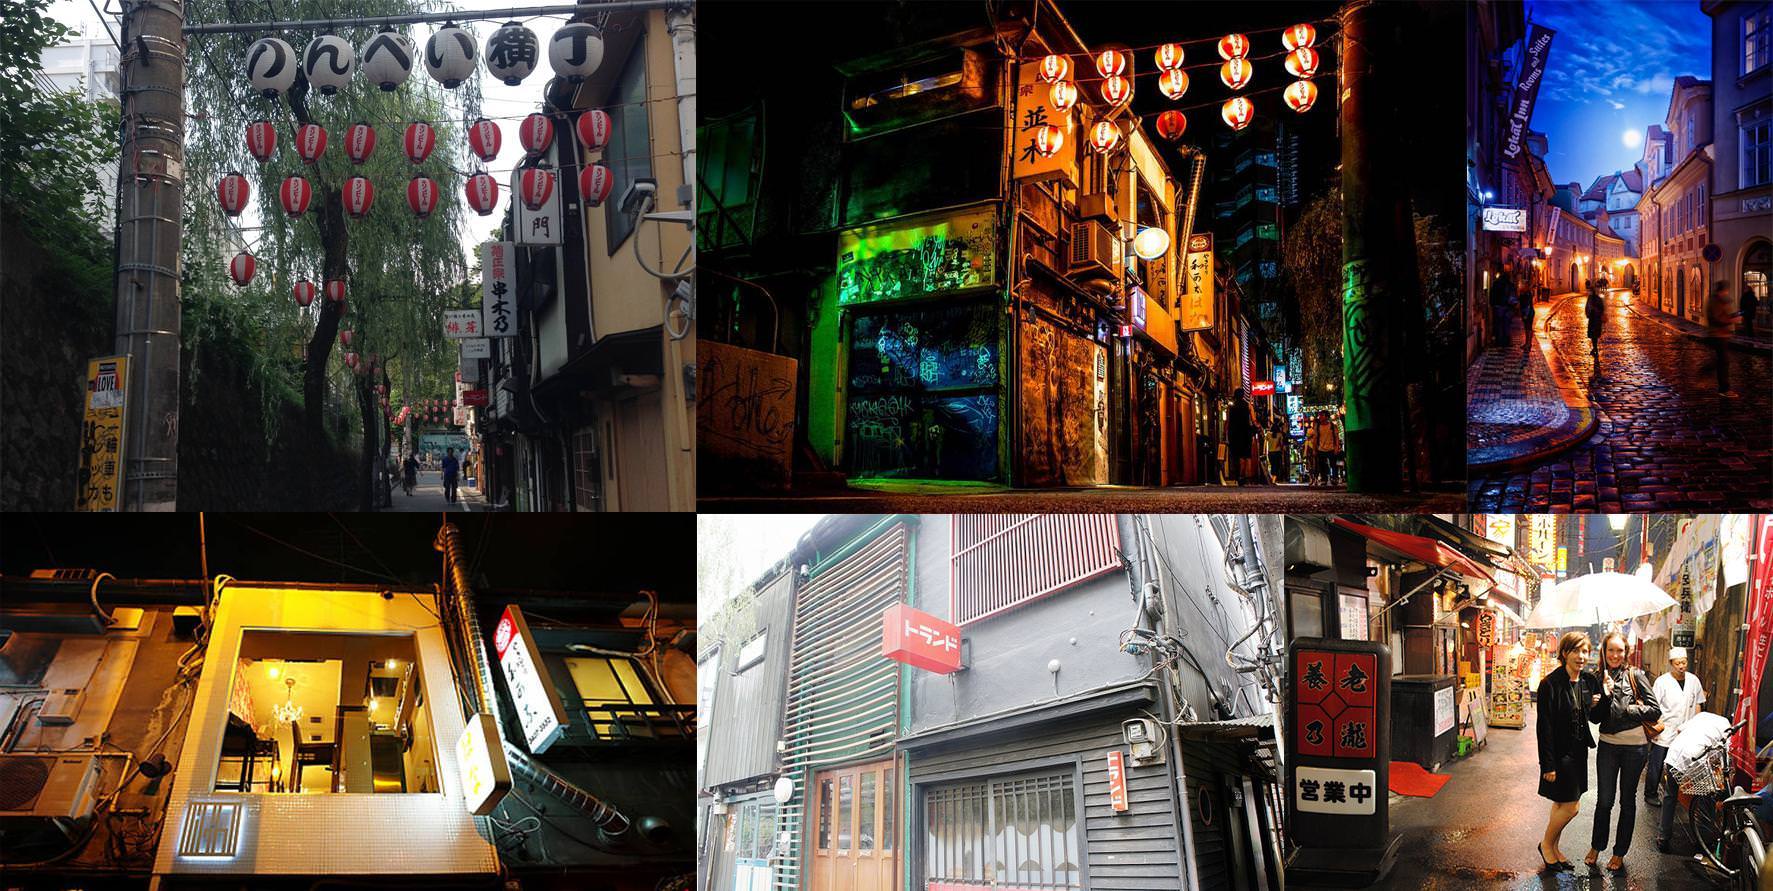
I think this is the most important part. Human imagination is wonderful, but we must connect what we do with the reality around us, which takes the time to understand in a way we can translate to our images. Before doing something, I often observe carefully, understand the nature of it, then I start drawing.
我想这是最重要的部分。人类的想象力是很奇妙的,但我们必须把我们周围的现实联系起来,我们可以通过我们的图像来转换,这需要时间来理解。在做事之前,我经常仔细的观察,理解它的性质,然后我开始绘制。
Here are some references that I love…
这里是一些我喜欢的参考…
3d Modeling
三维建模
This is the most time-consuming part for me.
这是我最耗时的部分。
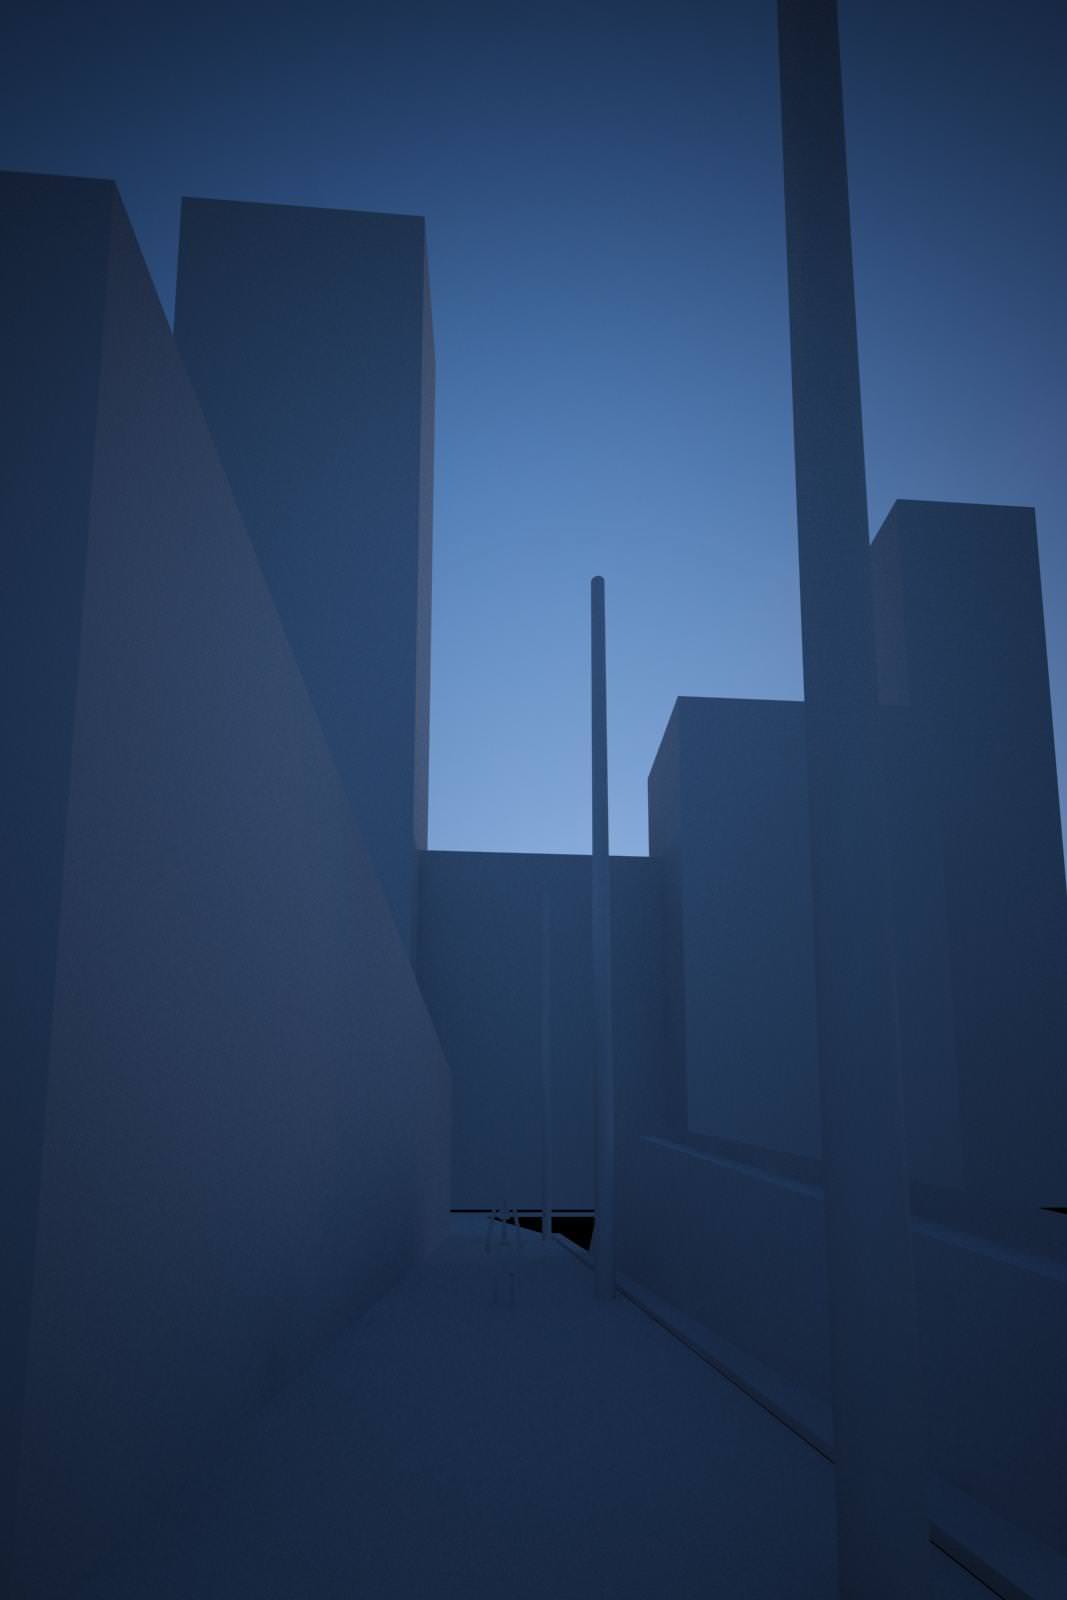
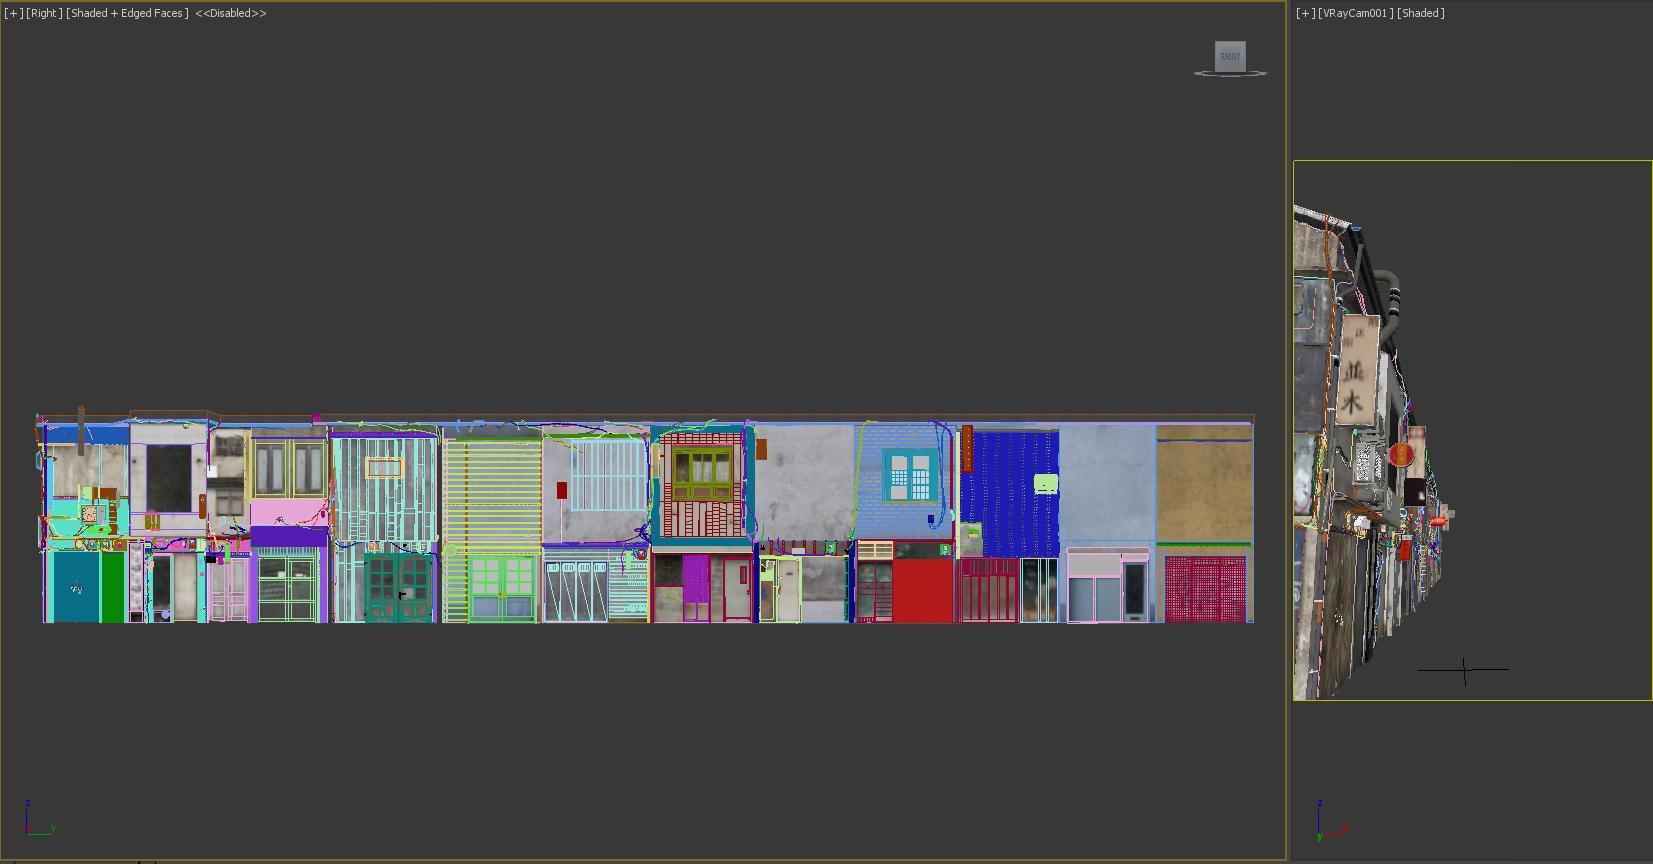
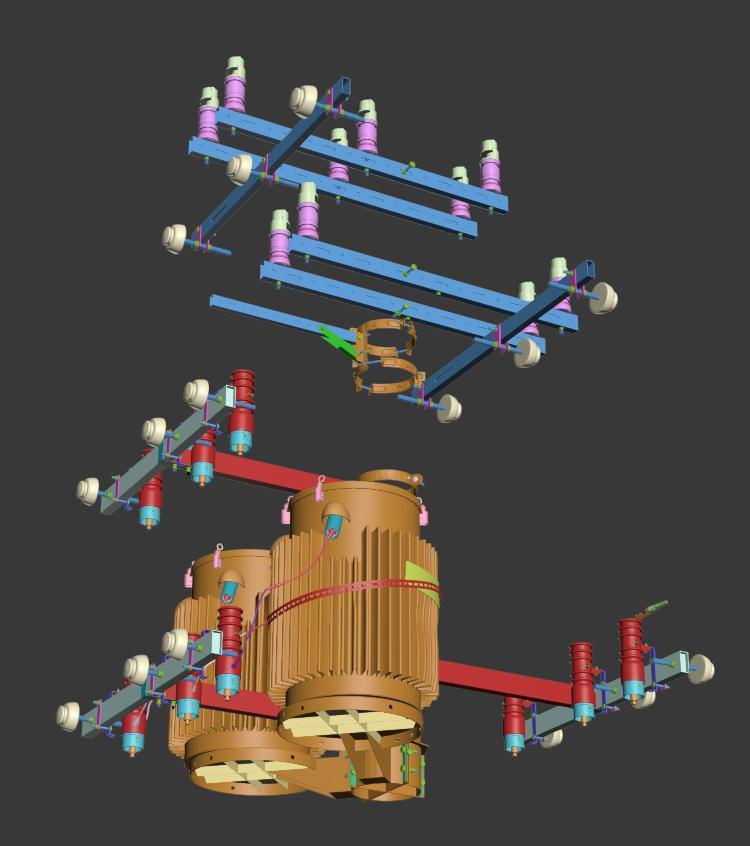
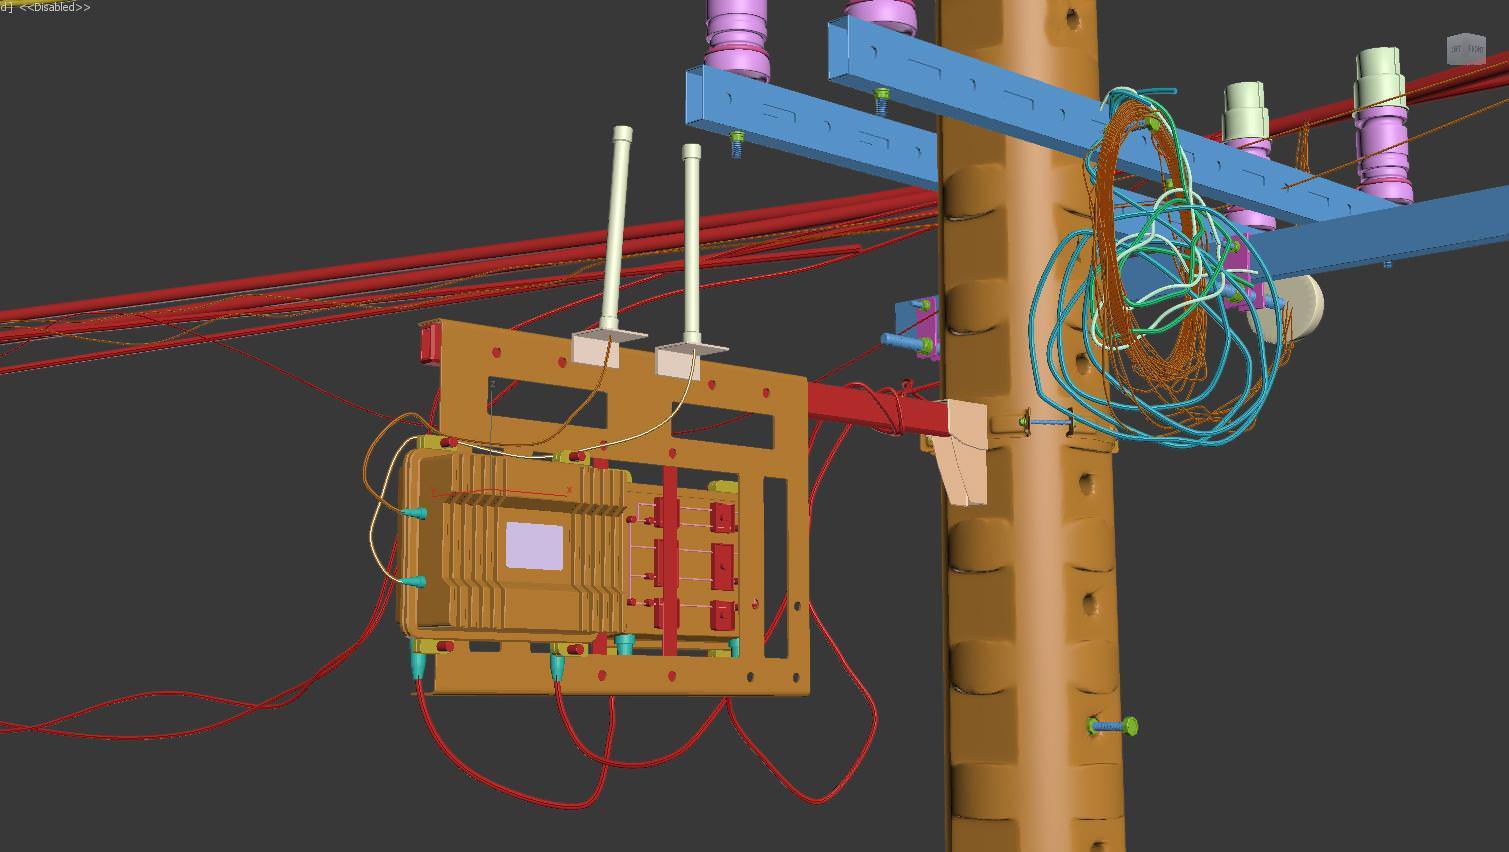
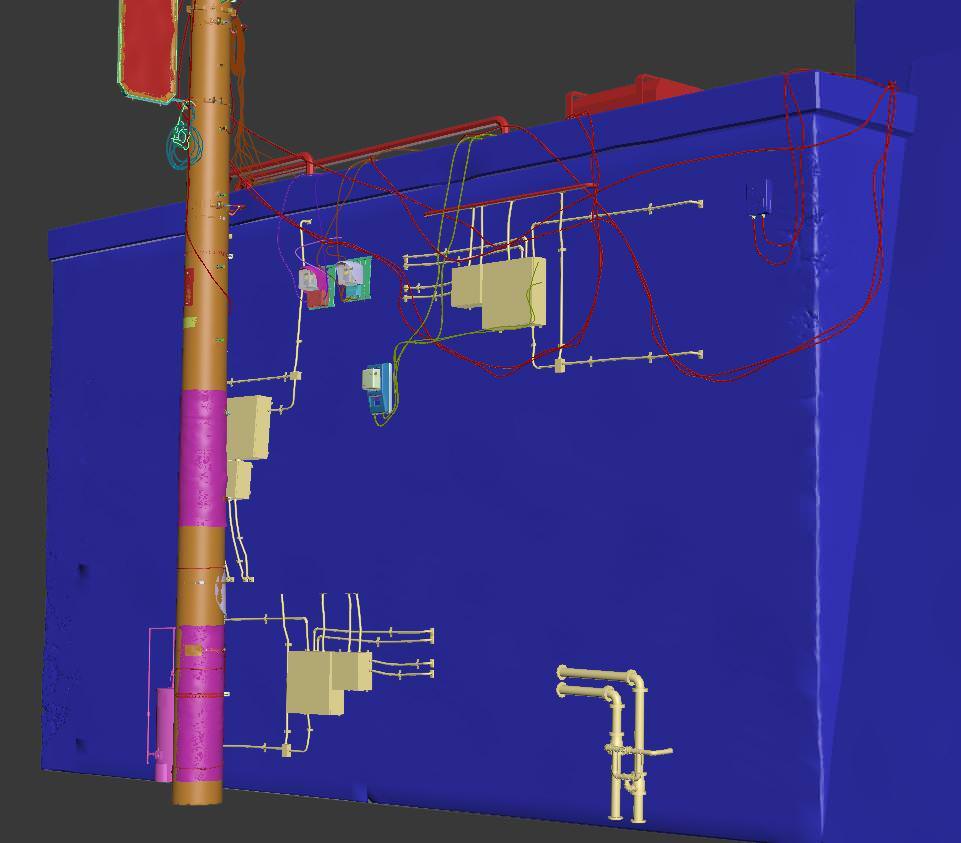
On this image, I want to do exactly with the current state of the buildings in this small alley. From architecture and location of electrical equipment, even the way matching electrical wiring must be the reality. To start with a camera and the cubes. I always do that because it helps my job easier.
在这个图像中,我需要在小巷中的建筑的当前状态正确。从建筑结构以及电气设备的位置,甚至是电力线路的匹配都必须真实。我从相机和矩形开始。我总是这样做,因为它会让我的工作更容易。
Prior to the model in detail, I would like to share with you an experience which seems everyone knows. All the sharp edges in this 3d model have a “chamfer” on them. It helps with picking up the important highlights on edges we do see in real life. Making everything to be more believable.
在详细模型之前,我想与你分享一条大概所有人都知道的经验。在3d 模型中所有锐利的边线它们都是有“倒角”的。这有助于我们在现实生活中看到的边缘拾取到重要的高光。使所有的东西变得更可信。
I always keep in mind that, to be truthful, even the furthest part of the 3d model, needs this level of detail. You can decide to cover it with fog later if need be. Just have the detail built in for when you need it. That’s just how I trained myself (and today with 360’s becoming more popular as well as VR it will make your scenes more ready for it).
我永远记住这个,为了更真实,即使是最远处的3d模型部分,都需要这个级别的细节。如果需要你可以决定用雾来覆盖它。当你需要它的时候,它就是具有细节的。这就是我如何训练自己的(并且如今360度的东西以及VR已经变得非常受欢迎,这样可以使你的场景为这些做好准备)。
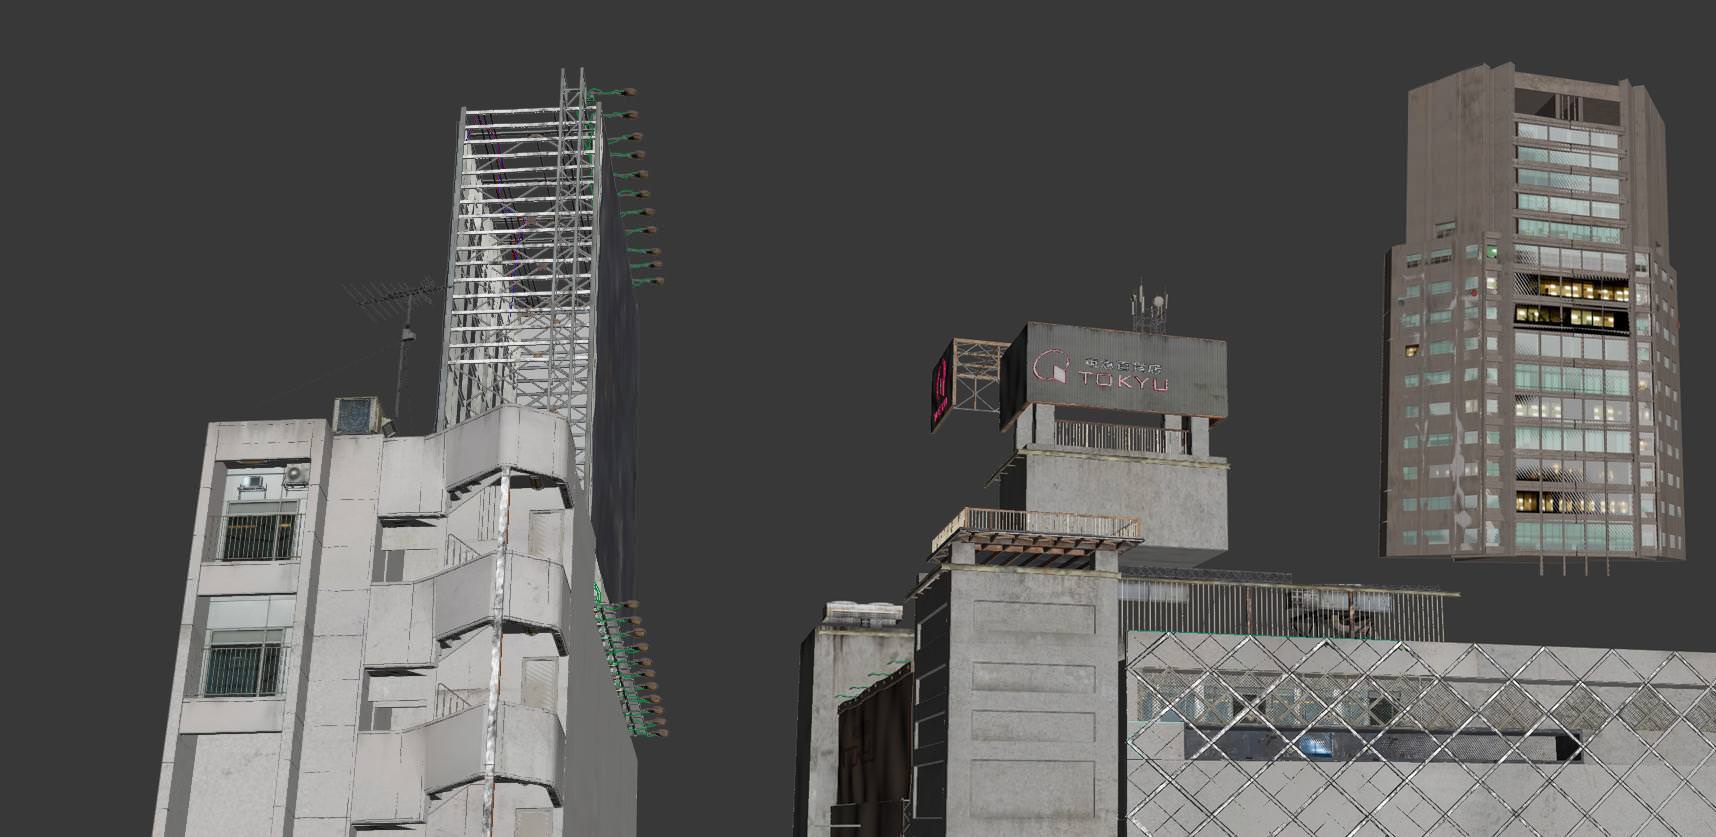
There are 17 buildings in the scene. I modeled them in 3dsmax. There are erosion details demanding the use of ZBrush. You can see this in the image below.
这里是场景中的17个建筑。我在3dsmax中制作他们。做旧细节的需求使用了ZBrush。你可以在下面的图片中看到这些。

And this is an example of how I make the concrete details eroded.
这是我如何制作破损细节的一个例子。
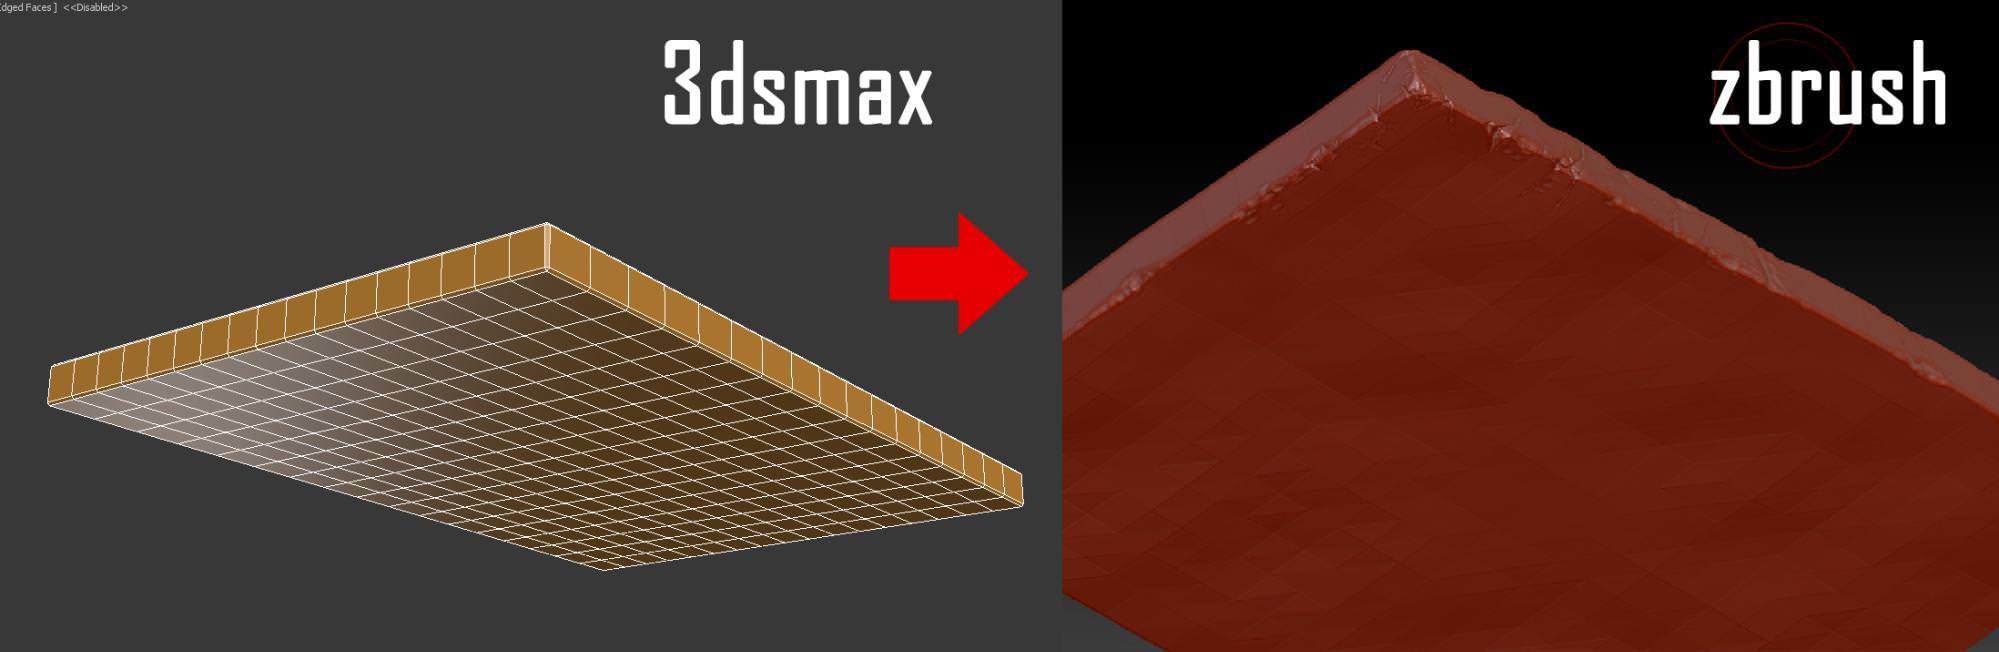
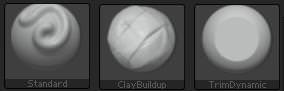
I used the 3 brushes below to sculpt in Zbrush.
在Zbrush中我使用了下面三个笔刷。
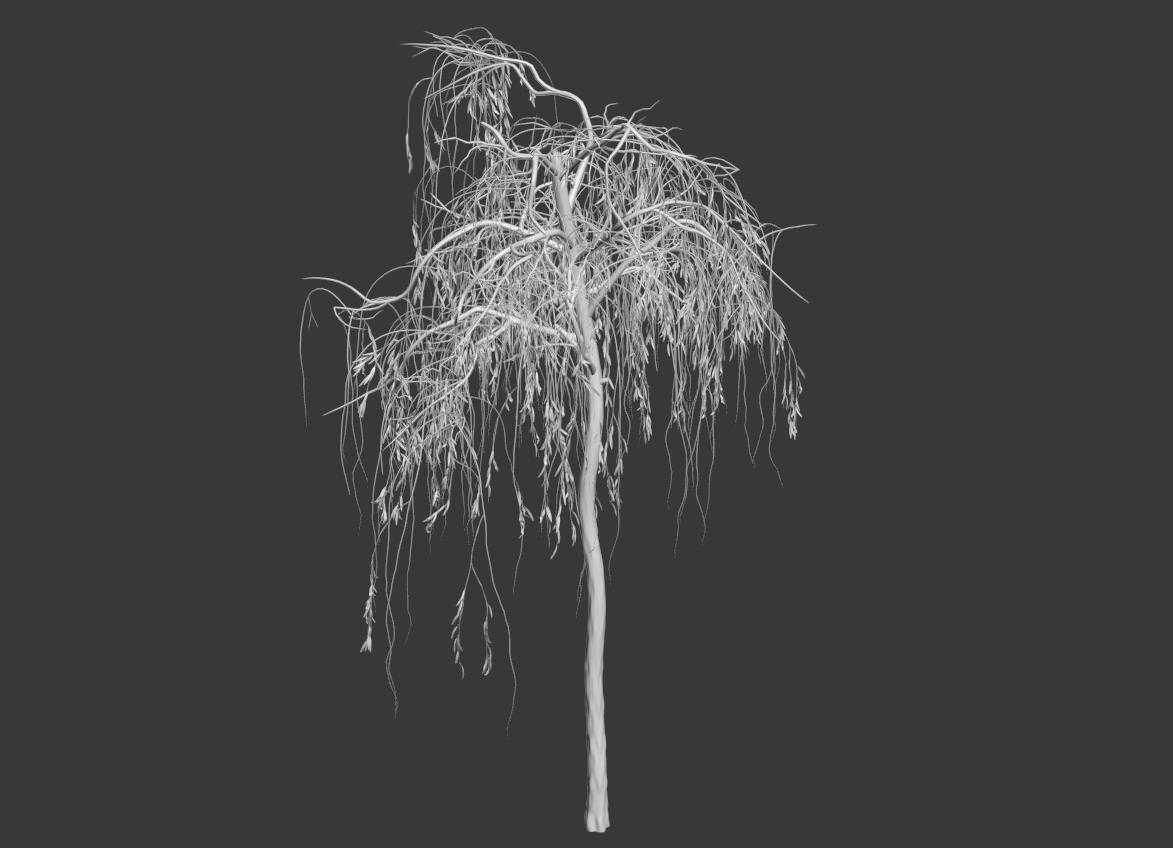
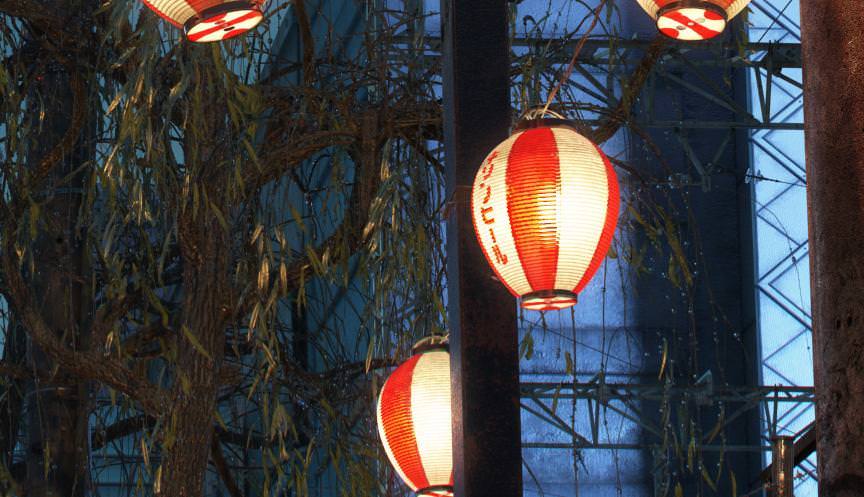
The Willow, in fact, is very bare. It has truncated branches because the alley is too narrow for growing. I modeled the willows in SpeedTree with 3 different models.
柳树,实际上,是光秃秃的。它被截断了枝杈,因为小巷对于生长来说实在太狭窄了。我在SpeedTree中使用三个不同的模型制作柳树。
You can see instructions on how to use SpeedTree on Youtube, there are many tutorials about it.
你可以在Youtube上看到如何使用SpeedTree的说明,哪里有很多关于它的练习。
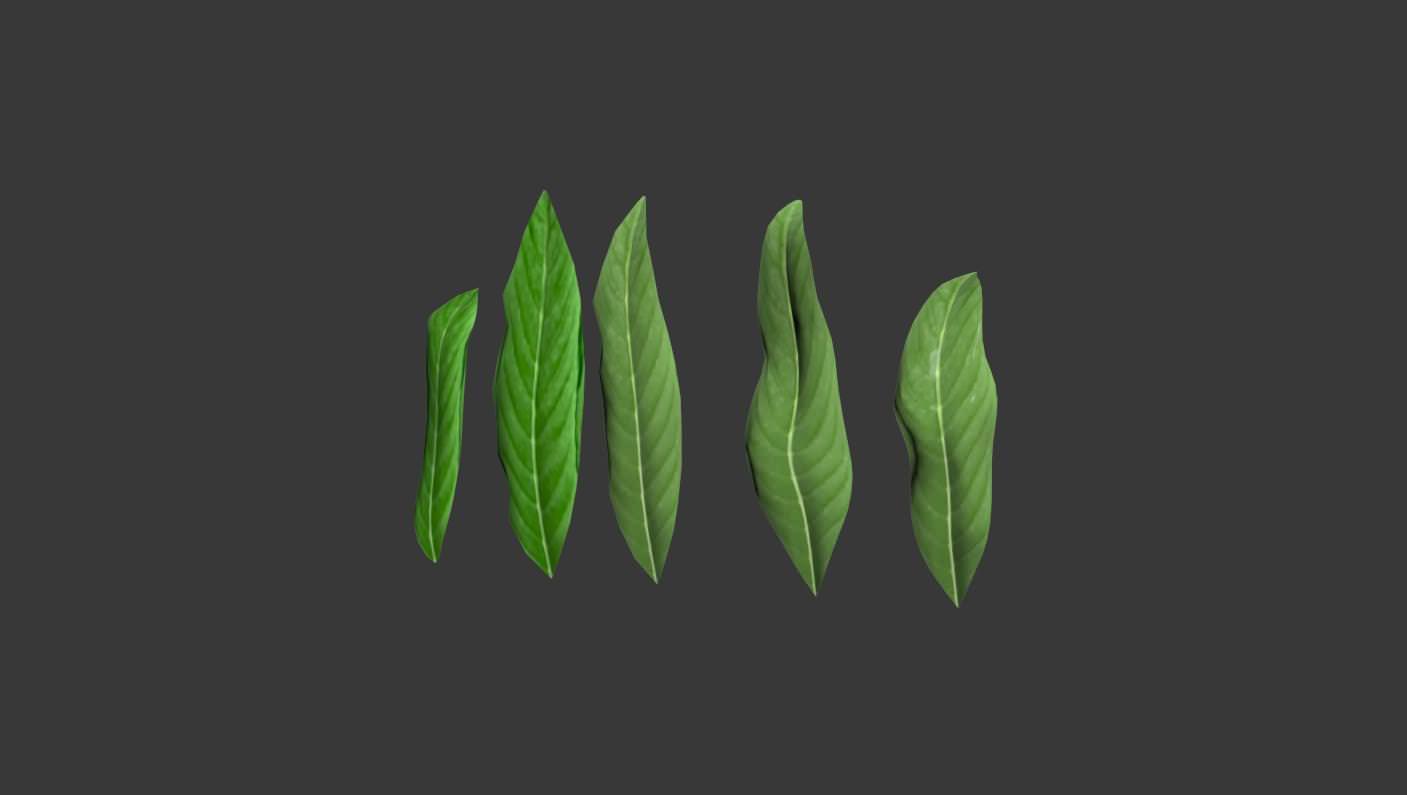
I created the leaves with GrowFX.
我在GrowFX中制作了叶子。
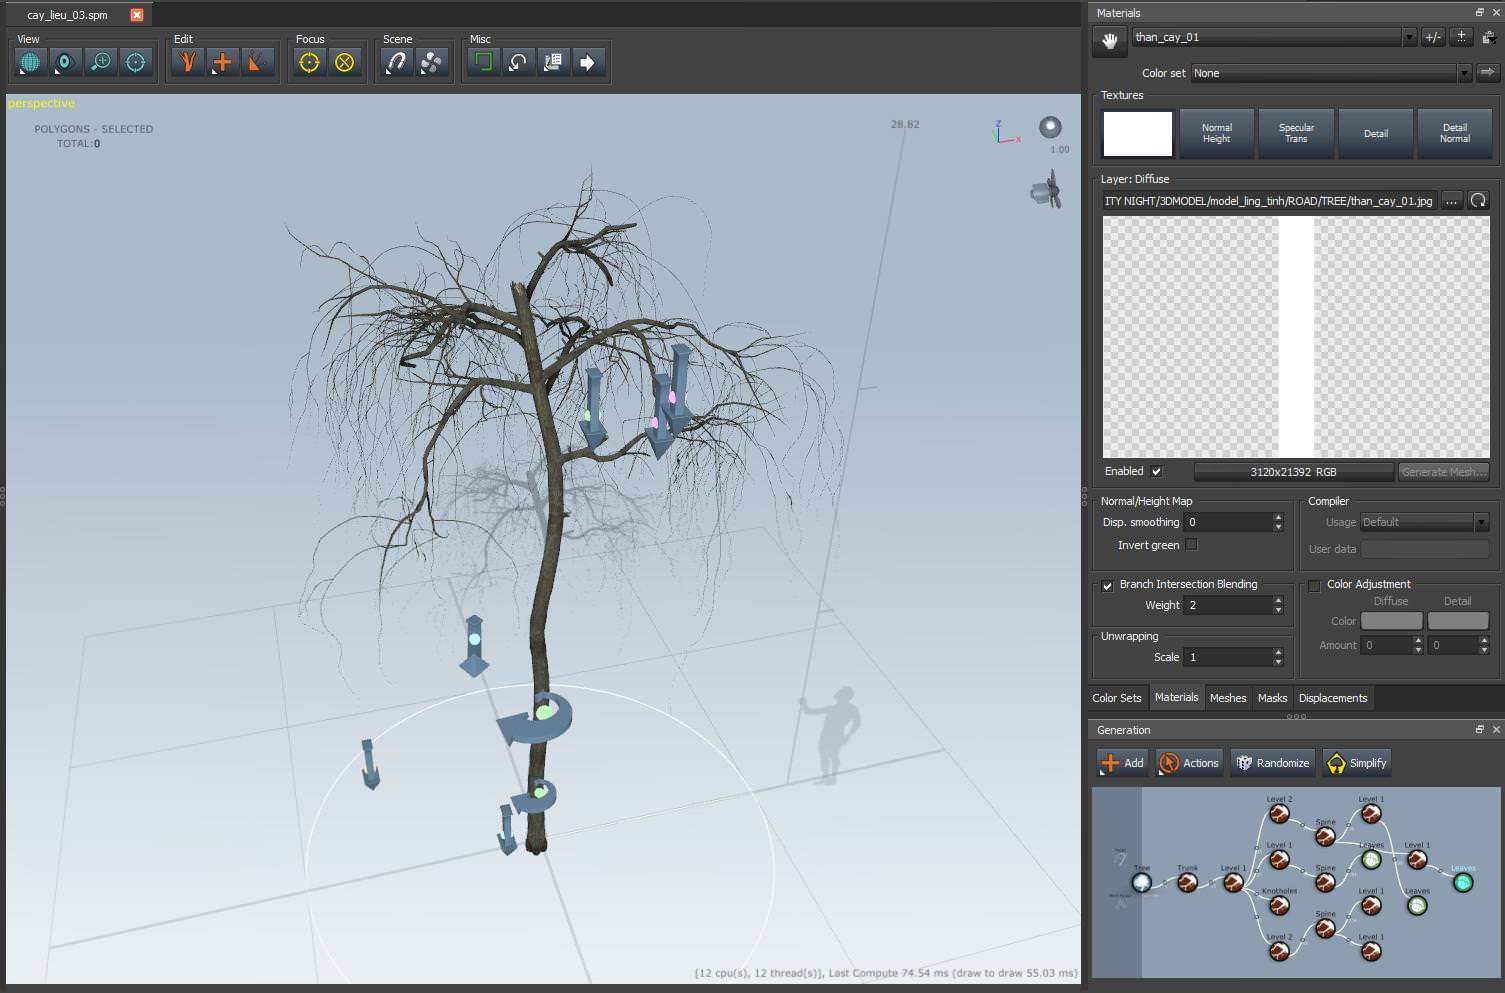
Incurvation of the leaf is very important, it helps with having specular highlights, which is necessary when it have just stopped raining.
叶子的弯曲非常重要的,它有助于所有的镜面高光,它在雨刚停的时候是必须的。
Results in 3dsmax…
在3dsmax中的结果…
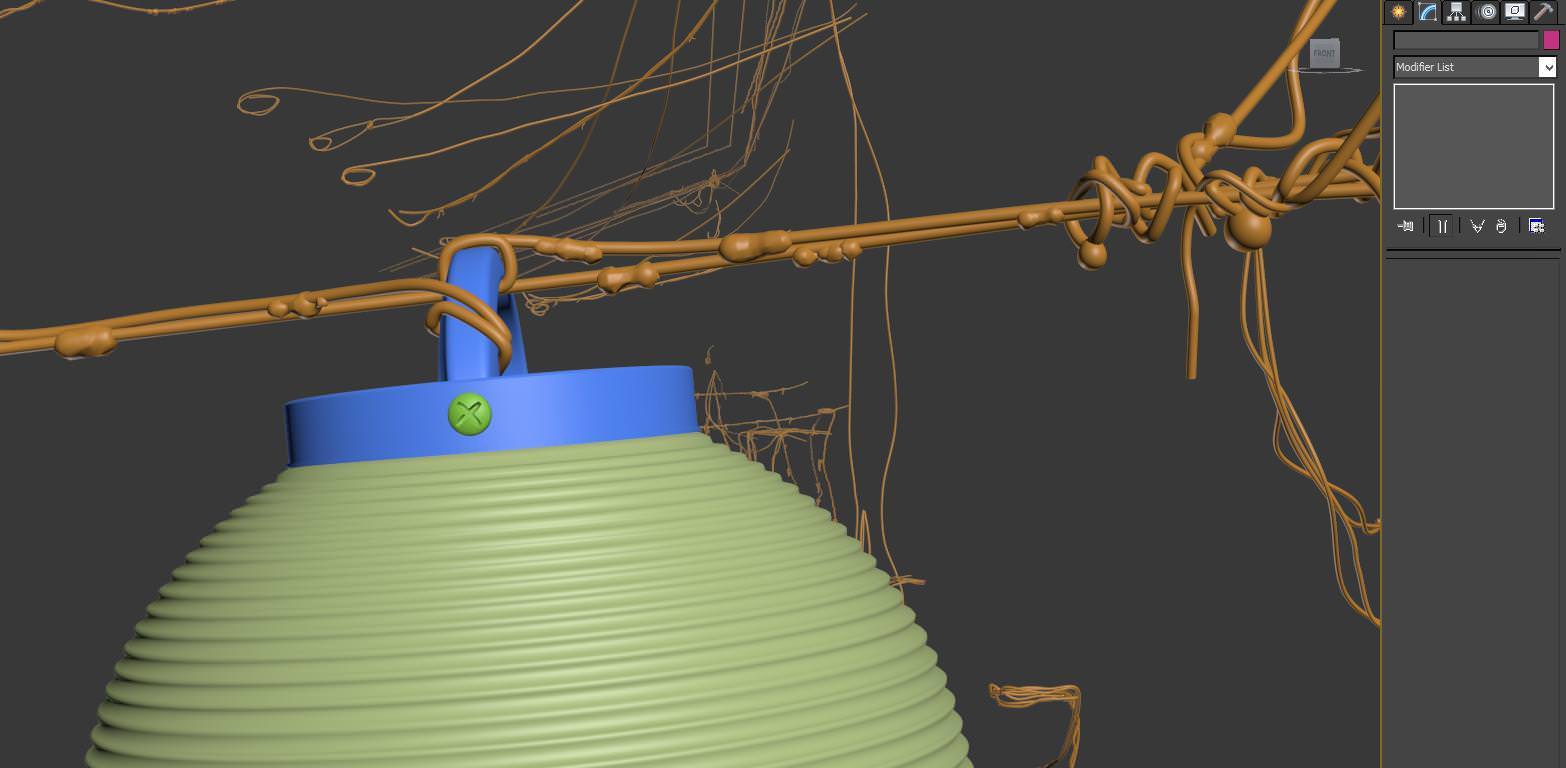
Raindrops on my leaf are distributed with MultiScatter.
在我叶子上的雨滴,使用了MultiScatter进行散布。
I had to manually distribute raindrops deposited on the wire. It is difficult to recognize. But it is necessary to create the mood after the rain.
我在电线上手动分布了雨滴。它是难以分辨的。但是创建雨后的气氛时它是必须的。
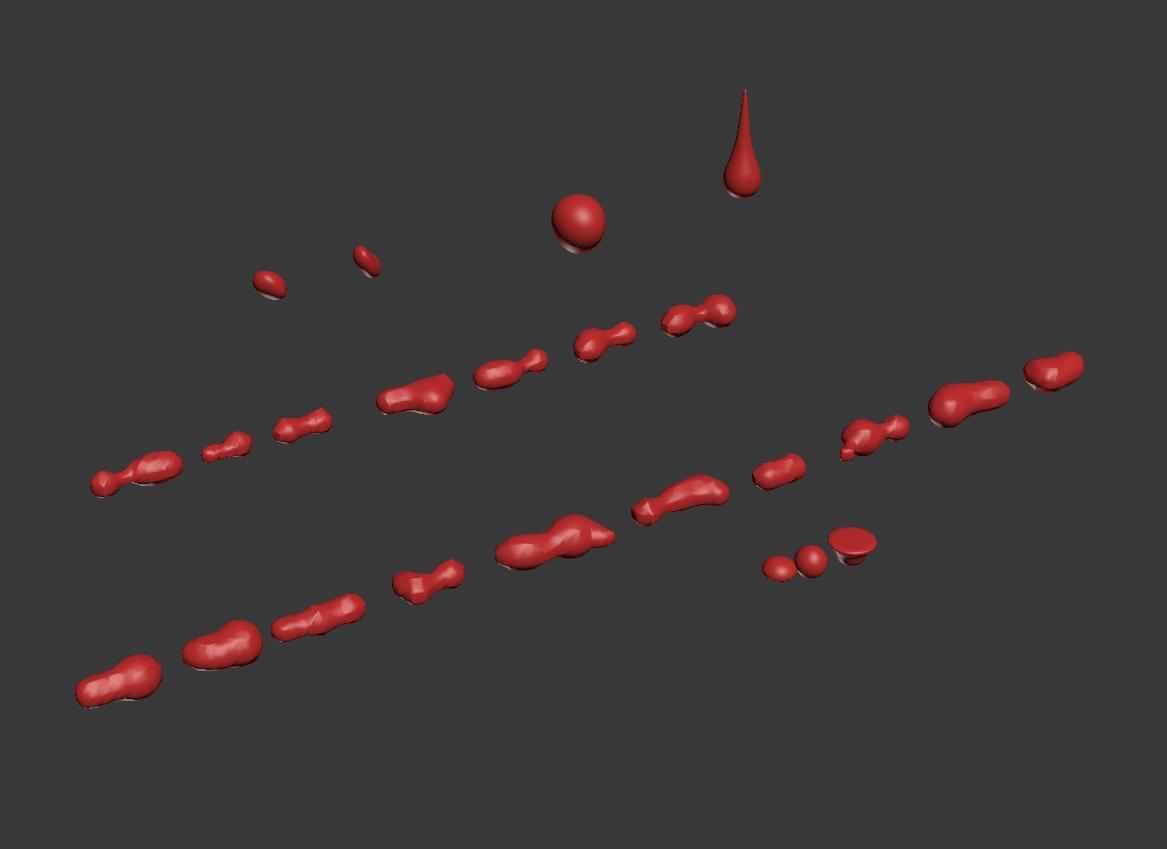
This is the model created in 3dsmax…(链接损坏,看图就知道用复合物体里的BlobMesh做的)
这是在3dsmax中建立的…
I will just mention some specific models further.
我将进一步提到一些具体的模型。
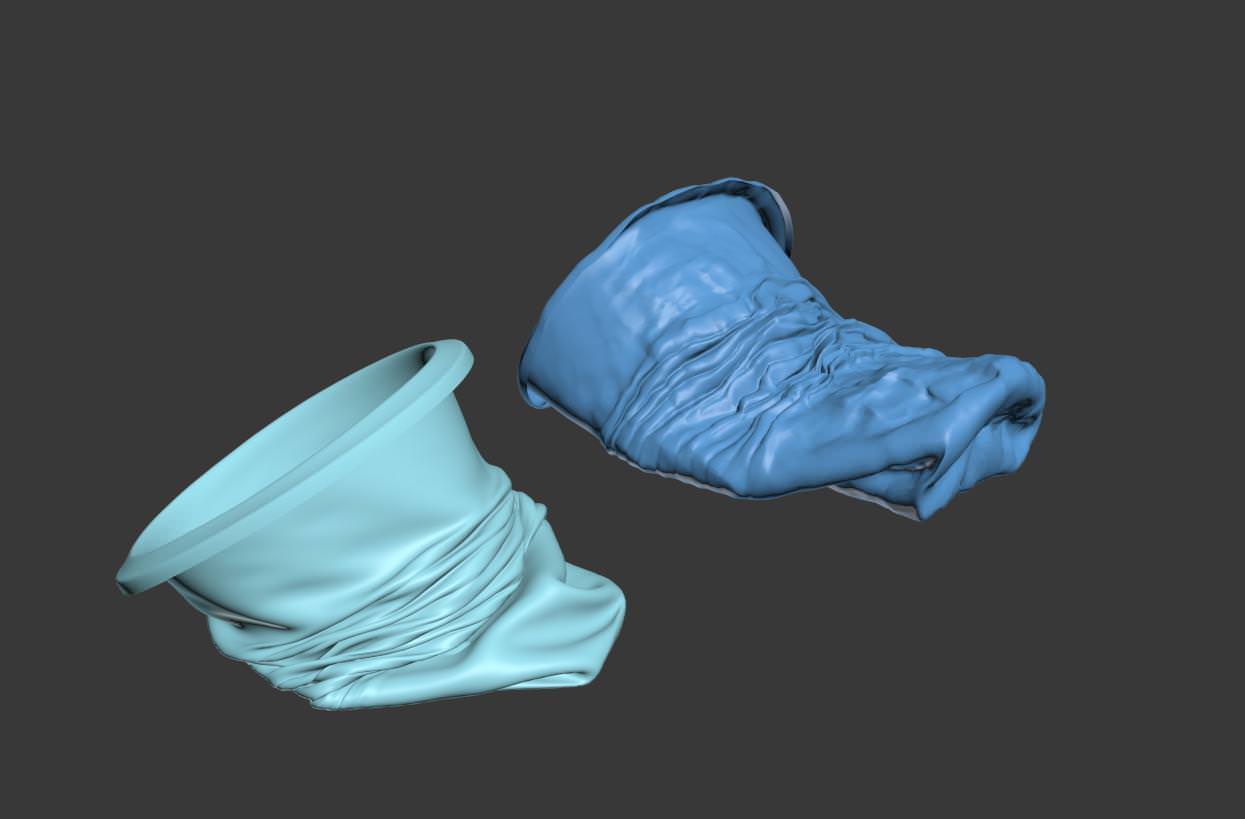
I want to share with you how I modeled the plastic packaging.
我想和你分享我是如何制作塑料袋。
I used MassFx of 3dsmax and made it hang down like cloth in accordance with the rules of physics.
我使用了3dsmax的MassFX,并且让它按物理原则产生类似布料一样的下垂。
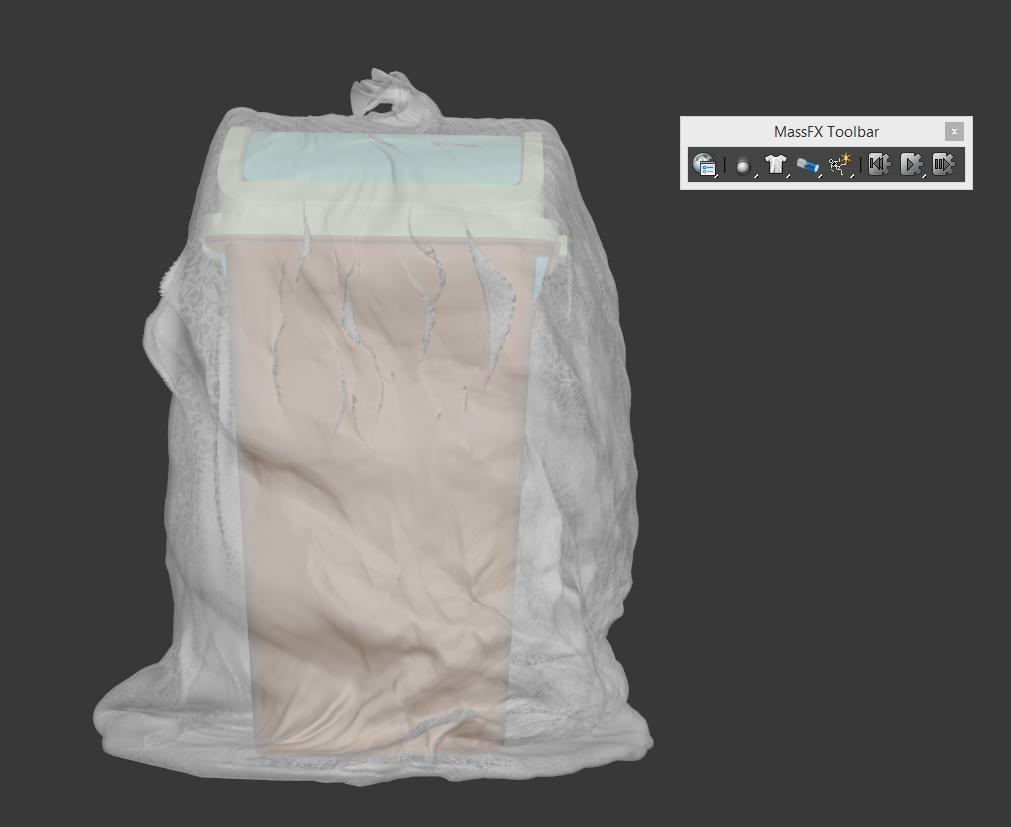
And added sculptural details in ZBrush.
然后在ZBrush中增加了雕刻细节。
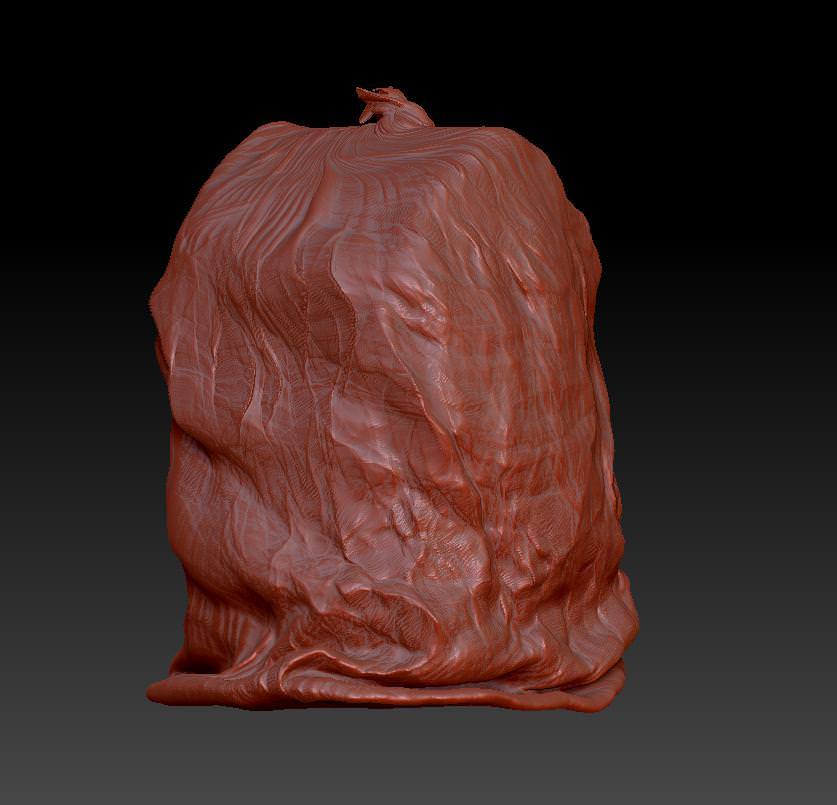
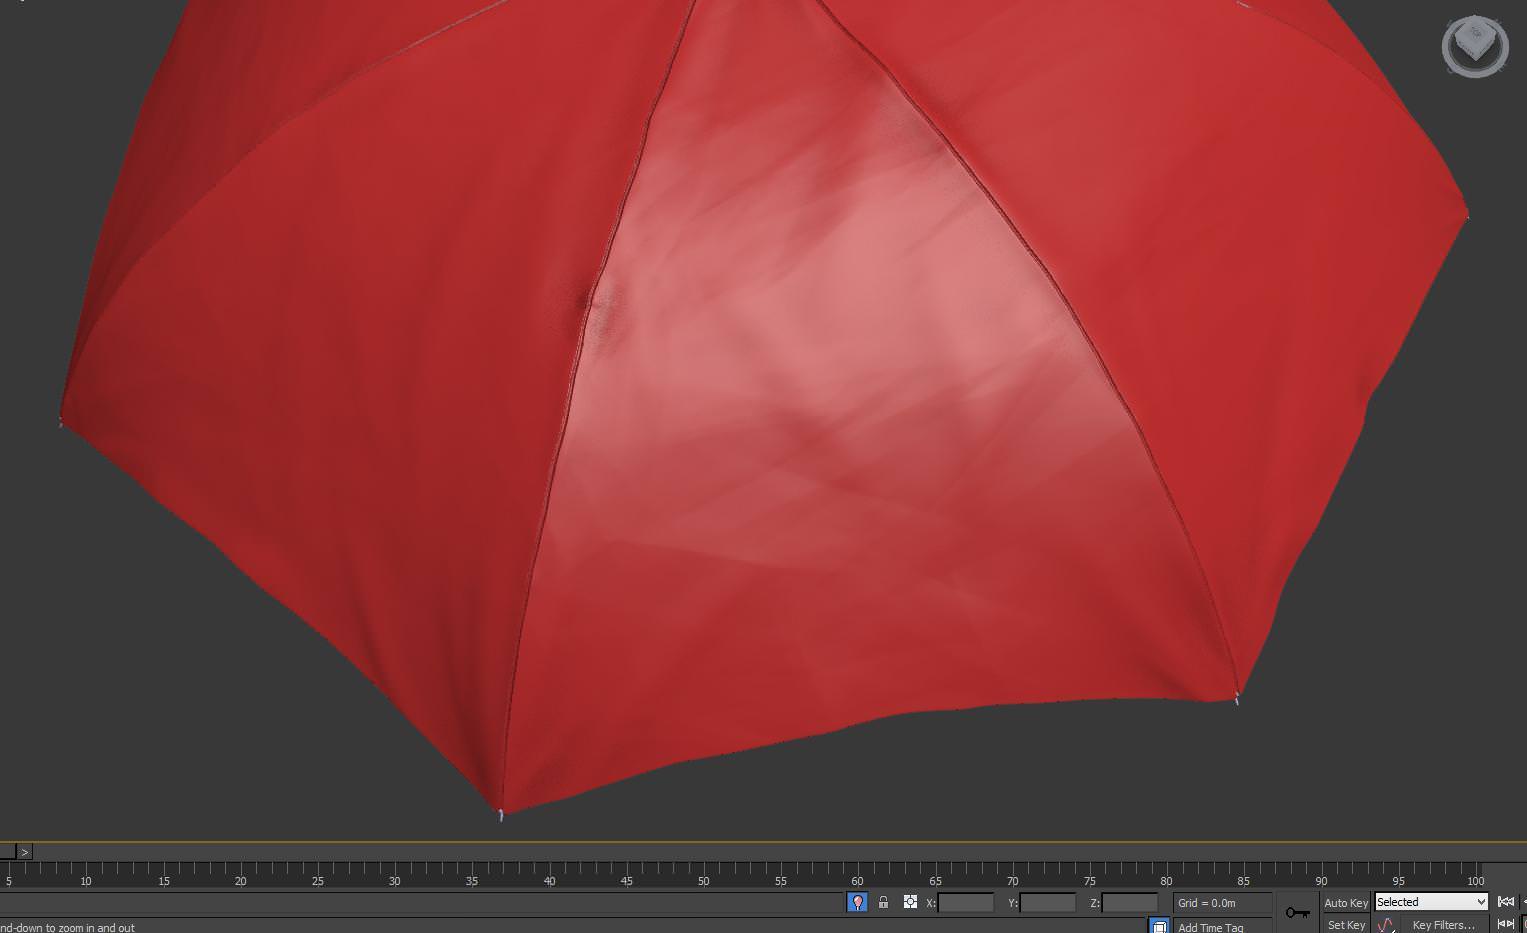
Similar to landfills and umbrellas.
类似的垃圾物和雨伞。
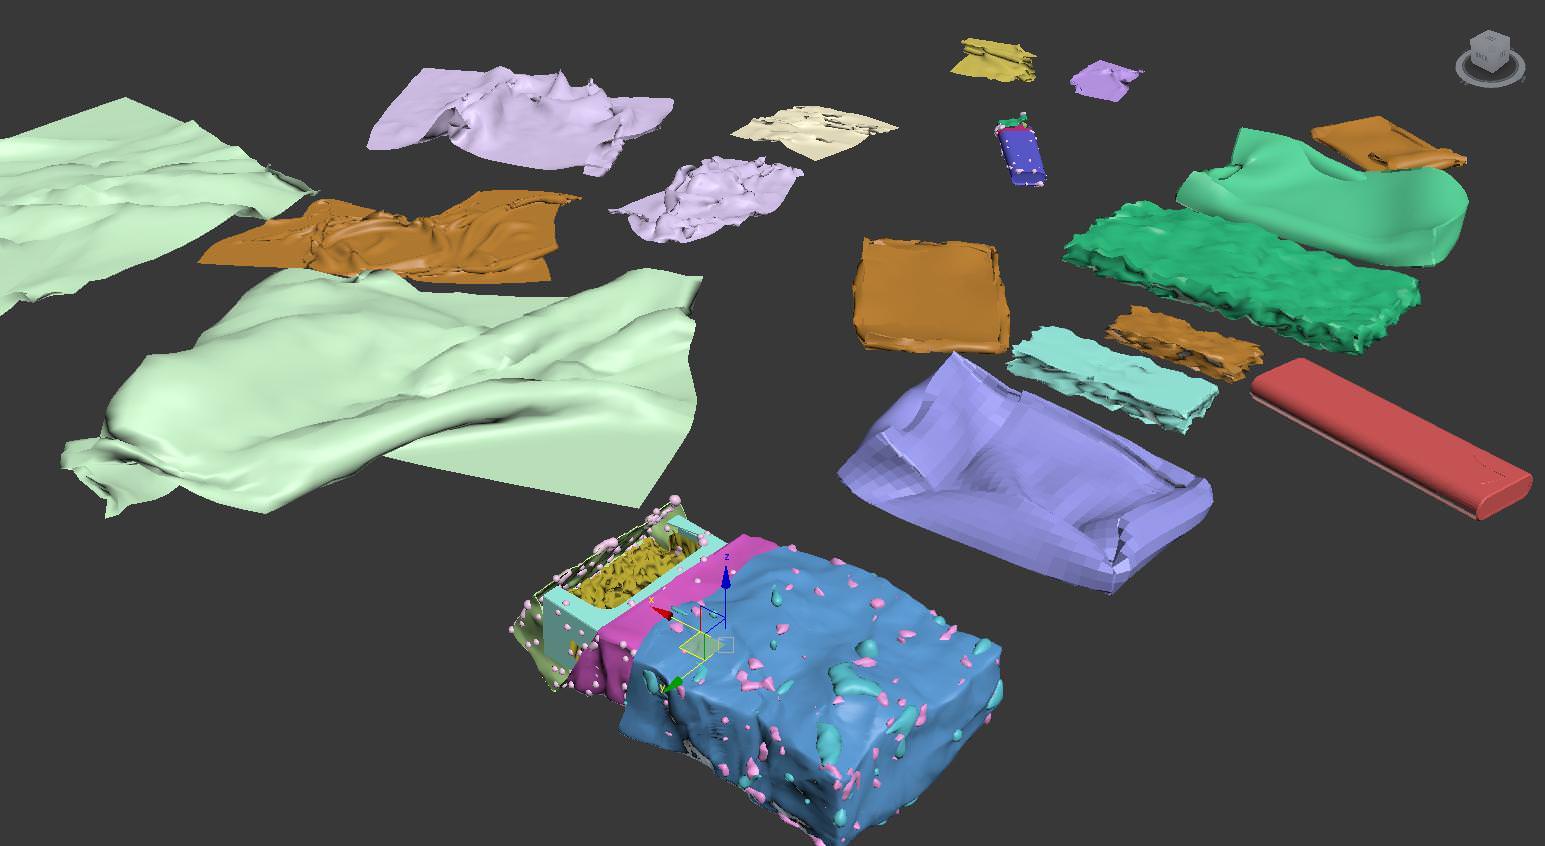
And here are some concepts of pubs.
以及这里的一些酒吧的概念物。
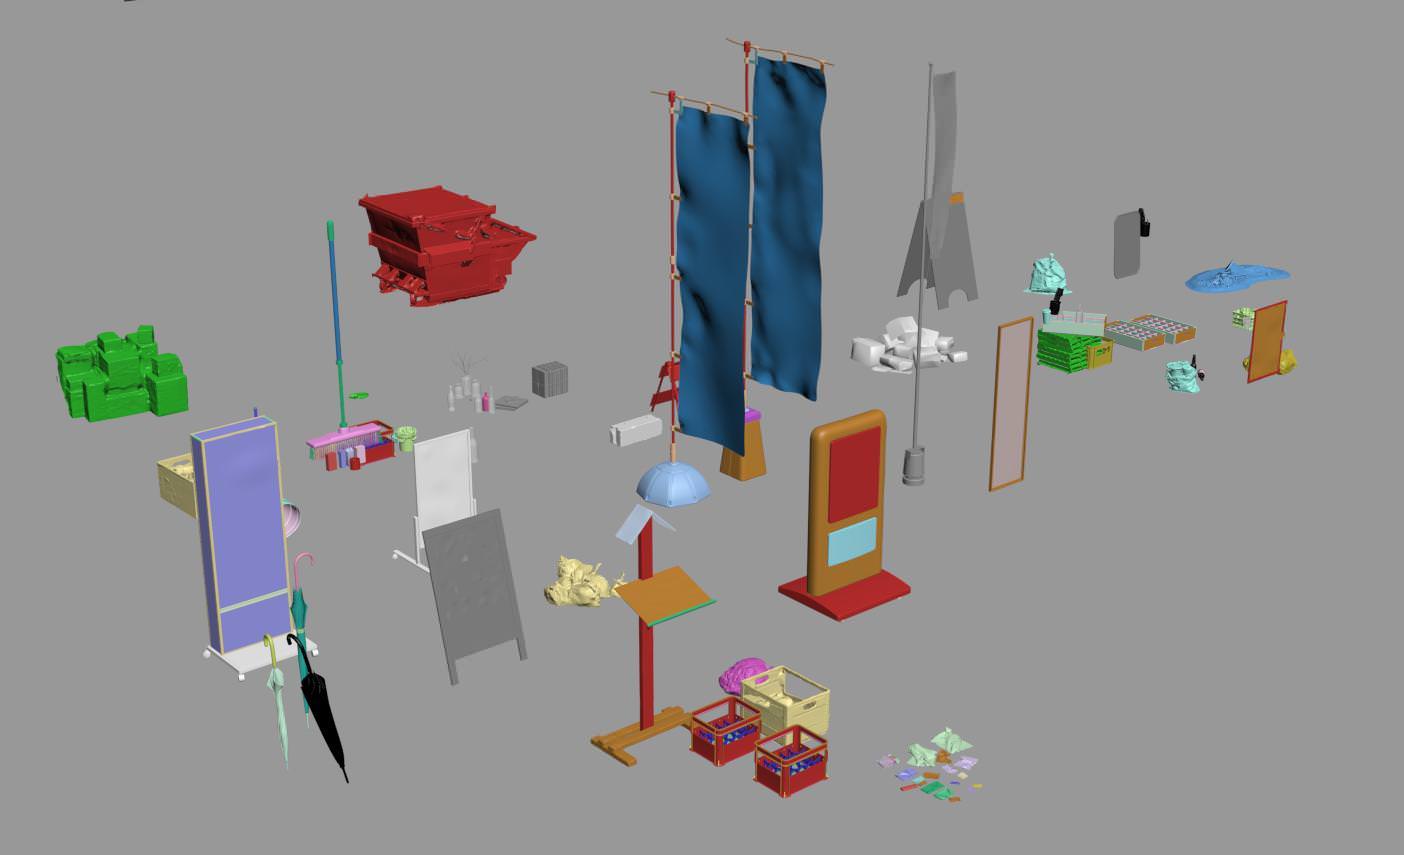
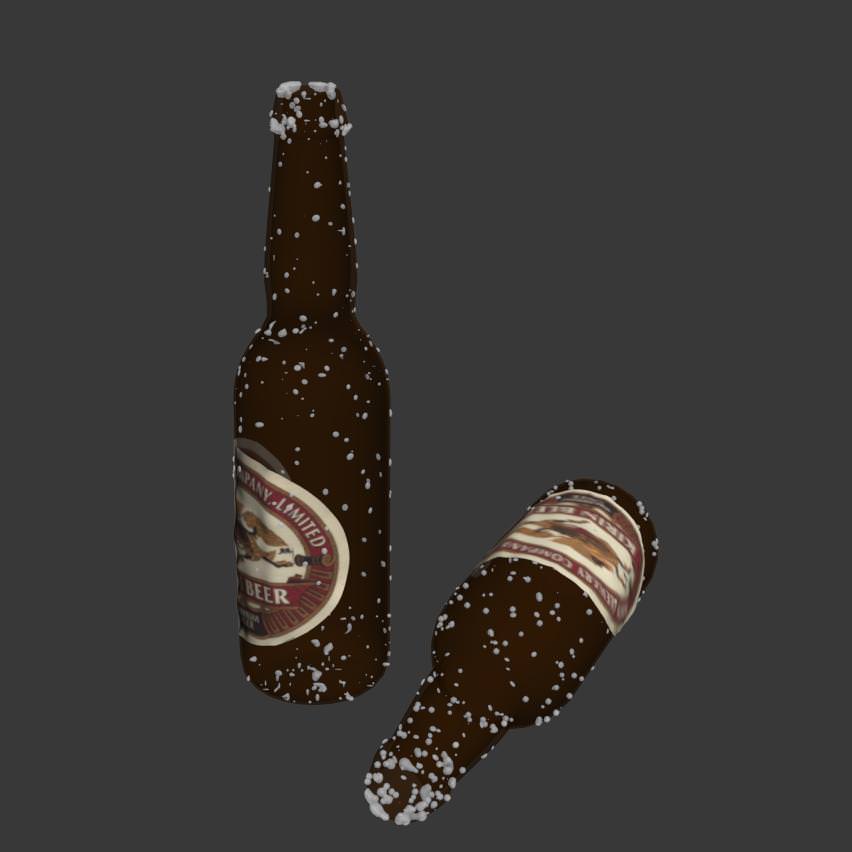
Some models of electronics.
一些电器的模型。
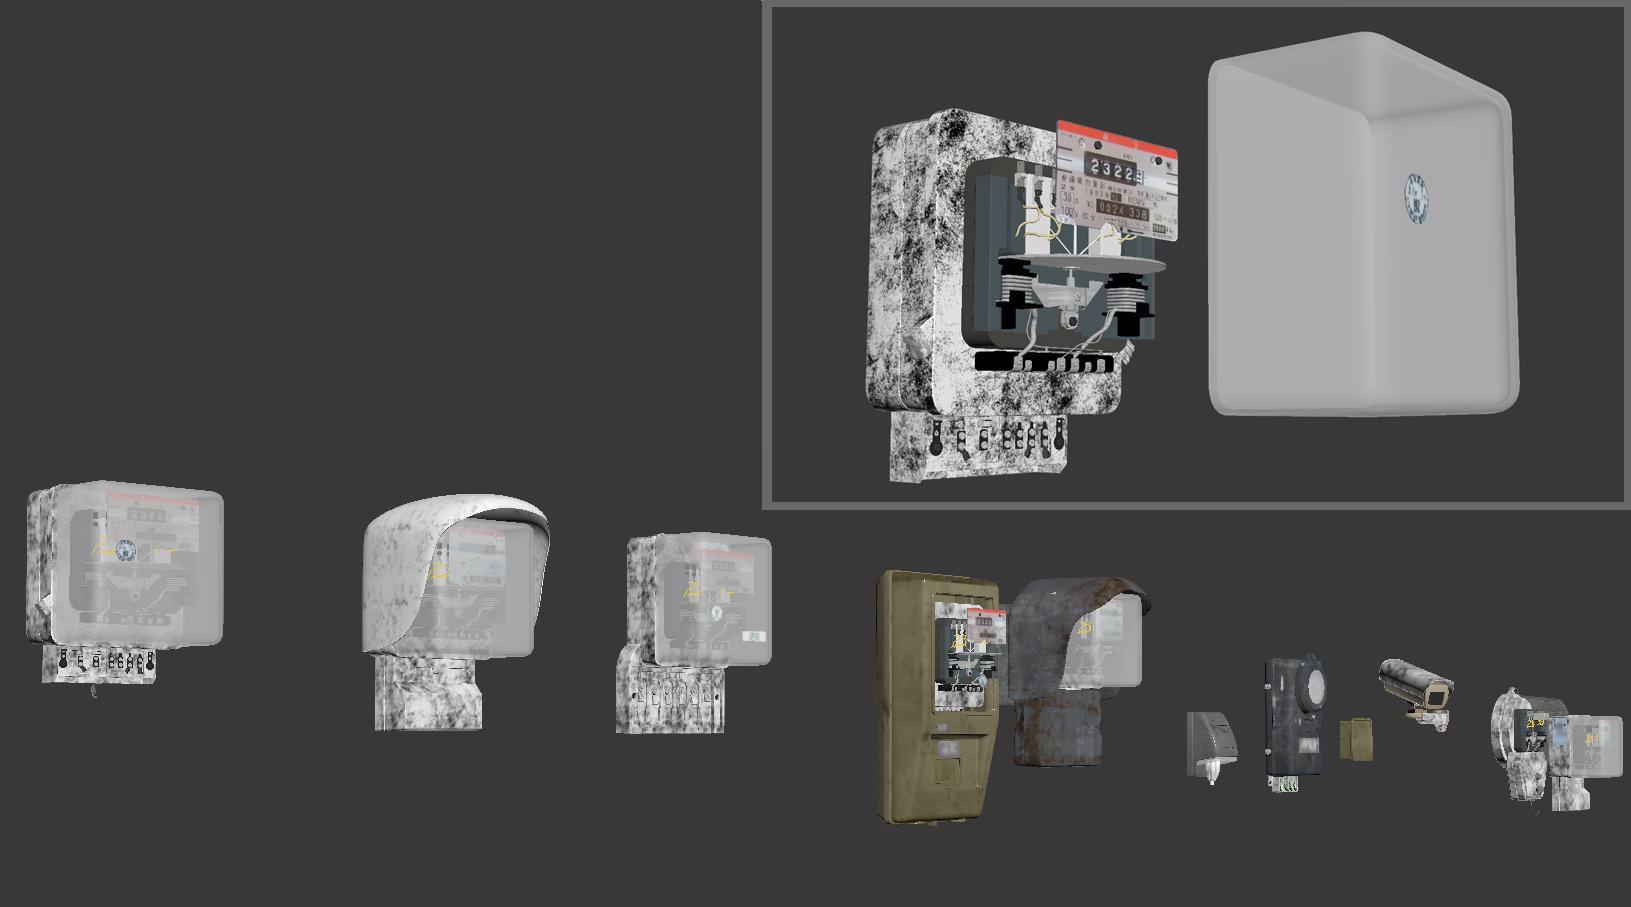
I wanted all to be really detailed. I want it to be true to reality. There is no deception, otherwise, I will feel very uncomfortable!
我需要所有的都真实详细。我想要它变像现实一样真实。这里没有欺骗,否则,我也会感觉非常好不舒服!
Texture & Materials
纹理和材质
In this part, I just mention some main components.
在这个部分里,我仅会谈到某些主要的部分。
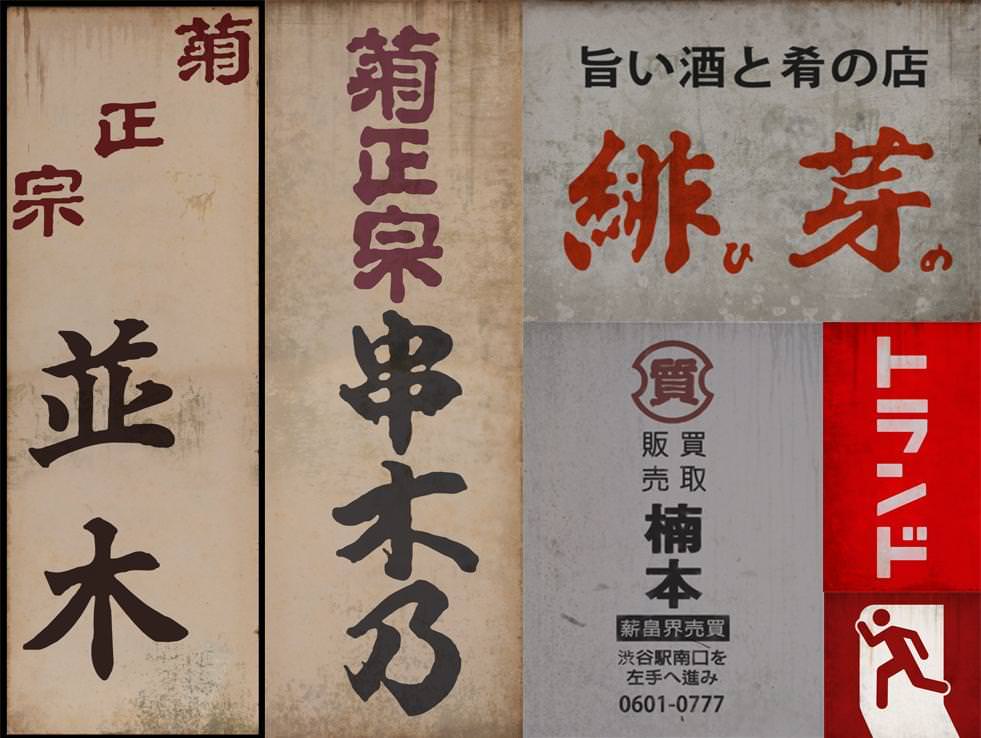
This is the part required your actual observations a lot. I do my texturing in photoshop with different blending modes. The biggest obstacle, which took most of my time is billboards. Because I am in Vietnam, I don’t know anything about Japan. Meanwhile, my intention was that the texts on the billboard will be accurate and textures resolution must be greater than 4000 pixels. So I’ve decided to do it manually in Photoshop and render them all.
这个部分要求你大量的实际观察。我在Photoshop中使用不同的混合模式来制作我的纹理。最大的障碍,耗费了我大量时间的是广告牌。因为我在越南,我并不了解关于日本的任何事情。同时,我的目的是在广告牌上的文字是正确的,并且纹理的分辨率必须大于4000像素。所以我决定在Photoshop中手动处理并且修饰它们。
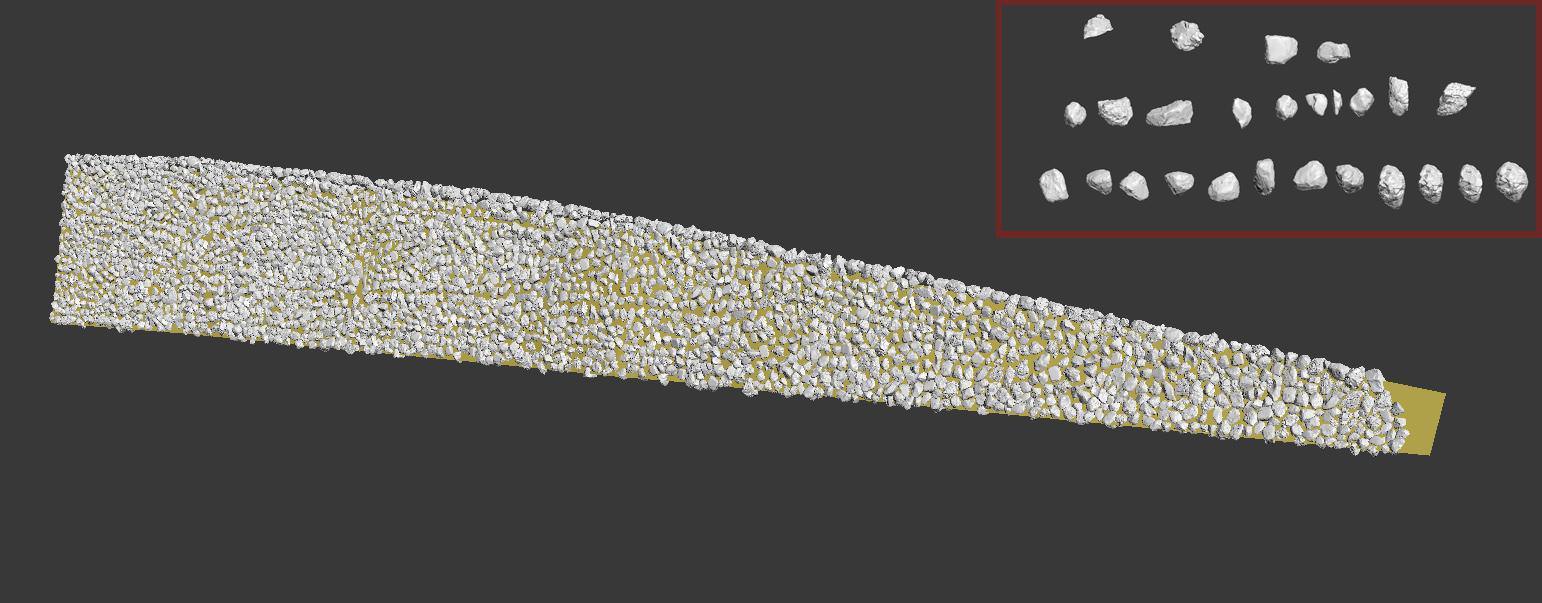
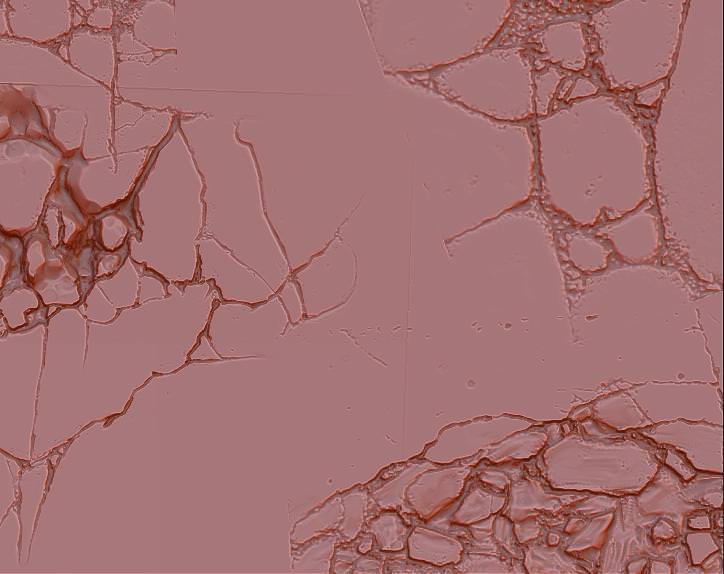
Modeling the stone wall was very time-consuming. With the camera angle of the picture, it required having a very long stone wall in view. To avoid repetition of stones I had to create 26 unique stone models.
建模石头墙非常耗时。在图片上的相机角度中,它在视图中有非常长的石头墙。为了避免石头的重复我制作了26个不同的石头模型。
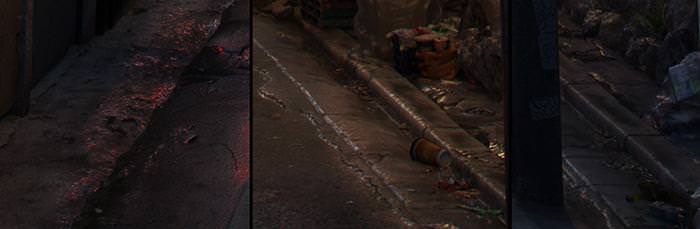
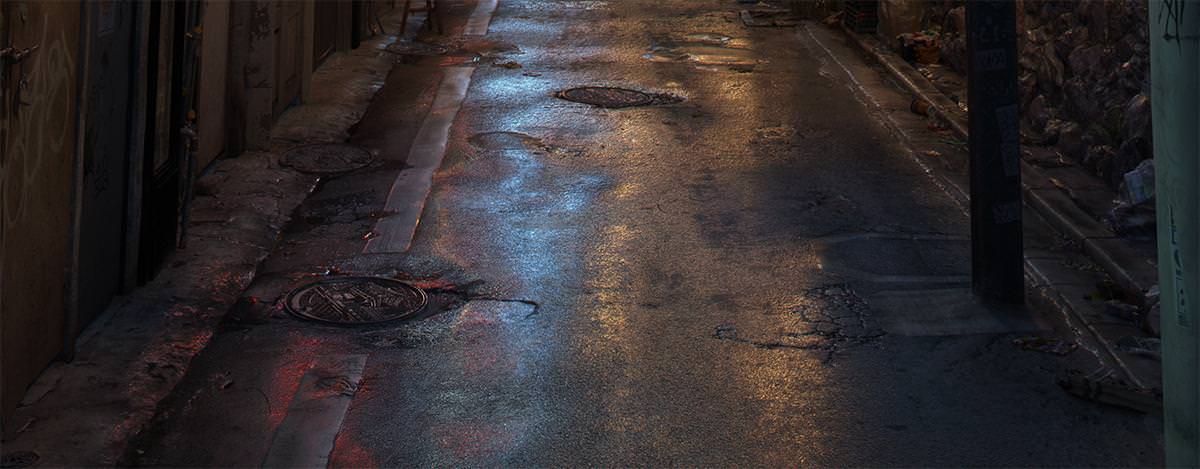
The road after the rain was my obsession.
雨后的道路是我迷恋的。
It took me 2 days to observe it. Luckily, where I live there is much rain. It is quite complicated to explain. I started with a simple path model in 3dsmax, then the model is detailed in ZBrush. Displacement map was created in ZBrush and photoshop. Reflection map is similar.
耗费了我2天来观察它。幸运的是,我生活的地方有很多雨。这是很难解释的。在3dsmax中我从简单的道路模型开始,然后在ZBrush中创建细节。置换贴图是在ZBrush和Photoshop内创建的。反射贴图也是同样的。
Here is an example.
这里是个例子。

I did the road as if it was an hour after the rain… so the puddle is very limited, mainly appear in the grooves and cracks on the road.
我制作了好像下雨一个小时后的道路…所以水坑是非常有限的,在路上主要出现在沟槽和裂缝里。
What makes me most confused is the material.
让我最困惑的是材质。
Darkness + Wet Asphalt + Light Colors = ???
阴暗+湿沥青+光线颜色=???
Is it not like metal under the lights? It is very dangerous, very difficult to let others believe that it is an actual path. The boundary between the wet asphalt and metal material is very fragile. I was very careful when setting up the road material.
不像在灯光下的金属?这是非常危险的,非常难让其他人相信这是一条真实的路。湿沥青和金属材料之间的界限是非常脆弱的,在设置道路材质时,我非常的小心。
These are pictures taken in my references…
这里是我参考时拍摄的照片…
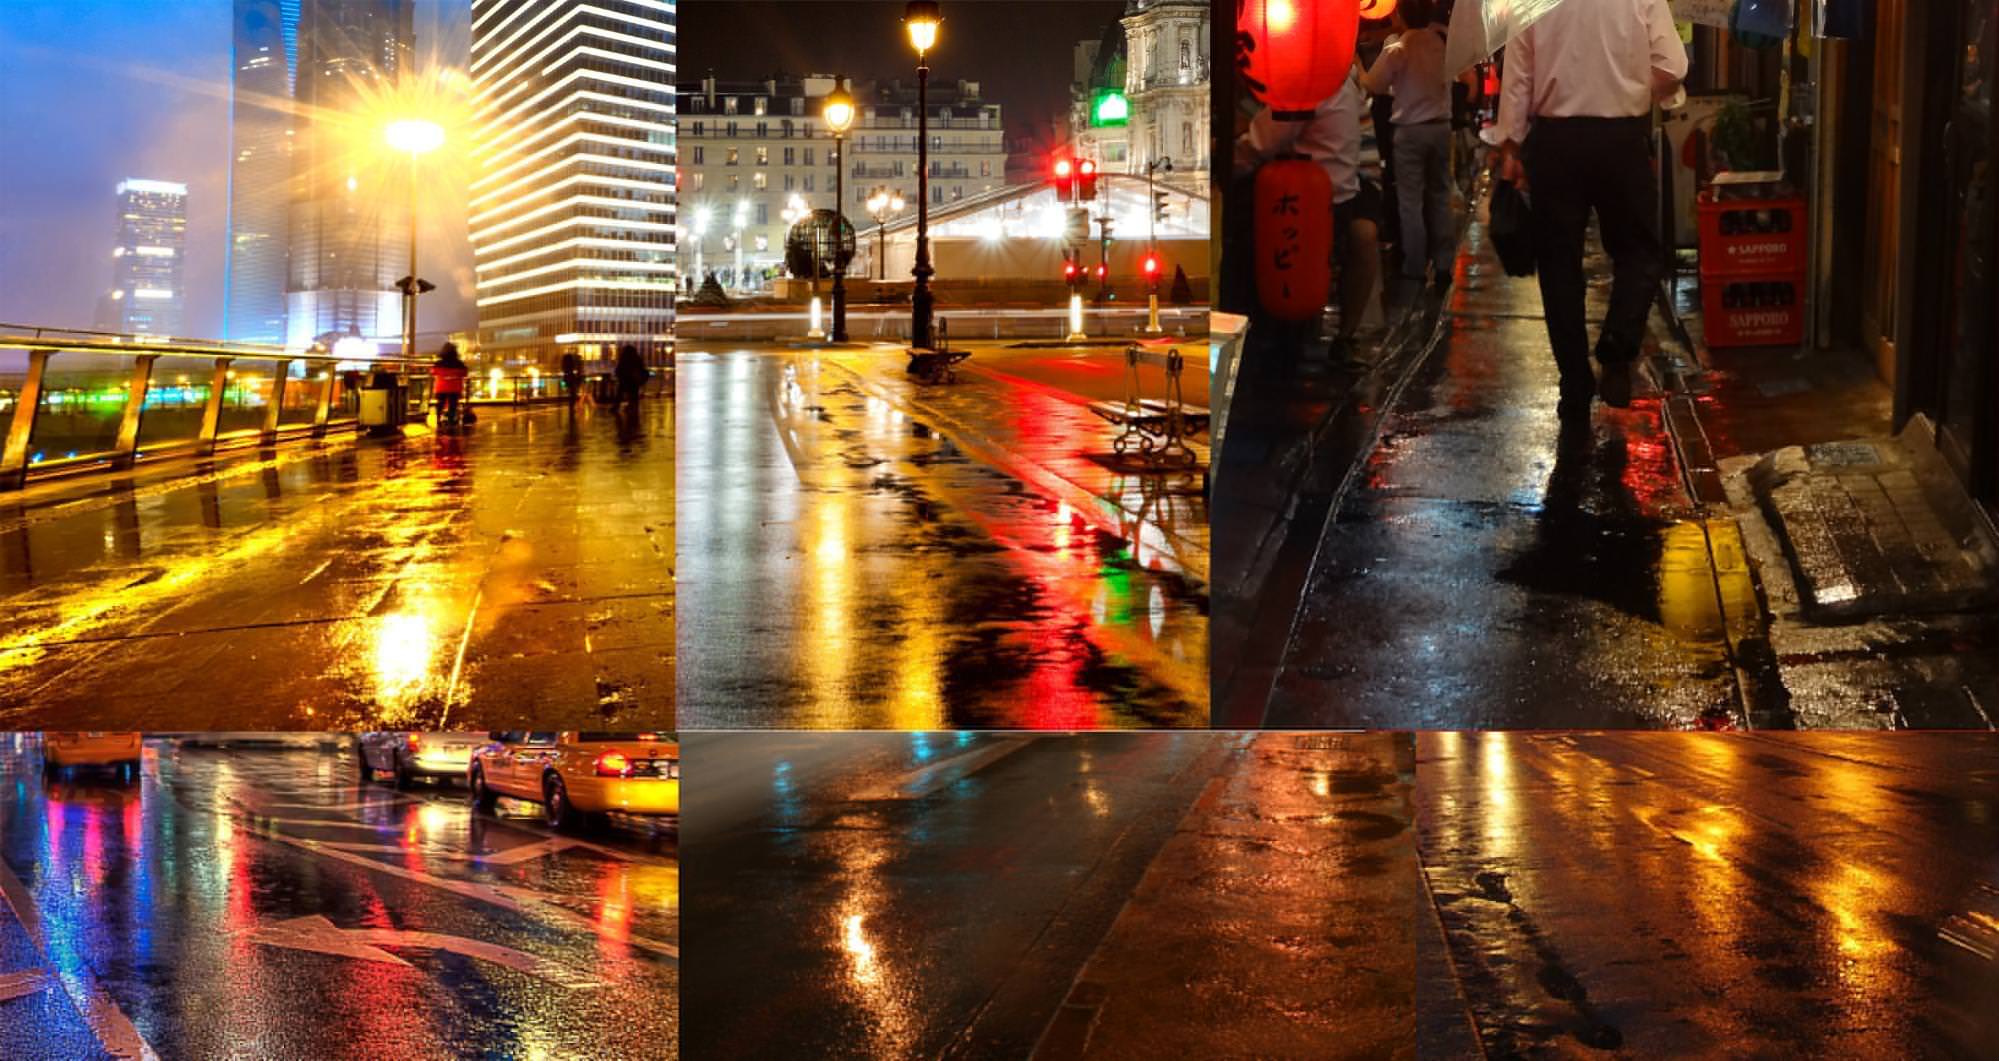
Is it pretty similar to metal?
它和金属很相似吗?
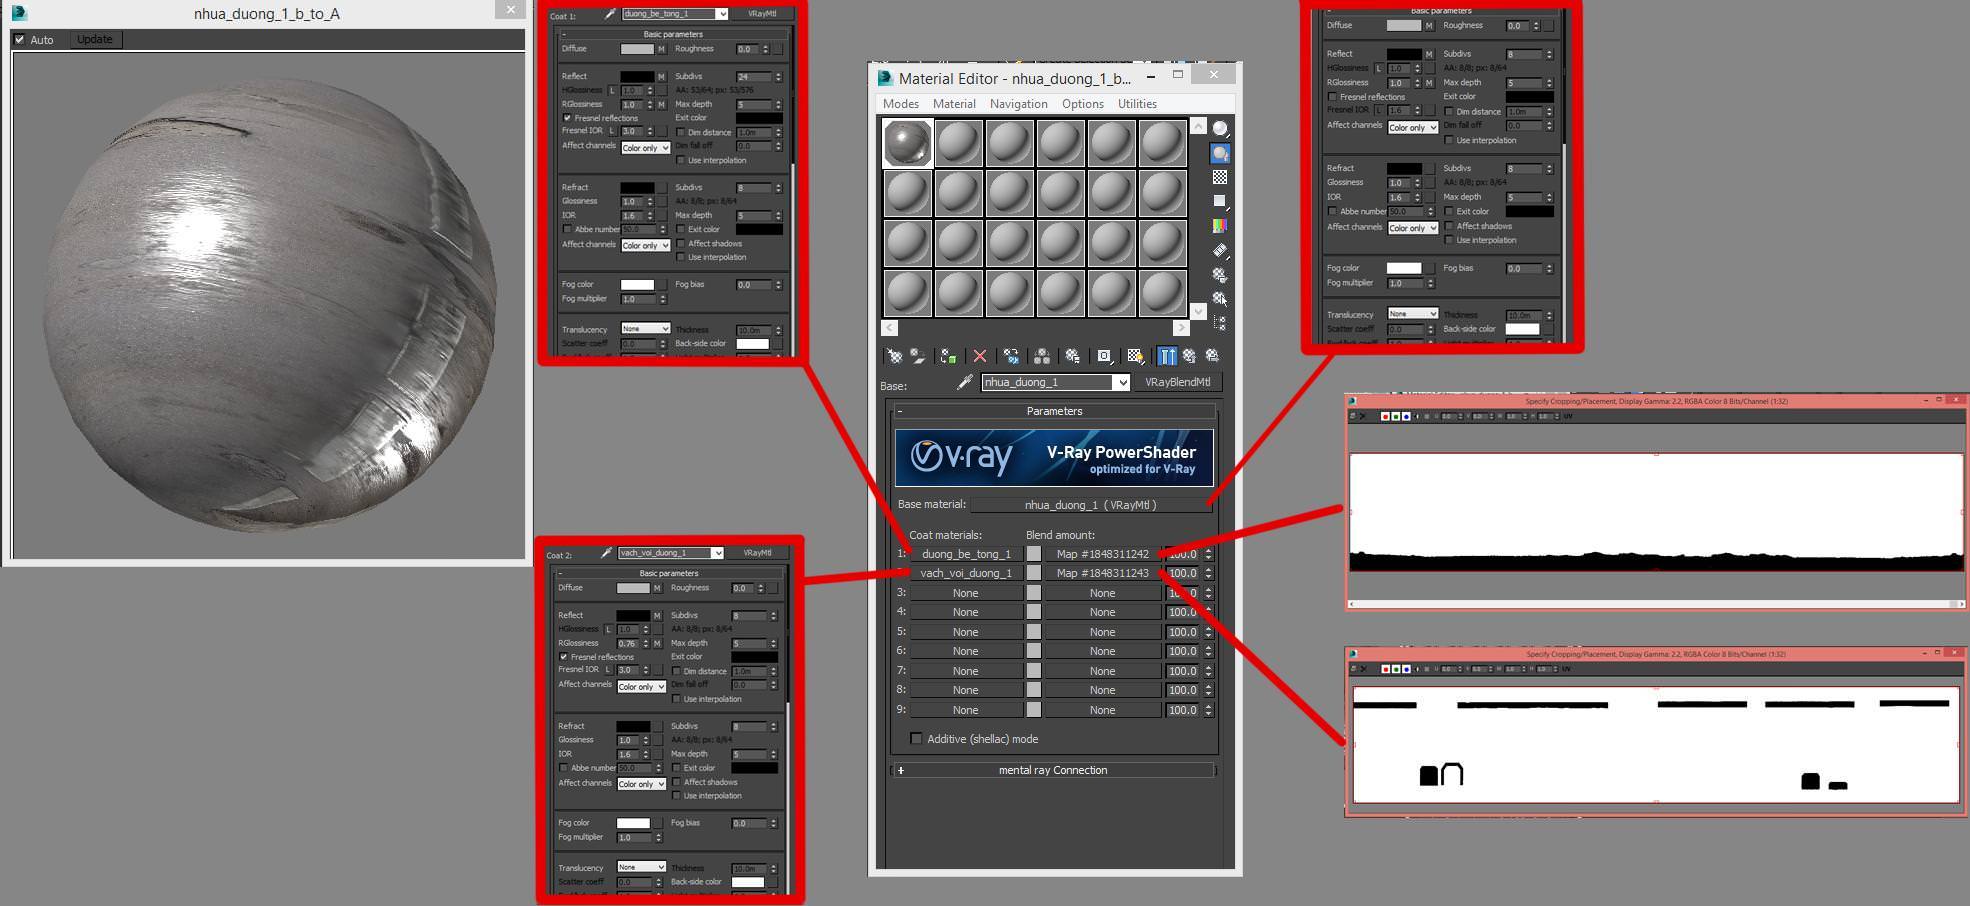
Wet concrete, wet lines and wet asphalt are completely different materials. I created an alpha map to differentiate the three materials. I mainly use V-Ray blend in most cases, the path is no exception.
湿的混凝土,湿的线路与湿的沥青是完全不同的材质。我制作了一个alpha贴图来区分三个材质。在多数情况里我主要使用V-Ray混合,道路也不例外。
This is my recipe of road materials : (wet asphalt level 1 + wet asphalt level 2 + puddles in the cracks + puddles exposed the line and the concrete) + (wet line + puddles on the line) + (wet concrete + puddles on the concrete)
这是我道路材质的做法:(湿沥青级别1+湿沥青级别2+裂缝里的水坑+水坑暴露下的划线以及混凝土)+(湿的划线+划线上的水坑)+(湿的混凝土+混凝土上的水坑)
Here is a diagram of the material of the path.
这里是道路材质的图解。
This is the first branch of the diagram.
这里是分解的第一个分支。
I created three versions of the road to avoid duplication. Add a bit of oil spilled on the road so as to the road look more attractive under the lights.
我建立了三个版本的路面来避免重复。在路面上添加了少许油迹,所以让路面在灯光下看上去更具吸引力。
And the result is…
结果是这样…
An example of the wet stone material.
潮湿石头材质的一个例子。
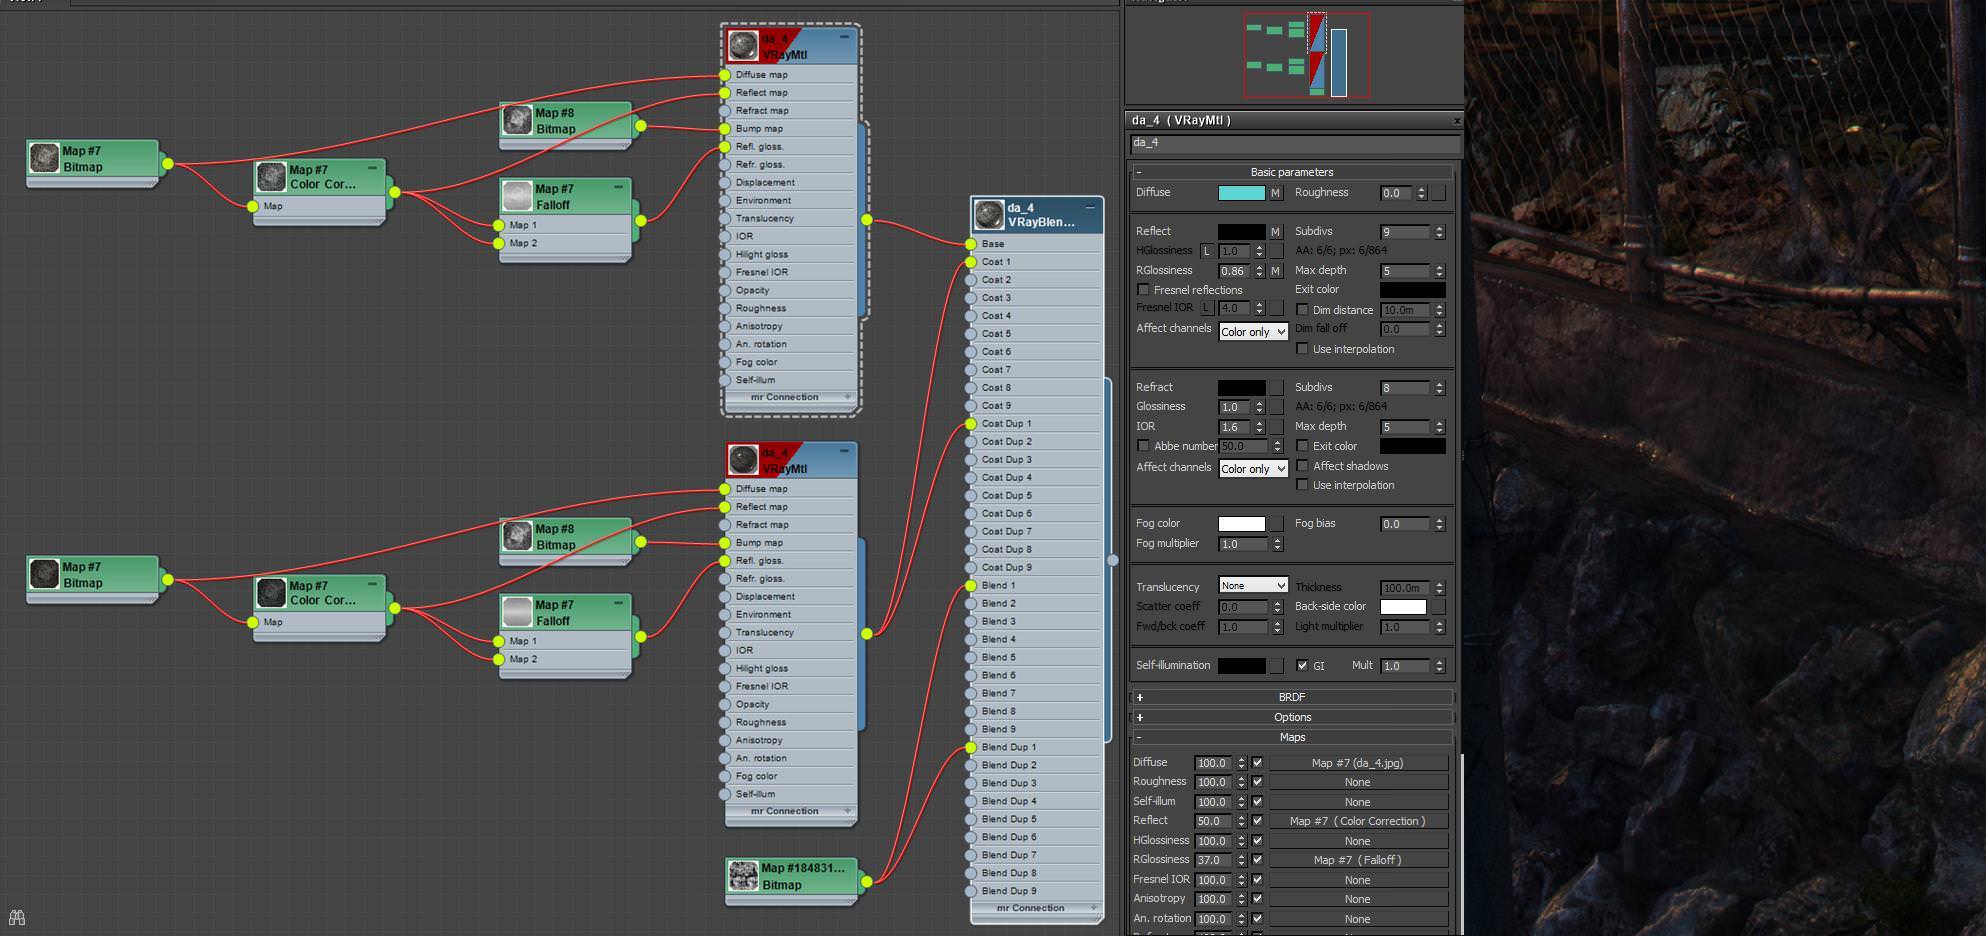
I often use V-Ray blend for rust metal materials too.
我经常也为腐蚀金属材质使用V-Ray混合。
Lighting
照明
This is my favorite part!
这是我最爱的部分!
It is critical in the creation of the mood of the image. This is my lighting setup.
它在创造图像气氛时非常重要的。这里是我的照明设置。
Use 1 Dome light + 1 HDRI from Peter Guthrie.
使用1Dome light + 1来自Peter Guthrie的HDRI。
These are my light settings…
这些事我的灯光设置…
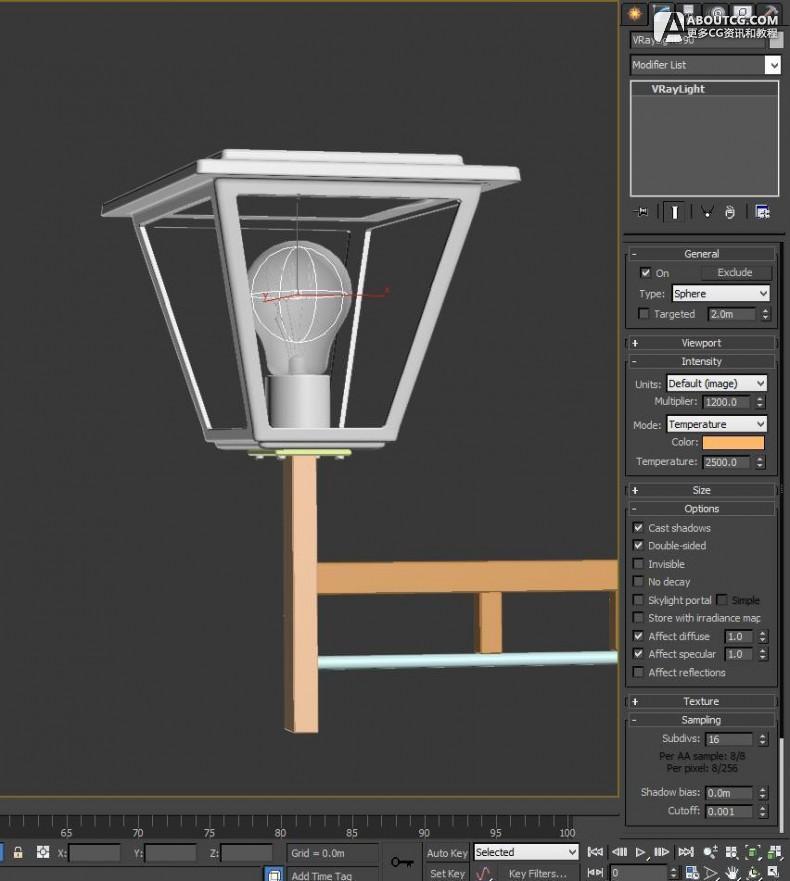
3 streetlights and 5 bulbs (1 bulb has burnt). Nothing is a secret here, I only use 1 V-Ray Light sphere for a bulb. And here are the setting…
3个路灯和5个灯泡(1个烧坏灯泡)。这里没有什么秘密,我仅为灯泡使用了1个V-Ray球型灯。这里是设置…
I will mention how to set up my lantern light. Operating range of lantern light is quite narrow, it only affects the objects near it.
我将提到如何设置我的灯笼光。灯笼光的影响范围相当狭窄,它仅影响它附近的物体。
The interior structure of the lamp.
灯笼的内部结构。
These are the sign lights settings…
这些是广告牌灯设置… 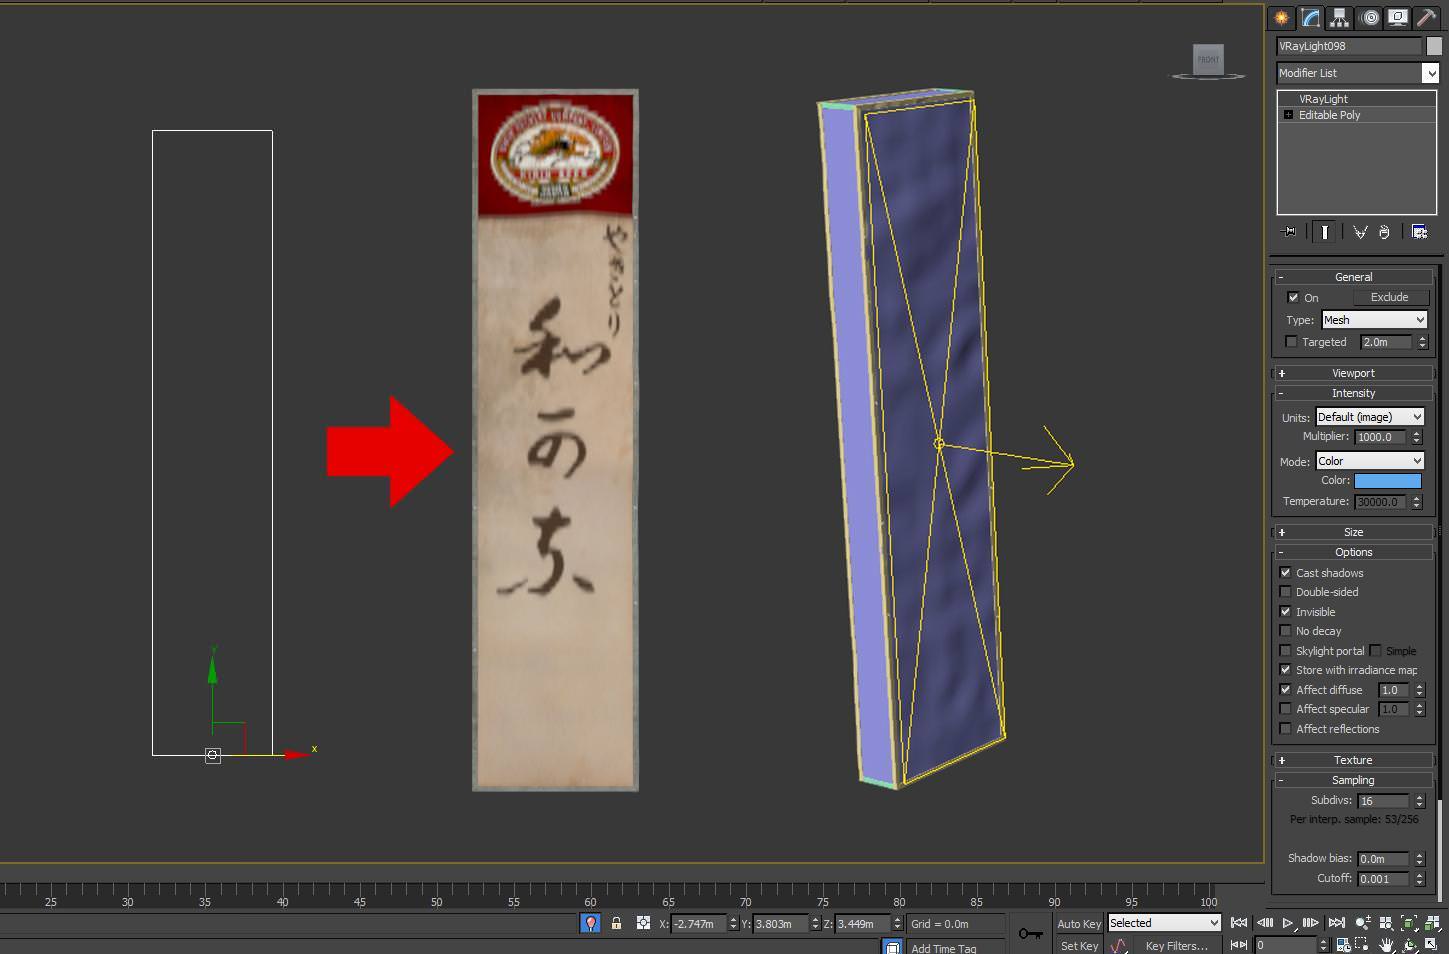
You can see the video below for sequences setting my light.
你可以从下面的视频中看到我灯光的顺序设置。
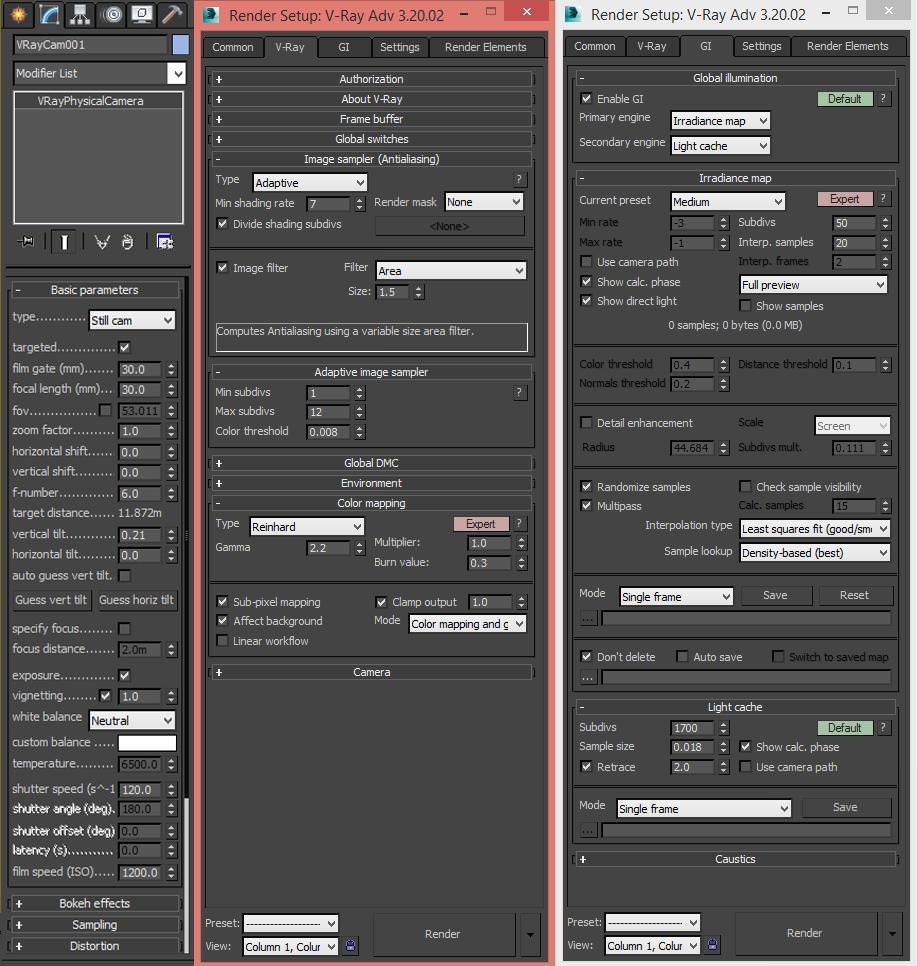
Render Setup
渲染设置
I used the V-Ray render engine to create this image (which is the most common tool I guess). It is fast and easy to handle! And I think in the future I will still use it. This is the camera settings and render that I usually use.
我使用V-Ray渲染引擎来创建这幅图像(我想它是最通用的工具)。它迅速并且容易操作!并且我想未来我仍然会使用它。这里是我通常使用的相机设置以及渲染设置。
Pretty basic, I think so.
非常基础,我认为是这样的。
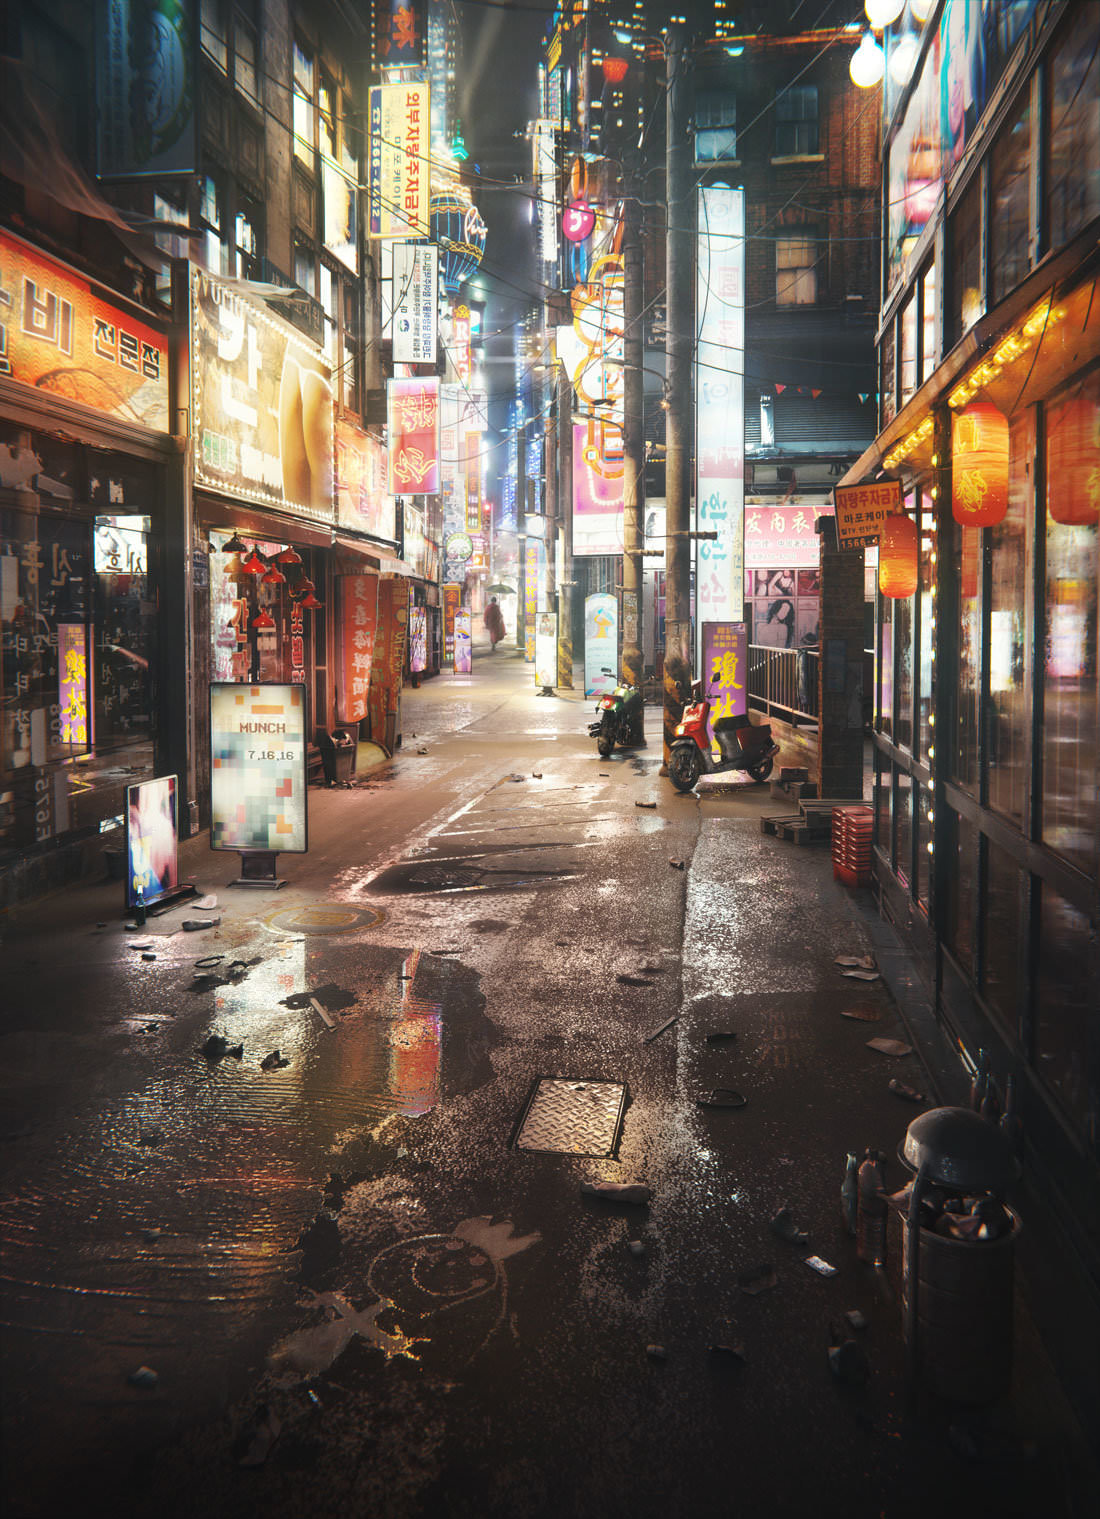
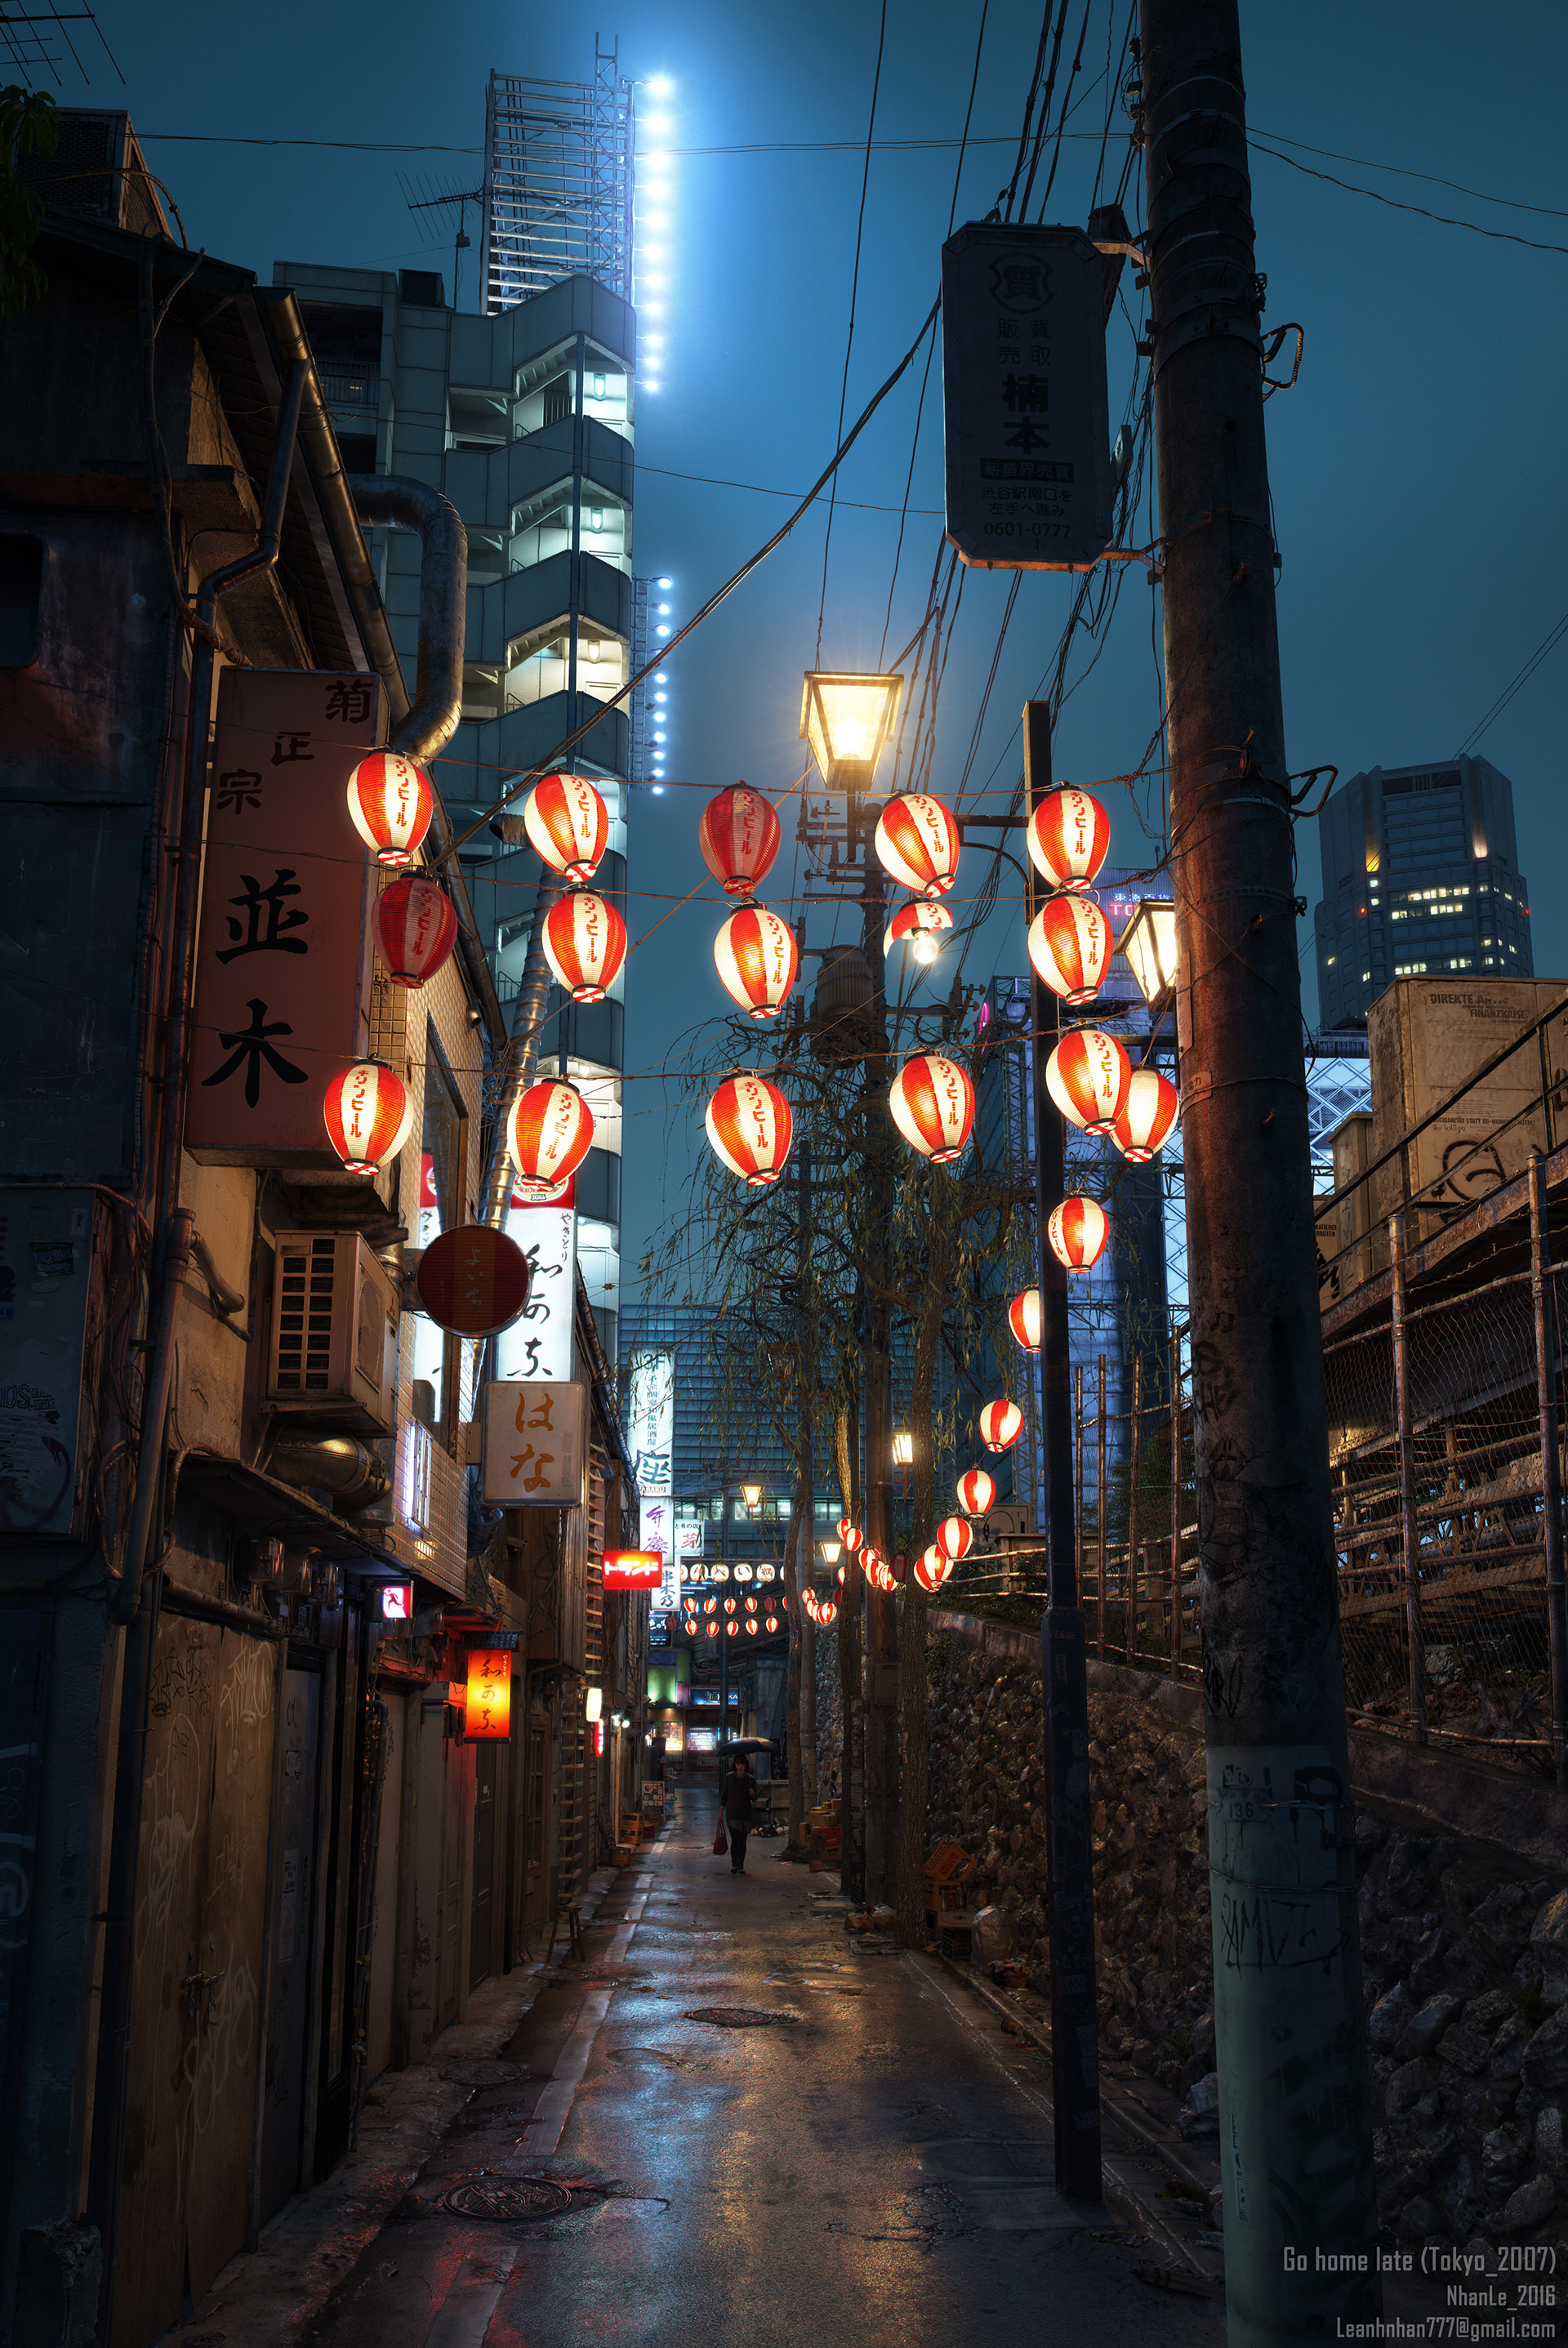
Below is the final render…
下面是最终的渲染…
Post Production
后期制作
Please feel free to check out the making-of video…
请随时查看制作视频…
https://www.youtube.com/watch?v=P96ZU_Ilx9o (Full HD)
Thank you for reading this “making-of” article and I hope you found some interesting and useful advice in it!
谢谢你阅读这篇“制作”文章并且我希望你在其中找到一些感兴趣的和有用的建议!
翻译于2017大年初四家中
Freeyy


推荐课程


推荐教程

0回复“晚上回家(2007东京)”制作过程"