Create Realistic Rain by Ashish Rastogi, India
使用photoshop创建真实的下雨效果
作者:Ashish Rastogi
翻译:CWWS
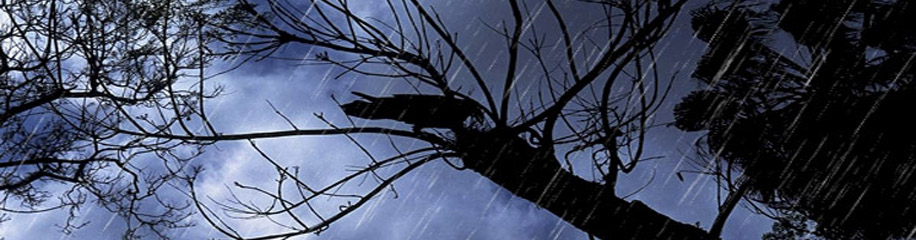
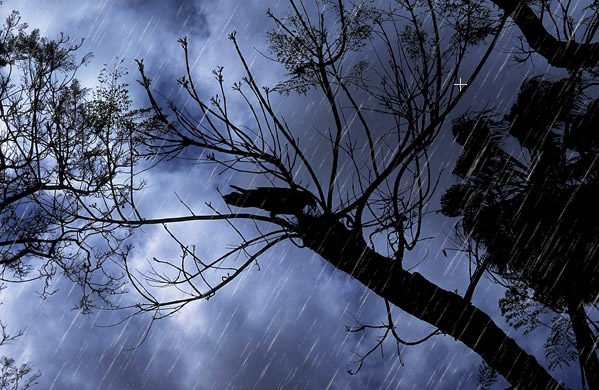
If you want to show any picture in a rainy season then you dont have to wait for a rain. Just open in Photoshop and follow these steps… What dont believe me…try and have a look…Download Source Files
如果你想拍到任何雨季中的场景,你不必等到下雨天到来,只要打开Photoshop并遵循下列的步骤,……如果不相信的话,眼见为实….这里可以下载原始文件。
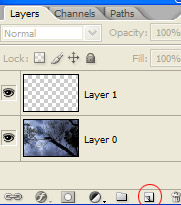
Open Raven.jpg or any other picture of your choice in Photoshop and create a new blank layer.
在Photoshop中打开Raven.jp或者任何其它你选择的照片,并创建一个新的空白层。
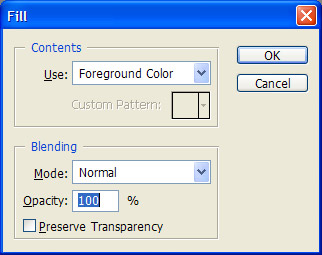
Filled the blank layer with Black color by pressing Alt + Backspace or through Edit > Fill > Foreground Color
用快捷键Alt + Backspace或者用Edit > Fill > Foreground Color (填充前景层),将黑色填满空白层。
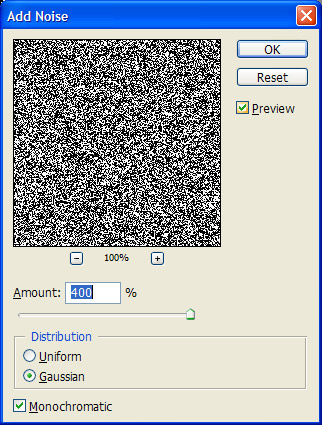
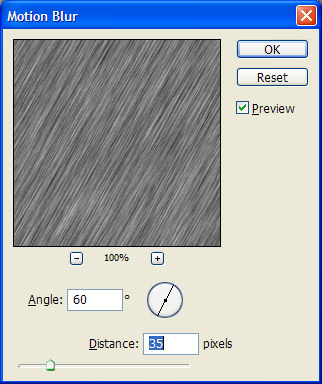
Select a black layer and add noise to the layer. Effect > Noise > Add Noise. Select Gaussian, Monochromatic and Amount – 400 in the Add noise dialog box. Then apply a Motion Blur (Blur > Motion Blur) and select the following settings in the dialog box.
新建并选择选择一个空白的层,给它添加杂点,使用 Effect > Noise > Add Noise滤镜,在选择Gaussian(高斯)选项,勾选Monochromatic(单色),并将数值设置为400,然后按确定,在添加一个MoBlur),并设置如下图所示的参数。
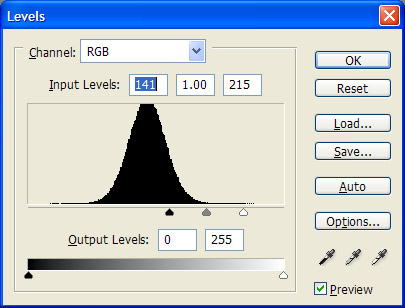
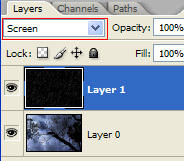
After applying the Motion Blur settings, press the (CTRL + L) to bring the Levels dialog box. And move the left slider to the right and right slider to left. Now change the blending mode of the layer from normal to screen.
再给过Motion Blur(运动模糊)效果之后,点击快捷键(CTRL + L)调出Level工具对话框,然后将左边滑块往右拉,右边滑块往左拉,现在将层叠模式改变为screen.(叠加模式。)
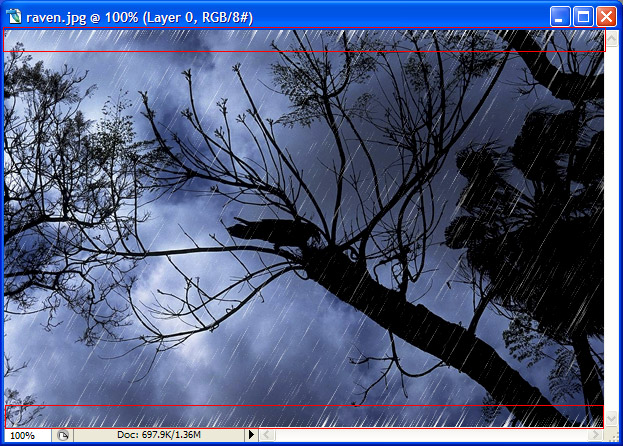
Now you will get the following output. To remove the excess noise from the top and bottom of the image, select the layer and press CTRL + T for transform the image and change the width and height to 110%.
现在你会得到如下的结果,要去掉图像顶层和底层过度的杂点,选中层并按快捷键 CTRL + T 将图像纵向拉伸110%
![]()


推荐相关中文教程

电影MATTER PAINTING基础实战案例教学
马良老师将通过一个精美的实例,来教你如何使用Photoshop结合After Effects软件完成动态Matter Painting场景的制作,从而带你踏入专业MP行业的大门。构图绘画完全教学
本套课程的内容重点是学习绘画艺术的构图规律和方法。在绘画学习过程中,构图是一个重要的组成部分,学习它对于提高绘画练习和创作水平有显著的促进作用。特指纯艺和插画,海报。艺用人体解剖实用教学 下集 四肢篇
本套“四肢篇”教学是王九斤老师的《艺用人体解剖使用教学》系列教程中的下集部分,主要讲解了四肢的结构绘画要点,以及部分人体动态的基础讲解。艺用人体解剖实用教学 上集 躯干篇
本套“躯干篇”教学是王九斤老师的《艺用人体解剖使用教学》系列教程中的上集部分,主要讲解了躯干的结构绘画要点,以及部分人体动态的基础讲解。


推荐课程


推荐教程

谢谢@分享
可是图层样式用了叠加或者柔光也好,那就改变了画面原有的颜色了
是柔光不是叠加吧
空白层貌似不可以使用滤镜,添加噪点的吧