本教学为翻译教学,转载请注明来自www.aboutcg.net,以及注明翻译者
原教学出自CGARENA网站:
http://www.cgarena.com/freestuff/tut…la_bottle.html
作者:Hamed Sabri
Web:www.hamed3d.org
翻译:单骑扫千军
关于译者:

Modeling of Coca-Cola Bottle
制作可口可乐瓶子的模型

Introduction – This tutorial is intended to show you how to make a Coca-Colabottle using Maya. Although, you may think making a bottle is trivial, but it is easy to overlook some of the tiny details that make your final image more desirable to watch. I will also try to give you some tips, which can help you with your workflow when you are modeling in Maya.
Alright, we start off by doing a fast R&D and try to find as many references as we can to make our life easier during the modeling process. Here are some of the images I found on the internet…. simply search for “Coca-Cola Bottle” in Google and you should find tons of good references.
介绍:这个教程告诉你如何使用Maya来创建一个可口可乐的瓶子,虽然你可能认为介绍一个瓶子的建模太琐碎了,但是人们会很容易忽略一些能提高你的作品可观性的技巧细节。我将着这个教程里面告诉你一些这些小的技巧,它们能帮助改进你的Maya的建模流程。
好了,我们做过做一些“研究和发展”就k可以使我们的生活和建模流程变得好起来。这里有许多在互联网上找到的图片,在GOOGLE搜索“Coca-Cola Bottle”,你将会找到无数的有关这方面的图片。

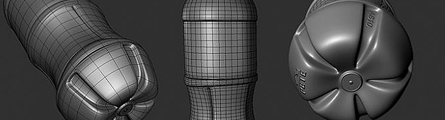
In this tutorial we are going to make the “Coca-Cola Classic” since it has some complex details. We divide the model to three major parts (Top – Middle – Bottom). This way it is easier for you deal with each part and also decide what technique to use next.
这个教程我们将制作可口可乐的经典之作,我们将这种瓶子分为3个大部分(顶端-中间-底部)这样比较容易处理各个部分的建模以及决定你下一步将要使用的方法。

Step 1 – First we need to setup up our “Image Plane” for the side view in Maya. Make sure that Image plane’s Center X is a negative value so it won’t block your model.
第一步:第一步我们将设置参考图,确保你的参考图在视图中的X轴上的数值时负数,否则它将遮挡住我们的模型。

Step 2 – Modeling the Middle Part – To model the middle part we simply start with an “EP curve tool” to create half silhouette of the bottle. While EP Curve is selected hit insert and make sure the pivot is somewhere in center of thebottle.
第二步:中间部分建模
中间部分的建模使用简单的EP curve tool,创建半边瓶子的轮廓线,将轮廓线的中心点放置到将来瓶子的中心,

Next select “Surfaces Revolve”, leave the default options to what they are. Now, we have a base shape to
work with
Since this shape is a NURBS surface, we need to convert it to a Polygonmesh. Go to Modify menu -> Convert -> “NURBS to Polygons Options”.Set the options as following and then hit
接下来选择”Surfaces Revolve“,使用默认选项,我们将获得一个简单的形状。
我们需要将NURBS转换为多边形,到Modify菜单下,Convert -> “NURBS to Polygons Options”
命令的选项根据下面的。

Apply:Type: Quad
Tessellation method: General
U type: Per span # iso params
Number U: 1
V Type: Per span # of iso params
Number V: 3
The reason we want the U, V to be set (1, 3) is because we don’t want our poly shape loses
much of its details while still is a Low Poly. If you compare the poly version to the original
NURBS surface, you can clearly notice that we have lost some of the curvature but don’t worry
since we later apply amesh smooth on it.
将UV设为(1.3)的原因是我们不希望生成的多边形是个简单的形状而失去细节。如果你对比一下生成POLY以及原始NURBS曲面,你能注意到我们失去了许多的曲度细节,但是不要担心,后面我们将给一个Smooth到POLY上去。

Also, we no longer need the NURBS surface, so simply just delete it.
还有,我们不需要NURBS了,删掉它
Now under Edit Mesh select “Insert Edge Loop Tool” and add some new edges around areas as you can see in the following image. Then, use “Select -> Select Edge Loop Tool” to select the new edges we just made, simply hit “R” and scale them towards inside a bit. The reason we added these edges is to give more depth to those areas as you noticed in the Reference image.
现在选择“ Edit Mesh”下的“Insert Edge Loop Tool”,添加几条线圈到图中的位置上。然后使用“Select -> Select Edge Loop Tool”选择新加的曲线,朝里缩放一下,这里注意,添加这个的作用是给商标的区域一些深度。

Here is what you should have by now….现在的话,你应该…
Tip: While middle object is selected press”3” on your keyboard to see the poly in smooth preview. Press “1” to go back to normal mode. Notice this feature is only available for Maya 2008 and higher…..
小技巧:(其实已经是路人皆知了)当你按下“3”的时候,你的POLY模型将会变得圆滑一些,按下“1”又回到原普通状态,这个功能从MAYA2008就开始了。

Select half of the object and delete it, then “Duplicate” the other half as an instance.
选择模型的一半并删除,然后使用“Duplicate”,以“intance”的形式复制出另一半。

Next, move the vertices according to following image. Try your best to match the vertices as close as possible to the reference image.
接下来,移动顶点,尽最大的努力使你的模型的形体去匹配参考图。

Step 3: Modeling the Top Part -
第三步:顶端的建模
Select the edges of bottle as extrude them similar to the following image:
选择瓶子的边,按照图中的方式挤出。


Modelingthe Cap and Treads:瓶盖的建模
We start off by making a poly cylinder with following parameters:我们按照下面参数的样子创建一个圆柱体
Radius: 2.72
Height: 2.484
Subdivision Axis: 20
Subdivision Height: 1
Subdivision Caps: 1
Select the lower vertices and scale them towards outside a bit, then delete the lower cap. Select the lower border and extrude it towards inside. Use the following image as a guide:
选择较少的点且往外缩放一点,然后删除较低的盖子。选择较低的边界,并且朝里面挤压。根据图片去做吧(我也糊涂了,哪些是“lower”啊?!)

Make a “poly Pipe” and position is under the cap. You are almost done with the Cap.
创建一个“ “poly Pipe”,把它放置在瓶盖的下面,这样你就快完成瓶盖子部位的创建了。

Now, make a triangular tread and align it with a cap door. You can use Vertex snap tools by holding “V” to make sure the tread is aligned properly. Make sure the pivot is exactly in the center of cap. Press “E” to switch to rotate mode then “Duplicate” it to make 20 treads.
现在,沿着瓶盖创建一圈三角的台阶。你必须按着“V”键,使用点吸附功能一次确定这些台阶紧贴在瓶盖上。是角锥台阶的轴心点放置在瓶盖的中心处,然后按下“E”键,更改旋转模式,“复制”20个台阶。

Step 4: Modeling the Bottom Part-
第四步:底部建模
There are many different techniques that can be used to tackle the bottom part. Here is one of them I came up with:有许多方法来制作可乐瓶的底部,这里我说一种:
First, make a simple “poly Sphere” and set it’s parameters as following:按照下面的参数制作一个简单的POLY球体。
Radius: 7.5321
Subdivisions Axis: 20
Subdivision Height: 8
Make sure the sphere radius is close to radius of middle part; don’t worry if they don’t
match exactly inch by inch together since we later merge them together. Also, you notice
that the number of subdivisions differs for each part. Don’t worry now, later we have to add
and delete some edges to middle part to match it with the bottom part.
确保球体的半径数值要和可乐瓶中间部位的半径尽可能的接近,不要担心他们不能精确的匹配,在后面的过程中,我们将慢慢的将他们合并起来,而且注意到他们的细分级别也不是一样的。我们将增删一些边来使中部和底部相匹配。

Use “Select -> Select Edge Loop Tool” to add a new edge to the sphere where middle part ends, so we can delete the upper half of sphere.
使用“Select -> Select Edge Loop Tool”在底部球体的中间部位加一圈线,这样我们删掉球的上部分。

Select all vertices at the bottom of sphere and scale them on “Y” axis until they are lined up. While there are still selected move them up on “Y” axis to line up with its upper edge. See the following image and use it as your guide
选择球体底部的所有定点,在“Y”轴上挤压到同一平面。

Here is what you should have so far. Press “3” to see the object is smooth preview.
按下“3”键,预览一下光滑效果。

Next, add new edge loops at the end of bottom part. Assign a red color material to those polys that we don’t need to work with. This way, you can focus on other parts and won’t get confused later when we extrude the polys between them.
接下来,在底部添加一圈新的线,给那些不会发生挤压的多边形一个红色的材质(选择这些面,Hypershade中赋予一个红色材质球),这样接下来就不会被搅浑了。

Now, try to extrude the polygons at the center to something similar to following image:
现在,按照图中的方式挤压瓶底的这些多边形,让他们产生一些细节。
Next, we extrude the polys between those polys we already colored and extrude them two times towards inside. I have selected the edges where the second extrude should occur for your guide.
接下来,我们挤压那些已经赋予红色材质之间的面,朝里挤压两次。我已经选择了那些应该在哪里产生第二次挤压的边。

Here is what we have so far. I also assigned a nice default Blinn shader to it so we no longer see the red areas.
到现在我们已经做了这么多了,我赋予一个不错的Blinn材质,这样就看不到那些红色的面了。

Step 5 – Connecting parts together -
第五步- 连接各部分
First we merge the two halves of middle part together. Simply combine and merge them together.
首先,我们将中部两边合并一下。
Now it is time to connect the middle part to the bottom and merge them together.
As we saw earlier in this tutorial, number of subdivisions differed for both middle
and bottom part. To fix this problem, we add some new edge loops tothe middle
part to match the edges of bottom and then we simply delete all the old edges
that don’t match .
现在,将中间部分和底部合并起来,在前面我说过中间和底部的细分段数不是匹配的,我们要给中间部分添加几条新的边来匹配底部的细分段数,以及删除不匹配的边。

Once you are done, merge all the vertices together and extrudethe middle towards inside
where middle and bottom part are connected. Call the new object “Bottle”.
做好了匹配两个部分的细分,将两个部分合并起来,并在二者连接的地方往里挤压一下。
给新物体命名“Bottle”

Step 6: Adding Extra Details to Middle Part
增加中部的附加细节
- In this step, we are going to add more definition to middle part where you hold the cock.
Simply, move the vertices and extrude their faces to make a basic slot. In this model we
need to have four slots.
在这一步,我们将给平常你手握可乐瓶的中间部分增加更多的细节。简单的调点,并且通过加压面来创建一个基本的凹槽。这里要四条凹槽。

Step 7: Combining Parts -
全部组装
This is a simple step. Combine all the objects except the cap’s treads and call it “Coca_Bottle”
or whatever you like. The reason we don’t combine the treads with the rest of objects is that once
we apply mesh smooth to them they get rounded and it is not something we want. Also,
make sure you delete all the history of the objects before combining them.
这一步将出瓶盖纹路外的所有点合并一下,给新产生的物体命名,为什么不讲瓶盖上的纹路一起合并呢?它们在进行平滑是会产生我们不想要的或者不好的效果。最后确定合并物体之前的所有历史。
Tip: if you feel the bottle needs to be a bit fatter, make sure you hold “Ctrl” while scaling the object on “Y” axis. This way you are scaling the object on both “X” and “Z” simultaneously.
如果你认为瓶子有点粗,可以按下CTRL键来缩放它的Y轴,这样XZ轴将会缩放,而Y轴不变(确实是一个很好的小技巧)
Here is the final model after applying mesh smooth. At this stage we are done with modeling part.
下面是光滑后的模型,我们的建模阶段结束了。

Step 8: UV Mapping -
UV贴图
To setup the UVs I used “UVLayout 2”. Select “Coca_Bottle” in the scene and export it as obj. Load the obj file in “UvLayout 2” and layout the UVs as following. I am not going to cover how to use UVlayout in this tutorial but if you are not familiar with it you can easily learn it by following the tutorials that’s on their website. Here is the link:
http://www.uvlayout.com/index.php?option=com_wrapper&Itemid=97
在UVlayouT中编辑UV,将模型一OBJ格式导出,导入UV layout,UV也会被导入,我不准备在这篇教程中介绍这个软件的使用,如果你对它不熟悉,请到下面的站点去学习。
http://www.uvlayout.com/index.php?option=com_wrapper&Itemid=97

UV mapping the Cap’s treads can be easily done in Maya using simple planar map.
We apply a planar map to one tread and then we transfer its UV information to rest of 19 treads.
This way all UVs pile up exactly on top of each other.
UV编辑结束后,将模型倒回Maya.
瓶盖上纹路的UV可以使用maya简单的平面投射,只给一个赋予uv,然后传递给其他的19个,可以将他们的UV重叠在一起。

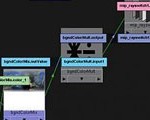
To transfer one object’s UV map to another object, first select the object that has proper UVlayout
and then the second object with no proper UV layout, then go to Meshà “Transfer Attribute Options”
and in this case set the options as following:
方法是先选择有UV的物体,再选择没有UV的物体,然后进入命令面板,按照图中的设置:

Do this step for the rest of 19 treads. Once you are done, all the UV’s are perfectly piled up on
top of each other. Merge all the tread to one object. Call the new object “Cap’s Tread”
重复传给剩余的物体,将纹路合并为一个物体,命名为“Cap’s Tread”

Step 10: Setting up UV as a guide in Photoshop:
在PS中设置UV
Once UV image is loaded in Photoshop, press “Ctrl+I” to invert the colors.
Double click on the lock icon to pop up the new layer window.
Call the new layer “UV_reference” and hit ok.
导入UV快照到PS中,按下CTRL+I键,翻转图像,解锁,将新图层命名为“UV_reference”。

so you can see the layers underneath. Make a new layer under the “UV Reference”
and call it “Bump”.
,这样就能看到在下面的层,新建一个层在“UV Reference”层并命名为“Bump”

Now, we need to gather some images to draw “CocaCola Logo”, and “small dots” on our bottle.
To make the small dots under Logo I used the following texture.
现在,我们需要收集一些图片来画“可口可乐”的标志以及一些小点在瓶子上。
我使用下面的图片来制作那些在标志下面的小点

The rest of small dots can be simply made by using “Ellipse Tool” in
Photoshop and duplicating them using “Alt+Drag”.
剩余的小点我用PS中简单的椭圆图形工具来创建,
并且使用“Alt+Drag”来复制他们。

Here is the “Coca-Cola Logo” I found on Google which is a nice high resolution image with transparency.
Simply, convert the color to white with black background.
这里是我在GOOGLE上找到的一张很好的高清并带有透明通道的可口可乐标志。我将颜色转换为黑白图。


Now that we have all the images we need, you can start aligning them on our UV we
exported from Maya. Here is what I came up with.
现在我们有了我们需要的全部图像。根据我们导出的UV快照图来摆放这些参考图片了。
Save the final image as tga format and name it “CocaCola_Bump.tga”.
保存最后的图片为TGA格式,并命名为“CocaCola_Bump.tga”
Step 11: Setup bump map in Maya:
设置BUMP贴图
Simply make a blinn shader and apply our texture (“CocaCola_Bump.tga”) to its Bump mapping
section. Try to reduce the “Bump depth” to something around 0.040. Also,
make sure reflection is set to zero
简单创建一个Blinn材质,并连接刚才的CocaCola_Bump.tga图像到BUNP通道。
试着将“Bump depth”降低一点(具体数值看情况)
关掉反射


Apply the Blinn shader to our CocaCola bottle. Make sure “Smooth shade all”,
“Textured”, “High quality” is check on, so we can see how our bump map looks
like in the viewport. You should get something similar to this:
赋予Blinn材质给可乐瓶,确认打开Smooth shade all”, “Textured”, “High quality”,这样我们能看到BUMP贴图的效果,
你将会看到下面的效果,如果你设置正确的话

Conclusion
- I hope you have enjoyed this tutorial so far and information in it was useful for you.
Also keep in mind that similar technique I describe here can be applied to any 3d packages out there
. Please feel free to email me at hamed.sabri@gmail.com in case you have any questions
or problems regarding this tutorial.
我希望你能喜欢这篇教程并从中找到有用的信息,这些我介绍的有用的技术在以后任何3D容器制作中都能用得上。通过电子邮件hamed.sabri@gmail.com我能为你解决这篇教程中遇到的任何问题。

深更半夜,哈欠连天,战战兢兢,终于发完。
翻译教程60%,论坛设置40%
无奈还是排版不好,大家勉强看看吧!


推荐相关中文教程

《大猿王传》电影级别动画短片系列教学第一部:大猿王模型篇
教程中涉及的技术流程都是现在影视公司比较流行的技术,掌握了这一系列教程中的技术能帮助CG从业者在公司更好的工作。对于CG专业的学生来说,学会了这套教学的技术能更好地完成毕业设计,做出更好的演示作品,找到自己满意的工作。3DSMAX零基础入门及建模实战中文教学
全套教学大大小小的案例总共有17个,从最简单的杯子到最复杂的角色,从硬表面到生物角色都有包括,全套教学接近40小时,3dsmax2016以及以后的版本都适合。高精度PHOTOGRAMMETRY照片阵列建模初级教学
本教学由HUNTER老师主讲,以photogrammetry(照相测量法也就是俗称的照片建模)的原理为核心,讲解高精度三维扫描的特性,分析并挑选合适的设备。最后制定出实用性极强的工作流程。适合需要快速制作逼真的高精度模型以及高清纹理的CG工作者。3DSMAX动力学特效实战教学
本套教学将通过24章实例教学,来向你详细讲解3DSMAX的动力学特效在电视包装与广告中的应用。Maya零基础入门及建模实战中文教学
本套教学通过软件讲解和实际案例相结合,带领大家快速学习和掌握maya的基础操作,多边形建模和uv编辑,为后续的学习打下较好的基础。3DSMAX国外粒子案例效果解析
本教学通过27个实战案例,教您如何用3DSMAX结合ParticleFlow本身以及扩展的ParticleFlow Box 1、Box 2、Box 3、功能包,结合Vray渲染器,来制作流行的广告和电视包装中的粒子特效效果。无论是常见的粒子聚合,分散,动态粒子替换,粒子矩阵,粒子动力学,本套教学都有相应的案例。3DSMAX国外流体案例效果解析
本教学通过20个实战案例,教您如何用3DSMAX结合Realflow,FumeFX, ParticleFlow插件,来制作流行的广告和电视包装中的流体效果。无论是常见的液体,烟雾,流体碰撞,沙粒变化,水墨表现,本套教学都有相应的案例。2.5D商业游戏场景制作教程 进阶篇
在本教程中,Freeyy老师将从零开始,向你讲解如何根据确定的主题进行前期准备,随后建模,绘制贴图,制作材质,最后再进行细节调整,完成一个商业游戏级别的2.5D场景画面。


推荐课程


推荐教程

1回复如何制作可口可乐瓶子的模型"