
本教学为翻译教学,转载请注明来自aboutcg.net,以及注明翻译者
原教学出自CGArena网站,原始链接如下:
http://www.cgarena.com/freestuff/tut…yuh/index.html
[B]作者: Leong Wan Kok, Malaysia (马来西亚)
个人网站: www.1000tentacles.com
翻译:CWWS (aboutcg.net)
请尊重互联网道德,转载请注明转载出处和翻译者,谢谢!
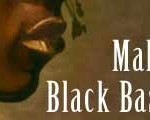
Puyuh的奇思妙想
twisted mind of puyuh

Hi, I’m WanKok. I have been involved in art industry for almost 12 years. Over my career path, I’ve been exposed to different techniques of creating digital art work for game industry, post production and publishing company. These experiences have somehow helped build up my personal way of rendering a scenes. In this tutorial, I’m happy to share my techniques and will walk you through the many steps I take, from initial conceptual work to final rendering.
嗨,我是WanKok,我在艺术行业工作了大约12年,在我的职业生涯中,我使用不同的工具来为游戏行 业,后期合成和出版公司创作数码艺术。这些经验帮我建立起个人的工作方法。在这个教学中,我很高兴来分享我的技巧并和你回顾我使用的很多步骤。从最初的概 念设计到最终的渲染。
Basically, this tutorial divides into 5 main sections: Brain Storming; Prior to Coloring; Coloring; Texturing; Final Touch Up. Each step of the way will be accompanied by WIP art works and shall also explain the tools and methods I used.
基本上,这个教学分成5个主要部分,头脑风暴;着色前准备,着色,材质纹理,最终调整。每一个步骤将会伴随着过程步骤,也会解释我使用的工具和方法。
As always, it is vital to know what’s your artistic direction prior to painting. What kind of style, design element, the canvas size, final output file format, etc. These are essential. If you have not received any brief from your art director, ASK! If this is your personal project, I strongly advice you to plan out one. This will indefinitely save you time in the end.
一如既往,预先知道你绘画的艺术方向是至关重要的。使用何种风格,设计元素,画板大小,最终输出媒体,等等等。这些是核心和基础,如果你对你的艺术方向无法确定的话,那就问你的客户。而如果这是你的个人项目,我强烈建议你事先做一个计划,这会在最后大大节约你的时间。
Brain Storming
头脑风暴
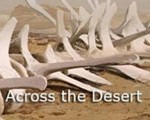
Read the design brief carefully. Design your character and roughly work out some thumbnails, rough and fast. Get the overall feel for it. If time permits, develop your characters. Think of the environment they dwell in, what kind of climate and clothing they wear? What’s their characteristic? Consider these questions and slowly you will start to “feel” for your painting. I believe this will make the painting more interesting and thus has a “longer read”. For my case, since this Twisted Mind of Puyuh is a front cover for my comic, I basically know what kind of composition, characters and direction I need to draw/achieve.
仔细阅读设计大纲,为你的角色和大致工作创建一些缩略图,很粗略并且快速。来得到整体的感觉,基础开发 你的角色,考虑他们所处的环境,周围的风土人情和他们穿的衣服,它们的个性如何。思考这些问题,然后你慢慢会开始对你的绘画有感觉。我相信这会使你的绘画 更加有趣和导致更深的理解。对于我的项目,“Puyuh的奇思妙想”是我的漫画封面,我基本上知道我要画/得到的是怎样的合成,角色,和方向。


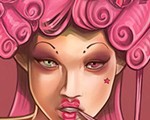
puyuh sketch
puyuh的草稿
Prior to Coloring
上色之前的工作
Once the layout is done, get it scanned. Usually I go with 300dpi, grey scale.
一旦构图完成了,把它扫描一下,通常我使用300dpi,灰度色彩。
Coloring
上色
On top of the layer, open a new one. Choose “paint bucket” (type ‘G’) and fill the whole canvas with a suitable darker tones. Here I go with warm brown for the basic coat. Turn the layer to “multiply” (under layer), so that the underneath layer is still visible. For personal liking, I always start coloring the characters first, then background, an “inside out” method. This way enables me to judge the colors’ relation more precisely. Constantly change your brush’s opacity. I love to work somewhere around 20-50%, “flow” sets to 68%. It builds up the color nicely this way IMHO.
在顶层新建一层,选择“颜料桶”(快捷键“G”),将整个画布填充上一种合适的暗色调。这里我使用暖的 褐色作为基本的色调。把颜色层改变为“multiply”层叠模式。这样下面的层仍然是可见的。出于个人喜好,我经常会先开始给人物上色,然后才是背景, 一个“由内而外”的过程。这可以让我更加好的判断色彩关系,经常改变你笔刷的透明度。我喜欢使用20-50%的的透明度工作,“flow”(跟随)设置为 68%。恕我直言这个方法画出的色彩非常漂亮。

puyuh coloring
给puyuh上色
The Journey Continues
让我们继续旅程
Make full use of the layering function. (Create layer by typing “ctrl + shift+N”) This is most advisable as you can always return to that layer and make changes if need to. Bear in mind that the more layers you have, the heavier the file will be. You need to balance it out. Merge selected layers by “Ctrl+E”.
充分使用层功能,(通过输入“ctrl + shift+N”快捷键来新建一个层),这是最好的建议,如果你需要,始终可以回到这个层并作出修改。记住你拥有的层越多,你的文件就会越复杂。你需要取得平衡,使用快捷键“Ctrl+E”来合并层。
Change the brush’s size by exploring the brush list. Call out brush (type “B”), control the diameter by “ ] ” increasing; “ [ ” decreasing. Remember to save your files constantly and do back up.
通过打开笔刷列表来改变笔刷的尺寸。启动笔刷状态。(点击键盘上的“B”),通过点击“ ] ”来增大笔刷尺寸,“ [ ”来减少笔刷尺寸。记住经常保存你的文件并且备份。


Texture Mapping_01
材质贴图_01
This is one of the fun parts and challenging process. To give the painting a unique rusted look, I choose a rusted metal texture as my base. Open a new layer, paste the texture in, and set the layer mode to “multiply”. Decide where you want to map the texture. Move and scale the texture to the right size. Make sure the texture size is relative to the painting, or else it will look out of place. Delete the areas you do not need (the texture). Once nicely mapped, change the texture’s opacity. Adjust brightness/contrast to the texture. Erase the hard edges of the texture by using eraser tool, or “E” to call it out. Make sure it looks subtle and merges well with the painting.
这是一个有趣和挑战性的过程。能给绘画一个独特的感觉,我选择一个锈迹斑斑的金属贴图作为我的基础。新 建一层,把贴图复制进去,把层叠模式设置成“multiply”,决定你想要贴上材质的地方。将材质移动并缩放到合适的位置。确定贴图尺寸和绘画相匹配, 不然它会在其他部分显示出来。删除你不想要地方的贴图,一旦贴图被处理好了,改变材质贴图的透明度,调节材质的 brightness/contrast(亮度/对比度),使用eraser tool(橡皮擦工具)擦掉材质的硬边,或者你可以按“E”来启动它,确认它看起来非常美妙,并且和绘画融合得非常好。

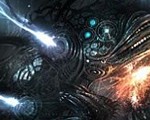
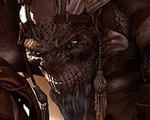
puyuh mind
Color Expansion
色彩扩展
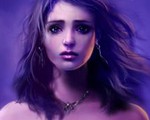
I usually keep on painting one character until it’s done. I feel comfortable seeing the characters take shapes one by one. This is my preference. As usual, “ctrl+shift+N” to create a new layer to paint on. Toggle between “normal” and “multiply” for layer mode. For the shadow, I go for “multiply”; for detail and new coloring, I go for “normal”. Try these out and you will get the feel of it. My habit is to always start with coloring the characters first, and then move on to background.
我通常持续绘制一个角色直到完成,我喜欢看着角色们一个个成型,这是我的偏好,通常,按“ctrl+shift+N”新建层绘制,在“normal” 和 “multiply”层叠模式之间切换,对于阴影 ,我使用“multiply”模式,对于细节和新的颜色,我使用“normal”模式,尝试这些,你会获得感觉的。我的习惯是永远从角色开始上色,然后转 移到背景。

puyuh full
Texture Mapping_02
材质贴图_02
Repeat Texture Mapping_01. Important note: subtlety is the keyword. The texture is here to enhance, not over powering the whole painting. Do not make it look too strong or introduce too many texture maps. It will make the painting looks congested and stifling. Balance is the art here. Various shortcuts:
重复材质贴图01的步骤,重要注释:微妙是关键词,这里的贴图即使需要增强,不要针对整个画面轩兵夺主。不要让它看起来太显眼或者导入太多的材质贴图,这会使整幅画面拥挤沉闷,在这里平衡是一种艺术,使用各种各样的快捷方式:
– Level (ctrl+L) ; Curves (ctrl+M); Color Balance (ctrl+B); Brightness/contrast; Hue/Saturation( ctrl+U).
Level(级 别调色) (ctrl+L) ; Curves(曲线调色) (ctrl+M); Color Balance(色彩平衡) (ctrl+B); Brightness/contrast; Hue/Saturation((亮度/对比度;色相/饱和度) ctrl+U).
Combine the above methods, or choose one or two. Try them out.
结合上述的方法,选择一到两个,然后试着使用它们。

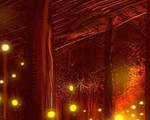
texture mapping
材质贴图
Decoration / Accessory
装饰/配件
A nice painting consists of not only catchy character design, focus point, good layout but also introducing small elements/details. It will definitely spice up the work. Add some supporting characters here and there. Have some fun!
一副好画不只包括令人影响深刻的角色设计,焦点,好的布局,还包括引入小元素/细节。这回明确地提升作品的情趣,给角色这里或哪里添加一些,获得一些乐趣!


Final Touch up
最终的修正
Tips: To ease your viewing, you can always open another window to view the work by hitting: Window > Arrange > New Window
小贴士:为了使你观看更加轻松,你总是可以通过点击Window > Arrange > New Window,打开一个新的窗口来观察
This is where the painting seems coming close to an end. (But actually far from it) Maintain your patience. I know when the painting close to an end, sometime we might “rush it a bit”. But refrain from that! Keep your patience and stay focus. Is good to always have a navigator in your scenes. With navigator, you can view the overall painting in a small individual window, without having to constantly zooming in and out.
现 在这幅画基本上算完成了(但实际上离完成还很远),保持你的耐心。我知道当绘画接近完成,有时候我们 可能会“稍微加快步伐”。但避免那样做,保持你的耐性并且继续专注,在你的画面场景永远有一个预览图是很好的事情,你可以在一个小的独立窗口看到你画面的 整体外观,不用常常放大缩小。
Detail is the key here, make or break the painting. Adjust the color for the last time. Hit “Tab” in your keyboard to close all windows, let alone the file. Now, really look at your illustration, and spot for places where you need to further refine. Until you have a smile on your face, you know you have an excellent painting. Congratulation, you are done!
这里的关键是细节,成就或毁了整幅画。最后一次调整颜色,按下你键盘上的“Tab”键关闭所有的窗口,只留下绘图文档,现在,真正好好看看你的插画,然后聚焦于你需要进一步细化的地方,直到你脸上出现笑容,你知道你完成了一幅精彩的插画,祝贺你,你搞定了!
I hope you enjoy going through my tutorial and thank you for reading it. To know more of my works and projects I’m working on, please visit my website. Happy painting!
我希望你在阅读我的教学时觉得享受,并感谢你乐于看完,想知道我更多的作品和正在进行的项目,请访问我的网站,快乐地画吧。

leong wan kok About the Artist
关于艺术家leong wan kok
Leong Wan Kok is an award-winning illustrator from Malaysia, specializing in character design and illustration. His work can be seen in various media : art print, illustration, poster, product design and comic, with clients listed from both local and oversea. Sculpting is one of his passions as well.
leong wan kok是一位马来西亚的得奖艺术家,专长于角色设计和插画,他的作品可以在艺术印刷,海报,产品设计,和漫画等媒体上被看到,同时拥有本国和国际的客户名单,雕刻也是他的热情所在之一。
Website: www.1000tentacles.com
官方网站:www.1000tentacles.com
Email: pkok@1000tentacles.com


推荐相关中文教程

电影MATTER PAINTING基础实战案例教学
马良老师将通过一个精美的实例,来教你如何使用Photoshop结合After Effects软件完成动态Matter Painting场景的制作,从而带你踏入专业MP行业的大门。构图绘画完全教学
本套课程的内容重点是学习绘画艺术的构图规律和方法。在绘画学习过程中,构图是一个重要的组成部分,学习它对于提高绘画练习和创作水平有显著的促进作用。特指纯艺和插画,海报。艺用人体解剖实用教学 下集 四肢篇
本套“四肢篇”教学是王九斤老师的《艺用人体解剖使用教学》系列教程中的下集部分,主要讲解了四肢的结构绘画要点,以及部分人体动态的基础讲解。艺用人体解剖实用教学 上集 躯干篇
本套“躯干篇”教学是王九斤老师的《艺用人体解剖使用教学》系列教程中的上集部分,主要讲解了躯干的结构绘画要点,以及部分人体动态的基础讲解。


推荐课程


推荐教程

0回复“Puyuh的奇思妙想”的绘制流程"