本教学为翻译教学,转载请注明来自aboutcg.net,以及注明翻译者
翻译:单骑扫千军
关于译者:

原始链接如下:
http://www.cgarena.com/freestuff/tutorials/maya/fruittarts/index.html
Making of the Fruit Tarts
by Hau Ming (Jamie) Li, USA

Hello, my name is Hau Ming (Jamie) Li, the female artist who created the Cheese Platter tutorial earlier. This is my second tutorial on food using Maya, Photoshop and rendered with Mental Ray. I will try to explain the process from photo concept to lighting the scene using Final Gather.
大家好,我叫Hau Ming (Jamie) Li,是制作这个《Cheese Platter tutorial》的女艺术家,这是我第二个用Maya,Photoshop以及Mental Ray制作食物的教程。我将在接下来的利用图片讲解怎样使用Final Gather照亮场景。
A lot of people have asked me why I wanted to create food for my demo reel instead of the typical modeling and texturing reels of environments and characters. I can model and texture environments and characters like any CG artist, although few people can make photorealistic food and I want my demo reel and portfolio to be unique enough for people to remember. In addition, I want to expand my horizon as a texture artist to experiment on the use of different materials and light it using Final Gather and not be dependant on the skin shader to make photorealistic food.
许多人问我为什么做关于食物的作品而不是其他的典型的环艺和角色的模型。我可以像其他CG艺术家一样去制作环艺和角色的模型,但是只有少数人能制作超写实的食物作品,而且我希望我的作品能具有个性从而使人记住我。另外,我想利用不同的材质和使用Final Gather照明而不使用SkinShader就能制作出超写实的作品来拓展我作为一个材质艺术家的视野。
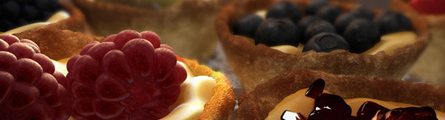
Here is the reference picture which I used as a photo concept of my fruit tarts project
下面就是吸引我来制作水果馅饼这个项目的实例参考图片

Reference of the Fruit Tarts
Just like the Cheese Platter project, I didn’t follow the reference 100%. I added stuff to it, and changed the lighting to make it look better. At the same time, I didn’t want to blur it in the post production like I did in the other image; I want a depth of field in it.
就像奶酪项目来说,我并不是100%的按照示例图片来做的。我在里面增添了素材,并且改变了照明以使它看起来好一点。同时,我没有对它进行模糊就像我以前的作品那样,我想有空间感在里面。
References参考
As I have said earlier, it is very important to have multiple reference pictures to look at when it comes to modeling and texturing a photorealistic scene. If possible, purchase the fruits and keep them in front of you so you can hold it up to the light to see the translucencies. Here are some of the pictures I have found on the net, which I used for this project.
就像我早先说的那样,如果你要制作一个超写实的场景的时候,在建模和贴图阶段拥有大量的参考图片是非常重要的。如果可能的话,你可以购买水果,将他们放在你的面前,在灯光下观察他们的,下面是我在制作过程中使用过的参考图片,我从网络上找到的。

Modeling建模
For the tart crust, I revolved a NURBS CV curve, added more isoparms in between and manipulated the curves to shape it into a tart crust. Then I converted it into polygon geometry, reversed normals and UV mapped it.
[LEFT]水果馅饼的硬皮,我是使用旋转NURBS曲线获得的,在其中添加了很多的ISO参考线,熟练操作曲线使之像一个水果馅饼的硬皮。接下来我将其转换成了多边形,翻转了法线并创建了UV。

Tart Crust and UV
For the custard, I used a NURBS plane, shaped it inside the tart crust, and checked the normals.
对于蛋奶糊来说,我使用一个NURBS平面,使之放置在水果馅饼上,并且检查了法线。
Custard and UV
For the tray, I revolved a NURBS CV curve, converted it into polygons, reversed normals, smoothed it, and then deleted every other edge inside the tray to keep the polygons low but still maintain the roundness of a tray. I could have left it as NURBS geometry, but the UVs were noticeably distorted so that’s why I converted it into a polygon
.对于盘子来说,我使用一个NURBS的CV曲线来旋转得到,将其转换为多边形,翻转了法线,细分一次,删除了盘子里面的一些边,以此来降低盘子的多边形面数但同时又能保持作为一个盘子所具有光滑的边。我本来想用NURBS曲面来制作这个几何体,但是我发现它的UV有曲解,于是我将其站换为了多边形。
Tray and UV
For the doily, I used a NURBS plane.
对于桌布来说,我使用了一个NURBS平面
Doily and UV
For the raspberries, I used a NURBS sphere, checked the normals, duplicated it many times, positioned them and shape them like a raspberry using a lattice. I left it as a NURBS geometry, because I needed that roundish organic look without having Maya calculate the densities of all the smoothed polygons. In addition, NURBS has its own UVs, although slightly distorted, it works out fine for the fruits. I also made sure all the texture seams are facing inside the raspberries instead of outside.
山莓我是使用一个NURBS的球来制作,检查UV之后,我复制了很多个,将他们摆放好位置,使用晶格框来塑造他们的形体。我使用NURBS来制作山莓没有像前面的物体将其转换为多边形的原因是,我需要一个光滑的有机体,如果是多边形的话,Maya要占用多数的空间来计算聚在一起的平滑过后的物体,还有,NURBS具有自己的本身自带的UV,虽然有些小的曲解,这些曲解对于小水果来说就微不足道了。而且我将贴图的接缝部分放在山莓群的里面看不到的部位而不是朝外的部位。
Raspberry and UV
For all the grapes, I used NURBS spheres and shaped them with a lattice. Red grapes are bigger and rounder at the bottom. Green grapes are elongated and thinner than red grapes.
对于葡萄来说,我使用NURBS球体来制作,使用晶格框来调整形体。红色的葡萄在底部,比较红,比较光滑。绿色的葡萄比起红色葡萄来,形体上显得细长一点。
Grapes and UV
For the blackberries, I used NURBS spheres just like how I modeled the raspberries, except I converted them to polygons, reversed normals, deleted the inside of the spheres and combined them, shaped them with a lattice to cover all the gaps and make them shaped like a blackberry. The bulbs of the blackberries are rounder and the bulbs of the raspberries are slightly flatter on top. I didn’t UV map the blackberries, because blackberries are mostly blackish in color with a shiny specular skin and they are not translucent like raspberries so there is really no need.
黑色的浆果我使用的是NURBS球 体就像刚才制作的山莓,不过我现在将他们转换多边形,转换了法线,我将浆果里面的球体删除,最后将他们组合起来,这样减少了多边形的面数而且便于选择编 辑。我使用晶格来编辑形体,将球体之间产生的空隙全部盖住,使他们像一个浆果。黑浆果的球茎要光滑一点,比起上面的山莓的球茎来。我没有给黑浆果创建UV,因为黑浆果的主体颜色是黑色的,只有一点光滑的高光而且他们不像山莓那样是半透明的,所以黑浆果不需要UV贴图。
Blackberry and UV
For the blueberries, I used a NURBS sphere, converted it to a polygon so I could texture it better, extruded the edges to make the leaves and of course reversed normals. Then when I positioned them, I duplicated the original, rotated them, flipped some of them upside down, and scaled the size smaller or bigger to make the blueberries look random.
对于蓝色浆果,我同样使用的NURBS球体,这次我将他们转换为了多边形物体,这样我可以更好的为他制作贴图。挤出边来制作叶子,最后翻转了法线。当我排放他们的位置的时候,我复制了很多个原始的蓝浆果,将他们杂乱的放置,缩放他们的形态大小,以起来是具有随机性的,充满生活气息而不是呆板的整齐摆放。
Blueberry and UV
For the pomegranate seeds, I duplicated the polygon seed and scaled it out to create the meat part. I actually didn’t know they were pomegranate seeds in the photo concept. For over a week, I seriously thought they were cranberries even though I couldn’t find the actual fresh fruit in the supermarket, (at least that was what my American instructor told me,) till my Brazilian instructor walked by one day and pointed out what they really were because his country sells them. So knowing exactly what you are modeling and texturing is a very good thing.
对于石榴籽,我是复制缩放的果实部 分。我实际上不知道石榴籽是什么样的。过了一周的时间,我认为石榴是以至于在超市我没有找到新鲜的,(至少我的美国老师是这样告诉我的),直到我的巴西老 师说石榴在真实存在的,因为他的祖国就出口这种水果。确切的了解和明白你所要塑造和绘画的东西对工作是非常有用的。

[LEFT]Pomegranates and UV
Texturing贴图
Before I explain about texturing my project, let me show you the old version of the fruit tarts, my first draft which I posted up on cgchannel. At the time, I wanted to create another food scene that is fast to render with very minimal skin shaders. As you can see it is not photorealistic. In that scene, I used a phong and fractal for the gel custard, a fractal and phong for the blueberries, and a fractal and a misss_fast_simple for the raspberries. Then there are the pomegranate seeds, melons and pineapples that no one can tell apart. It rendered 7 minutes a frame using very little final gather instead of an hour a frame like the Cheese Platter. Although, it rendered really fast, the quality of both the models and textures were not there, didn’t even come close to Ratatouille quality. So I went back and remodeled all the fruits, replaced the melons and pineapples with red and green grapes. I used file textures for everything instead of procedural shaders except the blackberries to have more control in making it photorealistic looking. I also used a misss_fast_skin shader for the custard instead of a subsurface phong, as well as a misss_fast_skin shader for the raspberries and grapes instead of using the misss_fast_simple shader. The misss_fast_simple shader is very basic, renders faster than the skin shader, but doesn’t offer much specularity control to make the fruits wet looking without the use of little transparent spheres.
在我讲解关于我这个项目的贴图工作之间,让我来给你看看我的老版本的水果馅饼项目,我发到CGChannel上的第一个草图。那段时间,我想创建另一个关于食物的场景,利用少量的皮肤Shaders来快速渲染。所以你看这个场景并不是十分的超写实的,在这个场景里,我使用一个Phong材质和fractal节点来制作果冻状的牛奶沙司,一个Phong材质和fractal节点制作蓝色浆果,一个fractal节点和一个misss_fast_simple来制作山莓。剩下的石榴,甜瓜以及凤梨已经模糊的没有谁能看得出来了。这个场景单帧渲染了有7分钟,只用了一点点的Final Gathing,而不像那个Cheese Platter却单帧渲染了有近一个小时。虽然这个作品渲染很快,但是模型和贴图的质量却是一般的,没有接近PIXAR的Ratatouille的那种效果,所以我折回重新制作所有水果的模型,将甜瓜和凤梨替换成了红的绿的葡萄,除了黑浆果之外,剩余的模型我全部使用文件贴图而不是程序Shaders,这样可以有更多的可控性来实现超写实效果。我还使用一个misss_fast_skin shader代替subsurface phong来制作牛奶沙司,同时使用misss_fast_skin shader代替misss_fast_simple shader来制作山莓和葡萄。misss_fast_simple shader非产的基础,渲染比起skin shader来要快,但是他不会提供多的高光效果控制,如果你不再使用一个小的透明的球体的话,就不会出现水果湿润的效果来。
This tutorial is more for people who already know how to set up a skin shader which looks like this.
这个教程对于那些已经知道怎么设置skin shader的人来说是多余的。
If not, read this tutorial from lamrug. Also, it would help if you read my Cheese Platter tutorial as well.
如果你不会设置,那就看看tutorial from lamrug,这样对你阅读我的另一教程Cheese Platter tutorial也有帮助。
For the tray, I used a blinn instead of a mia-material because of the low cost of rendering time. The mia-material requires physically accurate lights like Final Gather and Global Illumination to make it look good and a blinn does not. Depending on the closeness of the camera, a tray with a mia material renders longer than a tray with a blinn. Here is the file I used for the color and reflectivity along with the specular attributes of the tray.
对于盘子,我使用一个Blinn来替代mia-material,因为要缩短渲染时间。mia-material需要真实的物理光影想FinalGathing 和gGobal illumation来使之看起来效果不错,但是Blinn就不需要这个。依据距离摄相机的远近,使用mia-material的盘子渲染时间要比使用Blinn的盘子长一些。下面是对盘子材质的高光属性的颜色以及反射属性的设置。
olor, reflectivity and attributes
For the doily, the biggest picture I can find on the internet was 500 pixels wide with no alpha channel information. So I scaled it out to 2048 and used the magic wand tool in Photoshop to take out the black background. Then I used brightness and contrast and moved the sliders to fill the missing white color of the doily and it looks good as new. I called that my transparency layer which I saved as a targa 32 file. For the bump and reflected color maps, I filled a blank layer with noise, then motion blurred it, duplicated that layer, rotated it 90 degrees and played around with the layer and opacity in Photoshop to create that cloth-like criss-crossed look. Then I merged those two layers which I put the merged layer on top of the beveled doily so the doily will have a pattern for the bump layer. I saved that as a targa 24 file for my Bump map I used a lambert in the beginning, but for some reason, it kept coming out blurry behind the shadows of the crusts. So I changed to an anisotropic material with little specular. Here is the transparency and bump map.
对于桌布来说,我在会联网上找到的最大的图片是500像素的,没有Alpha通道信息。我将它进行了放大,放大到2048,使用Photoshop的魔棒工具将图案与黑色的背景分开。我使用亮度对比调节,将调节滑竿移动来适应丢失了的白色信息,使之看上去像新的一样,我将这个存为一个Targa32位格式的transparency layer。对以bump and reflected color maps,我用噪点(noise)填充了一个空图层,对其进行动态模糊(motion blurred),然后在复制一个图层,旋转90°,然后使用Photoshop的图层模式和透明度工具,对这两个图层进行调整,使之看起来像是纤维那样交叉的。然后我合并了这两个图层,将合并的图层放我将Bump map储存为一个Targa24位格式的文件。我开始是使用一个Lambert材质,但是不知道是什么原因,这种材质在馅饼酥皮的阴影之后总是会出现模糊,我更换了一个带有一点高光的anisotropic材质。下面就是透明贴图和凹凸贴图。
Doily Transparency, Reflected Color and bump map
For the blueberries, I took a piece of the biggest blueberry picture I could find on the internet, and put it all over my UV layout. Then I fixed it up using the clone and healing tool, brightness and contrast, sampled the blue color, filled the top layer with blue and used that as a tint and played around the layer modes. I used a phong with little reflection turned on and used this color map.
对于蓝色浆果来说,我从互联网上找到了一个最大的蓝色浆果的参考图片,我把它全部放在了Uvlayout上,接下来我使用克隆和复制工具来调节他的形状以适合UV,当我将参考图设置完成,我在Photoshop中使用亮度对比工具,反复采样调节蓝色,利用得到的色彩建一个图层再利用图层模式来制作浆果带着白色果霜的效果。我使用一个带有一点点反射的Phong材质和刚才制作的颜色文件贴图。

Blueberry Color
For the tart crust, I had the hardest time finding a high resolution image to create my texture. I even thought about taking a picture of it using my digital camera, but my camera doesn’t have the manual controls to take extremely good detail. So while I was searching for an alternative image for my crust, I found this really high resolution picture of biscuits which has a similar texture of a crust. So I took a piece of it, scaled it out, fixed it up with Photoshop, painted a strip of brownish color for the burnt part for the color map. The bump map is just a simple noise texture. I played around with the brightness and contrast to create the specular map with a black background. I also used this map for the reflectivity of the phong to give the crust details. Reflected Color is gray. Here are the maps of the tart crust.
[LEFT]对 于馅饼的酥皮来说,我耗费了不少时间来寻找一个高分辨率的图片来制作贴图。我一度想用我的数码相机来拍摄一张图片,但是我的数码相机没有办法手动控制来获 得一张非常精细的具有详细细节的图片。当我没有办法,只好寻找一些替代的图片来制作贴图的时候,我却发现了一张高分辨率的饼干图片,用它来为酥皮制作贴 图,使用Photoshop将饼干图片裁切,缩放来使用酥皮的UV,用画笔将斑点一样的浅褐色的酥皮烤酥的地方在Color map上画出来。bump map只是一个简单的添加了噪点贴图,我将Color map在Photoshop中使用亮度对比调节,再加上一个黑色的背景层,就是specular map了。我也使用specular map贴到了酥皮的phong材质的反射率上,以给酥皮带来更多的细节,这个反射贴图是灰色的。下面就是馅饼酥皮的各种贴图。
Tart crust color, specular and reflectivity map
For the blackberries, I used a phong with a procedural fractal shader and played around with the specularity.
[LEFT]对于黑色浆果,我使用一个phong材质和一个程序fractal shader,并且反复的测试调节高光的值。
Fractal from the Hypershade and attributes
The pomegranate seeds had two layers. There is the whitish tip inside the pomegranate seed and a reddish transparent outer skin of the seed. This is the probably the hardest fruit I have ever textured, since I couldn’t find it in the supermarket of my last residency, and most people I know have never seen the actual fruit so they really couldn’t tell what they were on my tarts nor on the photo concept. For the whitish part, I used a surface shader with a small glow. For the outer part, I used a transparent phong.
石榴籽有 两个图层,分别是里面浅白色的末端和外面淡红色的透明表皮,也许石榴籽是我曾经制作过的水果贴图中最难的了,从我在我居所附近的超市里找不到石榴,到我知 道的大多数的人们从来没有亲眼见到过真正的石榴是什么样子的,所以他们不知道那是什么东西在我的馅饼,也不知道参考图里面是什么。对于里面浅白色的末端, 我使用一个surface shader 链接一个小的 glow,对于外面淡红色的透明表皮,我使用一个透明的phong材质。
Pomegranate Color, Pomegranate Roughness, Pomegranate seed out color and out glow
Custard is yellowish in color, with a high specularity and some reflection. I cloned a piece of custard color, painted the entire layer with that color, added some noise and Gaussian-blurred it. For the specularity maps, I used a noise filter and painted it with a white brush and added a tint of light blue in the color balance of the attribute. And I used a skin shader for the photorealistic look.
[LEFT]牛奶沙司是淡黄色的,带有明显的高光和一点反射,我从参考图中复制了一点牛奶沙司的颜色,将其填充满整个图层,再加上一点噪点,最后高斯模糊一下。对于高光贴图,我使用噪点滤镜,使用白色刷了几笔,最好在色彩平衡里面调节,使图片偏一点淡蓝色。我使用了一个skin shader,便于创建超写实效果。
Custard color map and 2 specularity map
For the grapes, I took a piece of a grape image, scaled it, used brightness and contrast, level and blurred it. I did the same with the raspberries, except I used a white brush and painted the center for that powdery look. Here are the textures I used for the Red grapes, Green grapes, and Raspberries.
葡萄的材质和贴图是我找到一张葡萄的图片,将其缩放,使用亮度对比调节,色阶对比。我对树莓的贴图也是这样操作的,除了在图片的中间用白色画笔,下面就是我为红、绿葡萄还有树莓画的贴图。
Red grape textures
Green grape textures
Raspberry textures
To make a fruit fresh and wet looking without waterdrops不用水滴就能表现新鲜水果的质感
It is very simple really; all you need is a black and white noise file with a tint of light blue for the color balance for the secondary specularity attribute and a little bit of reflection. On the left is a red grape with the default secondary attribute which means no file texture. On the right is a grape with the noise file texture for the secondary specularity attribute. Next is the added reflection.
[LEFT]其实这个很简单,你只需要一个黑白色做成的噪点图像文件,然后色彩平衡中使之偏一点淡蓝色,将这个贴图添加给secondary specularity以及添加一点reflection,左边的图片是使用默认的secondaryspecularity,就是没有图片文件,中间的是secondaryspecularity使用了噪点贴图文件的葡萄的图片,右边是再中间图片的基础上给添加了reflection.的效果。
Lighting灯光
I used 3 Point Lights, 2 Area Lights and an HDRI. The main light is the back light with an orange color to represent the sun coming into the room hitting the surfaces of the fruits. Then I add a low intensity Area Light hitting the side of the raspberries with the same orange color as the back light. I had that Area Light light-linked to the selected bulbs of the raspberries, which I named litballs, as well as the custard of that tart to give that realistic look.
我使用了三个点光源,两个面光源,以及一个HDRI。主光是一盏橘黄色背光,再现阳光从窗户射进来,照射水果的表面的情形。所以我添加一盏低能量的也是橘黄色的面光源,从树莓的一边照射过来,我将这盏面光源与树莓的球茎连接起来,还有馅饼的牛奶沙司,这样能塑造出一个超写实的效果。
Skin shader is a very processor-expensive node if you are not using it to texture a character. Food is more translucent than human skin, so the values in the attribute of the skin shader are a lot higher, along with the scale conversion as the more translucent it is, the more noise you will see. So you have to add higher values in the scale conversion to balance it. You can adjust the lightmap as well, if you want smaller values in the scale conversion. The skin shader can only take so much before it gets corrupted by tweaking it for so long. It turns black in the hardware view. And if that happens to you, either open the same scene without saving it, or use a fresh node and copy and paste the attributes from the old node to the new node.
Skin shader是一个很耗费机器运算的材质节点,如果你不是给一个角色贴图的话,劝你不要使用它。食物比起人类皮肤来有更大的半透明属性,所以设置skin shader的值比起人类皮肤来要普遍的高一点,像scale conversion,材质的半透明效果越多,就会出现越多的噪点,所以你不得不设置较高的scale conversion来平衡噪点,你也可以调节lightmap,如果你想scale conversion的值比较小一点。
skin shader
Back to lighting, I added a point light with a reddish raspberry color inside each of the raspberries to enhance the translucencies. I also added a low negative point light of -2 to absorb the lights and enhance the shadows at the front right between the raspberry tart and the pomegranate tart. Be careful with the use of the negative light as it is more expensive than a positive light. In addition, it makes the neighboring textures bleed if the intensity is too high. So use very little.
[LEFT]回到灯光讲解里来,我在每个树莓的空腔里面添加了一盏带有树莓的淡红色颜色的点光源,以此来增进半透明的效果。我还添加了一个低数值为-2的吸光灯在树莓蛋挞的右前方和石榴蛋挞之间,用来增进阴影的效果。谨慎使用负值的灯光,也就是吸光灯,它占用的资源比正常的灯光要多,而且如果数值设置的较高的话,它会使靠近它的贴图产生不佳的效果,所以这种类型的灯光用的比较少。下图是使用数值为-10的吸光灯产生的效果。
Image with the negative light of -10
Rendering渲染
Final Gather is technology bounced light. It is cheating, but it looks great; however, you are stuck rendering straight out of Maya instead of layers and it makes render time very expensive even if you freeze the final gather points. Another downside is that when you render at 50% resolution in the render view, the quality of the image looks deliciously perfect, but does not at 100% resolution. That means it needs more Final Gather points. In the beginning, I was using 300 Final Gather points, and it was giving my tart crusts blotchiness because the material was a phong. I even turned on “jitter” in the Render Settings. I had troubleshot it to the point that I wanted to give up, then finally I decided to Google my issue and it turns out that someone else has the same blotchiness problem with Final Gather as I do. And he solved it by using an insane number of Final Gather points and a point interpolation of 12. I tried to render out 500,000 Final Gather point accuracy at 72 dpi at 2500 by 1406 resolution, but on the third day, it crashed. I wanted that 50% resolution look from the render view and I got way too greedy for Maya and my processor to handle. So I rendered the FG points in half of the original and it took 3 days to render just the FG points. And I am still not satisfied.
Final Gather是一个技巧性地反射灯光,虽然有点作弊,但是不管怎样,它产生的效果是很好的,如果你迷恋于直接用MAYA渲染出一切效果,而不是分层渲染的话,那么渲染时间是很可观的,即使你把Final Gather采样点冻结,仍是如此。另外一个缺点是,当你在50%的分辨率的渲染视图渲染的时候,图像质量看起来非常美妙,但在100%分辨率的视图里就 不是这样了,那意味着你需要增加更多的Final Gather采样点,在开始的时候,我使用了300的Final Gather采样点,由于蛋挞的材质是Phone类型,因此得到很多的斑块,我甚至在渲染设置中打开了 “jitter”选项,我不能达到我想要的效果,因此我决定放弃了,最终我决定Google搜索一下我遇到的问题,结果发现不少人在使用Final Gather的时候遇到了和我一样的问题,他的解决方法是设置一个疯狂的Final Gather采样点数,然后每个点的插值设置为12,我我试着使用500,000 的Final Gather采样点数渲染出2500 X 1406,72dpi的图像,但在渲染到第三天的时候,它崩溃了,我希望在渲染全尺寸的时候得到50%分辨率大小时一样的质量,同时MAYA和我的处理器 还能够挺过去,因此我使用原来一半的FG采样点数来渲染,即使这样,它都花了整整3天时间来仅仅渲染出FG的采样点,而且,我还是对结果不满意。
Here is my 23,958 KB Final Gather Points
这里是我的23,958KB的小的Final Gather的采样点
FG Points
Here are the render settings I used with a Final Gather Bounce of 2.
这是是我使用Final Gather 反弹次数为2的渲染设置

Occulsion 遮挡
The only geometries that need to be dark or slightly darker are the tray, blueberries, black berries and crust. I used a total of 6 occlusion nodes with different values. If you use too much occlusion on the custard, it will look plastic.
唯一需要表现出阴影或稍许阴影的物体是场景里的托盘,蓝莓和黑莓,以及酥皮,我一共使用了6个采用不用设置的遮挡材质,如果在蛋奶糊上使用过多的遮挡效果,它看上去就像是塑料了。
Occlusion
Depth of Field景深
I have to confess, I got help on this part. The lab instructor at the time, noticed that my image was missing a Depth of Field or ZDepth and suggested that I render it out straight out of Maya. Before I knew it, it added an extra 15 minutes per frame. I didn’t think about optimizing my scene at the time, so it was actually rendering twice as long. Anyway, a colleague of mine, Daniel Schrepf, came to my damsel in distress as a returned favor. He suggested that I render the ZDepth separately using a surface shader, and project a ramp texture onto the scene and then composite the final and occlusion in Shake. The best part was that it rendered out really fast.
我不得不承认,在景深这个部分,我寻求了帮助,恰好学校的导师注意到了我的作品缺少景深,并建议我直接在Maya里面把景深渲染出来,但我知道,这会给每一帧增加额外的15分钟渲染时间,我还没有考虑优化我的场景,因此实际上它等于要被渲染两次那么长的时间,无论如何Daniel Schrepf,我的一位同事注意到我的麻烦并给我提供了帮助,他建议我使用一个surface shader单独渲染ZDepth 通道,然后把一个ramp材质投射到场景里面,,然后在Shake里面合成最终的遮挡材质,最好的部分是这么做渲染起来实在是非常快。
(注意,红字部分的技巧,如果你想进一步了解的话,请看AboutCG的免费教学:Maya Z通道的解决方案:http://cn.aboutcg.com/290/ )

ZDepth image
Final Image最终效果
The final image still needed more shadow at the front, so I drew a line under the raspberry crust and Gaussian-blurred it and voila, one photorealistic image of Fruit Tarts.
最后的效果图我发现图片的前面仍然是需要更多的阴影,所以我在树莓蛋挞的下面画了一条线,将线进行了高斯模糊,超写实的水果蛋挞图就完成了
Final Render
Final Composite


推荐相关中文教程

《大猿王传》电影级别动画短片系列教学第二部:大猿王贴图篇
学完本套教学以后将能够理解自然界物体贴图的规律,不再局限于照片贴图的投射方式画贴图,能够高效率的完成大分辨率超多UV象限的UDIM模式贴图的绘制,制作出真正电影级别的贴图并且够理解Liner线性工作流程的原理,在工作流程灵活高效的完成贴图以及渲染工作。Maya绑定技术精解教程机器人绑定完全教学
本套教学还会讲解在绑定中如何结合python,大大提高绑定效率,与人物不同,机械类的绑定往往需要联动的效果,并且四足的设置也与人物不同,需要结合多套IK的特性和设置达到最终效果Maya绑定技术精解教程进阶篇角色身体绑定
本套教学基于初级人物绑定基础上增加了IKFK拉伸,肘部锁定,IKFK共存,无缝切换等大家迫切想要了解的知识,并结合作者经验,让大家快速掌握这些非常有用的技能。《大猿王传》电影级别动画短片系列教学第一部:大猿王模型篇
教程中涉及的技术流程都是现在影视公司比较流行的技术,掌握了这一系列教程中的技术能帮助CG从业者在公司更好的工作。对于CG专业的学生来说,学会了这套教学的技术能更好地完成毕业设计,做出更好的演示作品,找到自己满意的工作。3DSMAX零基础入门及建模实战中文教学
全套教学大大小小的案例总共有17个,从最简单的杯子到最复杂的角色,从硬表面到生物角色都有包括,全套教学接近40小时,3dsmax2016以及以后的版本都适合。Maya高精度建模全案例实战教程进阶篇
本教程是maya影视建模的实战教程,作者教授了多年的影视模型制作工作经验。使用maya的建模工具完成武器,场景,道具,角色等高精度的多边形模型的建模。这类模型的制作能力在影视制作,游戏制作中,都是必备的。也是所有CG从业者的必须技能。CARBON SCATTER FOR MAYA景观插件完全教学
本套教学是由MG录制。从CarbonScatter的每一个功能入手,让你从零基础开始熟悉并且掌握Carbon Scatter的使用技巧。写实女性角色制作全流程高级案例教程
本教程是超高质量的写实角色肖像制作完全流程,教程从基础模型搭建开始,演示了一个写实欧美女性的制作全流程,教程保留了所有技巧的关键节点,全面呈现制作这种写实类型角色的技巧和流程。希望制作写实角色肖像的用户将从中学习到大量的高级技巧。


推荐课程


推荐教程

0回复照片级别的食物制作"