本教学为翻译教学,转载请注明来自aboutcg.net,以及注明翻译者
原教学出自EVERFLOW STUDIOS网站,原始链接如下:
http://www.everflow.com/support/tutorials/AO/Everflow_AmbientOcclusion1.html
作者:Bruce
Email:webmeister@everflow.com
翻译:freeyy
关于译者:

请尊重互联网道德,转载请注明转载出处和翻译者,谢谢!
这是个系列教程,我今天翻译了第一部分,后续的我会尽快翻译出来。虽然是05年的东西我还是觉得这些基础知识还是我们这些CG人该了解和掌握的~~

There are many uses for the Ambient Occlusion shader, one being to accentuate details/edges and increase the realism of 3d renders. This occlusion is also known as the ‘dirtpass’ or ‘dirtmap’. The pass renders quite quickly and since it is a Global Illumination (GI) solution, it is an excellent tool when time is of the essence, and GI quality is required.
环境遮挡着色器有许多的用途,其中之一是用来增强细节/边缘 以及增加三维渲染的真实感。这里的 遮挡同样也是已知的“污垢处理”或者“污垢贴图”。渲染过程非常迅速并且因为它是一个全局光照(GI)的解算结果,所以当时间紧张时,它就是一个优秀的工 具,并且对于 GI 质量来说它也是必须的。
I will not go into the details of the science behind the magic, simply put; ambient occlusion fires rays into the scene at various angles from various points on the geometry, and determines which rays are blocked by other geometry, and creates a visual representation of the occlusion. The closer the occlusion, the stronger the representation.
我将不会深入探讨科学技术背后的魔法,仅做简单的叙述;当环境遮挡初级光线从几何体的不同出发点以不同的角度投射到场景中,随后将检测那些光线被另一个几何体所遮挡,最后会为遮挡简历一个视觉上的反馈。靠近的遮挡将表现出更强烈的反馈。
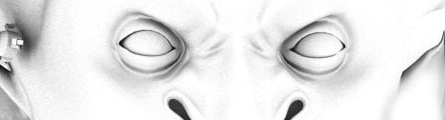
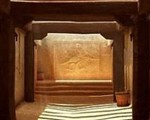
Below are 3 spheres over a plane. You can see the strength of the occlusion is dependant on the distance to the plane. If you look closely, you can see the spheres also are ‘casting’ occlusion upon each other.
下面是在一个平面上方的三个球体。你可以看到遮挡的强度将依赖于平面的距离远近。如果你观察近处,你可以看到球体与另外一个相互“投射”了遮挡。

Overview:
概述:
We will render our image normally, and save the result. This can be done using any renderer, default scanline, radiosity, mentalray etc. Next we will assign all the objects in our scene the occlusion shader. We will composite the two resultant renders in a third party application. In this instance, since it is just a still, we will use Photoshop. Any video editing package will allow you to composite them for animation as well.
我们将正常的渲染我们的图像,然后存储结果。这可以通过 任何渲染器来办到,缺省扫描线、光能传 递、mentalray等等。下一步我们将为在我们场景中的所有物体指定遮挡着色器。我们将在一个第三方的程序中合成两个渲染结果。在这个例子中,因为它 仅仅是一幅静态的画面,所以我将使用 Photoshop。任意的视频编辑模块也将允许你为了动画而合成它们。


Step 1: Render Scene
步骤一:渲染场景
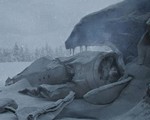
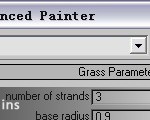
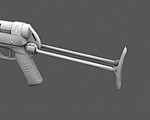
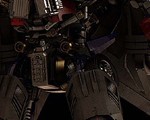
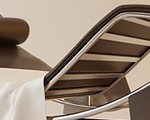
There is no need for any preparation, simply render your scene as you normally would. In this instance I created a simple greeble wave, rendered with default lighting.
这里不需要任何的准备,至于需要按你的标准来渲染你的场景。在这个实例中我创建了一个简单的建筑波浪(译者:用 Greeble 插件做的一个波浪城市小厂家),然后用缺省的照明进行渲染。

Step 2: Assign MentalRay as your renderer
步骤二:指定 MentalRay 作为你的渲染器

Step 3: Create a MentalRay Material.
步骤三:创建一个 MentalRay 材质。

Step 3: Click None in the surface parameter slot, and select Ambient/Reflective Occlusion to create the base shader.
步骤四:点击 surface 参数内的 None 贴图按钮,然后选择 Ambient/Reflective Occlusion 来建立基础的着色器。

Step 4: You now have your base ‘dirtmap’ shader. Read on for an explanation of the base parameters relevant to our cause.
步骤五:你现在拥有了你的基础“污垢贴图”着色器了。为了理解与我们目的相关的基本参数的解释请继续阅读。


Samples: determines the quality of the solution, the more the better. Tradeoff is rendertime.
采样:确定解算结果的质量,越高质量越好。不过要考虑渲染时间。
Bright/Dark: sets the colors for the extremes of the shader. For our purposes, we will leave the defaults of black and white.
亮色/暗色:为着色器的终点(译者:这里指遮挡检测结束后的结果)设置颜色。为了我们的目的,我们将保留缺省的黑色和白色。
Spread: this value sets the level of diffusion of the occlusion. If the default value leaves your render ‘loose’ you may reduce this value to ‘tighten’ the solution. Similar to the level of a Gaussian Blur filter in Photoshop.
传播:这个数值设置遮挡的扩散级别。如果缺省的数值让你的渲染太过“松散”那么你可能需要减少这个数值来“聚拢”解算结果。它类似于 Photoshop 滤镜中 高斯模糊滤镜的效果。
Type: again, we leave this at default, 0, which is occlusion.
类型:再次,我们使用了这里的缺省值,0,它将产生遮挡。
Step 5: Assign the shader to all your scene objects. One sweet way to accomplish this is by using mental rays Material Override. Under the processing tab dwells the Material Override slot. Drag your material from the editor, or select it by clicking the Material Override slot, and selecting it from the editor.
步骤六:为你场景中的所有物体指定着色器。一个方便的方 法在这里是利用 mental rays 的材质覆盖。在 processing 标签的下面的 Material Override 贴图按钮。从你的材质编辑器里拖拽材质到这里,或者通过点击 Material Override 贴图按钮来选择它,然后选择从编辑器中选择它。
The benefits of this technique are that you do not have to edit your scene materials, simply toggle Enable, and that shader overrides all the objects in the scene.
这个技巧的好处是你并不需要编辑你的场景材质,简单的打开 Enable 勾选框,然后着色器就会覆盖你场景中的所有物体。

Step 6: Set your environment background to white.
步骤七:把你的环境背景设置为白色。
Depending on your scene specific/quality needs, you may want to raise the Samples per Pixel in the Render Scene dialog.
依赖于你对场景的特别之处/质量的需要,你可能需要在渲染场景对话框中增加每像素的采样。

Render the image.
渲染图像

Step 7: Composite
步骤八:合成
In Photoshop, copy the Occluded image and paste it on a layer over the Diffuse pass. Set the Occlusion layer to Multiply. Adjust the opacity as you see fit. Click save. Dance a jig.
在 Photoshop中,拷贝遮挡图像,然后把它作为一个层粘贴到漫反射结果的上面。把遮挡层的图层模式设置为叠加。调整透明度直到你觉得合适为止。把它存储。起身跳支舞………

This is just one use for this most excellent shader, you may add it to other material slots as well as incorporate it into your lights. It is fast, simulates Global Illumination and is highly customizable. Have fun!
这仅是这个非常优秀的着色器运用的一个方面,你可以把它添加到其它的材质通道中,也可以把它包含到你的灯光里。它可以快速模拟全局光照并且能够完全的自定义。玩的开心!
Read on for further options and other uses for this most excellent shader.
为了更多的选项以及这个非常优秀的着色器的其它用途请继续阅读。


推荐相关中文教程

3DSMAX动力学特效实战教学
本套教学将通过24章实例教学,来向你详细讲解3DSMAX的动力学特效在电视包装与广告中的应用。3DSMAX国外粒子案例效果解析
本教学通过27个实战案例,教您如何用3DSMAX结合ParticleFlow本身以及扩展的ParticleFlow Box 1、Box 2、Box 3、功能包,结合Vray渲染器,来制作流行的广告和电视包装中的粒子特效效果。无论是常见的粒子聚合,分散,动态粒子替换,粒子矩阵,粒子动力学,本套教学都有相应的案例。3DSMAX国外流体案例效果解析
本教学通过20个实战案例,教您如何用3DSMAX结合Realflow,FumeFX, ParticleFlow插件,来制作流行的广告和电视包装中的流体效果。无论是常见的液体,烟雾,流体碰撞,沙粒变化,水墨表现,本套教学都有相应的案例。2.5D商业游戏场景制作教程 进阶篇
在本教程中,Freeyy老师将从零开始,向你讲解如何根据确定的主题进行前期准备,随后建模,绘制贴图,制作材质,最后再进行细节调整,完成一个商业游戏级别的2.5D场景画面。Mentalray for max实战教程
本教程共包含超过42小时以上的视频教学内容,共18章 132课,通过大量实例,详细讲解了3ds Max平台下的Mental Ray1渲染器的使用基础和实战方法。是一部非常完整详细的3dsMax版的Mental Ray渲染器的教学.网游角色制作女精灵实战教学
本教学以一个AAA级网游女精灵角色为案例,向您展示如何完成她的模型,UV,和贴图绘制。教学使用的软件主要是3ds max和 bodypaint, 其中建模和UV使用3ds max完成,贴图绘制在bodypaint和 PS中完成。


推荐课程


推荐教程

0回复如何使用AO贴图来增强细节1"