

原文:http://www.3dm3.com/tutorials/chaleur/index.php
作者:
Mohammed Khalil
a1future@hotmail.com
翻译:StoneBird(aboutcg.net)转载请注明出处。

Reference:
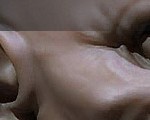
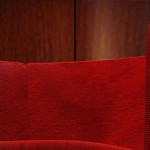
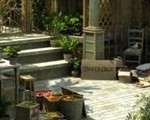
I was looking for some references that could help me put things together. Basically I was aiming for a dramatic shot of an ancient passage, and so after doing some research I came up with these references:
参考图:
我需要一些参考图来梳理我的想法。我想创建一张古老小径的景观,所以搜索了一番得到以下参考:

Reference:
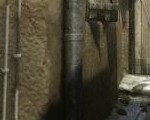
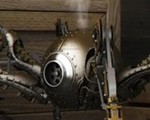
I was looking for some references that could help me put things together. Basically I was aiming for a dramatic shot of an ancient passage, and so after doing some research I came up with these references:
参考图:
我需要一些参考图来梳理我的想法。我想创建一张古老小径的景观,所以搜索了一番得到以下参考:

Now it is the perfect time to move on and model all the details you want to have in your scene:
现在可以去做场景里的细节了:

Since it is an ancient scene that we are after, it is a good idea to give your models an irregular shape. This can be done easily by adding more polygons to places where you want it to look and feel old, and then adding Noise modifier with reasonable values. It might look a bit exaggerated in viewports, but you have to put in mind the distance from camera, and GI calculation which blurs details due to interpolation:
因为这是个有年头的地方,所以模型最好不要整整齐齐的。只要在你想要表现古老风格的地方多加点多边形就行了,之后加上 Noise 调节器。在建模器里看起来效果可能有点夸张,但是你得记住相机离这些细节是有距离的,而且全局光也会因为插值计算模糊这些细节:

More tiny details were added with the aid of Cut tool:
用 Cut 工具制作更多小细节:

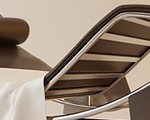
As for the awning (sunshader), I’ve used Cloth modifier. It started out with a simple plane, with enough segments to deform properly in simulation. Two cylinders were positioned below the plane to give it a shape of an awning stretching over a structure of support posts. In order to give it some wrinkles and folds, I’ve added Vol. Select modifier and on the vertex selection level I’ve selected areas where folds will most probably be. Soft selection had to be turned on to make it right. Wave modifier was added at the top of Modifier Stack. You can play around with values until you are happy with the result. To fine tune it even more, Noise modifier was used with a low value in Scale:
遮阳布的处理上我用了 Cloth 调节器。先做一个基本平面,多细分几次让它能变形得真实一点。两个圆柱体放在下面模拟搭布的架子。为了让它有点褶皱,我加上了 Vol. Select 调节器,然后选择折痕做可能出现的地方的点。打开 Soft selection 选项,让它得到正确的效果。在调节器栏最上方加入 Wave 调节器。试试各种参数,直到你满意为止。我还用了 Noise 调节器以便得到更真实的效果:

Texturing & Unwrapping
We are going to use Unwrap UVW to texture our objects in the scene. The process is mostly the same for all objects, for that reason I’m going to take this object as a sample:
贴图&展UV
我们要用 Unwrap UVW 来给模型上贴图。这个过程对每个物体都差不多,所以我只举其中一个作为例子:

Select planar faces and apply Planar map:
选择平面,创建平面贴图:

I had to unwrap the UVs for the door step, the inner part of windows and doors separately and then stitch them together. After positing UV groups next to each other, this is how it’s going to look like in the Edit window:
我得为楼梯、窗户内表面和门分开展UV图,然后把它们缝到一起。一系列操作之后的结果:

There’re no tricks to it, just simple and straightforward unwrapping! Now we can take our UV template to Photoshop and paints our textures. I’m using 1500*1500 resolution for this part. I’ve used some textures that I found in my library. Here is a sample of what I got:
这里没有投机取巧的办法,该怎么做就怎么做。之后就可以导入到Photoshop里画贴图了。我的贴图用了1500*1500的分辨率,并且用了一些我图库里的现成贴图:

Using regular techniques in Photoshop, I’ve ended up with this:
在Photoshop里面鼓捣一番,结果如下:

Other objects in the scene had Alpha Masks and Displacement Maps:
其他物体都有 Alpha 遮罩和位移图:

All plants are simply textured with a mask in opacity slot, to cut down on RAM usage.
植物什么的只是画贴图之后加了个遮罩,这样能减少内存消耗。
Lighting
One emitter (Spotlight) was used to light up the scene.
灯光
只用一个 Spotlight 照亮整个场景。

As you can see, I have created some boxes to block the light in certain places, allowing for more shadows to cast. By turning the viewport to Spotlight, you can manage to see which parts of your scene are exposed to light:
你也发现了,我做了几个大方块来阻挡某些地方的光照,这样能得到更多的阴影效果。旋转 Spotlight 视角你就能知道什么地方能被照到:


You can find the settings of the Spotlight used in the scene below:
下面是光照设置:

The GI Environment has a light blue color. I was experimenting with different shades of colors, and I found this to be most suitable:
全局光的颜色是淡蓝色。我试了几种不同的色调,觉得这种最好:

Rendering
I used V-ray 1.5 as a rendering engine, and rendered with a VrayPhysicalCam:
渲染
我用的是 V-ray 1.5,相机是 VrayPhysicalCam:

It is all about testing with different values in f-number, shutter speed and ISO. Vignetting was turned on to make corners darker. When you are testing, it is advisable to render at low settings and at low resolution for quicker renders, and when it is time to render the final scene you can pump your settings up. I’m using Linear workflow in V-ray, these are my settings:
剩下的工作就是调试焦距、快门和感光度。打开渐晕效果使整个场景边角部分更深。测试的时候最好把设置和分辨率调低一点,这样又快又好。定下来之后再玩儿真的:

My PC couldn’t handle a 1200*1600 render, so I had to use region rendering and then stitch all the render pieces up in Photoshop. Glow and Sharp filters were added in post production. Here is the final render:
我的电脑搞不定1200*1600分辨率的渲染,所以我得一小片一小片地渲然后在Photoshop里面给拼起来。之后又加上了光晕和锐化效果。这是最终结果:


推荐相关中文教程

3DSMAX动力学特效实战教学
本套教学将通过24章实例教学,来向你详细讲解3DSMAX的动力学特效在电视包装与广告中的应用。3DSMAX国外粒子案例效果解析
本教学通过27个实战案例,教您如何用3DSMAX结合ParticleFlow本身以及扩展的ParticleFlow Box 1、Box 2、Box 3、功能包,结合Vray渲染器,来制作流行的广告和电视包装中的粒子特效效果。无论是常见的粒子聚合,分散,动态粒子替换,粒子矩阵,粒子动力学,本套教学都有相应的案例。3DSMAX国外流体案例效果解析
本教学通过20个实战案例,教您如何用3DSMAX结合Realflow,FumeFX, ParticleFlow插件,来制作流行的广告和电视包装中的流体效果。无论是常见的液体,烟雾,流体碰撞,沙粒变化,水墨表现,本套教学都有相应的案例。Substance Painter 贴图绘画系统完全教学
我们的这套教学就是从一个个鲜活的案例入手,让你从零基础开始熟悉并且掌握 Substance Painter 的全流程,不论你是Maya,Max亦或者是Zbrush的用户 ,在这里都会找到如同Photoshop般的友善操作舒适性,直接在模型上绘制出各种物理属性,就像镀铬金属,锈蚀污浊的墙壁,嫩滑的皮肤,从多个案例中让你掌握这套简便快捷的材质制作流程。2.5D商业游戏场景制作教程 进阶篇
在本教程中,Freeyy老师将从零开始,向你讲解如何根据确定的主题进行前期准备,随后建模,绘制贴图,制作材质,最后再进行细节调整,完成一个商业游戏级别的2.5D场景画面。Mentalray for max实战教程
本教程共包含超过42小时以上的视频教学内容,共18章 132课,通过大量实例,详细讲解了3ds Max平台下的Mental Ray1渲染器的使用基础和实战方法。是一部非常完整详细的3dsMax版的Mental Ray渲染器的教学.网游角色制作女精灵实战教学
本教学以一个AAA级网游女精灵角色为案例,向您展示如何完成她的模型,UV,和贴图绘制。教学使用的软件主要是3ds max和 bodypaint, 其中建模和UV使用3ds max完成,贴图绘制在bodypaint和 PS中完成。


推荐课程


推荐教程

0回复“温暖与和平”的制作流程"