Fembot – Making Of
翻译:menboy2003(本站翻译小组成员)
原文:http://www.isaacoster.com/?page_id=1904
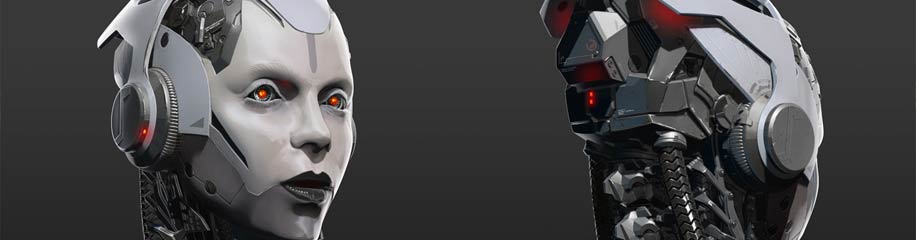
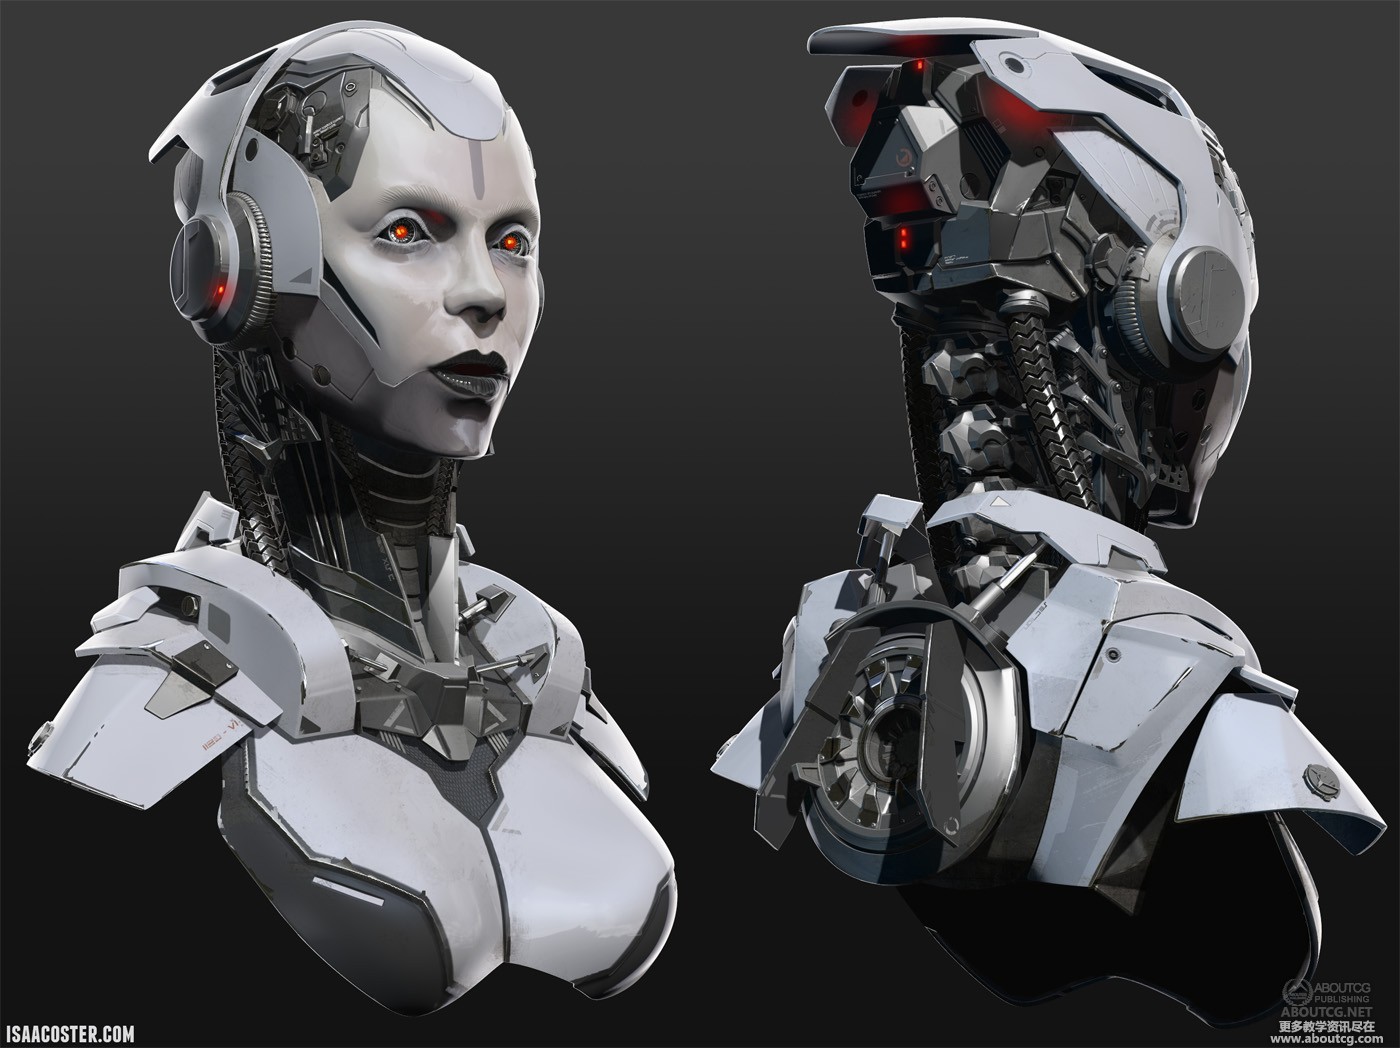
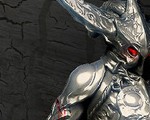
I love Darren Bartley’s work, and this piece in particular. I’ve posted a few images below describing the process that went into creating the final piece.
我喜欢Darren Bartley的作品,尤其是这个作品。我贴出了一些图片来展示创作完成的过程。
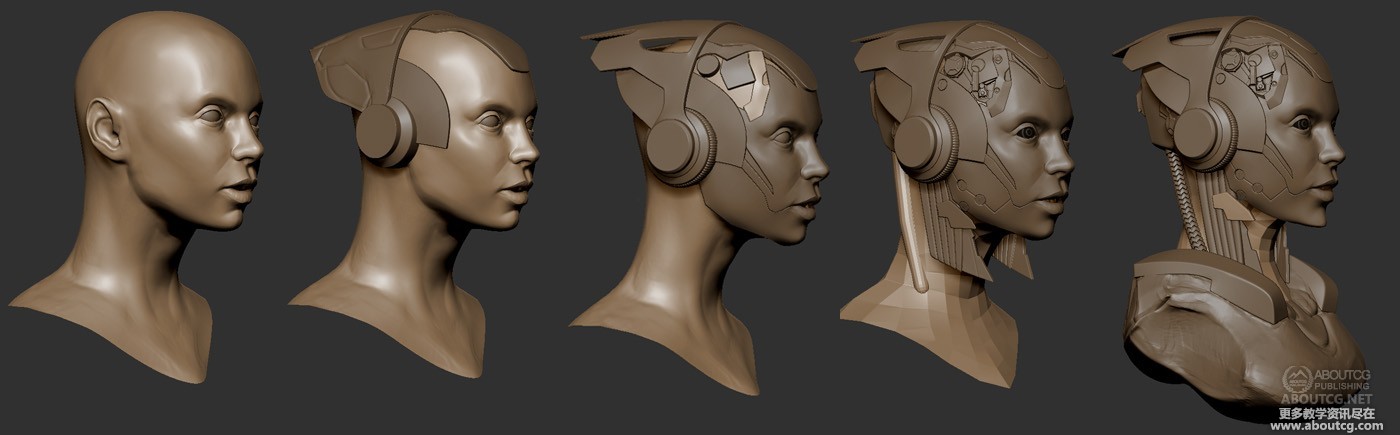
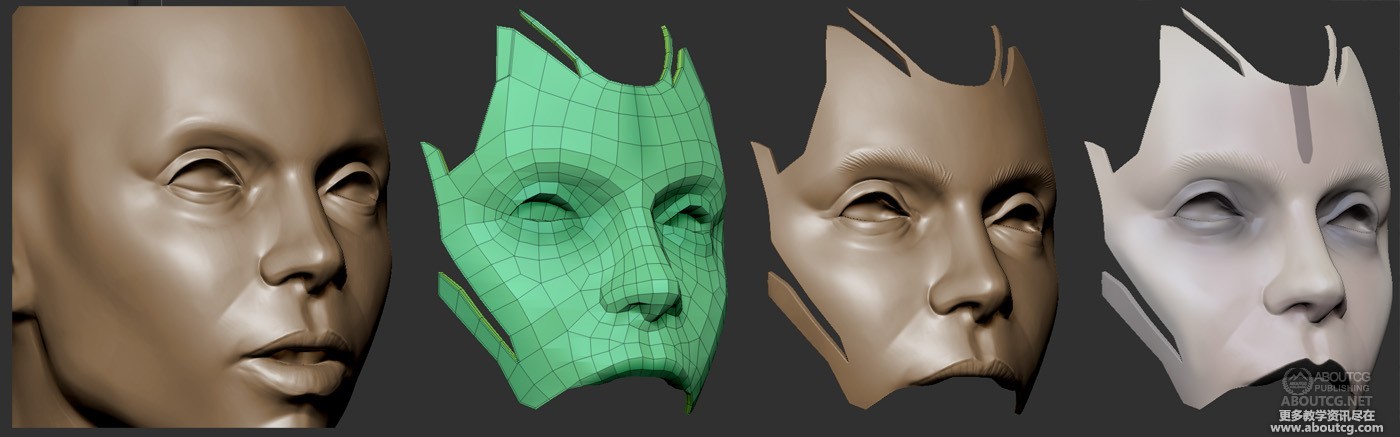
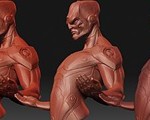
Here are a few shots of the initial modeling process. I start by modeling the head, and add paneling and replace existing geo using retopology and creasing. This is my go-to process for a lot of modeling, hard surface or not. Use whatever initial geometry you want, sculpt it into a scaffolding to support clean, low poly retopology. The scaffold geo doesn’t have to be perfect, it just has to have geo where you want to retopologize. When you create your preview mesh, give it a little skin thickness, and viola. Crease the edges that need creasing, and move on. To start the head, I’ll usually just create simple tube from 3 zspheres. Using move, dam_standard, and flatten (4r4), I get the head shape roughed in. It’s really hard to get the eye lids, lips, and other fine detail sculpted without doing a quick retopology of the mesh. The mesh 2nd from the left is retopologized.
这里有几张初始建模过程图。我开始建头部,并使用retopology和creasing添加panel并替换现有的几何体。这是我用来一般建模的过程,硬表面或者其他模型。用你想要的任何初始几何体,雕刻成一个框架模型来支持整洁的低模重拓扑。框架模型不一定是完美的,在你想要重拓扑的地方有几何结构即可。当你创建了预览模型,稍微给它一个厚度。给需要的地方crease,然后继续。雕刻头部,我通常只通过3个Z球建立。使用move,dam_standard,flatten(4 r4)笔刷,我得到头部形状大型。在不做一个重拓扑之前,真的很难得到眼皮,嘴唇,和其他细节雕刻。从左第二个模型是重拓扑过的。

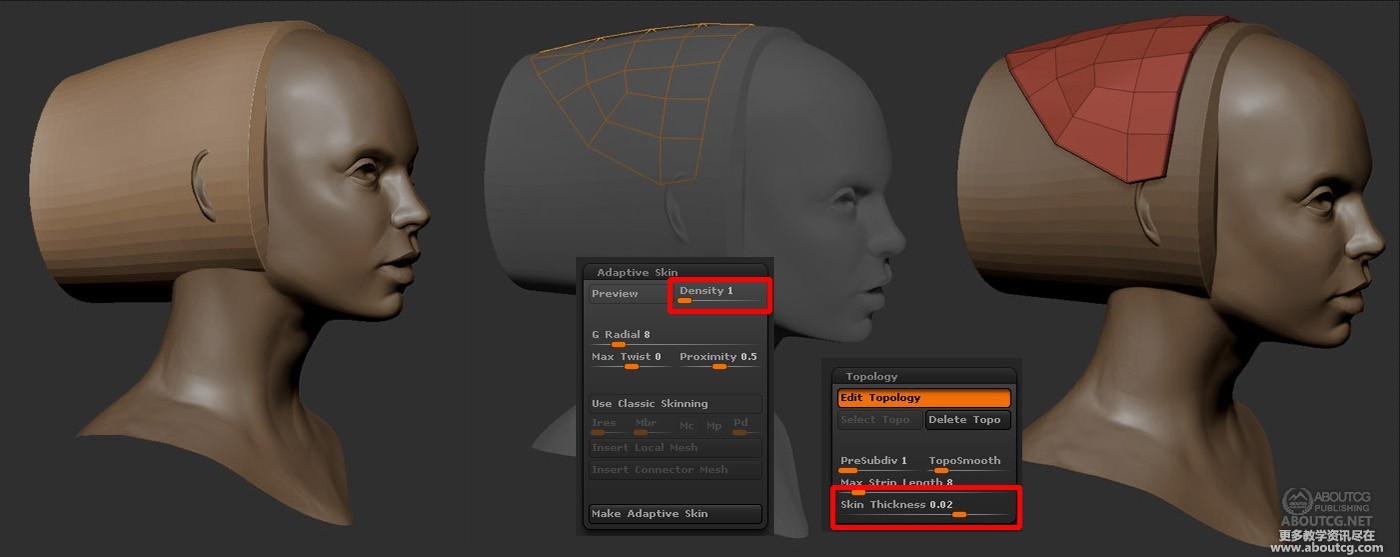
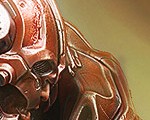
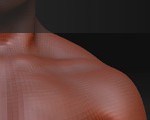
Once the base head is done, I start adding the first panel. As I mentioned above, I need geometry to use as a scaffold for retopology. To start the top piece, I appended a cylinder, positioned it in the middle of the head, and retopologized the rough shape of the panel. Once that was done, I gave it some skin thickness (essentially just an extrusion). Skin thickness lives in the topology menu, which is only available when a zsphere is selected. It is also important to set the adaptive skin density to 1 – the default setting is 2, which will subdivide the resulting mesh and smooth out the corners. After previewing the mesh (the ‘a’ key), I made it a PolyMesh3D and appended the new geo to the subtool menu.
完成了基础头模,我开始添加第一个panel。正如我上面提到的,我需要一个几何体作为重拓扑的框架模型。开始前,我附加一个圆柱体,定位在头中间,然后粗略重拓扑出panel的形状。这项工作完成之后,我给了一些skin thickness本质上只是一个挤压)。Skin thickness在topology菜单,只有当Z球被选中时可用。同样重要的是设置adaptive skin density为1 -默认设置为2,这会将生成的网格细分并消除角落。在预览网格(“a”键)之后,我将它转为PolyMesh3D并将新的几何体附加在subtool菜单。
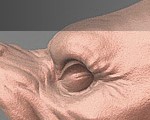
At this point, I need to crease the edges. Creasing tells Zbrush to preserve the edges for a specific number of subdivisions. It’s similar to adding a turbosmooth modifier in 3DS Max and telling it to preserve smoothing groups. There are two main parts to the crease settings to pay attention to. The first is CTolerance, aka crease tolerance. The number represents the angle two faces meet at. To be honest, I’ve never worked out exactly what the relationship is. I don’t know if its measured from the inside of the face or the outside. Functionally, the higher the number, the less sensitive it is. At 180, the default setting, it ignores all angles and only creases open edges. I use the Select Lasso to isolate each face or group of faces with edges I need to stay sharp. The default selection shape is a square, which is rarely ideal. Holding the control key + shift activates this tool. If you click on the brush menu icon while holding these keys, you open a menu with various options. I prefer the select lasso for this task. Once the correct faces are isolated, simply press the crease button. If the edges have not already been creased, they will be, and the hidden geometry will become visible again. Zbrush will crease the edges associated with the extrusion by default. The image on the lower left shows the edges I needed to preserve.
这时我需要对边进行crease。crease告诉Zbrush保留边缘特定数量的细分。类似于在3ds Max添加turbosmooth修改器,并告诉它保持平滑组。Crease设置有两个主要部分需要注意。第一个是CTolerance,即crease tolerance,代表两个面交汇的角度。老实说,我从来不知道它们确切的关系是什么。我不知道角度是从面内部算的还是外部。功能上讲,数值越高,就越不敏感。在180默认的值下,它忽略所有角度,只地狱开放的边缘crease。我使用Select Lasso分隔每一块需要保持锐利的区域。默认选择形状是一个方框,这并不是想要的。按住ctrl+ shift激活这个工具。如果你按住这些键点击笔刷菜单图标,会打开一个有许多选项的菜单。我推荐Select Lasso来完成这个任务。当正确面分隔之后,点击crease按钮。边缘会被crease,并且隐藏部分的几何体会重新显示。Zbrush默认会对挤出相关的部分进行crease。左下角的图展示了我需要保留的边。
The other important setting is CreaseLvl, aka crease level. This controls how many times you can subdivide the mesh while the creases are preserved. The default setting is 15, which is a little silly. My calculations could be off, but a 6 sided cube divided 15 times yields a mesh with way over a billion faces. I find a setting at or near 3 is perfect. What happens is you divide the mesh 3 times, and the creased edges stay sharp. All uncreased edges are smoothed with each division. Once you pass the crease level, the mesh is divided and smoothed uniformly. The result is nice clean hard surface geo, without the razor sharp edges that make things look computer generated.
另外一个重点是CreaseLvl,即crease level。这控制crease在你多少细分次数下保留。默认值15,有点蠢。我的计算是,一个6面立方体细分15次会生成超过十亿面的模型。我发现设置为3左右很完美。你把模型细分3次,crease的边缘还保持锐利。所有uncreased的边缘会在每个区域光滑掉。当你做好crease阶段,模型会被划分并统一平滑。结果是干净的硬表面几何体,没有锋利的边缘,让模型看起来是电脑生成的。

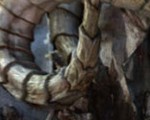
Once I had this new piece of geometry, I carved the pattern of the final piece of geo as a guide using the dam_standard brush with lazy mouse. I could have polypainted the guide lines, or just eye-balled it. Then I retopologized a new piece of geo following the guides, set up the creasing, and subdivided. Some pieces required multiple steps, and some I was able to retop directly off the head.
当我得到一些这样的模型,我用dam_standard 笔刷和lazy mouse功能雕刻最终几何体表面的花纹作为导向。我可以使用polypaint做导向线,或者目视测量。然后我按照导向重拓扑一个模型,设置crease,并且细分。一些部件需要多重步骤,一些可以直接在头部重拓扑。

Here are a few shots of the progress through this phase of the modeling.
这是一些建模过程的截图。
Here’s another example this process. I used the original face as the scaffolding, paying close attention to where I wanted the panel edges to go. Using as little geo as possible makes it easy to move these points around once you make it into editable polygons. In this case, I needed to mask off the edges and reproject the sculpting from the organic part of the original sculpt. I continued refining it as the sculpt went on.
这里是另一个例子过程。我使用了原始脸作为框架模型,注意我想要panel的边缘的地方。使用尽可能少的面数,以便于转成可编辑多边形时移动这些点。在这种情况下,我需要mask掉边缘并且从原模型曲面部分reproject其他部分(译者认为是本篇教学精髓技巧)。我继续细化造型。
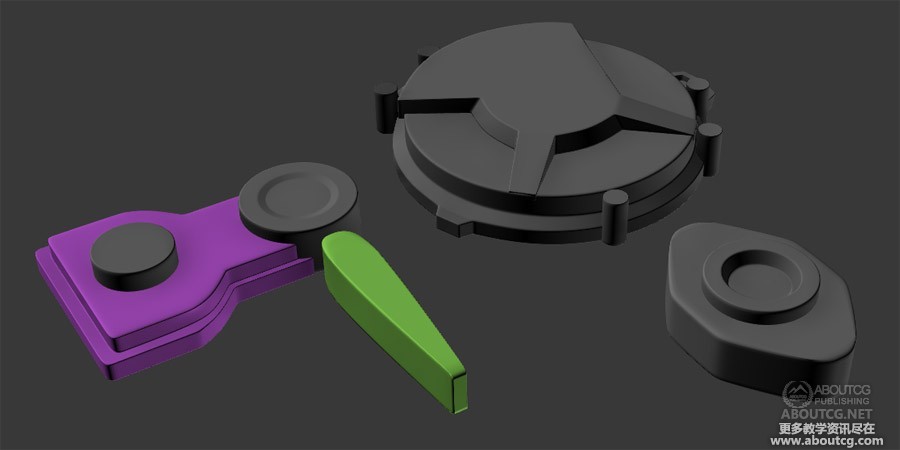
I find some geometry is easier to create in 3DS Max. Generally speaking, if something looks like it comes from a primitive, I’ll try to build it in Max. Here are a few examples. Once I have a widget, I’ll reuse it as much as possible (without overdoing it).
我发现一些几何体在3 ds Max中更容易创建。一般来说,如果看起来是原始几何体构成的,我就会在Max中创建。下面是一些例子。当我有了一个小部件,我将尽可能地重复使用它(注意不要过分)。
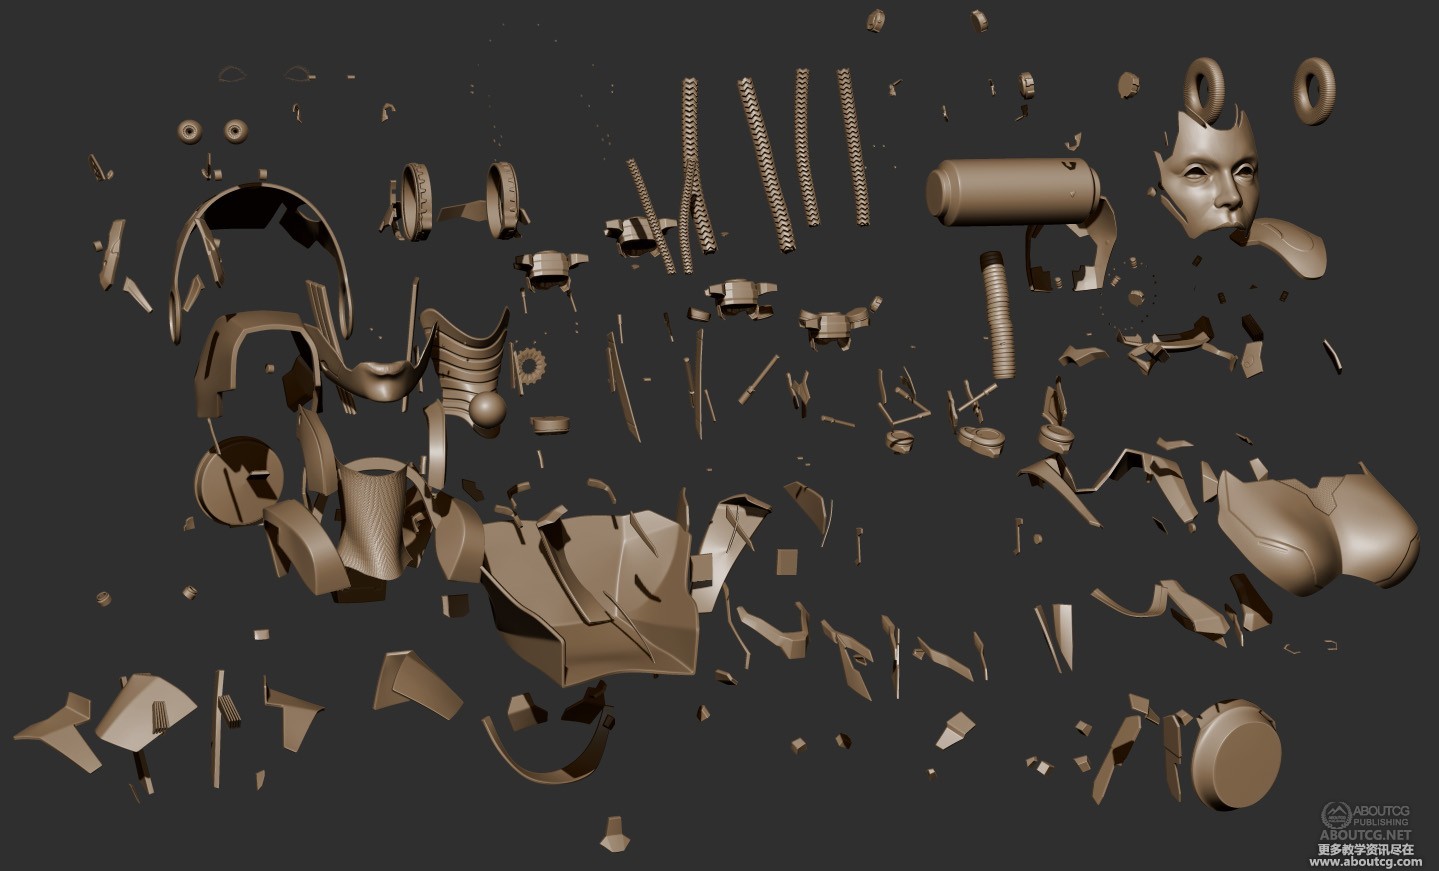
The final subtool count is around 150 pieces.
最终subtoll数量大约是150个。
I didn’t use a whole lot of noise maker on the project, but it did come in handy for a few pieces and is definitely worth mentioning. Noisemaker lives in the surface menu. What it does is tile an alpha over a surface. You can change the scale, the intensity of the deformation, and mask the surface according to the value of the alpha texture. I wanted to make sure it wasn’t possible to see through the mesh, so I borrowed part of the neck from the original head sculpt, shrunk it down a bit, and added a tiling pattern. For the most part, I use the UV mode. This helps avoid stretching (unless your UVs are distorted). I did a quick UV unwrap using Zbrush’s UV Master plugin, grabbed a great tiling alpha from Pixologic’s Download Center, and applied it to the mesh. To apply an alpha, just click the alpha button in the lower left hand corner of the window. Be sure to activate Uv mode in the upper right hand corner of the window. For some reason, reducing the strength value actually increases it. Scaling acts like you’d expect. If you have a part of the mesh you don’t want the pattern on, you can mask it off. Leaving Strength By Mask set to 1 will completely erase the pattern from any masked geometry. One really nice time saver is the copy/paste function, if you need to apply the same pattern to multiple subtools. By default, the pattern behaves very similarly to a bump map. The geometry appears to have the detail, but the silhouette is unchanged. In the main surface menu you can apply the pattern to the mesh if you like. There are other settings to play with, and more in depth tutorials if you need more info on this tool.
我并没有大量使用noise maker在这个项目中,但是值得一提的是在一些部件上这很便利。Noisemaker在surface菜单中。它的功能是在一个表面上重复一个alpha贴图。你可以改变变形的大小、强度,并且可以根据alpha值来mask表面。我想确保模型不被看穿,所以我借用了原始头部的颈部,稍微收缩,并添加图案。大多数情况下,我用UV模式。这可以避免拉伸(除非你的UVs就是扭曲的)。我用ZB的UV Master插件快速分了一个UV,在Pixologic’s Download Center下载了一个很棒的alpha,然后应用到模型上。点击窗口左下角的alpha按钮来应用贴图。确保在右上角激活了UV模式。出于某种原因,减少strength值实际上是增加它。Scaling缩放。如果有部分你不想有图案,你可以mask掉它们。Strength By Mask设置为1会完全移除遮罩区域的图案。一个很好的节省时间功能是复制/粘贴功能,如果你需要将相同的图案应用到多个subtools。默认情况下,图案和凹凸贴图差不多。模型看来有细节,但轮廓没变。在surface菜单可以将图案应用到模型上。如果你需要这个工具的更多信息,它还有其他设置,和更深入的教程。

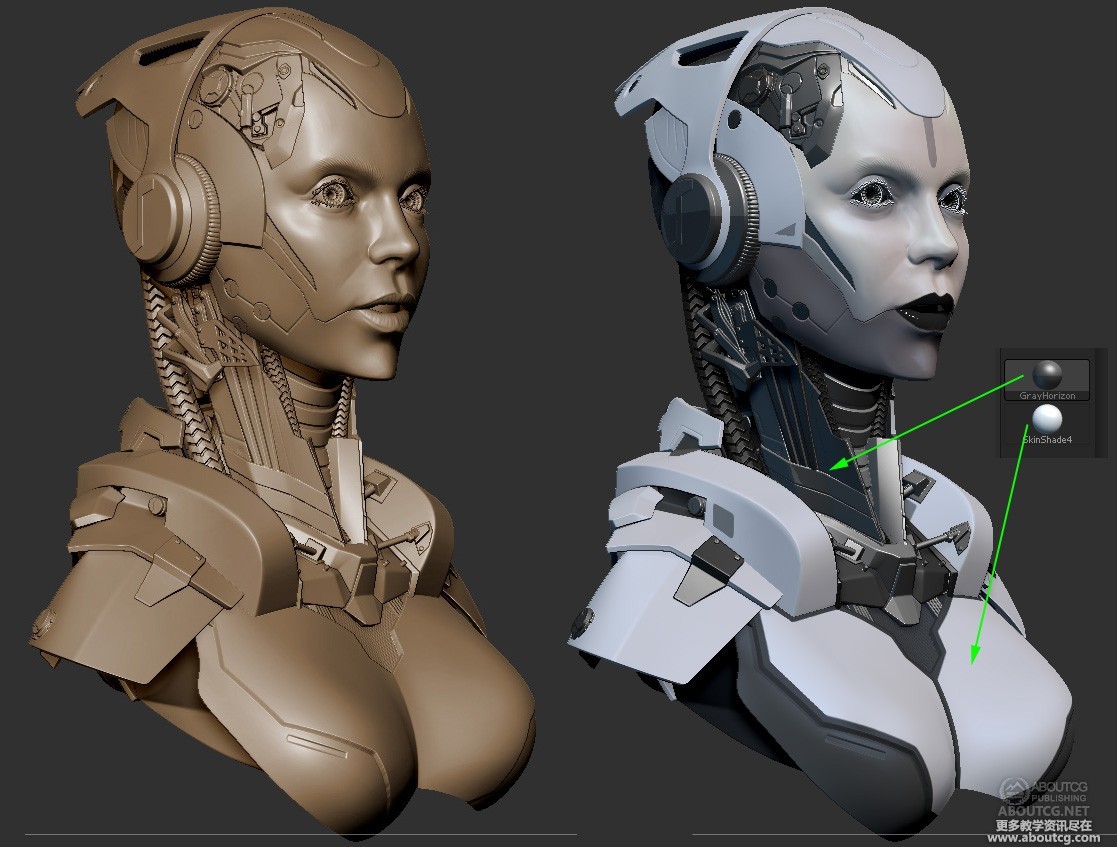
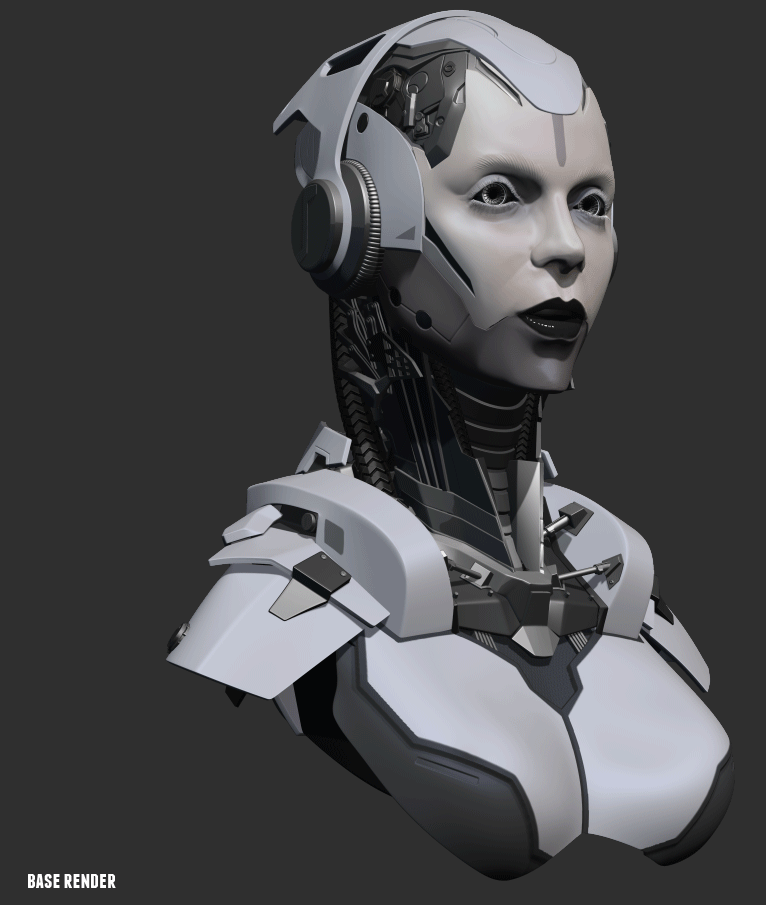
Once the geometry was finished (but before posing to preserve symmetry), I polypainted the face to match the concept. If you assign the image to a plane and drop it to the canvas in Zbrush, you can sample colors directly from it. To do this, click in the color picker, and drag over the image. I wanted some of the objects to be a white material, and the rest to be metallic. I assigned the white geo to skin shade 4 and left the rest unassigned. Unassigned subtools will use whatever material is selected. You can reset materials assignments by filling the subtool with the standard material Flat Color. I used the standard material Gray Horizon for the metal surfaces. I also added a dim blue light to the scene.
当完成模型(但在摆姿势保持对称前),我依照概念图进行了polypaint。如果你给平面指定图像,并且放置在ZB画布中,你可以直接从它上面吸色。要做到这一点,请点击拾色器,并拖拽到图像上。我想要物体的一些部分是白色材质,其他部分是金属材质。我给白色部分指定skin shade 4,剩下的未分配。未指定部分将使用任何所选材质。你可以通过填充默认FlatColor材质来重置材质指定。我使用了标准材质Gray Horizon作为金属表面。我还给场景添加了一个暗淡的蓝光。
One of the benefits of creating geometry as described above is you can usually get to a low poly subdivision level without too much work. I wanted to turn the head slightly, to match the concept. Zbrush provides a very useful tool called subtool master. This reduces all subtools to their lowest subdivision level and creates a single mesh. You can then pose the single mesh, and propagate the changes to your main mesh. I needed to concentrate the deformation in the neck without twisting the face. In my experience, Zbrush is a little weird about masking multiple subtools consistently, so using GoZ, I exported the low poly tpose mesh into 3DS Max, soft-selected the relevant verts, and used a free form deformer to turn the body. I figured there was a better chance I’d want to tweak the head, so I wanted to preserve symmetry for the upper part of the model.
以上描述的建模方法有一个好处是,你可以很轻松的回到低级别细分。我想稍稍转动头部,以匹配概念图。Zbrush提供了一个非常有用的工具称为subtool master。降低所有subtools到它们最低级别并创建一个单独模型。然后你可以对单独那个模型进行造型,然后转换到你原来的模型上。我需要变形集中在颈部而不影响到脸。以我的经验,Zbrush在mask多个subtools的时候很奇怪,所以使用GoZ,我导出tpose低模到3ds Max,soft-selected相关的顶点,并使用free form deformer旋转身体。我想会有一个更好的方法旋转头部,所以我想保留模型上部的对称。

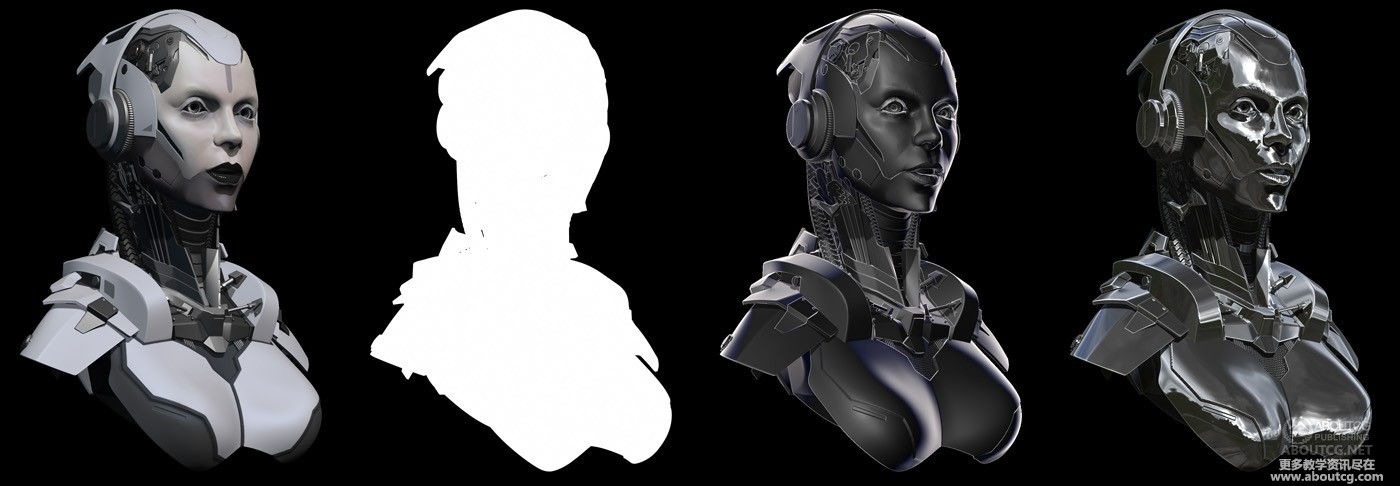
Once the materials were assigned and the pose was nailed down, I did a BPR render. I wanted to use some other matcaps in the final render, but I needed to clear the poly painting and material assignment. However, I needed to do two sets of renders, one for the front view, and one for the back view. I duplicated the file, filled all the subtools with white, and cleared the material assignment. Having two geometrically identical tools in the tool menu made it really easy to switch back and forth without worrying about consistent camera position. After some experimentation I found a set of materials that gave me what I was looking for. From left to right, this is the polypainted BPR render (skin shader 4 + gray horizon), the mask, a render using a graphite matcap I found somewhere, and a render using a really nice chrome I downloaded (for free) from Badking. Badking is awesome. Incidentally, the eye lashes came from an Insert Multi Mesh brush distributed by Badking as well.
当指定好材质并摆好姿势,我进行BPR渲染。我想在最终渲染里使用一些其他的材质,但是我需要清除polypaint和材质指定。我需要做两套渲染,一个正面视图,一个背面视图。我复制了文件,给所有subtools填充白色,清除材质指定。在工具菜单中有两个相同的模型使它很容易来回切换而不用担心相机位置是否一致。经过几次试验我找到了我想要的材质组合。从左到右,这是polypainted BPR渲染(skin shader 4 +gray horizon),遮罩,使用某处发现的石墨matcap渲染,使用我在Badking下载(免费)的很赞的铬材质渲染。Badking棒极了。顺便说一句,眼睛睫毛来自Badking的一个Insert Multi Mesh笔刷。
The compositing process in photoshop isn’t anywhere near as complex as the modeling, but there are still a few tricks to getting a good result. I wanted some edge lighting, which the graphite material is great for, but I didn’t want the interior of the model being edge lit – it wouldn’t make sense for lighting to get in there. I pasted the graphite render above the base render, selected the mask layer, contracted and feathered the selection, and added a layer mask to the graphite layer. Quick and easy!
Photoshop中的合成过程在不是和建模一样的复杂,但仍有一些技巧可以得到一个好的效果。我想要一些边缘照明,石墨材质很适合,但我不想模型内部同样被点亮——那样看起来不自然。我在基础渲染上粘贴石墨渲染,选择遮罩层,翻转,羽化选区,并给石墨层添加一个图层蒙板。快速又简单!
One of the things that really helps with a model like this is little symbols and writing sprinkled throughout. You can make little symbols easily enough in Photoshop, but I like to look for cool fonts at dafont.com. Another thing that really sets metal off is scratches on the edges. To get this affect as easily as possible, I pasted the chrome render, added a black layer mask, and painted in where I wanted scratches. Adding a tiny amount of drop shadow makes it look like the chipped paint has some thickness. I also like to find some dirt/concrete/grunge textures online, set them to almost transparent, add some kind of layer blending, and paint this into cracks and tight spaces. Finally, add some lights. Paint in some glow, and try to fake how it might actually light the surrounding areas. Feel free to ask additional questions in the comments section below, and thanks for checking out my site!
对于这种模型,有个非常有用的技巧是给整体添加一些小标志符号以及一些文字。你可以在Photoshop很容易的添加它们,但是我喜欢在dafont.com寻找很酷的字体。另外就是在金属边缘设置划痕。为了更简便的添加这个效果,我黏贴了chrome渲染,添加黑色图层蒙版,在我想要的地方绘制划痕。添加少量的阴影使它看起来像掉漆有一定厚度。我也喜欢在网上找到一些污垢/混凝土/垃圾的贴图,使他们几乎全透明,添加一些图层混合,在裂缝和狭小空间中绘制它们。最后,添加一些灯光添加一些辉光,并尝模拟环境灯光。可以随时在下面的评论栏中问更多的问题,并且感谢观看我的网站!


推荐相关中文教程

《大猿王传》电影级别动画短片系列教学第一部:大猿王模型篇
教程中涉及的技术流程都是现在影视公司比较流行的技术,掌握了这一系列教程中的技术能帮助CG从业者在公司更好的工作。对于CG专业的学生来说,学会了这套教学的技术能更好地完成毕业设计,做出更好的演示作品,找到自己满意的工作。3DSMAX零基础入门及建模实战中文教学
全套教学大大小小的案例总共有17个,从最简单的杯子到最复杂的角色,从硬表面到生物角色都有包括,全套教学接近40小时,3dsmax2016以及以后的版本都适合。高精度PHOTOGRAMMETRY照片阵列建模初级教学
本教学由HUNTER老师主讲,以photogrammetry(照相测量法也就是俗称的照片建模)的原理为核心,讲解高精度三维扫描的特性,分析并挑选合适的设备。最后制定出实用性极强的工作流程。适合需要快速制作逼真的高精度模型以及高清纹理的CG工作者。Maya零基础入门及建模实战中文教学
本套教学通过软件讲解和实际案例相结合,带领大家快速学习和掌握maya的基础操作,多边形建模和uv编辑,为后续的学习打下较好的基础。AboutCG Zbrush4R7高级机械建模实战教程
本套教学由我们两位强大的老师,《造型巨匠Zbrush》的作者田涛老师,和《Zbrush完全教学》的作者Purplesun老师一起打造,两位老师分别使用Zbrush4R7制作多个机械模型案例,难度由浅入深,对制作当中用到的功能命令一一讲解。并时时分享提高建模效率的宝贵经验。Zbrush 4R7新功能中文视频教学
zbrush4 r7将会是zbrush4版本的最后一次升级,下一个版本将会是zbrush5。本次更新进一步完善了zbrush的功能,首次提供了几乎全套的多边形建模命令,大部分硬表面对象的建模将不需要借助第三方软件。ZBRUSH全案例实战中文视频教学
本套视频教学以案例为主,通过11个完整的zbrush雕刻案例,由浅入深的带领大家掌握zbrush常用的雕刻流程和雕刻技巧,全套教学在25小时以上。次时代游戏角色制作完全教学 下集
本套教学将分为上下两部, 上部主要讲解高精度次时代模型的制作,内容主要包括建模,UV,雕刻,以及头部贴图制作和渲染,总时长12小时以上, 售价118元。下部主要包括贴图,拓扑,身体,武器贴图,以及其它所有的国际一线公司实次时代角色制作流程。 总时长30小时以上(剪辑加速完成后为24小时长度),售价 188元。
推荐课程


推荐教程

哇好棒啊
很厉害,今晚回去试试
好棒啊