
本教学为翻译教学,转载请注明原文链接,来自aboutcg.net,以及翻译者
原始链接:http://www.djx.com.au/blog/2008/09/11/mib_continue-and-mip_rayswitch/
原作者:Justin Albers
作者信息:
DJX
Website: http://www.djx.com.au/blog/
翻译:单骑扫千军
使用软件:maya
我在CGtalk上读到一个人询问“如何让物体不阻塞FG射线?”他的答案和以前我用到的一种技术很相似。我在这里详细阐述一下。
我正要写一篇我经常使用的shader以及一个照明设置的文章,这种技巧经常被用于我的产品展示渲染,这个设置背景很简单,经常是白色背景,能使产品看上去更加光亮一些。在最后的渲染中经常将物体渲染出不同的层通道,但我也喜欢在给客户展示时,会将所有物体放到一个Pass中渲染,以节省时间。
Here is a typical example of the end result.
这是典型的最终结果
My lighting is physical sun/sky using final gather. My background is a simple fileTexture of a cloudy sky above a white ground which I have mapped onto a flattened sphere. You can download my scene file here.
我使用了物理天光系统,背景是一个简单的天空文件贴图,地面是白色的压扁的球体。你可以点击这里下载源文件。
Here is a snapshot of the wireframe.
线框的截图

and this is a small version of the sky map
天空贴图

问题是扁平的球体阻挡了来自天光的FG射线。我只能将带着贴图的球体作为FG的散射器了,如下图所示。
那么,我们怎样才能不让球体阻挡FG射线呢?答案就是使用mib_continue 和 mip_rayswitch节点。
mip_rayswitch enables different shaders to be used depending on the type of ray that is being calculated. Have a look at the attributes here to see the different type of rays that can be singled out.
mip_rayswitch节点可以将不同的Shaders作为不同类型的射线来计算使用。看看它的属性面板,有许多不同类型的射线可以单独的分离出来。

I’ll just mention two of them in this example. The eye rays are the ones you actually see in the rendered image, so that is where I connect the shader that I want for my background color. The finalgather rays are used in the FG calculations and it is here I connect the mib_continue shader.
在我们这个例子中我将仅仅涉及到它们中的两种,Eye 射线是你实际上看到的渲染出来的图像,所以我将希望我的背景呈现的颜色连接给这个Shader。FG射线会在FG计算中用到,这里我将它连接给一个mib_continue节点。
mib_continue is a shader that takes any incomming ray and simply lets it continue on through the surface as if the surface was not even there. So in my example it lets the FG rays from the physical sky continue through the flattened sphere. In this case I’m just using the mib_continue with it’s default attributes.
mib_continue节点是一个接受任何入射光线,让其穿过模型表面就像表面不存在一样。在这个例子中,我让FG射线从物理天光发射出来穿过球体。我使用mib_continue节点的默认设置。
So that is the basis of my setup, but to make it work there are a few more things to consider.
这就是我的设想,但是做要比想难很多倍。
Firstly, I am using mia_exposure_photographic tone mapper as a lens shader with gamma=2.2 for a linear workflow. This means I need to increase the brightness of my background texture map to boost it into the same dynamic range as the physical sky. If I dont, then the background will be black! And I need to de-gamma the fileTexture since the gamma will be added by the tone mapper.
首先,我是用一个mia_exposure_photographic tone mapper作为一个镜头shader将Gamma值调节为2.2。这意味着我需要增加背景图片的亮度来迎合物理天光的高动态范围。如果我不这样做,背景图片在高动态的物理天光的照射下依旧是黑色的。同时由于Gamma数值会被tone Map贴图加大,我需要减少文件贴图的Gamma值。
Reason 1: it makes it easy to get shadows on a surface that is not otherwise illuminated by any lights.
Reason 2: it makes it easy to get reflections on very light colored (or white) surfaces, because it can do subtractive reflections. (I didnt use reflections in my example though.)
Reason 3: When I get to my final renders phase, I can easily break out the components I need into different renderlayers without having to change too many things.
1.因为很容易获得阴影而且不受其他灯光的影响。
2.他很容易从受灯光颜色影响很少(或者是白色)的物体上获得反射效果,因为他无需改变其他东西就可以进行负反射。
3.当我进入最后渲染阶段时,我不用更改大量的属性而将我需要的属性分离到渲染层中。
第三,我使用mib_amb_occlusion节点来替代mip_matteshadow节点的OCC功能,因为我常常将NURBS平面作为FG的底板。也许大多数人使用灯光阵列和反射板来模拟真实环境,这些物体经常是不可见的,但是我不想它们产生任何OCC的影响,我使用mib_amb_occlusion节点的idNonself属性来防止物体被计算到AO中。

注意我将idNonself设为5,如果我增加额外的属性miLabel到一个物体的位移节点上,将其值设为与idNonself相同的数字,那么这个物体就不会被考虑在AO的计算范围之内了。


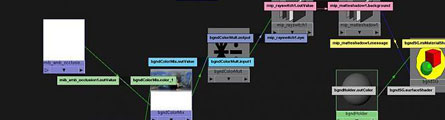
现在,我展示一下Hypershader中的节点网络。
The fileTexture connects to the gammaCorrect node with a value of 0.455 (1/2.2)
我将从左到右来解释节点网络。
文件节点连接到gammaCorrect节点,调节的数值时1/2.2(mia_exposure_photographicd 的Gamma值)=0.4545
mib_amb_occlusion 是用mib_color_mix节点与背景颜色联合使用,OCC层正片叠底在背景颜色上。
The combined result is then multiplied by 20000 to bring it into roughly the same dynamic range as the physical sky and counter the effect of the exposure node lens shader. This number, 20000, was determined through trial-and-error (but after doing this for I while, I’ve got fairly good at guessing).
叠加的结果要使用一个乘除节点乘以20000来适配物理天光的高动态和对抗镜头材质的曝光。参数是20000,这是需要反复测试计算得出的。 
The very bright background color is then connected to the eye ray of the mip_rayswitch where it is combined with finalgather ray from the mib_continue node (shown earlier).
非常亮的背景颜色连接到mip_rayswitch的sye ray上,mip_rayswitch的finalgather连接了mib_continue节点,让FG射线穿过背景的表面。
mip_rayswitch节点的输出连接到mip_matteshadow的background上,mip_matteshadow节点连接背景表面材质原Lanbert的SG的material shader上(现在Lambert材质在渲染中没有任何作用了,但是仍然能够通过它来选择到场景中的相关物体)
Have a look at the mip_matteshadow attributes
看看mip_matteshadow的属性。
It is not obvious but the Ambient color is set to 20000, 20000, 20000 (just like the multiply value I used before). This setting is required so that the Shadows color will work properly.
Ok. Thats it. Longer than I expected.
虽然不明显,但是Ambient color已经设置成为20000,20000,20000(就是前面我使用的multiply值),这个数值时让阴影颜色正确所需要的。
希望这也能对你自己的项目流程管用。


推荐相关中文教程

Mentalray for maya实战教程
本教程共包含超过32小时的视频教学内容,共20章 128课,通过大量实例,详细讲解了Maya平台下的Mental Ray1渲染器的使用基础和方法。
推荐课程


推荐教程

0回复mentalray AO 技巧"