
本教学为翻译教学,转载请注明来自aboutcg.net,以及注明翻译者
请尊重互联网道德,转载请注明aboutcg.net完整网站链接和翻译者,谢谢!
原教原始链接如下:
http://www.ronenbekerman.com/making-of-3d-render-house-to-catch-a-forest/
作者: Celestino Geronimo
网站:www.mushroommultimedia.com.
翻译:Zivix (www.aboutcg.net)
转载请写明出处和翻译者为Zivix,谢谢。

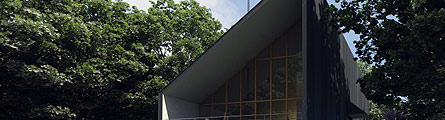
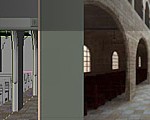
This is my interpretation of a Tezuka House by the forest, played with different foliage types as opposed to the original site itself. My intention was to achieve that “forest” look with lush vegetation while preserving the focal point which is the design of the house itself. It was a simple 3D exercise which I did to pass the time.
First let see how we end up…
我想要制作一个被森林环绕的建筑,布拉布拉,这是老爷我之前的一个建模联系,如图
首先,我们来看看最终效果


preparing the scene ,setting the ground work
I prepared the site with a plane as the base, pulled some vertices on the z axis to achieve an uneven terrain. This will create the rolling effect especially in the background areas of the scene. The ground is applied the grass material, then proceeded with the house structure itself.
建立一个平面作为地面,然后再Z轴向上移动一些点,让地面呈起伏状,然后赋予它一个地面材质。

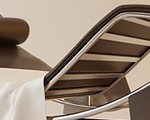
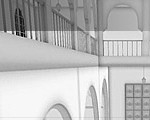
The house structure itself was not that difficult to create, it is mostly comprised of extruded splines (the walls and floors) or editable splines (such as the rails). As a rule I try to use the simplest mesh as possible so as to allow me more flexibility in editing in later stages. I only resort to polys on a case-to-case basis. Furniture for the interiors is a separate issue.
这所房子结构本身并不难创造,它是主要组成(墙壁和地板),用可编辑样条,作为一个惯例,我尝试使用尽可能以最简单的网格,让我在以后的阶段更灵活的编辑在。在内饰家具是其他的部分。

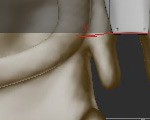
I always choose a texture which has a good tiling quality and not obviously repetitive when rendered. Also as a rule I try to avoid using high resolution textures if the scene does not showcase them close enough. For example, the concrete material I used was some random mid-res set of concrete textures which I cropped in the material editor and it is more than enough to suit my purpose in this exercise.
大爷我总是选择一个具有良好的品质纹理,而不是平铺时呈现明显重复。另外,作为一个惯例,我尽量避免使用高解析度的纹理,如果不用近距离观察的话。例如,我可以在材质编辑器中裁剪出混凝土墙所需要的部分来。


ssinigning he grass material
I then applied the grass material as shown, I intentionally modified some patches to show some ground textures rather than full grass alone, to achieve a more natural effect.
然后我采用了草地的素材,我刁意增加家泥土,以显示一些地面纹理而不是全部草单,以达到更自然的效果。

adding a grass displacement
Using the same bitmap, I added a VRay displacement modifier to the ground mesh.
使用同一张素材贴图到vray的置换上

From this point onwards, all plants and trees come from pre-existing tree libraries such as evermotion which were generously shared by some friends.
这些植物和树木的素材是朋友分享给我的,我要感谢这小子。
adding 3d grass elements
To enhance the scene further I opted to use 3d grass meshes with the material applied as shown in the image. The grass was applied with a gradient material, with a texture map applied in the middle tab, as shown. These were the default settings of the grass mesh. No UV Map was applied.
为了进一步提高品质,我使用一些3d的模型草,材质使用了渐变贴图,没有UV。

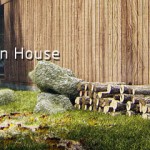
Rocks
The rocks were placed and assigned the material as shown in the image, with a bump value (100). Some of these rocks are available in preset libraries, but these were modeled using poly’s. The texture is also as shown in the image.
岩石的效果如图,使用了100的凹凸,这些岩石使用Poly建模出来的。

supplementary 3d plants
The scene was then peppered with various species of plants. These models are all preset including their materials, however to add more realism to the final output, I opted to follow the next step…
这些植物都是预先制作好的,这些植物能提供很好的写实的效果。

plant Glossies
For most of the plants that I used in the scene, I have applied a glossy reflection to the leaf materials. A value of 20,20,20 in RGB is what I used in this instance.
大部分的植物我都设置一个RGB是20,20,20 的反射。

3d trees
The forest trees were then inserted into the scene, with the default material applied. However, similar to the plants, some parameters were added.
将树木加入到场景中参数和之前加入的低矮植物情况类似。
Tree Glossies
和之前一样,树叶的光泽也是 20,20,20

Other Tree Settings
同样,也为树叶增加折射选项,RGB是30,30,30.其他的都是默认参数。如同下图所示,在从库中拿出来的时候,这些树木的文件就设置好了材质参数:凹凸,半透明等。


Scattering the Trees and Foliage
have not been able to use VRay Scatter for this exercise, just manually populated the scene with the plants and trees where I see fit. It is important to make sure that the proxies and/or 3d plant meshes had their anchor points slightly above the ground level to allow for some “submerging” of the meshes below the uneven terrain.
我在这里练习中没有使用Vray的离散功能,我都是手动的吧植物放置在合适的位置,要注意的是,设置好植物的轴心点,免得模型插入地面。

After making sure all the plants are in their proper pivot points, I proceed to scattering the plants. The obvious method is of course to create one instance, select both, then instance (hence 4), etc. which is simple multiplication of the objects.
当确定所有的植物坐标正确以后,我们就人肉离散这些植物,用关联复制的办法,一个变俩,俩变四。。。

After populating you can see that they are all in the same z axis. In order for these objects to align with the ground plane, I used a tool called scripted glue. It’s quite easy to use. This applies to all of the plants and trees in the scene.
完成复制以后,可以看到模型在Z轴都是一个水平位置的,我所还需要将它按照地面的起伏分布到地面,我使用这个脚本:http://www.scriptspot.com/3ds-max/scripts/scripted-glue


There is also this neat tool from called randomizer-0 which randomizes the size and rotation and even the scale of selected objects. A helpful script to randomize the foliage.
除此之外,还要使用一个随机缩放物体和旋转角度的脚本:
http://www.scriptspot.com/3ds-max/scripts/randomizer-0

Lights
Lighting for the scene is pretty straightforward. Using VRay Sun (with the default VRay Sky environment), a general VRay light for the ambiance, and an interior yellow light was all that was incorporated into the scene.
Light Settings (all using 8 subdivisions only)
灯光的设置相当简单,使用默认的Vray阳光系统,一个大灯来体现环境光,一个在室内的黄色灯光照明室内。
所有的灯光都是8及细分。


camera setup
Nothing fancy here. Just used a standard camera with the following settings. In Rendering however, I used the blowup option to rendernly the area of concern in the scene.。
摄像机设置没啥特别的,我使用了大广角来体现渲染效果。


render settings
渲染设置
Mostly default. I experimented with Reinhard for the color mapping, quadratic as AA and 1,6 for the DMC settings. The rest are as illustrated below.
大部分都是默认的设置,我调整了color mapping,采样,抗锯齿,蒙特卡洛等等玩意儿,最后的结果如图。


Also applied an HDRI map to the reflection slot. The map was obtained from a good source of free HDRI maps: http://www.hdrlabs.com/sibl/archive.html
我还用了一张HDR图片来反射,可以从http://www.hdrlabs.com/sibl/archive.html下载到。

rendered output and post processing
Finally! Got the raw render after a few hours of waiting. The resolution was 2500 pixels and took almost more than 8-10 hours to render (the price I had to pay for extreme glossy materials). Here’s the initial output below.
最后我渲染了2500像素的大图,真他妈的耗费时间,主要使用了好多反射材质。这是最后的渲染效果。

Decided to add a sky bitmap background to enhance the scene. The result below.
最后增加一个合成的天空背景。

still not entirely a good sight because the sky needs more tweaking, and the overall effect is a bit dark in the shaded areas. For this, I applied some postwork, using mostly curve adjustments.
其实老子觉得最后效果就一般般,为了效果更好,我拿去后期处理了一下,用曲线工具调节如下:


Finally, played with a few shots and cameras…
最后老子给他增加了一些摄像机色散效果


推荐相关中文教程

Vray for maya高级案例商业渲染流程教学
本套教程是vray的全案例流程教学,教程使用三个具有代表性的案例演示了vray的渲染参数设置经验和技巧,同时讲解了如何在实际的工作中使用这些参数来进行渲染的优化和质量的平衡。教程的内容从实际工作经验出发,详细的演示了:合理光源的布置原理,多光源合并调节,多通道渲染与合成,多象限UV的设置与渲染等高级技巧。Vray for Maya完全教学
本套教学选择最重要和最常用的核心功能作为讲解对象,所有内容占到了vray for maya全部功能的80%—90%以上。教学的目的是让学员能够加深对vray的理解,熟悉常用的vray渲染技巧,而不仅仅是记几个常用的参数。教学中很多软件原理和技巧应该是首次在vray for maya中文版教学中披露,而这些东西在帮助文档上是没有的,各位学完之后应该会打下较为扎实的软件使用基础。


推荐课程


推荐教程

0回复森林中的房屋"