

原文链接:
http://www.cgarena.com/freestuff/tut…/laespera.html
作者信息:
Jorge Suarez, Argentina
http://www.buildmultimedia.com.ar/
mailto:info@buildmultimedia.com.ar
翻译:StoneBird(aboutcg.net)转载请注明出处。
关于译者:
查看作者所有的教学
请尊重互联网道德,转载请注明转载出处网站链接和翻译者,谢谢!
以上声明,链接,地址,作者译者信息请勿在转载时删除或做任何编辑,否则,请勿转载。
Making of La Espera

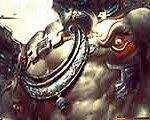
I am proudly present this making to all the great artists. La espera was created entirely in Lightwave. At first we used the 9.3 version which had already incorporated significant advances in fast skin y global light, then look at version 9.6 I could see that the improvements were even more notable, therefore rendering was done in this latest version. In the following pictures you can see the modeling process.
我很高兴向各路牛人介绍我的流程。La Espera(译注:英文是“pending”,小baby在等午饭哈)使用 Lightwave 创建。下面是建模和材质的设置。
Note that Lightwave is often occasionally send error and therefore lose the model file or scene. The solution to this sort of trouble is to duplicate the objects. This copy of objects given the chance to show more details in the modeling process.
LW偶尔会报错,然后场景和模型就丢了。所以尽量多保存副本(译注,shift+S可以步进保存)。
Here the process is to basically form and leave empty spaces and then put eyes, nose, ears and mouth.
建模的基本流程就是建头部低模,并将眼睛、鼻子、耳朵、嘴巴这些地方留空,之后在这些地方放上更细致的模型。

We have created the separate objects with full level of details. Then the model is subdivided and merge the polygons, but we must take into account the number of points that were generated as they should be equal to each other. This technique avoids odd merge point resulting in a rectangular grid and without triangulation.
做好耳、鼻等细节部分的模型,然后将各部分拼接到头部模型上,并打开细分模式。注意合并多边形时接缝处产生的 多余的点,尽量让它们对齐并一对一对地合二为一。这样可以避免不必要的麻烦。(译注:因Subpatch这种细分模式不支持多于4顶点的多边形的细分,所 以需要焊接接缝处的点,避免出现像砖墙那样错开的情况。Catmull-Clark模式没有这种限制。LW支持这两种模式,Maya采用的是 Catmull-Clark模式)
We demonstrated binding of the subdivision and separate objects. Then the basic model of the body and the shirt is modeled.
上一步展示了拼接各部分的方法,之后要创建身体和衣服的模型。
In Modeler, the shirt has a minimal amount of polygons because they use the Layout for Node displacement for details. Geometry tab in the Display subpatch level increase to 30 and get the desired results.
衬衫模型不用弄得那么仔细,我们可以在之后应用位移贴图来创造细节。在 Layout 里,subpatch level 设置成30可以得到更好的效果。(译注:这里疑为 3 而不是 30,如果是30的话,每一个四边形都会被细分成30*30*2=1800个三角形,这是非常……变态的。勇敢的各位可以试试,我是不敢试)
Also joining the head to the body and wrinkles added in the neck. Till now our work of modeling is completed.
把头和身子接起来,在脖子处加上皱纹。这样建模的工作就完成了。
Spline included for the hair, eyelashes modeling and the hand. The hair has Spline type guides. These few guidelines are sufficient for Fiver FX makes the abundant hair. The eyelashes were created with Subpatch (see below picture for details)
我用曲线的方法创建头发、眼睫毛和手。只需要为头发创建一些引导线,FiberFX就能制造出足够的头发。眼睫毛在细分模式下完成(见下图)。

The hands lack the details in some areas. For example, it was not necessary to create all the fingers, only the thumb is added others missing in the scene.
手不用建的那么细,只要把大拇指造好就行了。
To avoid unnecessary work, with a previously saved scene type “Layout” with the corresponding camera position. They identify the sections that needed work and what not. Final Details…
设置好相机的角度,来控制你的建模精度。看不见的就不用做得太细。
The eye has several layers with different volume to depth.
眼球是分层制作的,每层都有眼球的一部分,最后放到一起。
The iris, translucency and reflection is responsible for capturing the brightness of the light.
调整虹膜表面的 translucency 和 reflection 这两个值,让它能产生反射高光。
As for the brightness of the main light, use a plane with polygons and properties of UV map with Luminusity 500%. This scene also served as HDRI for its high light irradiation.
主光源用一个带UV贴图的多边形,luminosity 设置为500%,模拟HDRI光照。

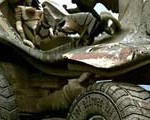
As you can see in the bottom of the chair, a set of polygons created in low-quality function to act as generators of shadow.
正如你所见,椅子底部是低模。这段低模的目的是产生阴影。

Final model with preview of textures.
Note: All textures are 360 degrees. Surface baking camera option gives us this possibility.
材质预览。用 surface baking camera 就可以360度预览材质了。

The images are displayed on their own. It often happens that when you view the screenshot of setup, that is more explicit then the words.
相机位置,有图有真相。

lights Area type (main and lateral support for filling) accompanied by Global light more HDRI up the entire lighting system. 8 in quality and avoid noise in the projection of shadows that even 6 is sufficient.
再加两个Area Light用于前后的填充光,全局光采用HDRI。Area Light的 quality 调为8,如果只是为了阴影降噪,6就够了。

It is here, among other things, I decided to do the rendering in version 9.6. Unlike previous versions 9.6 incorporates “Use gradient and Use bumps.” These options add additional details important to finish, especially the Nodes fast skin.
在LW 9.6的 Radiosity 设置里,“Use gradient”和“Use bump”两个设置要选上,尤其是采用Fast Skin节点的时候。这样可以给表面增加更多细节。


n postproduction Noise is added, a point of blur, chromatic aberration 1 px, is working on the curves and the variation of tones.
后期的时候加了一点噪点,模糊,和1px的色差。色差用来增加色调的多样性。

Many critics see the book suggested a change in tone with a tendency brown to generate drama buff but I have decided to change slightly towards the blue due to almost 50% is skin and my fear was the monotony of color.
许多人建议我将色调调为偏棕,但因为一半都是皮肤,而且我不希望颜色太单调,所以我还是决定为色调加一些蓝。
On the other hand I have played through a dramatic look lost and calm, being patient in waiting for their lunch time. Hence the derivation of the title.
I hope you enjoy. If you want to know more about my works can enter the following web site: www.buildmultimedia.com.ar or write me via email info@buildmultimedia.com.ar . I will be eager to share with you from Argentina.
(译注:这两段不翻译了。)


推荐课程


推荐教程

0回复La Espera的制作流程"