

使用软件:Photoshop
原文链接:http://www.3dtotal.com/team/Tutorial…_eyetex_01.php
作者信息:
Krishnamurti Martins Costa
Email: kris@antropus.com
Web: http://www.antropus.com
翻译:StoneBird(aboutcg.net)转载请注明出自AboutCG.net。
关于译者:

Photoshop绘制写实眼球贴图
This time, I will show how, with some patience and a tablet, you can produce your own eye textures, applicable to your 3D characters. It’s a realistic texture, but it can be simplified, depending of your intention and your character’s style. This tutorial will also be able to be taken advantage by those that work with 2D, helping them to understand a little of the Photoshop capacities.
这次我向各位展示如何自己绘制眼球贴图。你需要有一点耐心和一个手写板(译注:没有手写板也可以完成,但需要更多耐心)。这是写实级贴图,但你也可以根据具体的构思或项目对之进行简化。这篇教程对让2D工作者更好理解PS或许也有帮助。
For that texture, I used the 1000×1000 pixels resolution.
Approximate time of work to the final result: 3 hours.
制作这张贴图我用了1000×1000的分辨率,工时大约在3小时。
1. Begin creating a new file, square (in that case, 1000×1000 pixels). Fill the background with some tone that have a little of gray (almost white).
After, create a new layer and create a circular mask in the center of the image, with close proportions the one in the image on the left:
第一步:(下图,下同)新建一个正方形画布(1000×1000),为背景上一点淡灰色(非常接近白色)。新建层,在中心画一个圆形蒙版,大致比例应该与上图差不多。(译注:原文是“左图”,本译文把图像放到下边,下同。左右排版很麻烦的= =)

2. After deciding on the favorite color for the eye that you will paint (green, brown, blue), fill in the circle with it. After that, create a new layer and through the same procedure, paint the pupil with black:
第二步:确定眼球的主色(绿,棕,蓝),填充到刚才创建的圆形蒙版中。之后新建层,用同样的方法绘制瞳孔,并染为黑色。

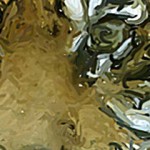
3. Using the smudge tool (finger), produce some “blots” as suitable in the illustration below, always from center to outside:
第三步:用涂抹工具(手指图标)制造一些“墨渍”,就像下图那样,由中心发散向外。

4. Create a new layer, a new circular selection and paint it with white, according to the image:
第四步:向下图那样,新建层,新建圆形选区,填充白色。

5. Now, use the noise filter (Filter> Noise> Add Noise…) and use the same setup shown:
第五步:按下图为白色层应用噪点滤镜(滤镜 – 噪点 – 添加噪点)。
6. Now, we will apply another filter: Filter> Blur> Radial Blur… Use the options “zoom” and “best” and put a very high value in “Amount” (100 or close to 100). The result will be this:
第六步:为刚才的层应用缩放模糊。滤镜选项选择“缩放”和“最好”,“数量”则设置一个很高的值(100左右)。结果就像下图:
7. Use some option of mixing layers, like Overlay, Pin Light, Screen, or the one that you prefer. After, use the “Liquify… ” filter in this layer. Through it, create small irregularities so that your image resembles the one shown:
第七步:为图层添加混合选项,比如Overlay,Pin Light,Screen,或者其他你喜欢的。之后,为这层应用液化滤镜。这样就会为贴图添加一些不规则性,如下图:
8. Duplicate the pupil layer and alter it’s color using the menu “Image> Adjustments> Hue/Saturation… ” or simply “Ctrl+U”. Set the parameters as in the image below:
第八步:为瞳孔层制作副本,用“图像 – 调整 – 色彩/饱和度”工具(快捷键Ctrl+U)调整副本层的颜色,设置如下图:

9. On this layer, use your ability to create more irregularities, this time, painted with a brush not very wide. Try to get a close result to the shown below:
第九步:在这层上,用细一点的笔刷制造更多的不规则感。
10. Copy that layer, set some mixing layer option (overlay, for instance), until obtaining a close result to this:
第十步:复制这层,设置混合选项(比如Overlay),试着得到下图的样子:

11. You can simulate some window reflections with another layer, as indicated below:
第十一步:你也可以新建层,模拟一些窗口形状的反射。
12. Duplicate this layer that you have just painted and alter the color (Ctrl+U again) for one more orange or brown. Choose another layer mixing type to produce a result as the one shown below. Rotate and resize that layer and, if necessary, alter the layer transparency to get a satisfactory result:
第十二步:为第十步那层创建副本,调整颜色(Ctrl+U),加入更多的桔黄或棕色。换一种图层混合模式,旋转、缩放这层,也可以调整透明度。如下图:
13. Softening the iris outlines to break the painting aspect. For that, use: Filter> Blur> Gaussian Blur… Choose a value not very high for not blotting too much. In this case, I used “6”:
第十三步:用高斯模糊软化虹膜边缘(滤镜 – 模糊 – 高斯模糊),设定值不要太高。我用的是6
14. To darken and to delimit the outline of the iris, use the drop shadow with “Distance=0″, little or no “Spread” and the best value that you find in “Size”. Change “Blend Mode” to produce the best effect. Tip: you can also use “Outer Glow” to reinforce the shadows, like shown:
第十四步:用投影来调暗并弱化虹膜边缘,”距离“设置为0,有一点点”扩散“,多调整一下”大小“这个选项。更改混合模式以创造最好的效果。你也可以用边缘发光来加强阴影的效果。
15. Select the layers where you painted the radial waves and apply a drop shadow, so their lines will have volume and seem like fibers:
第十五步:选中你绘制的不规则纹路层,应用投影,这样这些纹路就有了体积感,看起来就像纤维。

16. To randomize a bit, create a new layer, select the white color for the background and the black for foreground and apply “Render > Clouds” filter. Blur their borders using gaussian blur filter and a few times:
第十六步:为了添加一点随机性,新建一层,设置背景色白色、前景色为黑色,应用”渲染 – 云彩“滤镜。用高斯模糊对其边缘进行多次处理。
17. Add more details to the layers where you worked the irregularities. Create a circular selection and go in the menu “Edit > Stroke… “. Choose a high value for the stroke (12, 14 etc). Applying the stroke you will obtain a result like this:
第十七步:为你不规则纹理层增加更多的细节。新建圆形选区层,选择”编辑 – 笔画“。设置一个较大数值(12、14什么的),得到下面的结果:
18. Use the gaussian blur again with a high value, according to the image on the left:
第十八步:应用高斯模糊,模糊值设置的高一点。

19. Resize that layer to center of the iris, adding certain depth in that central area:
第十九步:把这层以虹膜中点为中心缩小一些,为笔画覆盖的区域增添一些深度感。

20. We will begin the blood vessels creating a new layer, choosing a red color but with a little bit of orange, to break the red aspect. Choose a very small brush and begin painting at the center-borders and borders-center directions:
第二十步:新建一层,我们开始创建眼白上的血丝。选一个红色偏桔的颜色,用一个非常小的笔刷,以眼球为中心放射状来回涂抹。
21. Create a new layer and add more veins larger and smaller:
第二十一步:新建一层,绘制更多大大小小的血管纹路。
22. Create another layer and add a red border as indicated on the left:
第二十二步:新建一层,制作一个发红的边缘。

23. Create other layer where you will add some small blood vessels, creating some stains in the located area between the iris and the white area of eye surface:
第二十三步:建立其它的层,再加上一点血丝,为眼白加点细节(好让纯白色面积少一点)。

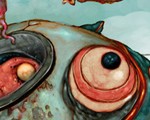
24. Here is the “final” version (don’t worry about the reddest parts. It practically will disappear in your character’s eye):
最终效果如下图。别担心边缘太红了,一般那些部分在应用贴图的时候就被挡住了。

25. Here a close-up to see the details better:
近景:


推荐相关中文教程

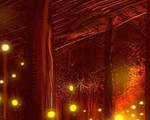
电影MATTER PAINTING基础实战案例教学
马良老师将通过一个精美的实例,来教你如何使用Photoshop结合After Effects软件完成动态Matter Painting场景的制作,从而带你踏入专业MP行业的大门。构图绘画完全教学
本套课程的内容重点是学习绘画艺术的构图规律和方法。在绘画学习过程中,构图是一个重要的组成部分,学习它对于提高绘画练习和创作水平有显著的促进作用。特指纯艺和插画,海报。艺用人体解剖实用教学 下集 四肢篇
本套“四肢篇”教学是王九斤老师的《艺用人体解剖使用教学》系列教程中的下集部分,主要讲解了四肢的结构绘画要点,以及部分人体动态的基础讲解。艺用人体解剖实用教学 上集 躯干篇
本套“躯干篇”教学是王九斤老师的《艺用人体解剖使用教学》系列教程中的上集部分,主要讲解了躯干的结构绘画要点,以及部分人体动态的基础讲解。


推荐课程


推荐教程

0回复Photoshop绘制写实眼球贴图"