
本教学为翻译教学,转载请注明来自aboutcg.net,以及注明翻译者
作者信息:
Portfolio: http://chokmah.cgsociety.org
Email: floriandelarque@hotmail.fr
翻译:zivix (aboutcg.net)
原始链接:http://www.3dm3.com/forum/articles.php?action=viewarticle&artid=114
请尊重互联网道德,转载请注明转载出处和翻译者,谢谢!
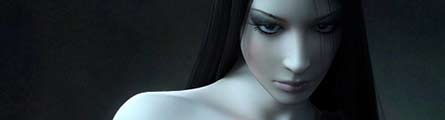
Making of Binah by Florian Delarque

Binah was a difficult and long time consumming project. It was a great challenge for me, technically and artistically. Binah is the third sephirah of the tree of life in cabbala. After reading many texts about the tree of life, I wrote some sentences describing my vision of Binah:
Binah是一个艰辛与漫长的项目,对我来说无路在艺术上还是技术上都是挑战,Binah是在卡巴拉生命树的第三位sephirah,在阅读了相关资料以后,我得到了以下启发
She is the third sephira in the tree of Life.
She channels the torrent of energy of Chokmah.
She is the one who creates Life…
She gives Life to all things…
She gives Death too…
She is the dark protector of Life and Death.
她是生命树的三分之一sephira。
她沟通着Chokmah能源洪流。
她是生命的创造者…
她带来生命…
她也带来死亡…
他是生和死的黑暗保护者
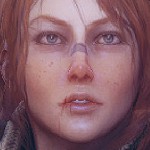
After this process of describing the character I thought about my inspirations and the graphical style I want to create. I wanted Binah to have a soft, pale skin, with some details only in the eyes, mouth and hand areas. She wears a long dark robe, and drapery, and I wanted her hairs to be in the continuity of her robe style. Finally, I wanted her to have a dark, cold and enigmatic glance.
在得到这些启示后,我开始思考作品的风格和样式,以及我想创造思维的过程。我想Binah有一个柔软,苍白的皮肤,只有在眼睛,嘴巴和手地方有一些细节。她穿着长长的黑色长袍,我想她的头发和她的长袍风格具有连续性。最后,我希望她有一个黑暗,寒冷和神秘的一瞥。
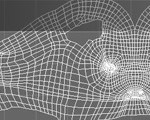
My modeling process is based on the edge extruding technique. During this process, I try to get edgesloops as accurate as I can, so I can manipulate/animate what I do. I principaly use EdgeExtruding method for my characters so I can set up my edloops directly. For the face, I do my best to keep circulars edgeloops over the overall surface. I try to get good transitions between edgeloops too.
我的建模过程是基于挤压技术的。在此过程中,我尝试尽可能准确的布线,这样我可以尽可能的得到正确的结构。我使用边挤压的办法得到环形的布线结构,所以我可以的顺利的得到环切布线。对于脸,我尽我所能,保持对整个表面都有流畅的环切式布线(就是一嘴和眼睛那些一圈一圈的布线)。我试图让环切之间的过渡也很好。


For the dress, I use procedural approach in fact. (I was discovering Houdini at the same time …). First I modelised a polygonal patch with few polygons and unwrapped it directly with planar projection.
对于服装,其实我使用的程序功能控制的办法。 (我还用了houdini测试…).首先,我创建一个平面,然后给他平面的UV映射。
Then I add it an EditPoly modifer to give his main shape. As you can see, the object keeps its uvs. Now It’s time to use procedural approach further to detail it.
然后,我给它添加一个EditPoly控制器,给它一个大型。正如你所看到的,物体仍然保持它的UV。现在是时候使用程序命令的方法进一步加强细节。


eneraly, I add a Meshsmooth/Turbosmooth modifier on top of this hierarchy. And I add a noise modifier too with soft selection on vertices. This create little chaotic turbulences that make the fabric more natural.
一般来说,我添加了网格平滑/涡轮平滑在堆积面板上。然后我给软选择的点加噪波控制器。这造成一些起伏,使织物更自然。
The falloff helps to smooth this effect toward the surface. Then, I add a new EditPoly, to erase the selection of the previous one, and a MeshSmooth to smooth the surface.
该衰减帮助顺利完成柔和的表面效果。然后,我添加一个新的EditPoly,抹去了选择的前一个,然后使用网格平滑。


his method is very usefull for doing drapery because doing so, you can step back to the first EditPoly and model the main shape, and the Uvs and the overall details will be preserved.
Of course there will some little coorections about uvs, and the falloff selection pour the noise modifier, but I prefer to do drapery so, because it is much easier than modeling the drapery and unwrapp it directly.
这种方法是非常方便于制作衣物的,因为你可以回过头来修改首次EditPoly和模型的主要外形,UV信息也同样会被保留下来。
当然也需要有一些小的UV修改,以及噪波控制器和衰减选择的调整,但我仍然喜欢这样做的布料,因为它比直接建模布料然后在制作UV简单得多。


s you can see, this is the same object deformed, and the uvs did’nt changed, there was only a few corrections to it, and to reselect the vertices in the second EditPoly modifier for the falloff and the noise modifier. Hair were modeled in the same way, and received opacity maps for rendering. I like a lot to put the details more and more accurate on the models, because it makes them really react to the lighting of the scene. So I don’t usually use tricks on texture maps to replace the details of the model. I skinned and rigged the body of Binah to set her in pose. The dress and the other accessories were modeled on the posed body. I spent a lot of time searching the good pose, to give Binah a lot of personnality. Posing is a great way to make a 3D character alive, much more than a realistic rendering.
正如你所看到的,这是同样的方法制作的结果,而且UV不会改变,只要给它一些修改,并重新选择第二次编辑时候的的衰减和噪波控制器调整即可。头发也是如法炮制,然后使用透明贴图即可。我喜欢精致的模型,应为他们都将反映到照明上。因此,我不经常使用的纹理贴图技巧,以取代该模型的细节。我做了绑定,制作的pose。根据pose制作了服装的其他部分。我花了很多时间寻找一个很好的姿势,让她能看起来鲜活。造造型结合写实的渲染是让一个角色活灵活现的基本条件。
因为有了造型,所以建模的过程会变得更加繁琐,但是一旦认真的制作完毕,将会给角色更加自然的光影和材质效果。


Texturing/Shading :
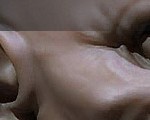
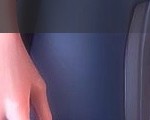
The skin : I wanted Binah to have a cold pale porcelain skin. So, I choose to put details only in caracteristic areas:
the eyes
the mouth
the hands
The rest of skin remains really simple, with only subtle variations on it. Here is some example of the diffuse texture for the skin
纹理/阴影:
皮肤:我想Binah有冷瓷苍白的皮肤。所以,我只能选择需要表现细节的区域:
眼睛
口
手
其余的皮肤依然很简单,它只有细微的差别。下面是一些的皮肤纹理例子,例如


use the SSS Fast Skin Material from MentalRay to render the skin. I putted the diffuse texture in the Unscattered Diffuse Color and the Epydermal (Top) Layer Scatter Color slots. Then I putted a warmer version of the diffuse texture in the Subdermal Layer Scatter Color.
我使用MentalRay的皮肤材质。我把色彩贴图贴在Unscattered以及Epydermal (Top)通道上。然后,我在Subdermal Layer Scatter Color贴上更红的贴图版本。


I use a specular map, reflexion map, and bump map(pictures below from left to right) for her skin, too.The dark areas of the reflexion map aren’t really black. It allows my skin shader always reflect some light from the environment, even where the skin doesn’t seem to be reflective. The bump map is really subtle as you can see. The details are mainly around lips and eyes area (again to make contrasts on her skin).
我使用高光贴图,反射贴图,和凹凸贴图(以下图片左到右)为她的皮肤,反射贴图的黑色部分,并不是纯黑。它使我的皮肤着色总是反映一些环境光,即使在皮肤似乎没有被反射。凹凸贴图正如你所看到的一样很为微妙。在嘴唇和眼睛的周围区域,(在此为皮肤作出对比)


For the dress fabric, I mainly used the Oren Nayar Blinn shader from 3DSMax. One of the tricks I often use for fabrics is to put a Fresnel Falloff map in the self-illumination slot of my material.Then I tweak its intensity curve to get the results I want. I do the same for the bump slot.It allows me to have some variations for the bump of my surface. Moreover I always put some reflexion map on fabrics (except the soft ones).
Here are some texture examples from the lace areas of her dress:
对于服装面料,我主要用于从3DSMax的Oren Nayar Blinn 材质,这是我经常使用的材质之一,我经常使用衰减贴图贴到自发光通道上,用来模拟绒布的效果。我也同样这样对凹凸通道如此操作,以让我有我的表面凹凸的一些变化。此外我也给不了材质一些反射贴图,
这是我使用在裙子上的一些材质贴图范例。


used polygonal patch, and opacity maps to create hairs. For the material, I used , one texture in the diffuse slot, one in the specular one, and another ine the opacity slot. Maps see below:
我使用多边形面片来创建头发,下面依次是 色彩贴图,凹凸贴图 和透明贴图。

Of course, all this texture and lighting work had to be tested with many renders tests. It took a lot of time, but the more time an artist spend on his image, the more best quality he gets.
当然,这些贴图和渲染的工作要花费大量的时间来测试,对于一个艺术家来说,越多的时间花费在制作上,得到的效果也就越精良。


After doing all this lighting/texturing work, it was time to do the final render of the image. The result was good, but I tough that that specularity of the lace wasn’t strong enough. So I decide to create a specular pass to enhance the lace’s specularity, and used it in photoshop in a layer in screen mode.
做这一切照明/纹理的工作后,是时间做最后的渲染图像了。其结果是好的,但我认为的花边泛着不够有力。因此,我决定创建一个单独的反射,通过加强花边的反射并在Photoshop中是用屏幕方式叠加。


My name is Florian Delarque, and I currently working as freelance 3D Artist for video games and cg animated film.
My interests are drawing, cg and jogging. I’m a 3D generalist, doing modeling,texturing , rigging, and animation. I’m use many softwares, mainly, 3DSmax , Maya , and Softimage XSI, and Zbrush.
I would like to thanks 3DM3 for giving me this opportunity to show my work, all people who supported me since I posted this picture on the web.
And to finish this making off, I would like to give a last advice to 3D beginners: keep working and be courageous, 3D pictures are very time consuming to do and need a lot of attention. The more time you will spend on your work, the best results you will get. Keep working!
Thank you all again.
我的名字是Florian Delarque,我目前作为自由的3D游戏艺术家和CG动画电影工作者。
我的兴趣是绘画,CG和慢跑。我是一个三维的通才,做建模,纹理,绑定,及动画。我用很多软件,主要是3DSmax,maya,以及Softimage XSI的,和Zbrush。
我想感谢3DM3给我这个机会,让我的工作,所有支持我的人。
现在我要完成这个教学,我想作最后的建议,三维初学者:保持工作和勇气,三维创作非常耗时,需要加倍的耐心。艰辛的耕耘,丰富的收获。继续努力!
谢谢大家!


推荐相关中文教程

3DSMAX动力学特效实战教学
本套教学将通过24章实例教学,来向你详细讲解3DSMAX的动力学特效在电视包装与广告中的应用。3DSMAX国外粒子案例效果解析
本教学通过27个实战案例,教您如何用3DSMAX结合ParticleFlow本身以及扩展的ParticleFlow Box 1、Box 2、Box 3、功能包,结合Vray渲染器,来制作流行的广告和电视包装中的粒子特效效果。无论是常见的粒子聚合,分散,动态粒子替换,粒子矩阵,粒子动力学,本套教学都有相应的案例。3DSMAX国外流体案例效果解析
本教学通过20个实战案例,教您如何用3DSMAX结合Realflow,FumeFX, ParticleFlow插件,来制作流行的广告和电视包装中的流体效果。无论是常见的液体,烟雾,流体碰撞,沙粒变化,水墨表现,本套教学都有相应的案例。2.5D商业游戏场景制作教程 进阶篇
在本教程中,Freeyy老师将从零开始,向你讲解如何根据确定的主题进行前期准备,随后建模,绘制贴图,制作材质,最后再进行细节调整,完成一个商业游戏级别的2.5D场景画面。Mentalray for max实战教程
本教程共包含超过42小时以上的视频教学内容,共18章 132课,通过大量实例,详细讲解了3ds Max平台下的Mental Ray1渲染器的使用基础和实战方法。是一部非常完整详细的3dsMax版的Mental Ray渲染器的教学.网游角色制作女精灵实战教学
本教学以一个AAA级网游女精灵角色为案例,向您展示如何完成她的模型,UV,和贴图绘制。教学使用的软件主要是3ds max和 bodypaint, 其中建模和UV使用3ds max完成,贴图绘制在bodypaint和 PS中完成。


推荐课程


推荐教程

2回复Making of Binah by Florian Delarque"